
- Latest SAPUI5 Version 1.120
- Version 1.118
- SAPUI5 Version 1.116
- SAPUI5 Version 1.114
- SAPUI5 Version 1.112
- SAPUI5 Version 1.110
- SAPUI5 Version 1.108
- SAPUI5 Version 1.106
- SAPUI5 Version 1.104
- SAPUI5 Version 1.102
- SAPUI5 Version 1.100
- SAPUI5 Version 1.98
- SAPUI5 Version 1.96
- SAPUI5 Version 1.94
- SAPUI5 Version 1.92
- SAPUI5 Version 1.90
- SAPUI5 Version 1.88
- SAPUI5 Version 1.86
- SAPUI5 Version 1.84
- SAPUI5 Version 1.82
- SAPUI5 Version 1.80
- SAPUI5 Version 1.78
- SAPUI5 Version 1.76
- SAPUI5 Version 1.72
- SAPUI5 Version 1.70
- SAPUI5 Version 1.68
- SAPUI5 Version 1.66
- SAPUI5 Version 1.64
- SAPUI5 Version 1.62
- SAPUI5 Version 1.60
- SAPUI5 Version 1.58
- SAPUI5 Version 1.56
- SAPUI5 Version 1.54
- SAPUI5 Version 1.52
- SAPUI5 Version 1.50
- SAPUI5 Version 1.48
- SAPUI5 Version 1.46
- SAPUI5 Version 1.44
- SAPUI5 Version 1.42
- SAPUI5 Version 1.40
- SAPUI5 Version 1.38
- SAPUI5 Version 1.36
- SAPUI5 Version 1.34
- SAPUI5 Version 1.32
- SAPUI5 Version 1.30
- SAPUI5 Version 1.28
- SAPUI5 Version 1.26
- Latest SAPUI5 Version 1.120
- Version 1.118
- SAPUI5 Version 1.116
- SAPUI5 Version 1.114
- SAPUI5 Version 1.112
- SAPUI5 Version 1.110
- SAPUI5 Version 1.108
- SAPUI5 Version 1.106
- SAPUI5 Version 1.104
- SAPUI5 Version 1.102
- SAPUI5 Version 1.100
- SAPUI5 Version 1.98
- SAPUI5 Version 1.96
- SAPUI5 Version 1.94
- SAPUI5 Version 1.92
- SAPUI5 Version 1.90
- SAPUI5 Version 1.88
- SAPUI5 Version 1.86
- SAPUI5 Version 1.84
- SAPUI5 Version 1.82
- SAPUI5 Version 1.80
- SAPUI5 Version 1.78
- SAPUI5 Version 1.76
- SAPUI5 Version 1.74
- SAPUI5 Version 1.72
- SAPUI5 Version 1.70
- SAPUI5 Version 1.68
- SAPUI5 Version 1.66
- SAPUI5 Version 1.64
- SAPUI5 Version 1.62
- SAPUI5 Version 1.60
- SAPUI5 Version 1.58
- SAPUI5 Version 1.56
- SAPUI5 Version 1.54
- SAPUI5 Version 1.52
- SAPUI5 Version 1.50
- SAPUI5 Version 1.48
- SAPUI5 Version 1.46
- SAPUI5 Version 1.44
- SAPUI5 Version 1.42
- SAPUI5 Version 1.40
- SAPUI5 Version 1.38
- SAPUI5 Version 1.36
- SAPUI5 Version 1.34
- SAPUI5 Version 1.32
- SAPUI5 Version 1.30
- SAPUI5 Version 1.28
- SAPUI5 Version 1.26
Table Select Dialog
sap.m.TableSelectDialog
Intro
Table select is a commonly-used dialog that helps users to make a selection from a comprehensive table containing multiple attributes or values. With the dialog, users are also able to access additional information about the objects in the table without needing to select them first.
The dialog provides a responsive table layout with additional search, filter, and selection functionalities in the header. A footer toolbar provides actions for canceling or confirming the process.
Usage
Use the table select dialog if:
- You need to help users select one or more items from a comprehensive list that contains multiple attributes or values.
Do not use the table select dialog if:
- You need to help users pick one item from a predefined set of options that contains only one value. In this case, use the dropdown box instead.
- You need to help users with query-based range selection and enhanced filter options. In this case, use the value help dialog instead.
- Your use case requires tabs, filters, or actions in a select dialog.In this case, use a standard dialog instead.
- Your use case only requires filtering without selection. In this case, use the filter toolbar instead.
Responsiveness
The table inside the table select dialog behaves like the responsive table. On smaller screens, the columns wrap and build a list that shows all the information. All other elements in the control are also responsive.
On bigger screens, the table select dialog also provides columns

The table in the dialog is responsive and wraps on smaller screens to show a list
Behavior and Interaction
The table select dialog can be called up from any control. The trigger is usually a button with a selection icon in an input field, or an Add button in a toolbar.
Triggers
Input Trigger
This trigger can be useful if users need to select, for example, one customer from a large customer register.

Example of a trigger: the selection icon in the input field
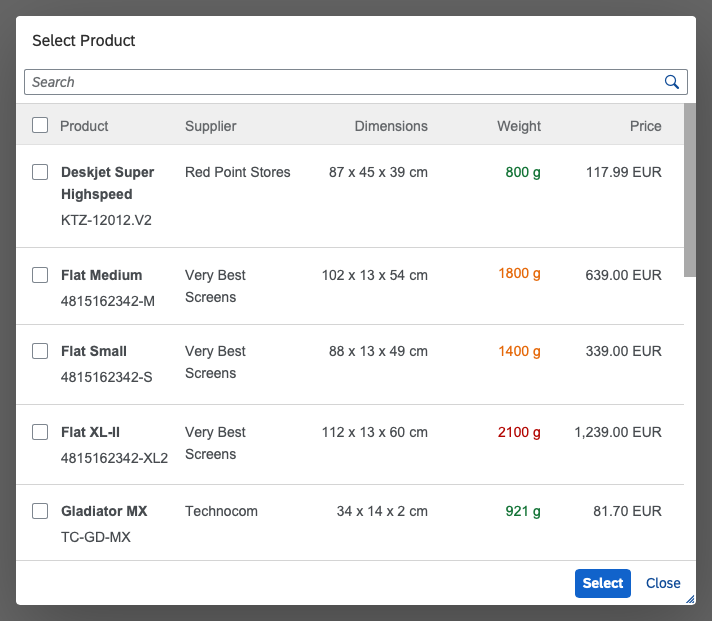
“Add” Button
This trigger can be useful if users need to add an item to a list. For example, the dialog could help users select the product from a large product catalog. Clicking Select in the footer toolbar of the dialog adds the selected products to the list.
“Clear” Button
The Clear button allows users to clear all the selected items.

Example of a trigger: 'Add' button in a table
Sticky Header
The column headers and info toolbar in the table select dialog are “sticky”, which means that they stay fixed on top when scrolling (sap.m.Table, property: sticky).
Example of sticky headers
Single Select
The single-select version does not need a Select button in the footer toolbar because the selected entry is taken over and closed as soon as a user selects an item from the table. If applicable, the entry is displayed in the field from which the dialog was triggered. Alternatively, a toast message can be shown if necessary.
Multi-Select
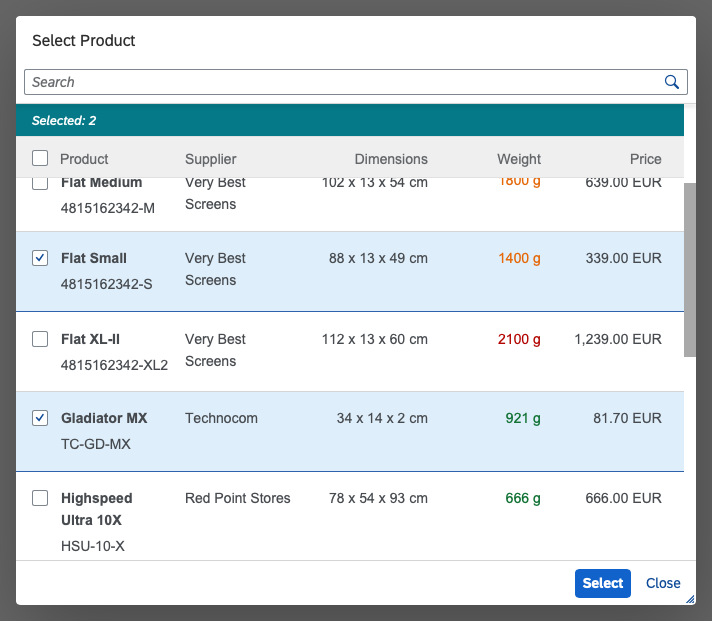
The multi-select version of the table select dialog provides checkboxes for users to choose multiple items. The blue infobar above the table indicates the number of selected items. The selection is taken over when the user closes the dialog via the Select button in the footer toolbar. Clicking Cancel closes the dialog without taking over the selected values.
Remembering Selections
If selections need to be memorized in order to help users make corrections, you can set the RememberSelections property to true. This restores the selection to the state it was in when the dialog was last opened as soon as users exit the dialog via Select or Cancel. The interaction flow of the RememberSelections property is shown and explained in the select dialog article.
Grouping
The list can also be displayed as grouped. Group headers divide the table into segments. A pregrouped table is useful for tables with many entries, which can be sorted by a single attribute.
Table select dialog with group headers
Resize and Drag Dialog
You can allow users to resize and drag the table select dialog by setting the resizable and draggable properties to “true”.
- A resizable dialog makes sense if the items within the dialog can have long names or descriptions.
- A draggable dialog allows users to see the app content behind the dialog.
Guidelines
Set the information provided in the table select dialog from top to bottom as follows:
Dialog Header
Use the following format for the dialog header:
- For single selection: Select [Business Object]
Example: Select Product - For multiple selection: Select [Business Objects]
Example: Select Products.
Search
The first interactive element in the dialog is a standard search field. Two types of search behavior are available:
- A live search, also known as “search-as-you-type,” which is triggered by each character that the user enters or deletes.
- A manual search, which is triggered explicitly after the user enters text in the search field and clicks theSearch icon or presses the ENTER key. As soon as the user hits the Search button, a Delete icon appears at the end of the input field to delete the keyword and cancel the result list.
App developers need to decide which search to use. We recommend implementing the live search whenever possible. Use the manual search only if the amount of data is too large and if your app would otherwise run into performance issues. For more information, check out the article on searching.
Infobar
In multi-selection mode, an infobar shows the number of selected items. Use the following format:
[Business Objects] Selected: [Number of Items]
Example: Products Selected: 2
“Clear” Button
The “Clear” button for clearing all the selected items is optional. By default, the button is not shown. To display the button, set the showClearButton property to “true”.
Content
The content area provides a table. This behaves like the responsive table, so the columns wrap on smaller screens and display a list.
By default, the table select comes with a growing feature (property: growing = true). We recommend disabling the growing feature and setting this property to “false”. This ensures that all items in the table are loaded at once, and that the “Items selected” count, the search, and select/deselect features all work properly.
Footer Toolbar
In the multi-select version, the footer toolbar contains the Select and Cancel buttons. Select takes over the selection, while Cancel resets the selection to the state it was in when the user opened the dialog.
In the single-select version, only provide Cancel in the footer toolbar because the dialog takes over the selection as soon as the user chooses one.
Resources
Want to dive deeper? Follow the links below to find out more about related controls, the SAPUI5 implementation, and the visual design.
 Your feedback has been sent to the SAP Fiori design team.