
- Latest SAPUI Version 1.124
- SAPUI5 Version 1.122
- SAPUI5 Version 1.120
- SAPUI5 Version 1.118
- SAPUI5 Version 1.116
- SAPUI5 Version 1.114
- SAPUI5 Version 1.112
- SAPUI5 Version 1.110
- SAPUI5 Version 1.108
- SAPUI5 Version 1.106
- SAPUI5 Version 1.104
- SAPUI5 Version 1.102
- SAPUI5 Version 1.100
- SAPUI5 Version 1.98
- SAPUI5 Version 1.96
- SAPUI5 Version 1.94
- SAPUI5 Version 1.92
- SAPUI5 Version 1.90
- SAPUI5 Version 1.88
- SAPUI5 Version 1.86
- SAPUI5 Version 1.84
- SAPUI5 Version 1.82
- SAPUI5 Version 1.80
- SAPUI5 Version 1.78
- SAPUI5 Version 1.76
- SAPUI5 Version 1.74
- SAPUI5 Version 1.72
- SAPUI5 Version 1.70
- SAPUI5 Version 1.68
- SAPUI5 Version 1.66
- SAPUI5 Version 1.64
- SAPUI5 Version 1.62
- SAPUI5 Version 1.60
- SAPUI5 Version 1.58
- SAPUI5 Version 1.56
- SAPUI5 Version 1.54
- SAPUI5 Version 1.52
- SAPUI5 Version 1.50
- SAPUI5 Version 1.48
- SAPUI5 Version 1.46
- SAPUI5 Version 1.44
- SAPUI5 Version 1.42
- SAPUI5 Version 1.40
- SAPUI5 Version 1.38
- SAPUI5 Version 1.36
- SAPUI5 Version 1.34
- SAPUI5 Version 1.32
- SAPUI5 Version 1.30
- SAPUI5 Version 1.26
- Latest SAPUI Version 1.124
- SAPUI5 Version 1.122
- SAPUI5 Version 1.120
- SAPUI5 Version 1.118
- SAPUI5 Version 1.116
- SAPUI5 Version 1.114
- SAPUI5 Version 1.112
- SAPUI5 Version 1.110
- SAPUI5 Version 1.108
- SAPUI5 Version 1.106
- SAPUI5 Version 1.104
- SAPUI5 Version 1.102
- SAPUI5 Version 1.100
- SAPUI5 Version 1.98
- SAPUI5 Version 1.96
- SAPUI5 Version 1.94
- SAPUI5 Version 1.92
- SAPUI5 Version 1.90
- SAPUI5 Version 1.88
- SAPUI5 Version 1.86
- SAPUI5 Version 1.84
- SAPUI5 Version 1.82
- SAPUI5 Version 1.80
- SAPUI5 Version 1.78
- SAPUI5 Version 1.76
- SAPUI5 Version 1.74
- SAPUI5 Version 1.72
- SAPUI5 Version 1.70
- SAPUI5 Version 1.68
- SAPUI5 Version 1.66
- SAPUI5 Version 1.64
- SAPUI5 Version 1.62
- SAPUI5 Version 1.60
- SAPUI5 Version 1.58
- SAPUI5 Version 1.56
- SAPUI5 Version 1.54
- SAPUI5 Version 1.52
- SAPUI5 Version 1.50
- SAPUI5 Version 1.48
- SAPUI5 Version 1.46
- SAPUI5 Version 1.44
- SAPUI5 Version 1.42
- SAPUI5 Version 1.40
- SAPUI5 Version 1.38
- SAPUI5 Version 1.36
- SAPUI5 Version 1.34
- SAPUI5 Version 1.32
- SAPUI5 Version 1.30
- SAPUI5 Version 1.28
- SAPUI5 Version 1.26
Edit Page Floorplan
Intro

Simple edit (compact mode) on split screen
The edit page floorplan offers various options for editing an existing object or page. You can use this floorplan for standalone apps, full screen apps, or as part of a split-screen layout. The edit page contains forms and numerous other controls.
There are two ways in which a user can set an app to edit mode (examples are provided below):
- The user enters the app, which is already in edit mode by default and no action has been triggered.
- The user has to click or tap the Edit button to set the page to edit mode.
The use case determines which variant should be chosen.
There are also several ways of editing a page to support different use cases (more details about this are provided later):
- Simple edit
- Partial edit
Note:
- The flow of the form should follow the logic of creation. Use in-place messages on the fields for validation.
- If you are using the edit flow combined with draft handling, have a look at the draft handling article.
- With full screen layout, you can also set the whole table to edit mode and edit the values directly. Such cases are rather exceptional.
- The object view and flat object view floorplans use specific edit patterns, which are described under Object View Floorplan and Flat Object View Floorplan.
- Editing multiple items on the master list allows you to implement multiselect edit functionality in different ways to support different use cases. For more information about this, see Master List.
Usage
When to Use Which Flow Type
- Use the simple edit flow if the user wants to edit the whole page and save it afterwards. If there are related subpages on this object, you have to choose between the local and global edit flow.
- The partial edit flow with transparent button is the preferred way to set a part of an object to edit mode. Use the partial edit flow with dialog if the switch from display mode to edit mode involves an extensive change of layout.
- Use the partial edit flow if only parts of the page (single sections) should be editable and not the whole page. If there are a lot of editable sections, think about setting the whole page to (simple) edit mode. This depends on which approach best supports your use case.
- Use the local edit flow with subpages if the user is supposed to save every page separately. Whenever the user wants to navigate away from the page while in edit mode, either the modifications must be saved or changes are lost (data loss message). Unsaved changes can be kept only by using draft handling.
- Use the global edit flow with subpages if the user is supposed to be able to navigate seamlessly between multiple subpages linked to a main page in edit mode.
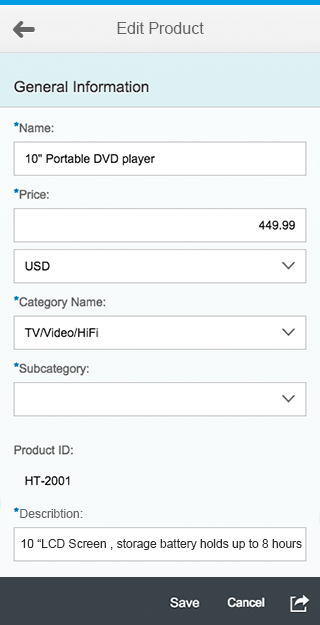
Structure
The edit page floorplan is flexible and can be embedded in the full screen layout or split-screen layout. The title (application header) shows Edit and the current <Item Type>, such as Edit Product. The main pattern of the edit page is the form. The footer bar appears right at the bottom.

Schematic visualization of edit page
Responsiveness
The responsiveness of the edit page control follows the responsive behavior of the forms and controls used.
Touch devices on a phone

Touch devices on a tablet
Letterboxing on a desktop
Simple Edit
Starting in display mode with split-screen layout
The “Simple Edit” flow in split-screen layout describes how a user can edit an item of the master list. At the first step, the user has to click the Edit button (detail footer toolbar) to switch into edit mode, until then the page is in display mode. If the user has finished the entries s/he clicks the Save button. The updated object is then marked in the master list and the object details are shown in display mode again. As a confirmation the user gets a message toast that the object has been successfully saved.

Simple edit - starting in display mode with split-screen layout
Starting in edit mode with split-screen layout
In some use cases an object is always editable and it does not make sense to show it in display mode. In these cases the user starts directly in edit mode. In the footer toolbar there is a Save and Cancel button offered. If the user clicks on Save then the object stays in edit mode. As a confirmation the user gets a message toast that the object has been successfully saved.
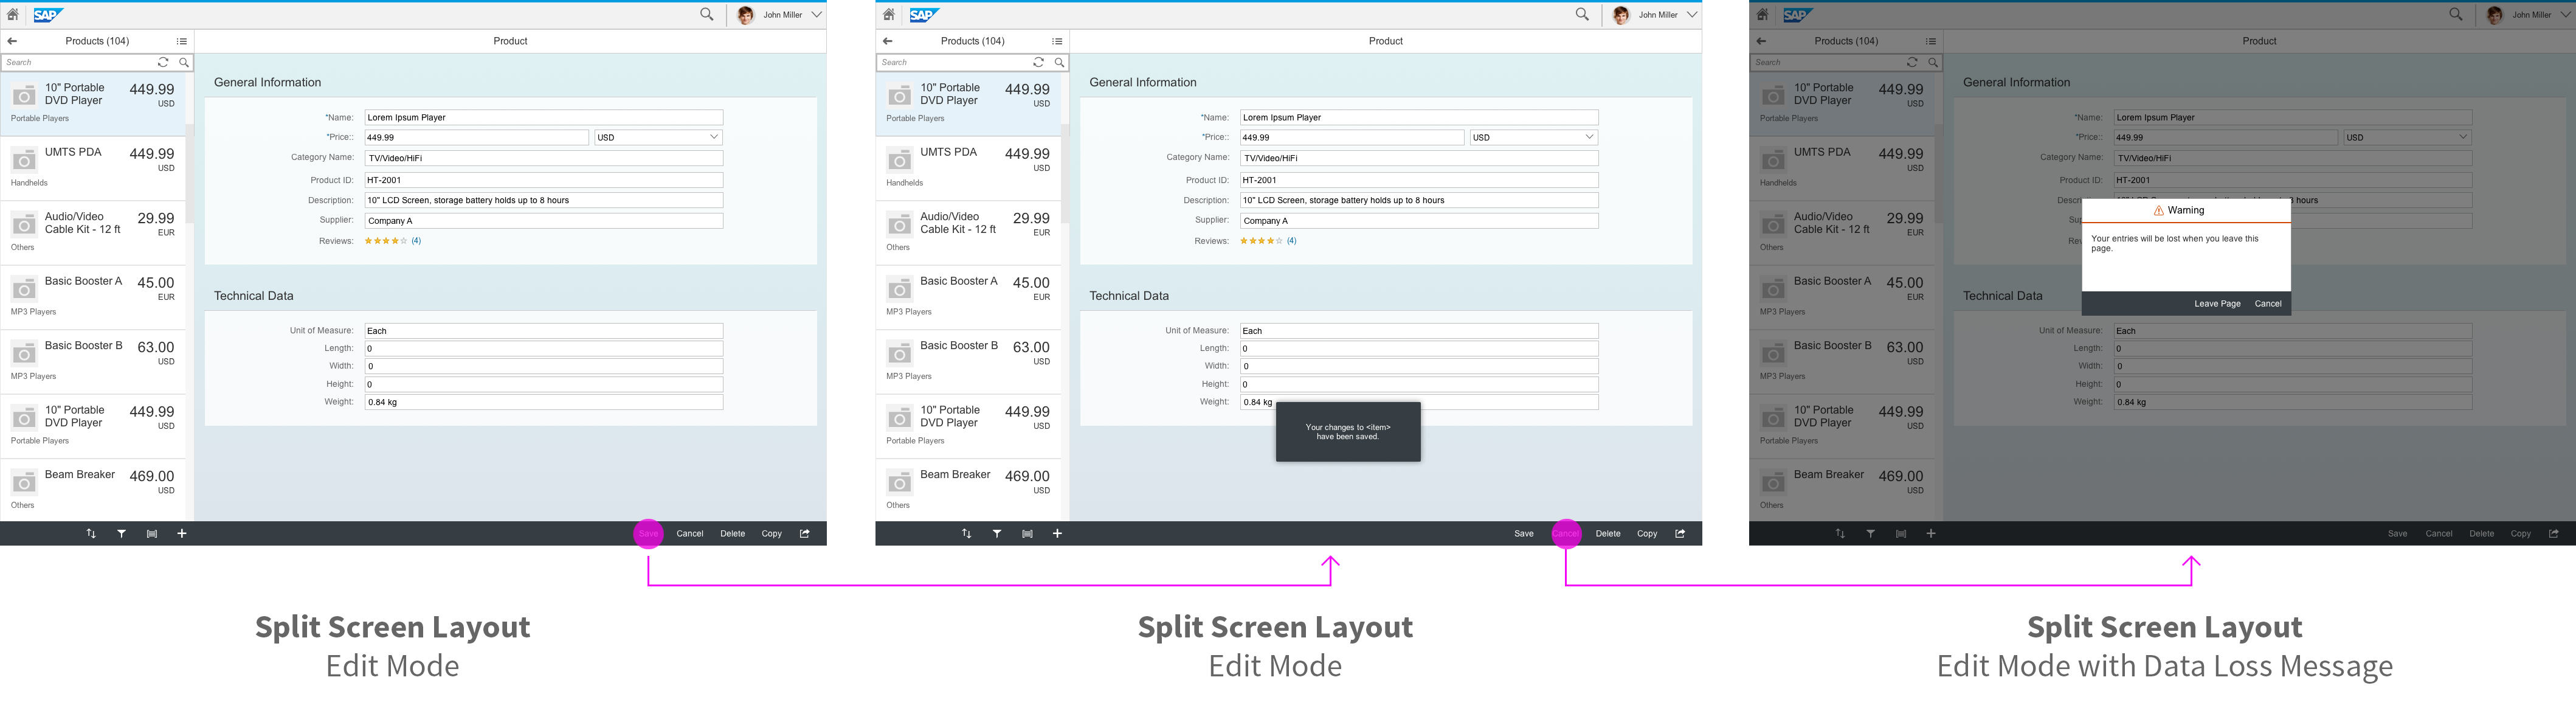
Simple edit - starting in edit mode with split-screen layout
Full screen layout
The edit flow in full screen layout describes how a user can edit a line item in the table. Very often the line item contains more details then displayed in the table, so that the user has to navigate to a detail page and edit the values there. After editing the detail page the user clicks on Save.
There are two ways to go forward after saving, depending on the use case:
- The user navigates automatically to the previous page and the updated line item will be shown in the table.
- The updated line item on the detail page will switch to display mode. The user may want to check the entries again with the possibility to change them by means of a click on the Edit button in the footer toolbar. To navigate back to the table the user has to click on the Back button in the App Header.
As a confirmation the user gets in both ways a message toast that the object has been successfully saved.
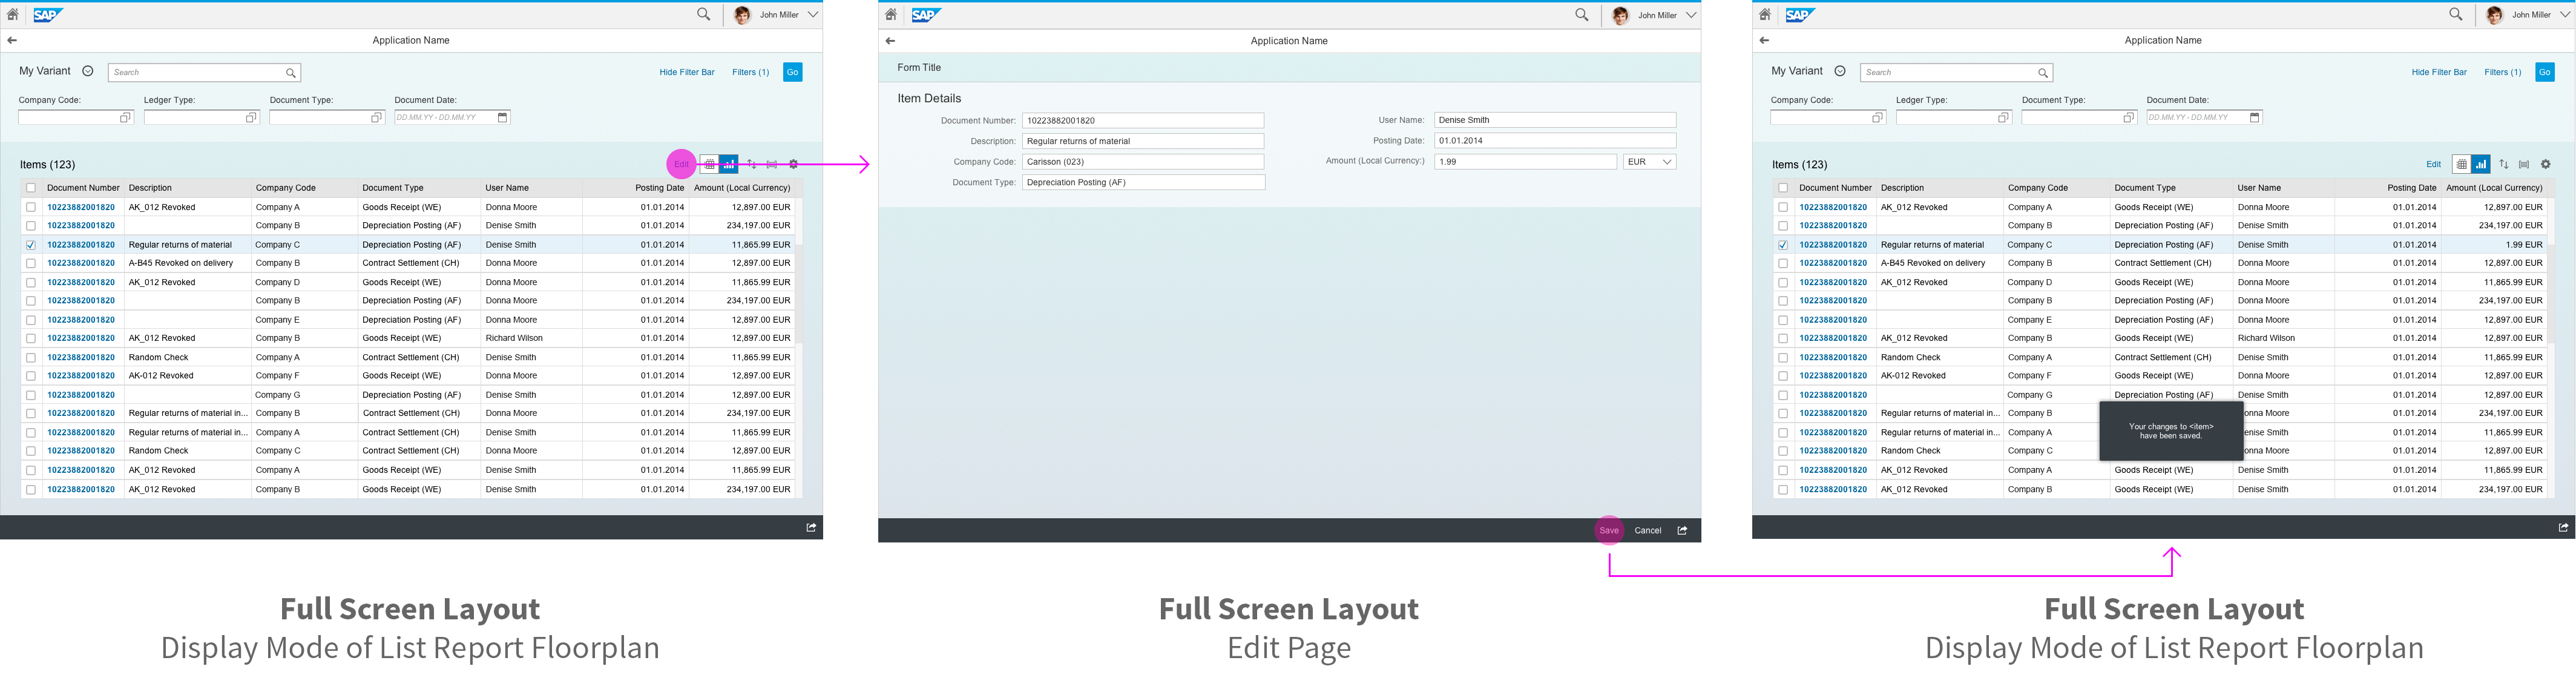
Simple edit in full screen - variant 1

Simple edit in full screen - variant 2
Data loss message
Show a data loss message in Split-Screen Layout and Full Screen Layout whenever the user wants to navigate away from the page or clicks the Cancel button while in edit mode (example above Simple Edit Flow in split-screen). Unsaved changes can be kept only by using draft handling. However, if the user has nothing changed on the content side, a data loss message is not necessary.
Partial Edit
Partial Edit in place
This edit flow describes how a user can edit a section of an existing object via transparent button in split screen and full screen layout. A transparent button called Edit is placed right aligned above the object (section header). After a click on the Edit button, the object switches into edit mode and the Edit button changes to Save and Cancel.
The partial edit with transparent button is the preferred way to set a section of an existing object into edit mode.
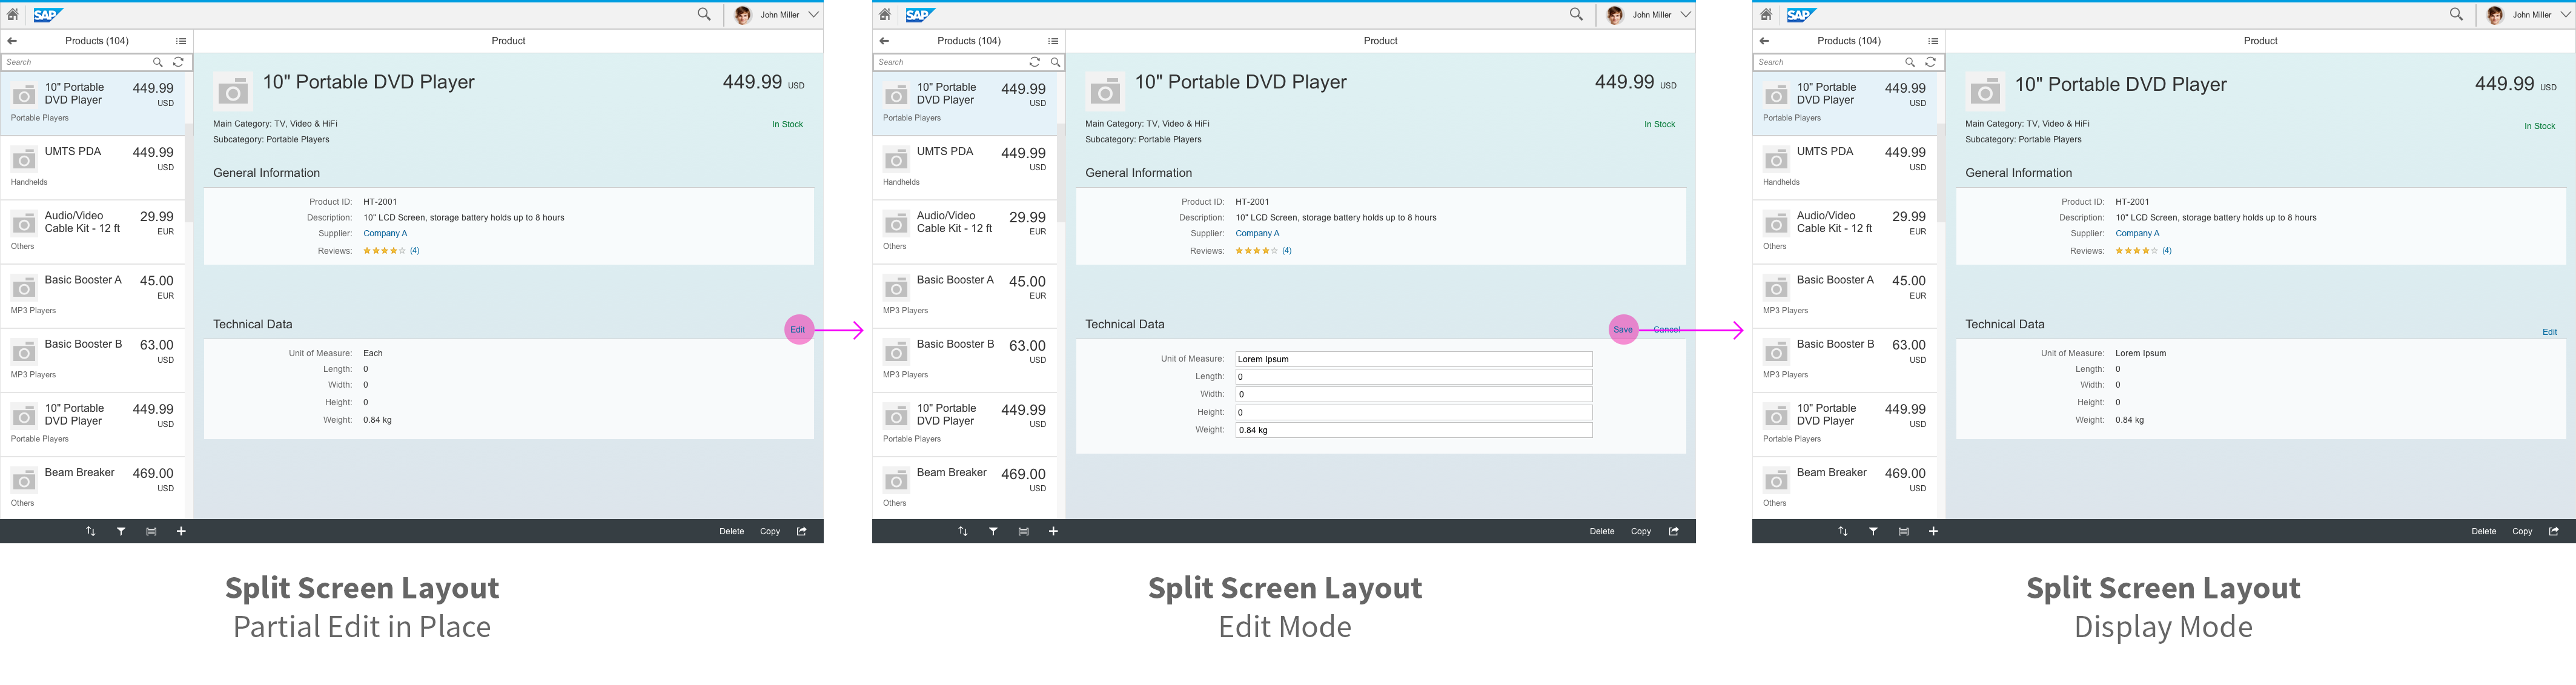
Partial Edit in place
Partial Edit Flow with Dialog
This edit flow describes how a user can edit one or several existing object/s (mass editing) via dialog in split screen and full screen layout. One example of this is selecting several line items in the table and clicking the Edit button. Then a dialog shows up with all merged and editable fields of the object/s. Fields with different values from the selected line items show a prompt text called “Multiple Values“. Fields with equal values will be shown directly. Click on Save will close the dialog and shows the updated line items.
Use the partial edit flow with dialog if the switch from display mode to edit mode involves an extensive change of layout; e.g. mass editing. If there are more than 8 editable fields in the dialog, a better way could be navigating to a detail page.

Partial edit with dialog
Data loss message
Show a data loss message in Split-Screen Layout and Full Screen Layout whenever the user wants to navigate away from the page or clicks the Cancel button while in edit mode (example above Simple Edit Flow in split-screen). Unsaved changes can be kept only by using draft handling. However, if the user has nothing changed on the content side, a data loss message is not necessary.
Resources
Want to dive deeper? Follow the links below to find out more about related controls, the SAPUI5 implementation, and the visual design.
 Your feedback has been sent to the SAP Fiori design team.