- Latest SAPUI Version 1.124
- SAPUI5 Version 1.122
- SAPUI5 Version 1.120
- SAPUI5 Version 1.118
- SAPUI5 Version 1.116
- SAPUI5 Version 1.114
- SAPUI5 Version 1.112
- SAPUI5 Version 1.110
- SAPUI5 Version 1.108
- SAPUI5 Version 1.106
- SAPUI5 Version 1.104
- SAPUI5 Version 1.102
- SAPUI5 Version 1.100
- SAPUI5 Version 1.98
- SAPUI5 Version 1.96
- SAPUI5 Version 1.94
- SAPUI5 Version 1.92
- SAPUI5 Version 1.90
- SAPUI5 Version 1.88
- SAPUI5 Version 1.86
- SAPUI5 Version 1.84
- SAPUI5 Version 1.82
- SAPUI5 Version 1.80
- SAPUI5 Version 1.78
- SAPUI5 Version 1.76
- SAPUI5 Version 1.74
- SAPUI5 Version 1.72
- SAPUI5 Version 1.70
- SAPUI5 Version 1.68
- SAPUI5 Version 1.66
- SAPUI5 Version 1.64
- SAPUI5 Version 1.62
- SAPUI5 Version 1.60
- SAPUI5 Version 1.58
- SAPUI5 Version 1.56
- SAPUI5 Version 1.54
- SAPUI5 Version 1.52
- SAPUI5 Version 1.50
- SAPUI5 Version 1.48
- SAPUI5 Version 1.46
- SAPUI5 Version 1.44
- SAPUI5 Version 1.42
- SAPUI5 Version 1.40
- SAPUI5 Version 1.38
- SAPUI5 Version 1.36
- SAPUI5 Version 1.34
- SAPUI5 Version 1.32
- SAPUI5 Version 1.30
- SAPUI5 Version 1.28
- SAPUI5 Version 1.26
Edit with Subpages
Intro
SAP Fiori distinguishes between two edit flows:
- Local edit flow is an edit mode that applies to a single page. The user edits one page at a time.
- Global edit flow is an edit mode that allows the user to edit multiple subpages in one editing session. The subpages are all linked to one main page.
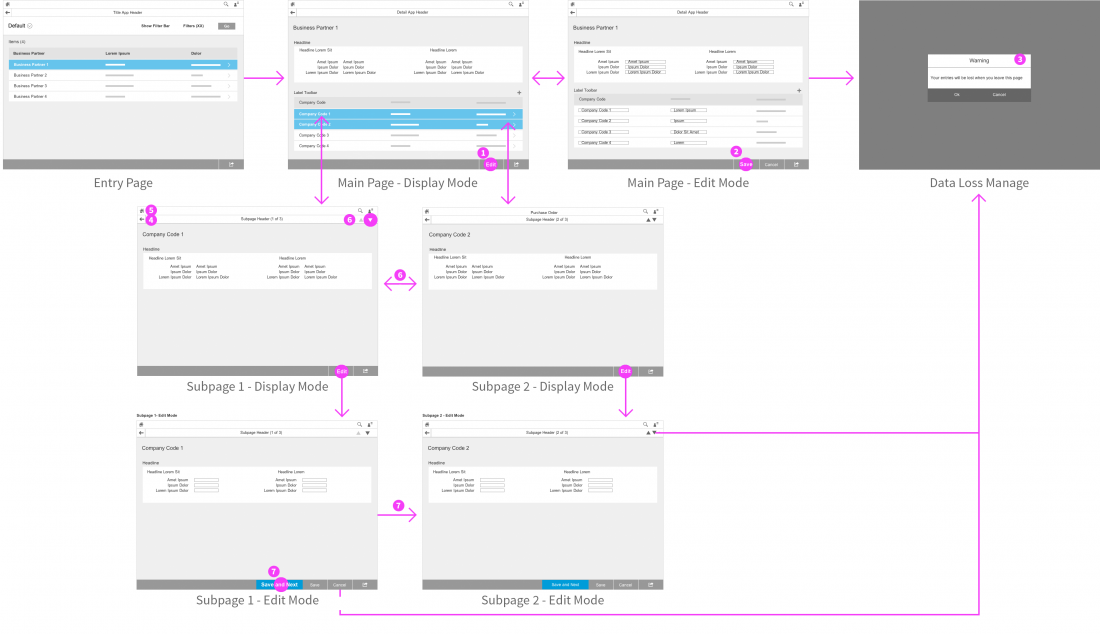
Local edit flow: The user edits one page by pressing the Edit button. Before leaving the edit page, users must save their changes. Otherwise, the changes are lost (data loss message).
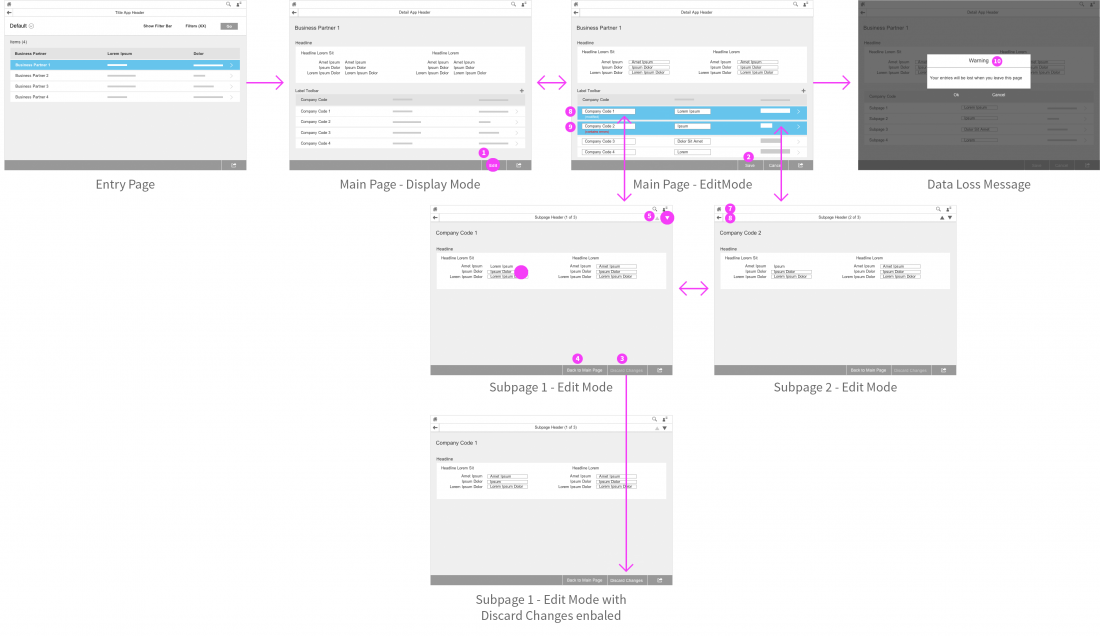
Global edit flow: The user clicks Edit on the main page, and every subpage linked to this page changes to edit mode. Navigation between the subpages is unrestricted. The subpages do not have an explicit Save button. Any changes are saved in the background automatically (temporary save). Each subpage has a Discard Changes button, which discards any changes made on that subpage.
To save the changes for all subpages to the database, the user has to navigate back to the main page and click the Save button. Clicking Cancel on the main page discards all changes to all subpages. If a user tries to navigate away from the main page, or clicks Cancel on the main page, a data loss message appears. No data loss message appears if the user is just leaving a subpage.
Try interactions of both edit flows in the Axure prototype (click dummy).
Local Edit Flow
Local means that the user edits one page by pressing the Edit button (1). When users try to navigate away from the page while in edit mode, they must save the modifications, otherwise the changes are lost (data loss message (3)). This behavior applies to both the main page and any subpages.
There are several ways to leave a page depending on the overall layout (full screen or split screen). The user can leave a page by clicking or tapping either the Back button (4) in the app header or the Home icon (5) in the shell bar. If the user has not saved the changes before leaving the page, a data loss message is shown.
In local edit flow, the user can move from one subpage to another by using the up and down arrows (6) in display mode. In edit mode, the user must save the entries, otherwise a data loss message is shown.
The user can save the entries in one of two ways:
- Clicking or tapping Save and Next (7) brings the user to the next subpage, which stays in edit mode. Depending on the use case, clicking or tapping Save and Next can also take the user to display mode. This can happen if the user clicks through many subpages and edits only a few (logging issues).
The assumption is that the user will mainly use the Save and Next button. This is the reason for highlighting the button. - Clicking or tapping the Save button saves all entries on the subpage and the user stays on the page.
Error handling: If an entry is incorrect or missing, the user must first change the entry before it can be saved.
Create a New Line Item
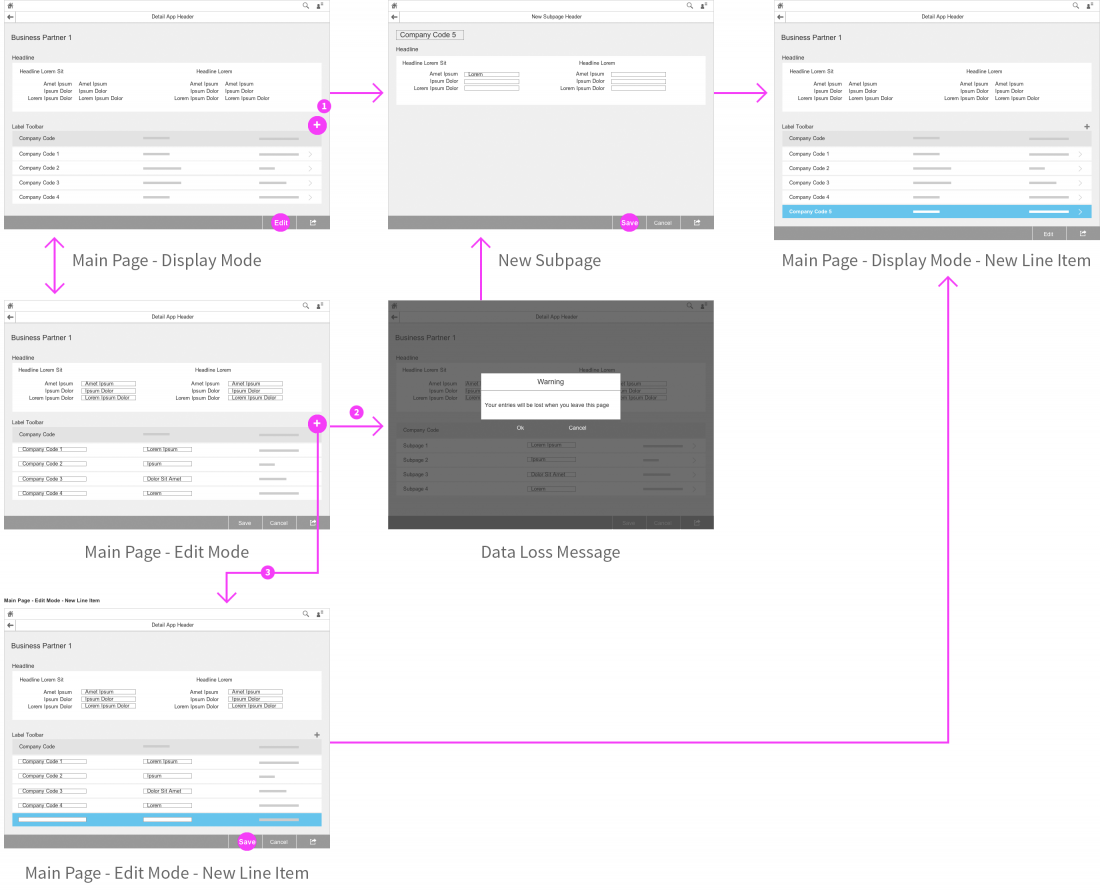
Display mode: After clicking or tapping the + icon (1), the user navigates to a new subpage, where he or she can Save the new entries or Cancel the process.
Edit mode: When the user clicks or taps the + icon, a data loss message (2) appears. The user must first Save the entries before being able to navigate to the new subpage.
New Line Item on Main Page (optional – special case)
Display mode: If the new line item includes only a few fields which could be displayed directly on the main page, the user can open a new row directly on the main page.
In this special case, the main page switches to edit mode and the user must first Save the entries before being able to leave.
Edit mode: If the new line item includes only a few fields which could be displayed directly on the main page, the user can open a new row (3) directly on the main page. The user must first Save the entries before being able to leave.
Global Edit Flow
Global means that the user clicks or taps Edit on a page (1), and every subpage linked to this page also changes to edit mode. Navigation between them is unrestricted. After the user switches to edit mode, the Edit button on the main page is replaced by two buttons labeled Save and Cancel (2).
There are two ways in which a user can set an app to edit mode:
- The user enters the app, which is already in edit mode by default and no action has been triggered.
- The user has to click or tap the Edit button on the main page.
The use case determines which variant should be chosen.
The subpages do not have a save function. The user’s modifications are automatically saved temporarily. No data loss message is needed on subpages. The only functions available are the Discard Changes button (3) and the Back to Main Page button (4).
The Discard Changes button is disabled until the user starts editing a field. The button is then enabled automatically. Disabled means that the Discard Changes button stays on a subpage the whole time but is inactive. The Discard Changes button discards the changes made on the subpage and reverts to the “back-end state”. The user stays on the subpage.
If there are identical input fields on the main page and on a subpage, these fields can be edited only on the main page. To prevent errors, the user is not able to edit these input fields on subpages.
Handling of sub-subpages is not recommended. If necessary, the Back to [title] Main Page button changes to Back to [title] subpage.
The Back to [Title] Main Page button (4) brings the user back to the main page. Change the name of the main page on this button to the name of your app’s main page.
The user entries are automatically saved temporarily. This button should give the user a secure feeling, and it has the same functionality as the Back button (6).
By using the up and down arrows (5), the user can navigate between subpages to edit more objects, for example.
The Back button (6) on subpages always navigates to the main page. Users stay in edit mode until they save the entries or discard them via Cancel. The entries on subpages are taken over by temporary automatic saving. If the user clicks or taps the Back button (6) or the Home icon (7) on the shell bar before saving the entries, a data loss message (10) is displayed.
An indicator labeled (modified) (8) marks edited objects on the main page until the changes are saved. This enables users to see modified subpages on the main page to ensure that they have changed all the required objects.
How to display (modified) in a table
Use the responsive table (sap.m.Table) pattern. It allows the responsive behavior of elements in the table, which means that (modified) stays below the title of the line item. If there is an ID number next to the line item title, put (modified) in the next row below.
Layout: (modified) is an additional text with smaller letters than the headline. It should not be truncated.
Error handling: If the user edits an object on one subpage and an error occurs, the user might then have to change a value on a second subpage to correct the data.
To edit the second subpage, the user should be able to switch during the subpages while the error still exists. The error should be shown to the user but navigation should be possible.
Finally, the user has to finish the editing process on the main page by clicking or tapping Save or Cancel. Therefore, the user always returns to the main page, which provides an overview of all modified pages and pages with errors.
An indicator labeled (contains errors) (9) marks objects that need to be corrected before saving.
Layout: (contains errors) is an additional text with smaller letters than the headline. It should not be truncated.
Create a New Line Item
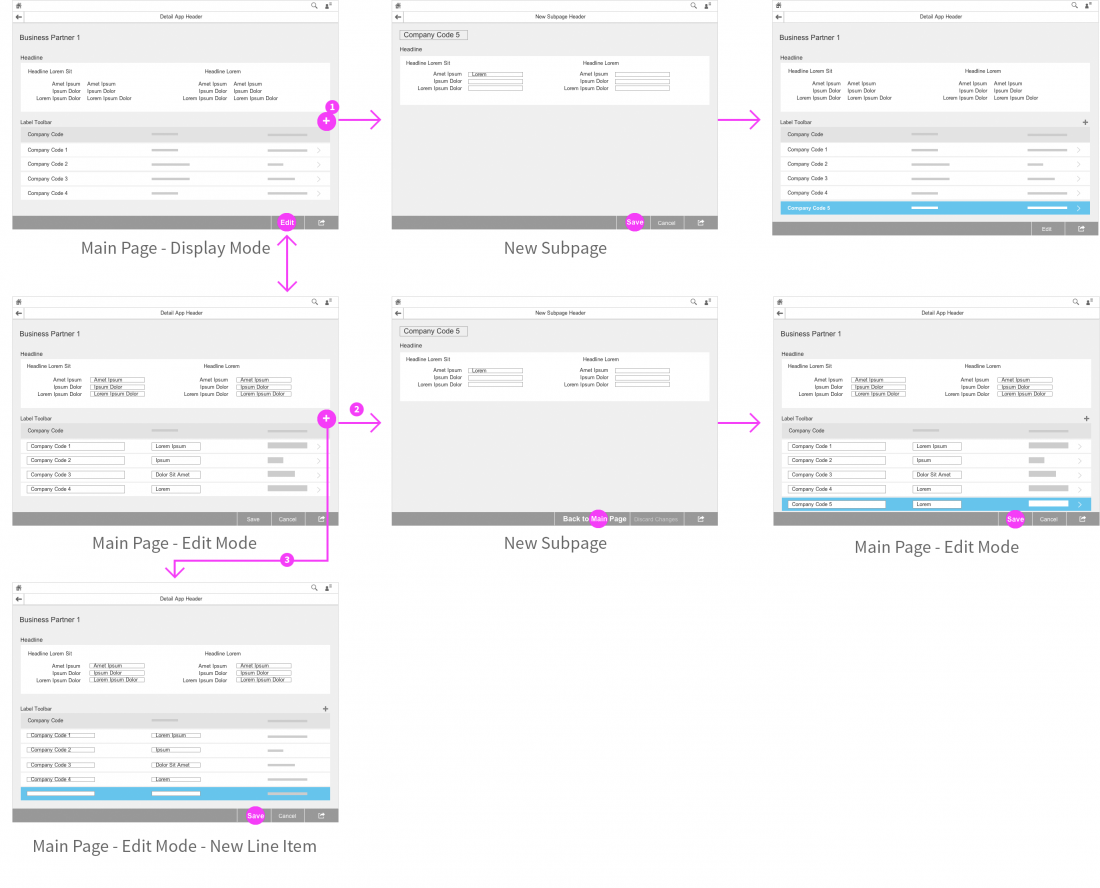
Display mode: After clicking or tapping the + icon (1), the user navigates to a new subpage, where he or she can Save the new entries or Cancel the process.
Edit mode: After clicking or tapping the + icon (2), the user navigates to a new subpage. The Back to Main Page and Discard Changes button labels correspond to the button labels in edit mode.
New Line Item on Main Page (optional – special case)
If the new line item includes only a few fields which could be displayed directly on the main page, the user can open a new row (3) directly on the main page. This is possible in display and edit mode. After the user clicks or taps the + icon, the main page switches directly to edit mode.
Pessimistic Locking
If a user sets the main page to edit mode, the next user cannot edit the main page or the related subpages until the first user has saved the entries.
The second user can see the content in display mode and is given status information in the line item (1) and on detail pages in the object header (2) that User 1 is currently editing the content.
At this time, the Edit button is disabled (3).
Resources
Want to dive deeper? Follow the links below to find out more about related controls, the SAPUI5 implementation, and the visual design.


 Your feedback has been sent to the SAP Fiori design team.