
- Latest SAPUI Version 1.124
- SAPUI5 Version 1.122
- SAPUI5 Version 1.120
- SAPUI5 Version 1.118
- SAPUI5 Version 1.116
- SAPUI5 Version 1.114
- SAPUI5 Version 1.112
- SAPUI5 Version 1.110
- SAPUI5 Version 1.108
- SAPUI5 Version 1.106
- SAPUI5 Version 1.104
- SAPUI5 Version 1.102
- SAPUI5 Version 1.100
- SAPUI5 Version 1.98
- SAPUI5 Version 1.96
- SAPUI5 Version 1.94
- SAPUI5 Version 1.92
- SAPUI5 Version 1.90
- SAPUI5 Version 1.88
- SAPUI5 Version 1.86
- SAPUI5 Version 1.84
- SAPUI5 Version 1.82
- SAPUI5 Version 1.80
- SAPUI5 Version 1.78
- SAPUI5 Version 1.76
- SAPUI5 Version 1.74
- SAPUI5 Version 1.72
- SAPUI5 Version 1.70
- SAPUI5 Version 1.68
- SAPUI5 Version 1.66
- SAPUI5 Version 1.64
- SAPUI5 Version 1.62
- SAPUI5 Version 1.60
- SAPUI5 Version 1.58
- SAPUI5 Version 1.56
- SAPUI5 Version 1.54
- SAPUI5 Version 1.52
- SAPUI5 Version 1.50
- SAPUI5 Version 1.48
- SAPUI5 Version 1.46
- SAPUI5 Version 1.44
- SAPUI5 Version 1.42
- SAPUI5 Version 1.40
- SAPUI5 Version 1.38
- SAPUI5 Version 1.36
- SAPUI5 Version 1.32
- SAPUI5 Version 1.30
- SAPUI5 Version 1.28
- SAPUI5 Version 1.26
- Latest SAPUI Version 1.124
- SAPUI5 Version 1.122
- SAPUI5 Version 1.120
- SAPUI5 Version 1.118
- SAPUI5 Version 1.116
- SAPUI5 Version 1.114
- SAPUI5 Version 1.112
- SAPUI5 Version 1.110
- SAPUI5 Version 1.108
- SAPUI5 Version 1.106
- SAPUI5 Version 1.104
- SAPUI5 Version 1.102
- SAPUI5 Version 1.100
- SAPUI5 Version 1.98
- SAPUI5 Version 1.96
- SAPUI5 Version 1.94
- SAPUI5 Version 1.92
- SAPUI5 Version 1.90
- SAPUI5 Version 1.88
- SAPUI5 Version 1.86
- SAPUI5 Version 1.84
- SAPUI5 Version 1.82
- SAPUI5 Version 1.80
- SAPUI5 Version 1.78
- SAPUI5 Version 1.76
- SAPUI5 Version 1.74
- SAPUI5 Version 1.72
- SAPUI5 Version 1.70
- SAPUI5 Version 1.68
- SAPUI5 Version 1.66
- SAPUI5 Version 1.64
- SAPUI5 Version 1.62
- SAPUI5 Version 1.60
- SAPUI5 Version 1.58
- SAPUI5 Version 1.56
- SAPUI5 Version 1.54
- SAPUI5 Version 1.52
- SAPUI5 Version 1.50
- SAPUI5 Version 1.48
- SAPUI5 Version 1.46
- SAPUI5 Version 1.44
- SAPUI5 Version 1.42
- SAPUI5 Version 1.40
- SAPUI5 Version 1.38
- SAPUI5 Version 1.36
- SAPUI5 Version 1.34
- SAPUI5 Version 1.32
- SAPUI5 Version 1.30
- SAPUI5 Version 1.28
- SAPUI5 Version 1.26
Mass Editing
Intro
Mass editing allows users to change multiple (homogenous) objects simultaneously. Usually, these objects are selected from a list or table and have most or all of their changeable facets in common, such as Object Name, Object ID, or Description.
By aggregating all the values of each of these facets, users can quickly choose to either keep or overwrite them.
Usage
Use mass editing if:
- Users need to change one or more values for multiple objects.
- The list that the objects are selected from is homogenous; that is, the objects have certain editable aspects in common.
- The values that need to be changed are common to all objects.
Do not use mass editing if:
- The list that the objects are selected from is heterogeneous; that is, the objects do not have any editable aspects in common.
- The objects that need to be edited have no (or barely any) common aspects.
Components
The two main controls used during mass editing are the combo box and the select control. Mass editing is usually done in a dialog. However, in the master list floorplan multiple items can be selected in the master list and edited directly in the details section without the need for a dialog.
Both the combo box and the select control are used to aggregate the multiple values of the objects to be edited. While the combo box allows the user to enter values that differ from the ones that have already been present, the select control limits the user’s choice to a predefined set of values.
Behavior and Interaction (incl. Gestures)
Mass editing can generally be applied for every type of object facet that can be edited.
Example: editing a list of employees
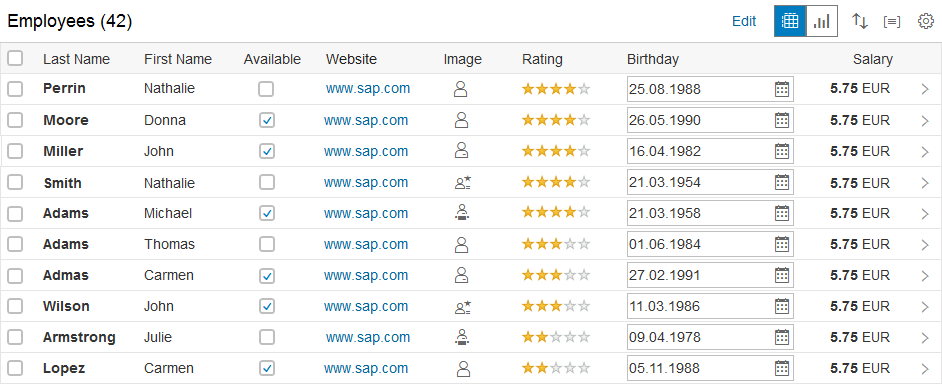
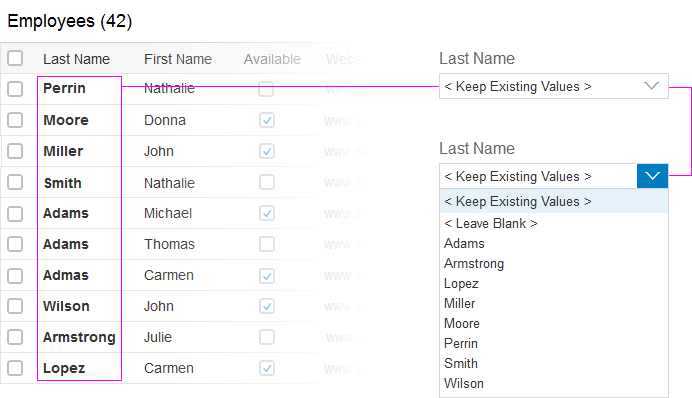
- The table above (first image in the carousel) contains 10 employees. While they all share the same columns, the values inside are usually different. Of course, there are exceptions, for example, if employees have the same name.
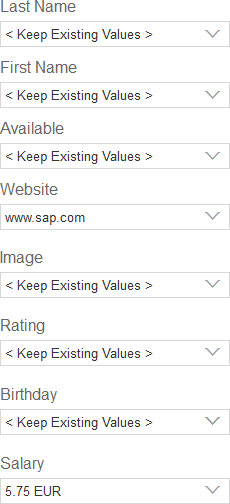
- The second image shows how all the columns can be represented as combo boxes or select controls. If the values of a certain column are different, the user selects < Keep Existing Values >. If all the values are identical, the respective value is shown directly (see Website or Salary).
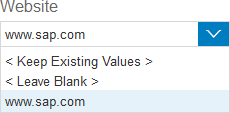
- Image three shows a combo box that allows the user to type in a new website for all employees, leave the field blank, or keep the previous values. In this case, the latter is identical to selecting sap.com. This entry allows users to undo any changes they may have made. It is especially helpful if many preset entries are available and the user is unsure of what the original value was.
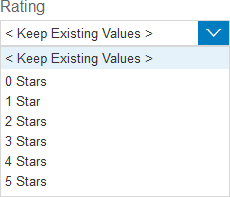
- The last image shows a select control that reduces the user’s choices to the presets shown – no free text input is possible here. Because of the employees’ different ratings, <Keep Existing Values> is preselected.
From Regular Editing to Mass Editing
The transition from regular editing to mass editing is very simple. The existing values are listed in a combo box or select control depending on whether the user is allowed to add a custom entry or if the choice is restricted to a predefined set of entries.
If the values of the selected objects differ from one another, the entry < Keep Existing Values > is preselected.
If all the values are identical, that specific value is used as the preset value. Exception: If the original entries were put into input controls that have all been left empty, the entry < Leave Blank > is preselected.
< Leave Blank > must only be offered if the input fields on the original objects are allowed to be left empty.
In the screen below, you can see the table from the first example. To edit a name, a user would usually select (or navigate to) one employee and click Edit. In edit mode, the employee’s name is represented as two input fields for the first and last names.
If, for example, the user wants to edit all the last names at once (mass editing), all the last names are aggregated into one single combo box (in the top right-hand corner). Because of the many different values, the preselected entry is < Keep Existing Values >.
In the dropdown list, all the values (last names) are listed in alphabetical order and without duplicates. Selecting one of these names would overwrite all the last names with that entry.
If permitted (by the design and the back end), the user can select < Leave Blank > to put a blank value into this field for all the employees.
In this example, a combo box was used, so the user can also type in a new value that is not represented in the dropdown list. All the existing last names are then overwritten with that new value.
If the user is not allowed to enter a custom value, you must use a select control instead of a combo box. All the permitted values must be listed in the dropdown list.
Example: From list to combo box
The following list shows how to “translate” controls into their mass editing equivalent. Each control is represented in two sections:
Example of the control’s use.
“Translation” for mass editing.
Description of which control to use and how to choose the preset entry.
Checkbox

Checkboxes
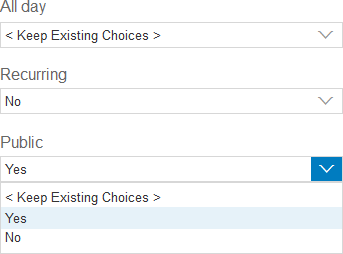
Checkboxes – Editing
Control
Select
Preset Entries
Mixed choices: < Keep Existing Values >
All checked: Yes
All unchecked: No
Composite Fields
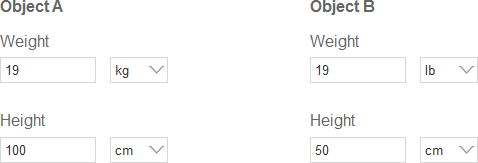
Composite fields
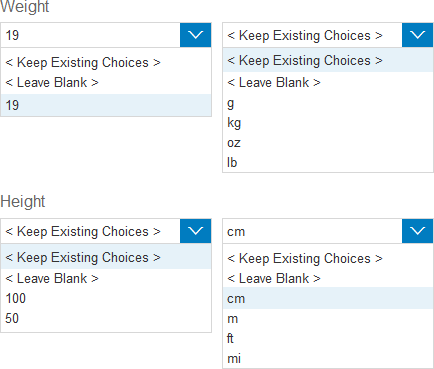
Composite fields – Editing
Control
Combo box/Select (depending on use case)
Preset Entries
See respective control in the list above.
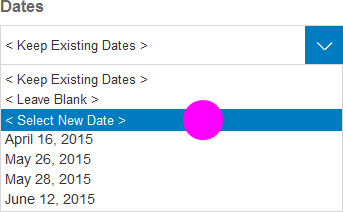
Date Picker
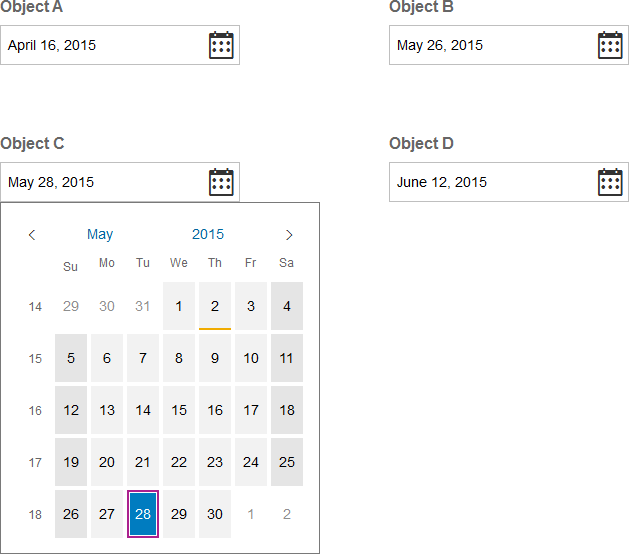
Date picker
Date picker – Editing (1)
Date picker – Editing (2)
Control
- A) Select (if users are only allowed to pick a date from a predefined list)
List all allowed dates beneath the standard actions.
- B) Combo box (if users are allowed to pick any date)
Right above the list of dates from the object, offer another selection
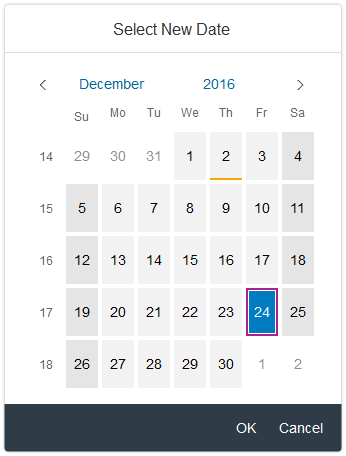
< Select New Date >. - Dialog with calendar control inside
Selecting a date and clicking OK closes the dialog and populates the combo box with that date.
Preset Entries
Mixed entries: < Keep Existing Values >
Identical entries: Use this entry as preset.
Exception – all blank: < Leave Blank >
Input (Any Characters Allowed)

Input (all characters)

Input (all characters) – Editing
Control
Combo box
Preset Entries
Mixed entries: < Keep Existing Values >
Identical entries: Use this entry as preset.
Exception – all blank: < Leave Blank >
Input (Restricted to Specific Characters, e.g. Numbers)

Input (restricted characters)
Input (restricted characters) – Editing
Control
Combo box
Preset Entries
Mixed entries: < Keep Existing Values >
Identical entries: Use this entry as preset.
Exception – all blank: < Leave Blank >
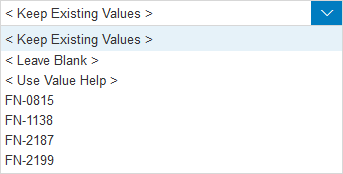
Input (With Value Help or Select Dialog)

Input (Value Help)
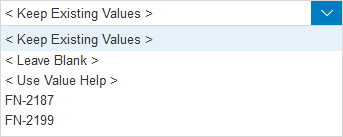
Input (Value Help) – Editing
Control
Combo box (Add < Use Value Help > or < Use Select Dialog > entry to trigger the respective dialog.)
Preset Entries
Mixed entries: < Keep Existing Values >
Identical entries: Use this entry as preset.
Exception – all blank: < Leave Blank >

Input (Multi Input)
Input (Multi Input) – Editing
Radio Buttons

Radio buttons

Radio buttons – Editing
Control
Select
Preset Entries
Mixed choices: < Keep Existing Values >
Identical choices: Use this choice as preset.
Rating Indicator
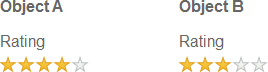
Rating indicator

Rating indicator – Editing
Control
Select
Preset Entries
Mixed choices: < Keep Existing Values >
Identical choices: Use this choice as preset.
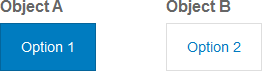
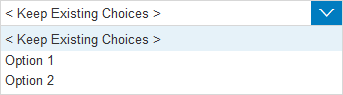
Segmented Button

Segmented buttons
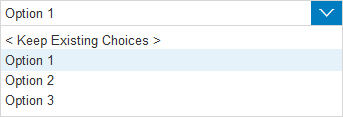
Segmented buttons – Editing
Control
Select
Preset Entries
Mixed choices: < Keep Existing Values >
Identical choices: Use this choice as preset.
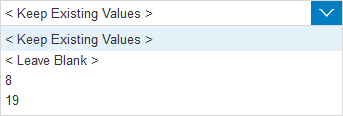
Slider
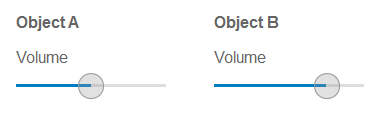
Slider
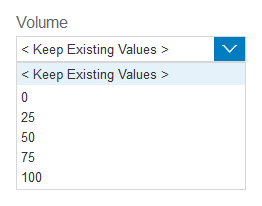
Slider – Editing
Control
Combo box / Select
Preset Entries
Mixed values: < Keep Existing Values >
Identical values: Use this value as preset.
Switch
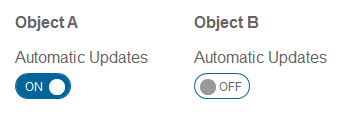
Switch
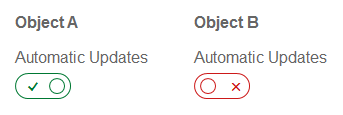
Switch (Semantic)
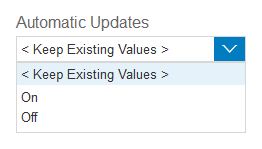
Switch – Editing
Control
Select
Preset Entries
Mixed choices: < Keep Existing Values >
Identical choices: Use this choice as preset.
If the semantic switch is used, make sure to provide fitting options during mass editing, like On/Off or Yes/No.
Toggle Buttons
Toggle buttons
Toggle buttons – Editing
Control
Select
Preset Entries
Mixed choices: < Keep Existing Values >
Identical choices: Use this choice as preset.
Guidelines
- Ensure that< Keep Existing Values > is always the first entry.
- If applicable,< Leave Blank > should always be second.
- Display all other entries after the two entries mentioned above. These additional entries can be all the values from the respective facet of the selected objects and/or all permitted values.
Ensure that you list all necessary options/presets that the user can choose from. - Usually, mass editing should be done in a dialog after selecting multiple items from a list or table and clicking Edit.
There is one exception: In the master list floorplan, multiple items can be selected in the master list and edited directly in the details area, without the need for a dialog. - If your application also allows the creation of objects that the user can edit via mass editing, try to structure both create and edit screens similarly. This reduces the cognitive load for the end users. The same rule applies if your users have an additional SAP Fiori application for creating the object.
- If certain fields belong together semantically (such as First Name/Last Name or City/ZIP Code, arrange them in such a way that the user can recognize the connection.
Exceptions
< Leave Blank >
Only offer the < Leave Blank > option in the dropdown list if the user is explicitly allowed to leave a field empty and the back end supports it.
If the fields of a specific type of all selected objects are empty (such as Name), it is better to preselect < Leave Blank > instead of showing an empty combo box or select control, and having a blank entry in the dropdown list. Even though this is not consistent, it provides a better user experience.
Special Characters (“<” and “>”)
The entries < Keep Existing Values > and < Leave Blank > should always be used as described in this guideline: They must start with “<” followed by a blank space, and end with a blank space followed by “>”.
These two characters have been chosen because they are not usually used in text form in objects.
In the unlikely event that these characters are already used by a customer, replace them with another set of unlikely special characters that are not used by this customer. However, you must still ensure that < Keep Existing Values > and < Leave Blank > stay at the top as the first two entries.
Resources
Want to dive deeper? Follow the links below to find out more about related controls, the SAPUI5 implementation, and the visual design.
 Your feedback has been sent to the SAP Fiori design team.