Time Picker

Information
This guideline describes the target design for the time picker. Some features are not yet implemented in the time picker web component.

Intro

The time picker allows the user to select a localized time. It can be used with touch, mouse, or keyboard input.

When to Use

Do

Use the time picker:

  • To select a time.
  • To select a time range. In this case, one time picker can be used to set the starting time and a second one to set the end time.
  • To select a specific duration, such as 1 minute and 30 seconds.
Don't

Don’t use the time picker:

  • If users need to select a standard duration, such as 15 minutes, 30 minutes, 1 hour, or 2 hours. In this case, use the select control instead.

Anatomy

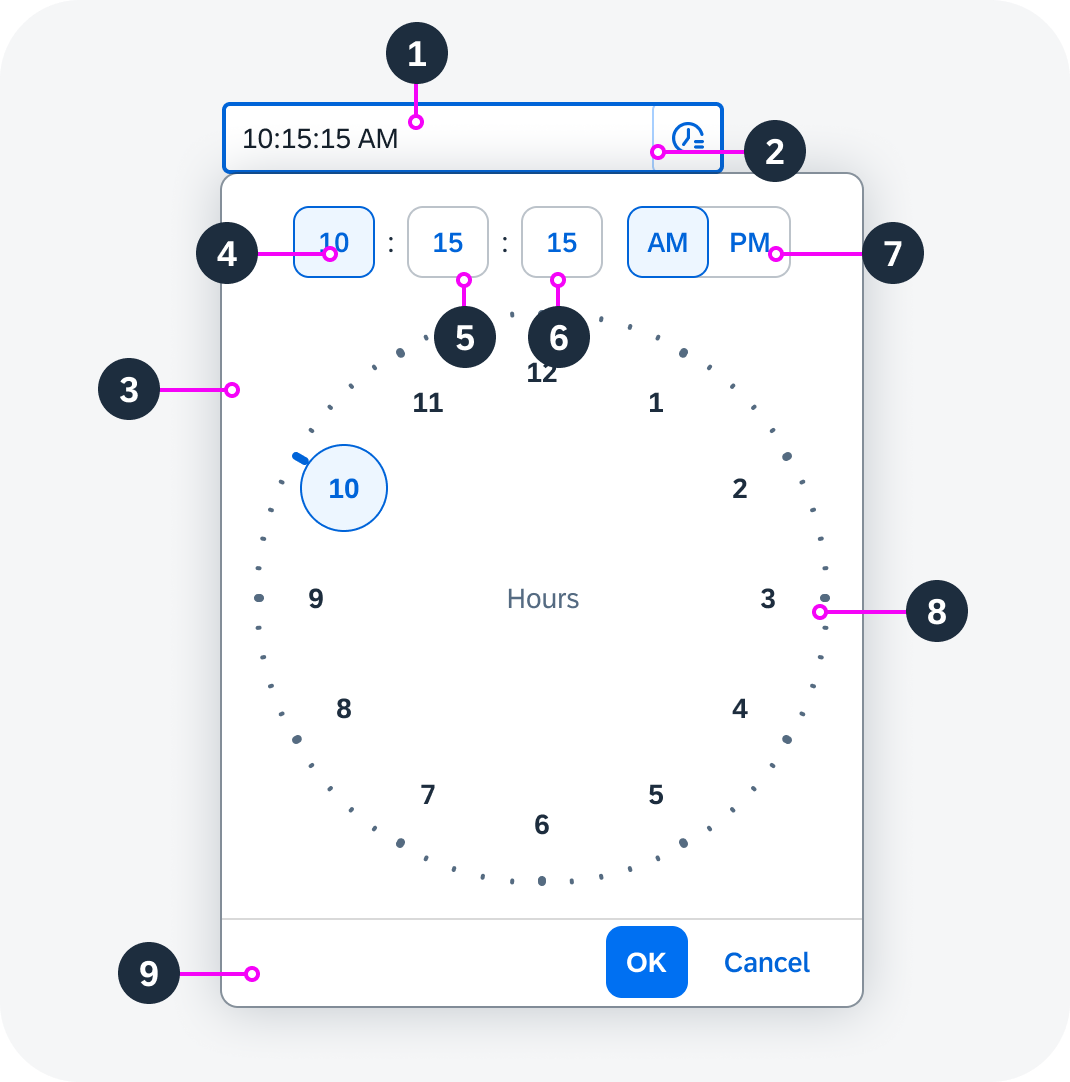
Time Picker

  1. Time picker input field: The container in which a user enters data. It contains a mask.
  2. Time picker button: The button that opens the time picker popover-.
  3. Time picker popover

  4. Hours field: Displays the hour entered or selected.
  5. Minutes field: Displays the minutes entered or selected.
  6. Seconds field (optional): Displays the seconds entered or selected. You can add the seconds field if it’s relevant for your use case. The recommended display format doesn’t include seconds.
  7. AM/PM switch. The switch is displayed if the user has opted for the 12-hour format.
  8. Clock face for selecting the time: The appearance of the clock face depends on the focus (hours, minutes, or seconds) and the time format (12-hour or 24-hour clock).
  9. Footer: With OK and Cancel buttons.
Anatomy of the time picker

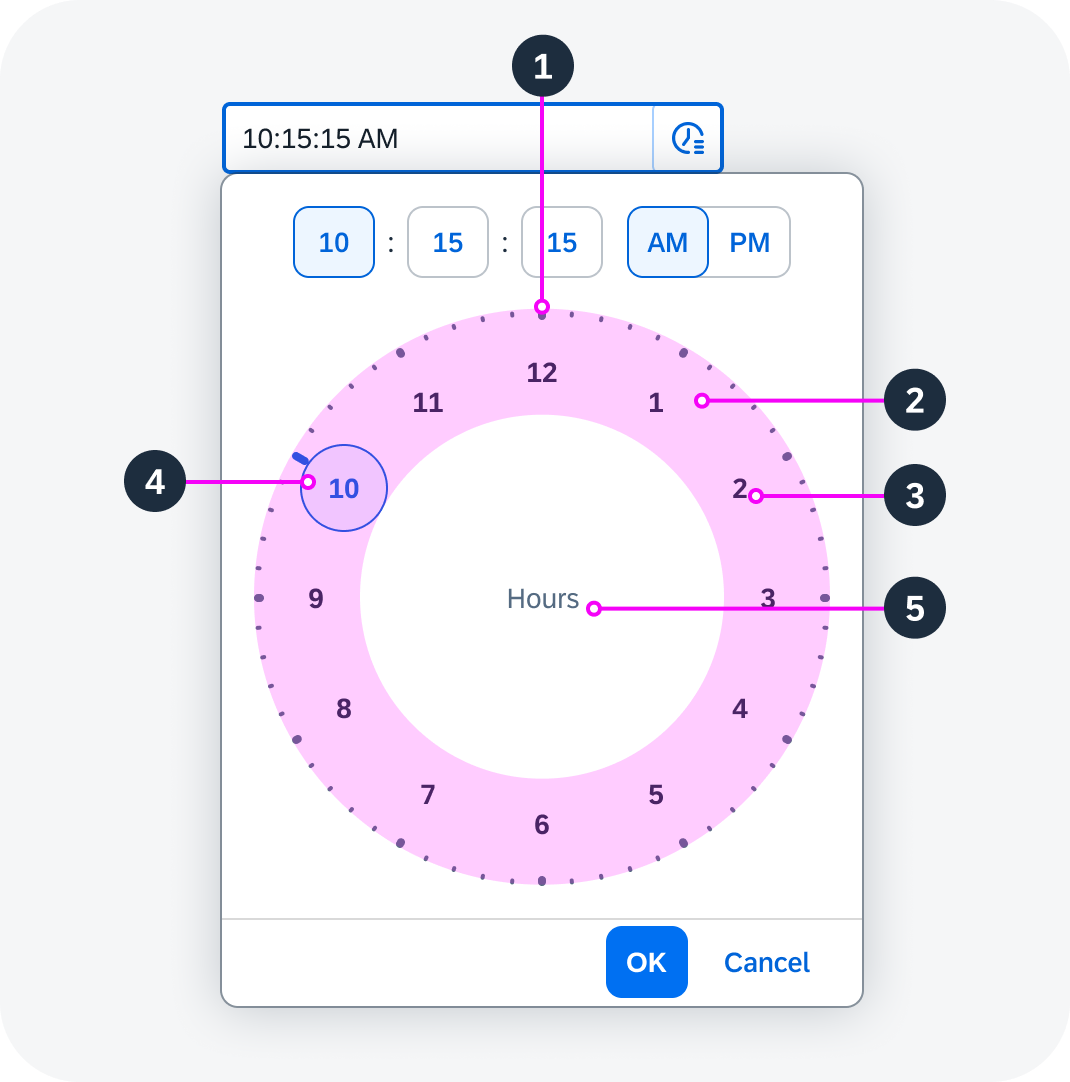
Clock Face

  1. Tick marks
  2. Clock face circle
  3. Number selector
  4. Selected hours/minutes/seconds
  5. Hours/minutes/seconds label
Anatomy of the clock face

Variants

24-Hour Clock Face

12-Hour Clock Face
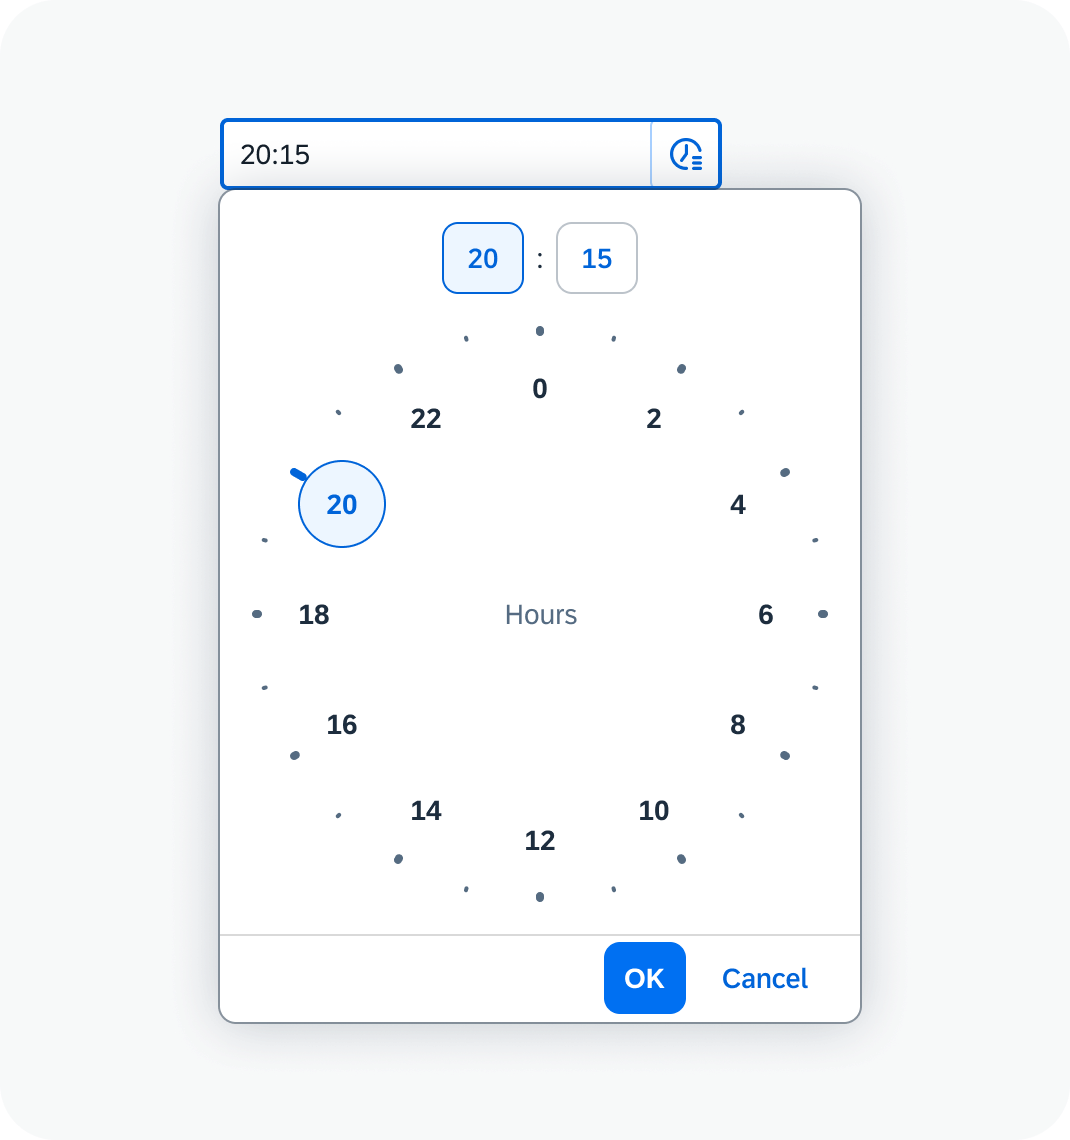
Time picker with 24-hour clock face
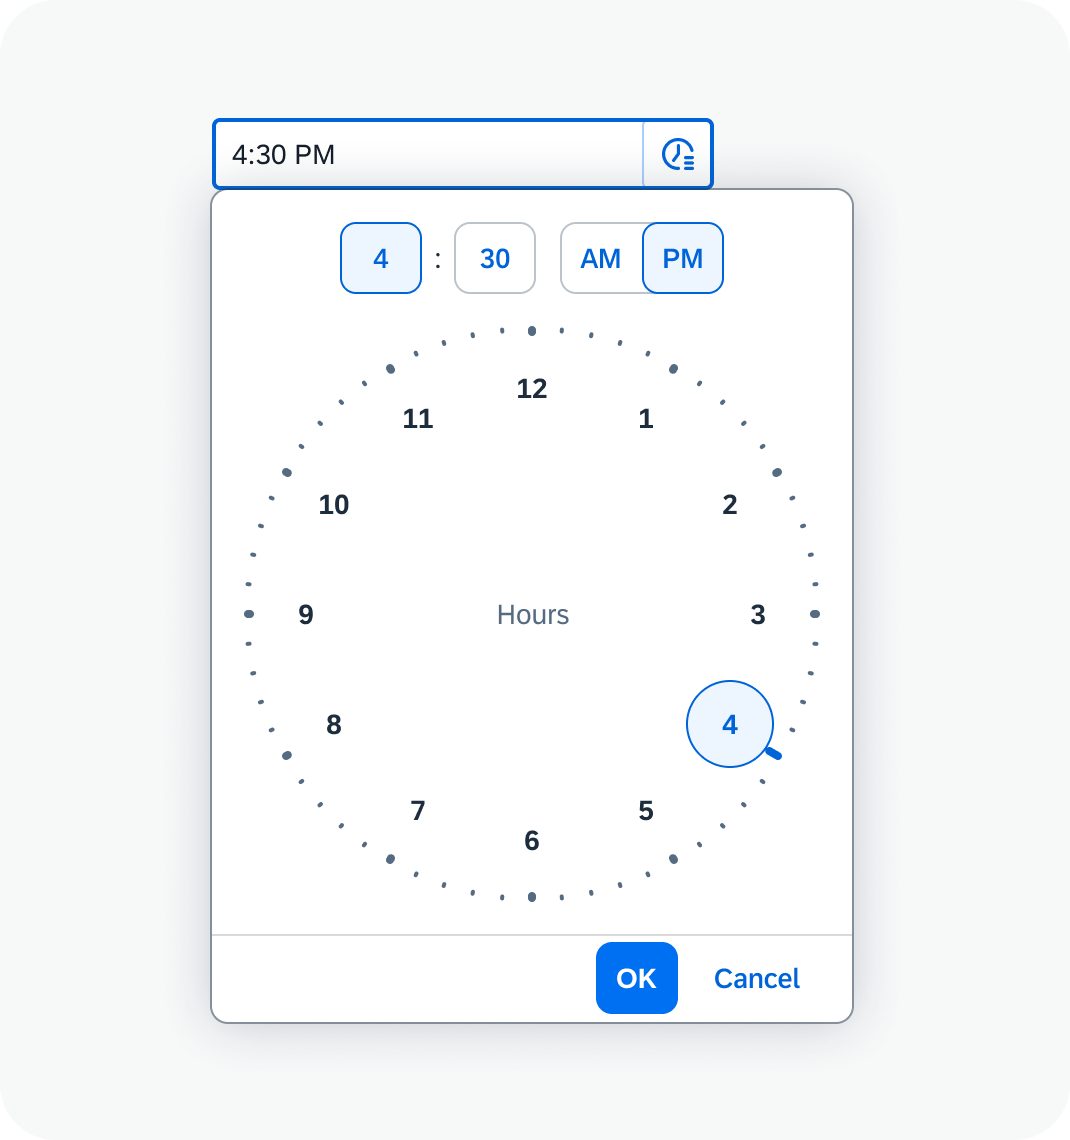

Time picker with 12-hour clock face

Selection of Seconds

Input Placeholder
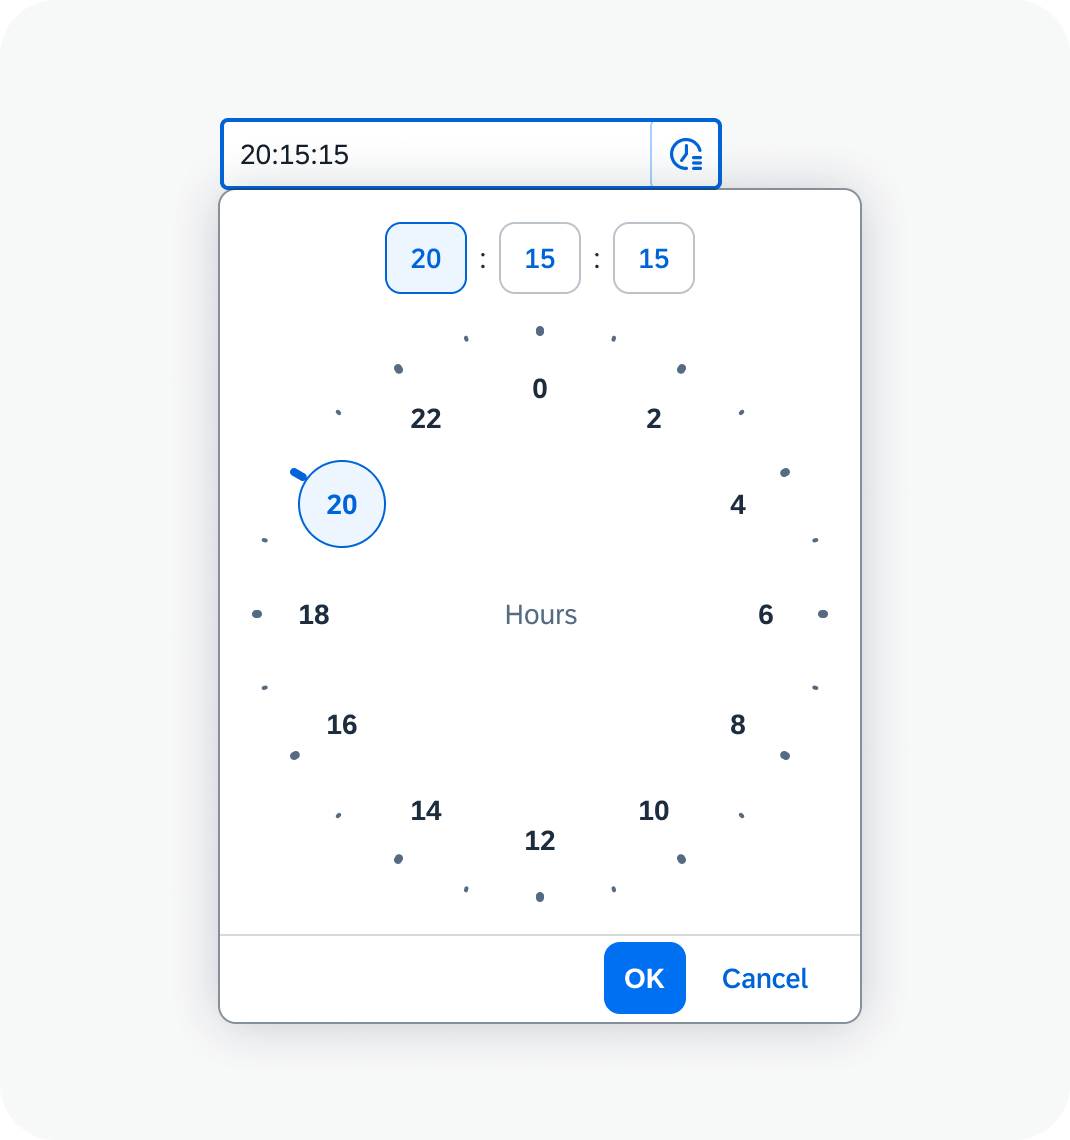
Time picker with selection of seconds
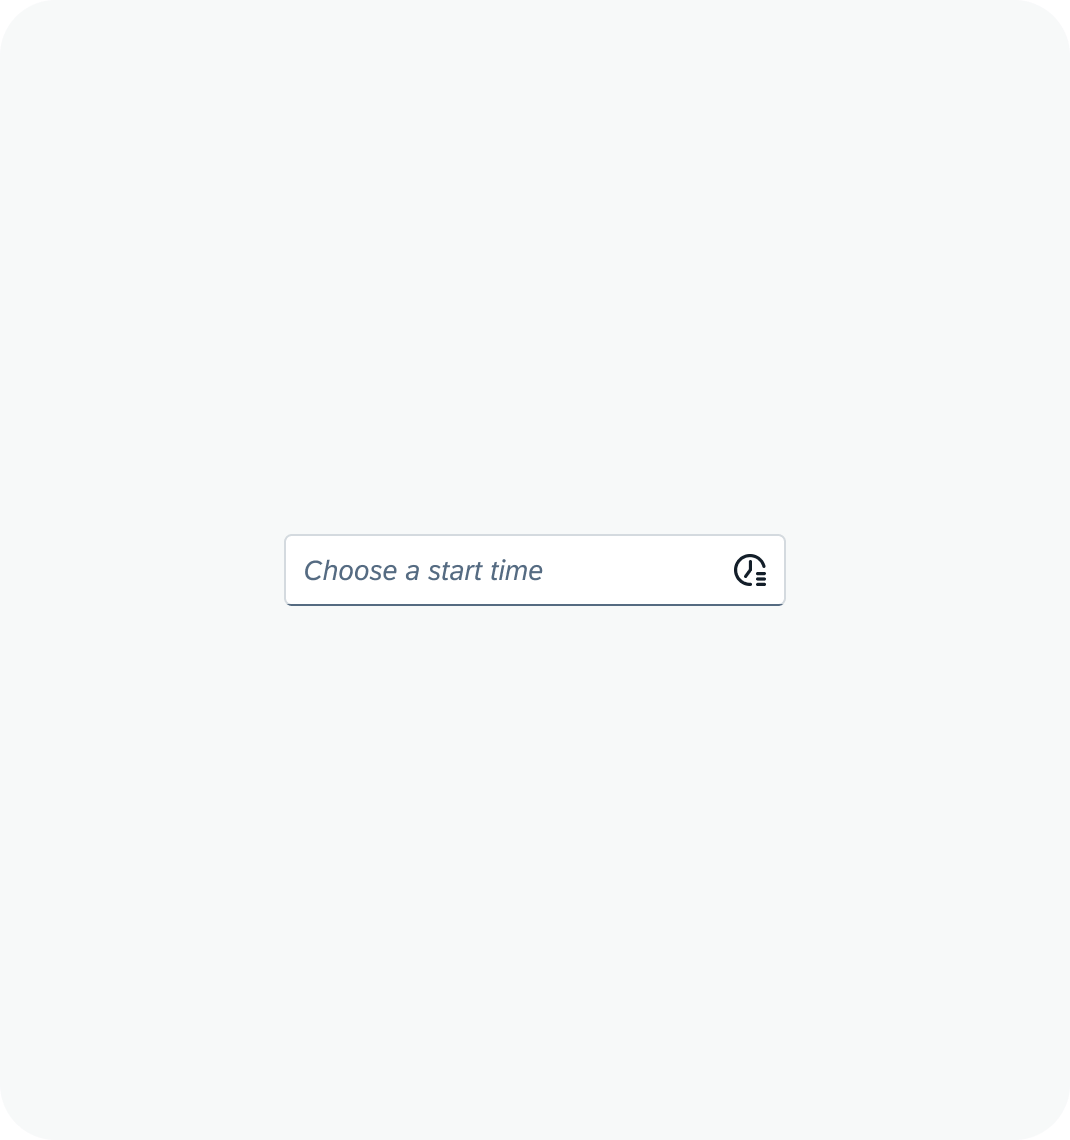

Time picker with a placeholder in the input field

Value States
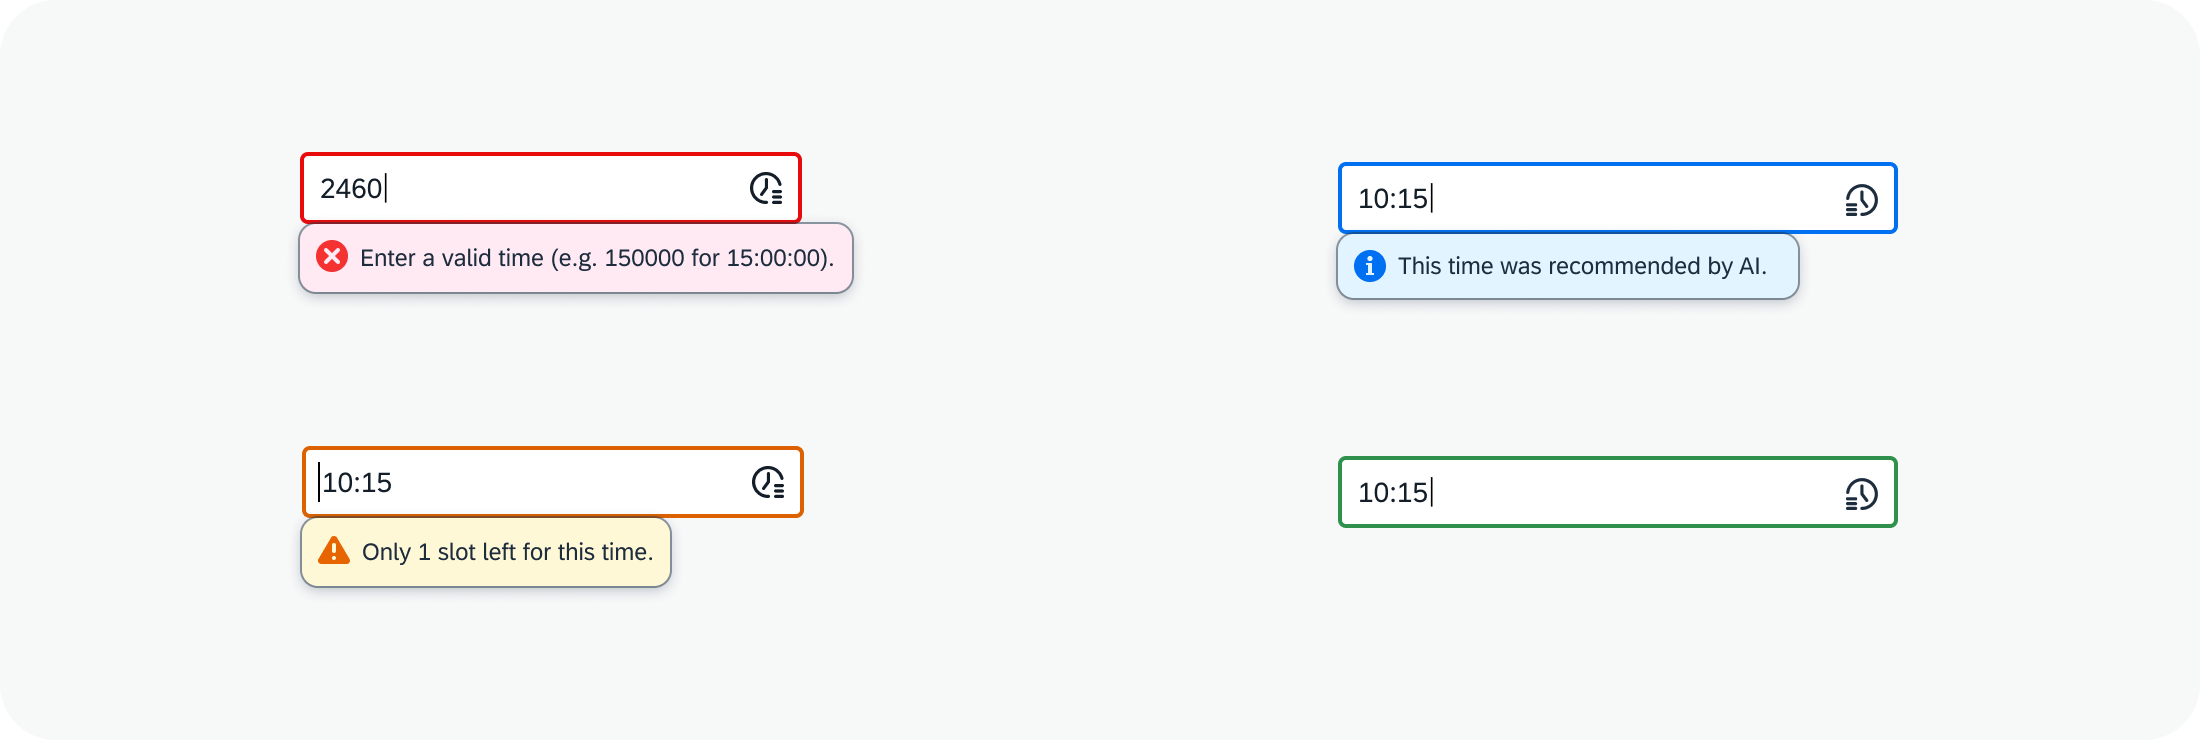
Time picker with different value states

Behavior and Interaction

Selecting a Time

To enter a time, the user can either type the value in the input field or choose the values from the time picker popover and built-in clock interface. By default, the time fields in the time picker popover show the current time. Users can edit this value in the time picker popover in two ways:

  • By clicking on a value or tick mark on the clock face to select the corresponding time value. Even if the time doesn’t initially display a number, it becomes visible upon hover or click.
  • By dragging the mouse round the clock face for more precision.

Once a value has been selected, the focus automatically moves to the next time field in the sequence (for example, from hours to minutes). The clock face shows the current value for this field (for example 30 minutes). Once the value for the last time field has been selected, the focus remains unchanged.

To change a time value, the user can click on the corresponding time field (for example, hours) and choose a different value on the clock face.

Clicking the OK button confirms the selected time. Clicking Cancel or clicking anywhere outside the popover discards the changes.
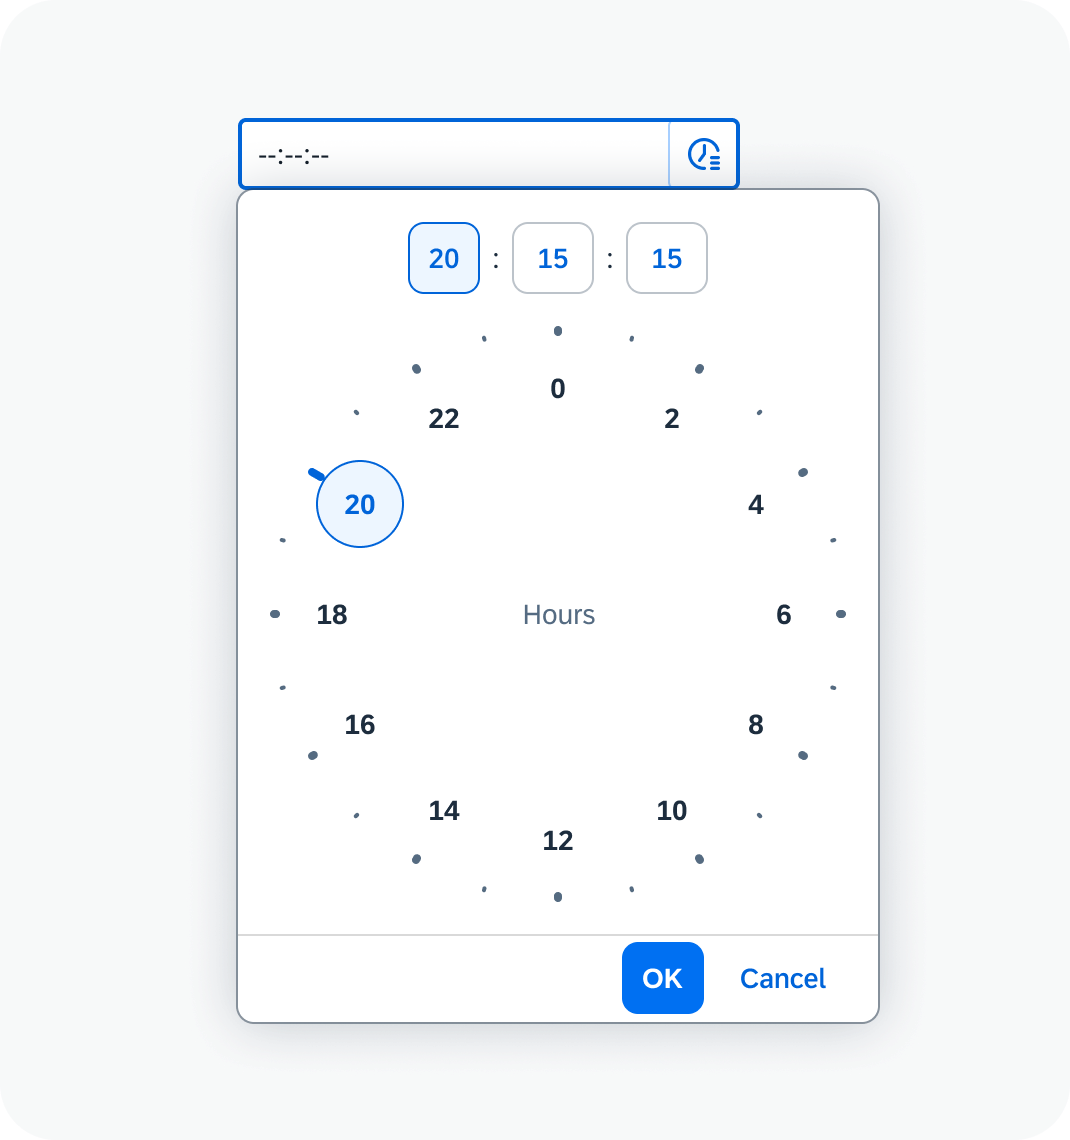
Selecting a time in the time picker popover

Shortcuts

You can use the following shortcuts to enter a specific time.

  • “now”
  • “in 1 hour” / “in x hours”
  • “1 hour ago” / “x hours ago”

The system calculates the time automatically and enters it in the input field.

Responsive Behavior

On a tablet or mobile device, tapping the input field opens a popover. To set the value, the user enters the desired value in each input field within the popover.
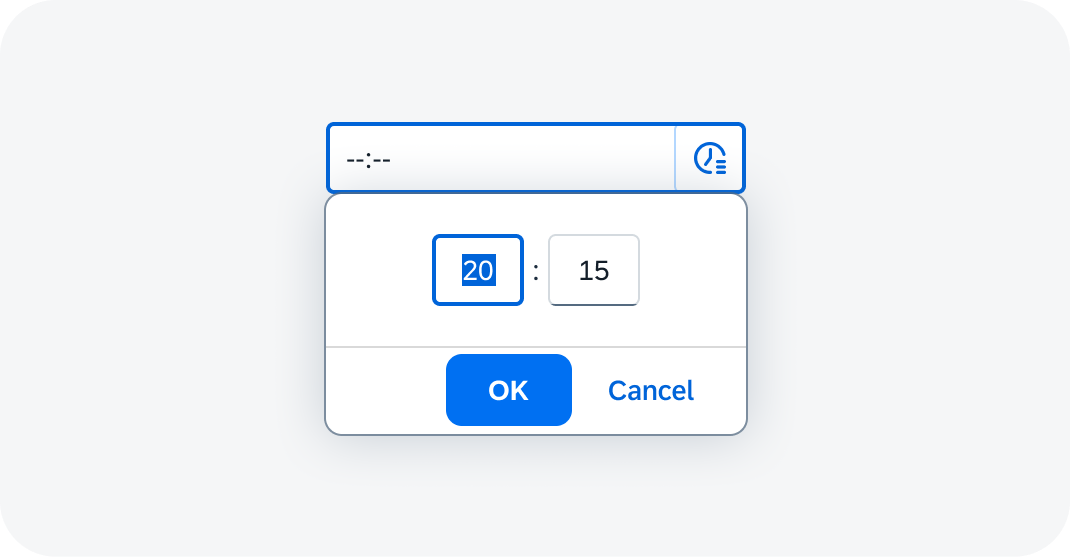
Popover with inputs on touch devices

Tapping the time picker button within the input field opens the time picker popover.

On smartphones, the popover is displayed as a full screen dialog.
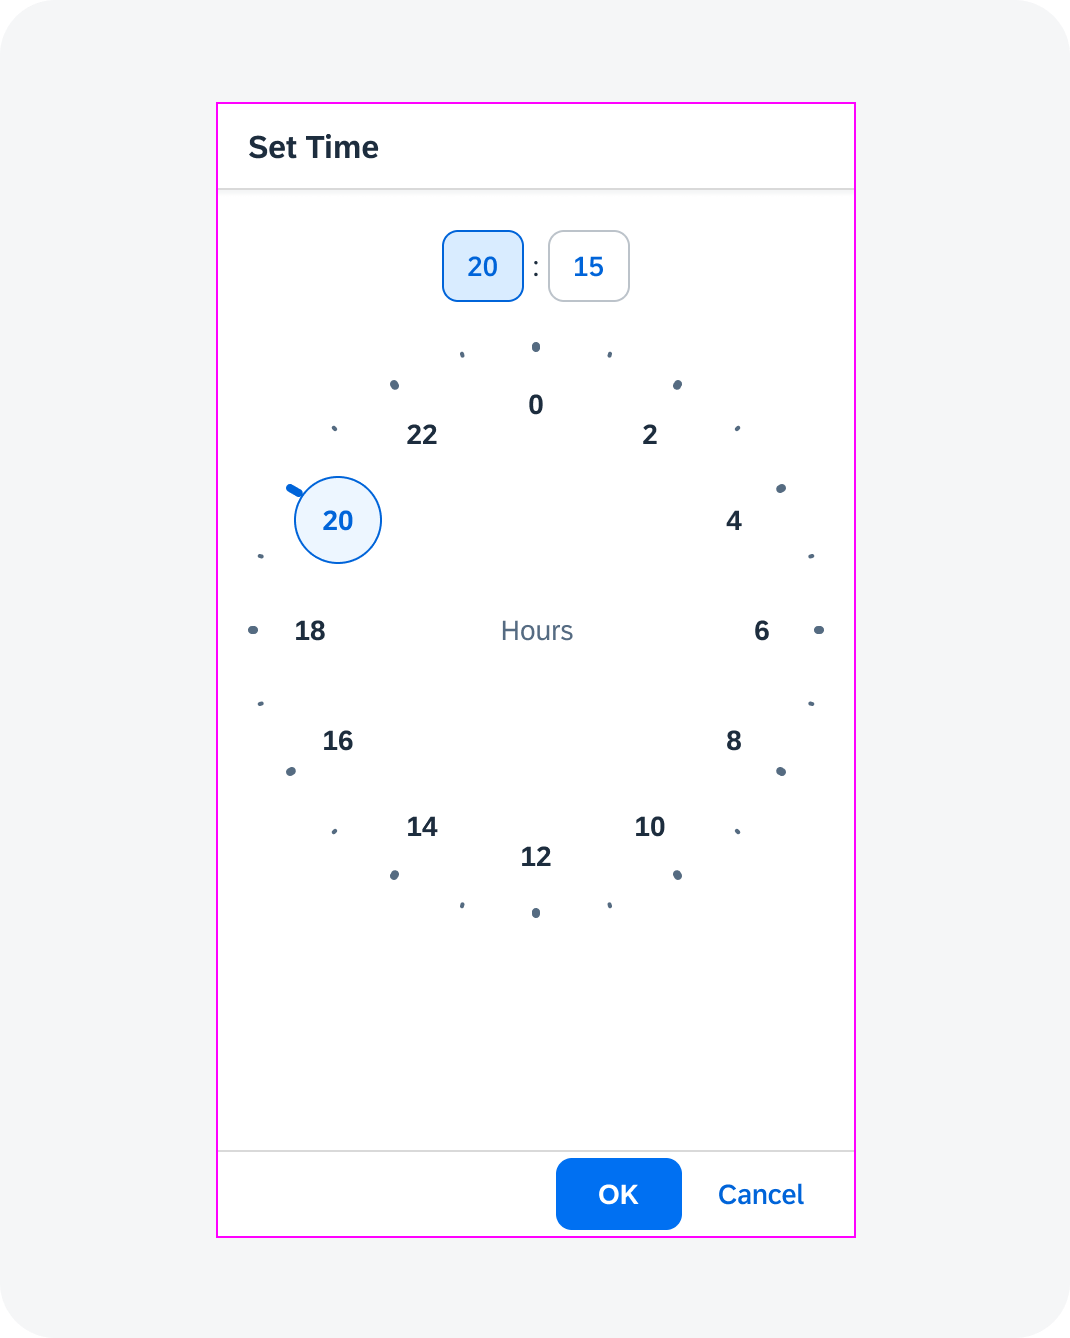
Full Screen Dialog with Clock Face on Mobile

Related Links

Implementation

What’s New in Guideline Version 1.120

This article provides an overview of the updates to the SAP Fiori web design guidelines with guideline version 1.120.

Look, Feel, and Wording

Topic Update Topic Link
Situation Handling Framework – UI Text Guidelines Section on naming for templates and triggers updated. Situation Handling Framework – UI Text Guidelines

Designing Intelligent Systems

Topic Update Topic Link
NEW Designing for Generative AI   Introduction to application design for generative AI, including:

  • SAP’s generative AI strategy
  • SAP’s approach to developing AI design guidelines
Designing for Generative AI
NEW Design Principles for Generative AI   Building on existing SAP guidelines, we’ve identified five design principles for generative AI. Each principle is translated into key features and behaviors we can build into our apps. Design Principles for Generative AI
NEW Building Trust in Generative AI   Outlines the factors that influence user trust in AI-generated content and the steps we can take to build trust into our products. Building Trust in Generative AI
NEW AI Design Glossary   Explains key AI terms in the following areas:

  • Artificial intelligence
  • Ethics and user-centered design
  • Generative AI
  • Machine learning (ML)
  • Natural language processing (NLP)
AI Design Glossary
NEW Helpful Links on SAP AI  A curated collection of links to get you ramped up on AI design at SAP. Helpful Links on SAP AI
NEW Get In Touch With Us Share your feedback with SAP’s AI design team and join our SAP User Research Panel. Get In Touch With Us

General Patterns


Topic Update Topic Link
Content Density
(Cozy and Compact)
Guidelines added for hybrid devices. Content Density – Guidelines
Export to Spreadsheet The Export As dialog now contains select controls for the:

  • Format of the file to export
  • Destination for the export, when cloud is enabled on the customer’s instance

For the cloud destination, the primary action label in the dialog is “Export To…” and opens a cloud file browser where users choose the target location for the exported file through a remote repository.

Export to Spreadsheet – Export As Dialog
Message Handling – Processing Multiple Items After partial processing, when one or more items have been excluded from processing and one or more backend errors have occurred during processing, the summary message view dialog includes:

  • Successfully processed items
  • The backend error or errors
  • An information message for each item excluded from the processing
Message Handling – Processing Multiple Items – Partial Processing

UI Elements – SAPUI5

Topic Update Topic Link
Input Field Don’t use the “value help only” option. This can result in inconsistencies for screen reader users. Input Field – Value Help
Message Toast For accessibility purposes, the user can keep the message toast onscreen with the following keyboard shortcuts:

  • Ctrl + Shift + M (Windows)
  • Cmd + Shift + M (Mac OS)
Message Toast – Behavior and Interaction – Choreography

UI Elements – SAP Web Components

Interaction Design Foundations

Topic Update Topic Link
Value States NEW Foundation guideline for all components (base concept). Value States
Wrapping and Truncation NEW Foundation guideline for all components.

  • Options for handling space constraints for text (wrapping, truncation, or a combination of both) and when to use them.
  • Options for displaying the full text when a text is truncated.
Wrapping and Truncation

Components

Topic Update Topic Link
Bar  NEW New web component guideline. Bar (Web Component)
Breadcrumbs  NEW New web component guideline. Breadcrumbs
Busy Indicator Don’t display a busy indicator text if the busy indicator is used where space is limited. Busy Indicator – Anatomy
Color Palette NEW New web component guideline. Color Palette
Color Palette Popover NEW New web component guideline. Color Palette Popover
Date Range Picker  NEW New web component guideline. Date Range Picker
Icon  NEW New web component guideline. Icon
Menu Button  NEW New web component guideline. Menu Button
Rating Indicator NEW

New web component guideline.

Rating Indicator
Segmented Button

Added variants and behavior for selection modes:

  • Single selection
  • Multi selection

Updated interaction design specification (version 1.1)

Segmented Button
Text Area  NEW New web component guideline. Text Area
Toolbar  NEW New web component guideline. Toolbar
Tree  NEW New web component guideline. Tree

SAP Fiori Elements Framework

Topic Update Topic Link
Table Features When the selection of multiple rows is enabled for a table in the list report and object page, the Select All  checkbox is displayed by default in the selection column header for the responsive table. You can change the default. Table Features (SAP Fiori Elements) – Clear All / Select All
Table Rows  With both versions of SAP Fiori elements, in object pages, in create and edit modes, the grid table and responsive table contain an empty row. Users now receive guidance in completing the required fields for an empty row, as follows:

  • With SAP Fiori elements for OData V4, a red asterisk (*) is displayed in the column header label for the mandatory fields.
  • Both SAP Fiori elements for OData V2 and V4 show an error message strip above the table:
    • When the table does not display mandatory columns. It instructs users to display the columns from the table settings.
    • When mandatory fields are not filled. In addition to the message strip for the table, the mandatory field displays a value state message. “Enter a value” is the the placeholder message text. Replace the text to better specify for the users the value to enter, for example, “Enter a delivery date.” in the application’s i18n file, under the respective entitySet using the key format as shown here:

With both versions of SAP Fiori elements, you can disable fields in the empty row so they are read-only at creation time and become editable afterwards for use cases where certain fields become relevant only after creation.

With SAP Fiori elements for OData V2, a draft for a once empty row is saved after the users have shifted their focus away from the input field in the row and an interval of 20 seconds has passed with SAP Fiori elements for OData V2.

Table Rows (SAP Fiori Elements)
Table Toolbar With both versions of SAP Fiori elements, when My Home in SAP S/4HANA Cloud is enabled, by default, the Add Card to Insights option is displayed in the overflow toolbar of list report tables with the single content and multiple view layouts.

You can ask the application development team to turn the option off.

With SAP Fiori elements for OData V4, in tables in the list report or object page, the copy action in the table toolbar applies to:

  • Multiple rows for all tables including value help tables
  • A range of selected cells for all tables except the responsive table

Users can select a range of cells:

    • With their mouse, by clicking and holding the mouse button while they select the cells
    • With the key combinations.
Table Toolbar (SAP Fiori Elements)

Designer Toolkit

Topic Update Topic Link
Designer Toolkit We’ve restructured/renamed the following topics in the Designer Toolkit section of the navigation menu:

  • The menu node SAP Fiori Design Stencils was renamed to UI Kit.
  • The menu nodes for design stencils that are no longer being updated were removed (Sketch, Adobe XD, Axure RP). You can still access these older download files in previous guideline versions.
  • The SAP Fiori Design Stencils Overview article was renamed to Download Fonts. It now contains only the download files for the Font 72 family and SAP icon fonts.
  • The article Design Stencils for Figma was renamed to SAP S/4HANA Web UI Kit. The introduction was updated to provide more context.
Download Fonts

SAP S/4HANA Web UI Kit

Download Fonts Font 72: The font files have been extended to include Cyrillic characters for Bulgarian.

SAP icon font: Download files were updated to version 5.7 (Horizon theme) and 4.19 (Quartz theme).

Download Fonts
SAP S/4HANA Web UI Kit New UI Kit version (02/2024) SAP S/4HANA Web UI Kit

About Guideline Updates

With each new guideline version, we deliver two types of update:

  • Updates to reflect new or changed UI controls available with SAPUI5, or new/updated design guidelines for SAP web components.
  • Ongoing updates on how to best apply the SAP Fiori design (such as overarching concepts, floorplans, and additional decision support). These updates are introduced with a given guideline version, but are not necessarily dependent on a specific SAPUI5 version.

Note: Our policy is to update only the latest guideline version. If you are working with an earlier SAPUI5 release, also consider checking out the most recent guideline version to get the latest general guidance.