- SAPUI5 Version 1.122
- SAPUI5 Version 1.120
- SAPUI5 Version 1.118
- SAPUI5 Version 1.116
- SAPUI5 Version 1.114
- SAPUI5 Version 1.112
- SAPUI5 Version 1.110
- SAPUI5 Version 1.108
- SAPUI5 Version 1.106
- SAPUI5 Version 1.104
- SAPUI5 Version 1.102
- SAPUI5 Version 1.100
- SAPUI5 Version 1.98
- SAPUI5 Version 1.96
- SAPUI5 Version 1.94
- SAPUI5 Version 1.92
- SAPUI5 Version 1.90
- SAPUI5 Version 1.88
- SAPUI5 Version 1.86
- SAPUI5 Version 1.84
- SAPUI5 Version 1.82
- SAPUI5 Version 1.80
- SAPUI5 Version 1.78
- SAPUI5 Version 1.76
- SAPUI5 Version 1.74
- SAPUI5 Version 1.72
- SAPUI5 Version 1.70
- SAPUI5 Version 1.68
- SAPUI5 Version 1.66
- SAPUI5 Version 1.64
- SAPUI5 Version 1.62
- SAPUI5 Version 1.60
- SAPUI5 Version 1.58
- SAPUI5 Version 1.56
- SAPUI5 Version 1.54
- SAPUI5 Version 1.52
- SAPUI5 Version 1.50
- SAPUI5 Version 1.48
- SAPUI5 Version 1.46
- SAPUI5 Version 1.44
- SAPUI5 Version 1.42
- SAPUI5 Version 1.40
- SAPUI5 Version 1.38
- SAPUI5 Version 1.36
- SAPUI5 Version 1.34
- SAPUI5 Version 1.32
- SAPUI5 Version 1.30
- SAPUI5 Version 1.28
- SAPUI5 Version 1.26
- Latest SAPUI Version 1.124
- SAPUI5 Version 1.122
- SAPUI5 Version 1.120
- SAPUI5 Version 1.118
- SAPUI5 Version 1.116
- SAPUI5 Version 1.114
- SAPUI5 Version 1.112
- SAPUI5 Version 1.110
- SAPUI5 Version 1.108
- SAPUI5 Version 1.106
- SAPUI5 Version 1.104
- SAPUI5 Version 1.102
- SAPUI5 Version 1.100
- SAPUI5 Version 1.98
- SAPUI5 Version 1.96
- SAPUI5 Version 1.94
- SAPUI5 Version 1.92
- SAPUI5 Version 1.90
- SAPUI5 Version 1.88
- SAPUI5 Version 1.86
- SAPUI5 Version 1.84
- SAPUI5 Version 1.82
- SAPUI5 Version 1.80
- SAPUI5 Version 1.78
- SAPUI5 Version 1.76
- SAPUI5 Version 1.74
- SAPUI5 Version 1.72
- SAPUI5 Version 1.70
- SAPUI5 Version 1.68
- SAPUI5 Version 1.66
- SAPUI5 Version 1.64
- SAPUI5 Version 1.62
- SAPUI5 Version 1.60
- SAPUI5 Version 1.58
- SAPUI5 Version 1.56
- SAPUI5 Version 1.54
- SAPUI5 Version 1.52
- SAPUI5 Version 1.50
- SAPUI5 Version 1.48
- SAPUI5 Version 1.46
- SAPUI5 Version 1.44
- SAPUI5 Version 1.42
- SAPUI5 Version 1.40
- SAPUI5 Version 1.38
- SAPUI5 Version 1.36
- SAPUI5 Version 1.34
- SAPUI5 Version 1.32
- SAPUI5 Version 1.30
- SAPUI5 Version 1.28
- SAPUI5 Version 1.26
Export to Spreadsheet
sap.ui.export.Spreadsheet
Intro
“Export to Spreadsheet” is a utility for exporting data from an app to a spreadsheet, enabling users to work with the data in common spreadsheet applications. Typical use cases are to mix the data with other sources, perform complex calculations, or change the layout of the data (for example, to present the content differently).
Usage
Use “Export to Spreadsheet” if:
- Users need to work with the data in common spreadsheet applications.
- Exported data should be the same as displayed (for example, taking visible columns, column order, filter, and sort settings into account).
- The amount of data to be exported is limited.
Do not use “Export to Spreadsheet” if:
- You want to export a complete database table. Use custom-built exporters instead.
- You need to export large tables. Use custom-built exporters instead.
Behavior and Interaction
“Export to Spreadsheet” can be used in all cases where the exported data can be represented in a tabular format. The export is independent of the control used to display the data in the app. It can be used not only for tables, but also for all other controls that work internally with tabular or hierarchical data, such as charts.
Content Formatting
The exported file contains only simple read-only text content. Basic data type information can be configured per column, such as text, integer number, floating point number, percentage, date/time (UTC or local time), and so on. Since spreadsheet applications provide their own formatting for cell content, SAPUI5 formatters (for example, for dates, times, and numbers) are not taken into account.
You can combine several data points and display them in one cell, or spread them over several cells.
In the spreadsheet files, tree structures are displayed using the grouping functionality (first seven levels) and double indentation (all levels).
Exporting Readable Texts
By default, the Export to Spreadsheet feature only uses data from the back end. Front-end formatting is not considered. For example, if the back-end database value is “F” and the value displayed in the front end is “Finished”, the exported value is still “F”.
To ensure that the data is exported as it is displayed on the screen, you can define key value pairs to overwrite the back-end values for a given column or columns (such as “F” for “Finished”).
If you opt to use this feature, bear the following in mind:
- The correct translated text must be provided by the application. It isn’t done by the framework.
- The text is just replaced, without additional formatting.
In this sample the exported texts for the Enumeration column in the exported file are identical with those shown on the UI, even though the database values are 1, 2, and 3.
Exporting
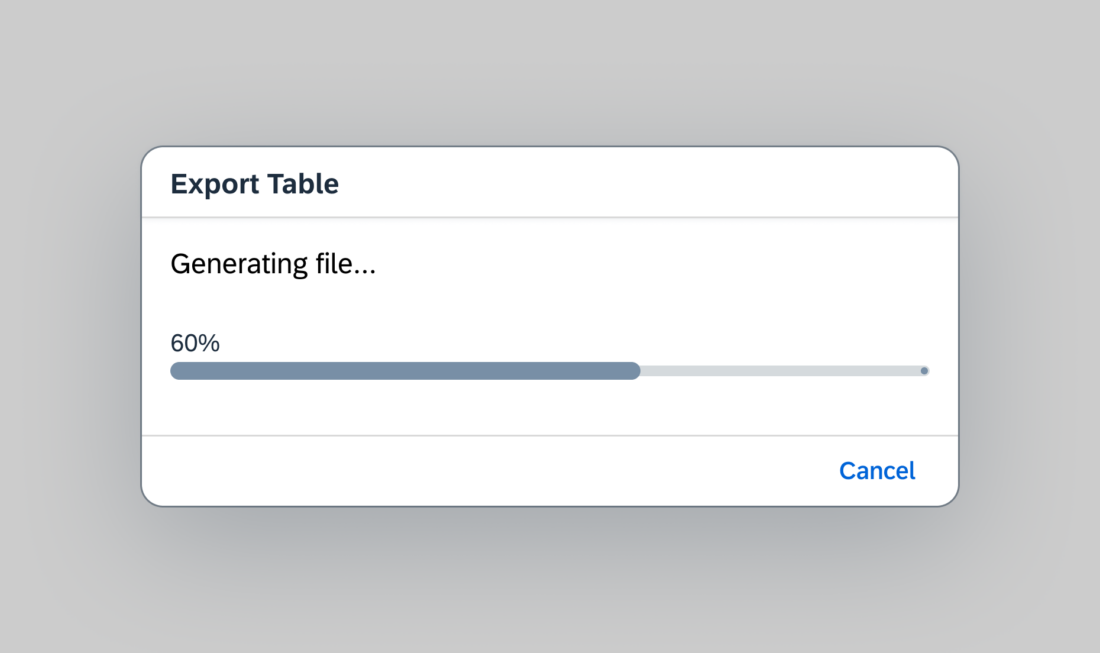
During the export, a modal progress dialog is displayed. The user can cancel the export at any time.
As soon as the spreadsheet file has been created, it is offered for download automatically.
Components
Menu Button
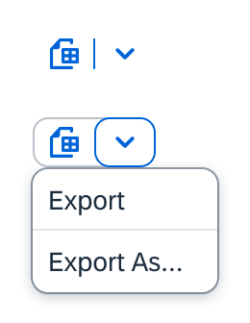
Provide a split menu button for triggering the export (for example, on the toolbar of the corresponding control).
Design the menu button as follows:
- The export icon starts the export with default settings, or custom settings chosen previously by the user in the Export As dialog.
- The dropdown arrow opens a menu with two options:
-
- Export
Exports the table with default settings, or custom settings chosen by the user via the Export As dialog.
-
- Export As…
Opens a dialog for specifying the export settings. The settings are stored until the user changes them again.
For Export As…, use the shortcut: Shift+Ctrl+E
The tooltip label of the button is “Export Table“
Export As Dialog
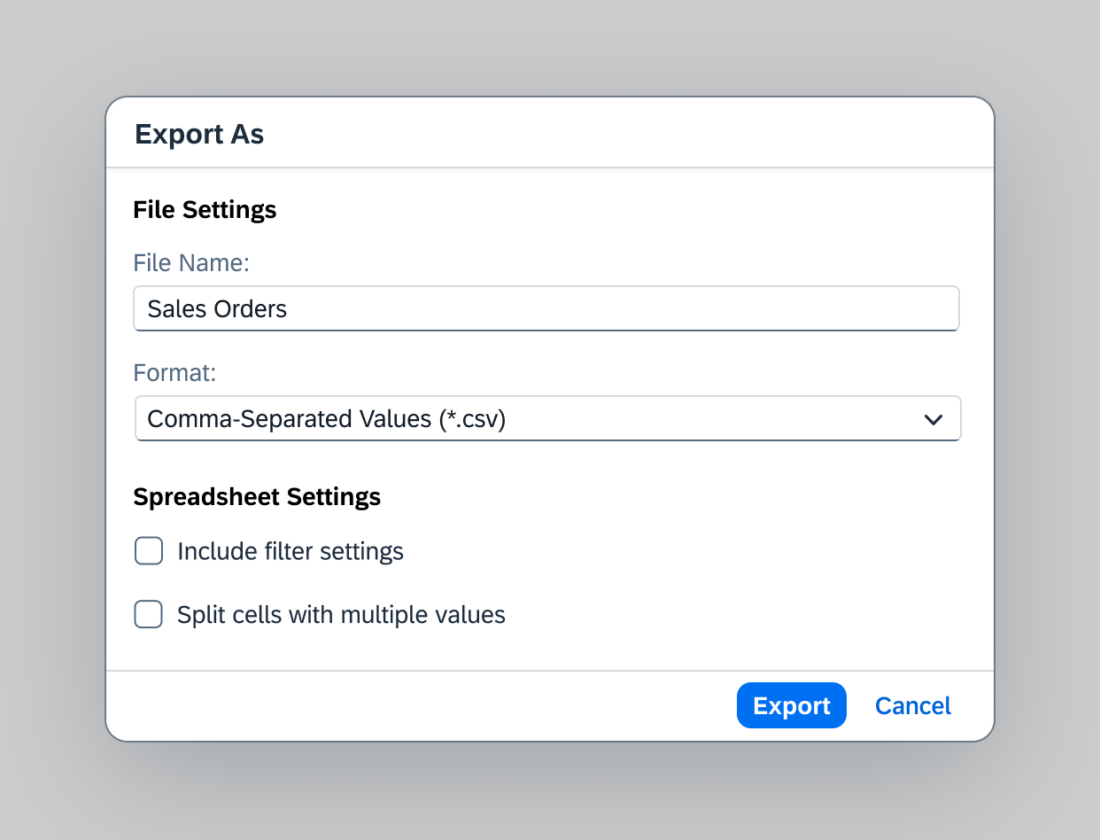
The dialog allows the users to define export settings, including:
- The exported file name
- The format for the exported file
- An option to include the current filter settings. If the user selects this option, the current filter is included on a second sheet in the exported file.
- An option to split cells with multiple values into separate columns.
Selected, the option exports data best suited for calculating and filtering it in a spreadsheet application.
When the option is unselected, the results in exported data with formatting best suited for presentations.
The primary action label is “Export” or, if cloud is enabled and selected as the destination, “Export To…”.
After the primary action is triggered, the settings are stored until the user changes them again.
Export to Cloud
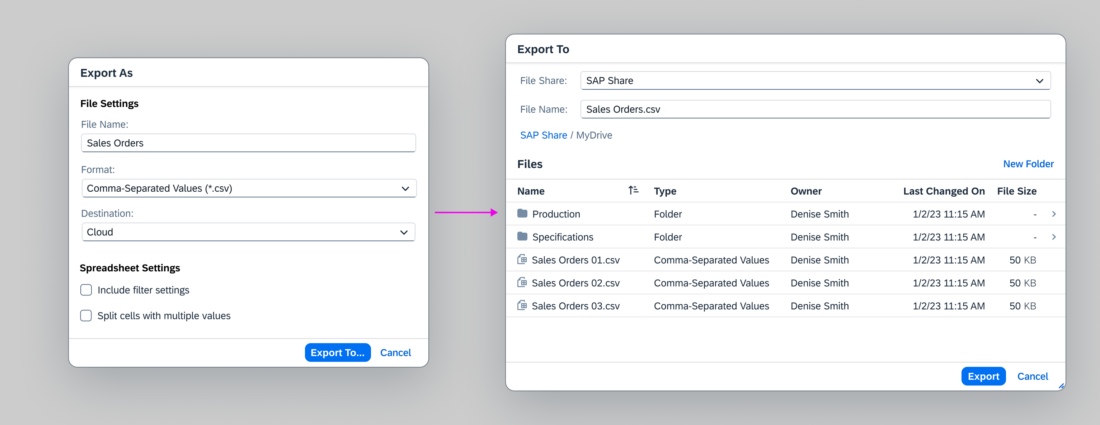
When cloud is enabled on the client’s instance, the dialog displays the Destination select field below the Format field. It opens a menu where the users can select Cloud, the default, or Local.
For the cloud destination, the primary action label in the dialog is “Export To…” and opens a cloud file browser where users choose the target location for the exported file through a remote repository.
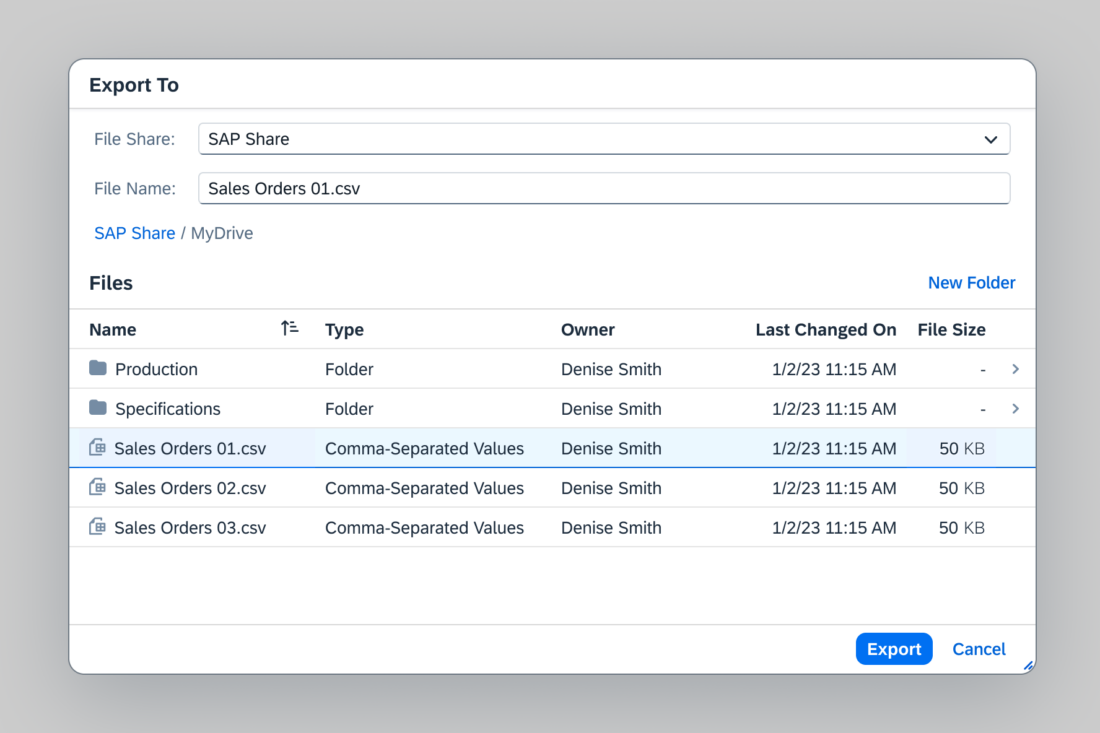
Cloud File Browser
The cloud file browser is a tool that allows users to browse through a remote repository. It can be used to export data to the cloud or import files from the cloud to an SAP instance.
The control is composed of the following:
- A file share select field
- A file name field
- A breadcrumb navigation
- A responsive table with files and folders
- A New Folder feature
- The Export finalizing action and Cancel
After the users have chosen the file format in the Export As dialog, they cannot change it via the file browser. Instead, they need to cancel the file browser and return to the settings dialog.
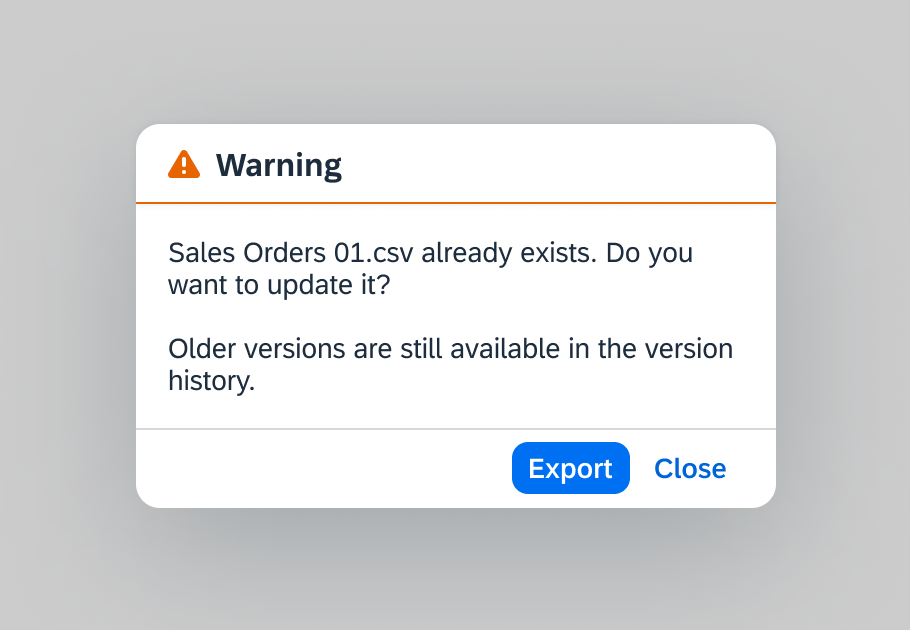
To update an existing file, users can select the file in the list and export the updated version.
Guidelines
Default Configuration
When you configure the exporter, ensure that your data is converted to a tabular representation. For example, when exporting a list item, configure the exporter to display each data point in a separate column.
For tables export the data as it is displayed on the screen:
- Export all visible columns in the same order.
- Combine data points as they are combined on the screen (for example text and ID in one cell).
- Take the view settings (sort, group, filter, …) into account.
- Use the same column header texts.
- Do not include the filter settings.
When exporting, convert non-text elements to a text-only representation. Non-text elements include icons, images, micro charts, or controls like checkboxes and buttons. Converting them to text ensures that the data is not lost in the exported spreadsheet file.
Resources
Want to dive deeper? Follow the links below to find out more about related controls, the SAPUI5 implementation, and the visual design.
Elements and Controls
- Table Overview (guidelines)
- Charts (guidelines)
- Breadcrumb (guidelines)
- Dialog (guidelines)
Implementation
- Export to Spreadsheet (SAPUI5 samples)
- Export to Spreadsheet (SAPUI5 API reference)
- Cloud File Browser (aka Cloud File Picker) (SAPUI5 samples)

 Your feedback has been sent to the SAP Fiori design team.