
- Latest Version 1.128
- Version 1.126
- SAPUI Version 1.124
- SAPUI5 Version 1.122
- SAPUI5 Version 1.120
- SAPUI5 Version 1.118
- SAPUI5 Version 1.116
- SAPUI5 Version 1.114
- SAPUI5 Version 1.112
- SAPUI5 Version 1.110
- SAPUI5 Version 1.108
- SAPUI5 Version 1.106
- SAPUI5 Version 1.104
- SAPUI5 Version 1.102
- SAPUI5 Version 1.100
- SAPUI5 Version 1.98
- SAPUI5 Version 1.96
- SAPUI5 Version 1.94
- SAPUI5 Version 1.92
- SAPUI5 Version 1.90
- SAPUI5 Version 1.88
- SAPUI5 Version 1.86
- SAPUI5 Version 1.84
- SAPUI5 Version 1.82
- SAPUI5 Version 1.80
- SAPUI5 Version 1.78
- SAPUI5 Version 1.76
- SAPUI5 Version 1.74
- SAPUI5 Version 1.72
- SAPUI5 Version 1.70
- SAPUI5 Version 1.68
- SAPUI5 Version 1.66
- SAPUI5 Version 1.64
- SAPUI5 Version 1.62
- SAPUI5 Version 1.60
- SAPUI5 Version 1.58
- SAPUI5 Version 1.56
- SAPUI5 Version 1.54
- SAPUI5 Version 1.52
- SAPUI5 Version 1.50
- SAPUI5 Version 1.48
- SAPUI5 Version 1.46
- SAPUI5 Version 1.44
- SAPUI5 Version 1.42
- SAPUI5 Version 1.40
- SAPUI5 Version 1.38
- SAPUI5 Version 1.36
- SAPUI5 Version 1.34
- SAPUI5 Version 1.32
- SAPUI5 Version 1.30
- SAPUI5 Version 1.28
- SAPUI5 Version 1.26
Design Stencils for Axure RP (Mac and Windows)
Intro
For more information about SAP Fiori design stencils in general and other tool options, see Design Stencils.
Prerequisites
To use the SAP Fiori stencils, you need to install SAP’s 72 font family and the SAP icon font on your machine.
These fonts are provided as part of the stencil download package. See Download and Installation below.
Download & Installation
Standard SAP Fiori Deisgn Stencils
- Install the Axure RP software.
- Download the design stencil set: Download the ZIP file and unzip it.
- Install font 72.
- Choose the folder Font 72 / 72_Desktop.
- Double-click each .ttf file and click Install.
- Open Axure RP and change the default font within Axure RP to font 72 by using the Widget Style Manager (Project / Widget Style Editor / Default / change font to “72”).
- Install the SAP icon font.
- Remove any former versions of the SAP icon font.
- Choose the folder Icon Fonts / …final icon package / Fonts
- Double-click the SAP-icons.ttf file, and click Install.
- Load the libraries in Axure RP: Open Axure RP and load the libraries for the stencils and icon font (tutorial).
- Optional: Embed font 72 as a web font for Axure RP web prototypes
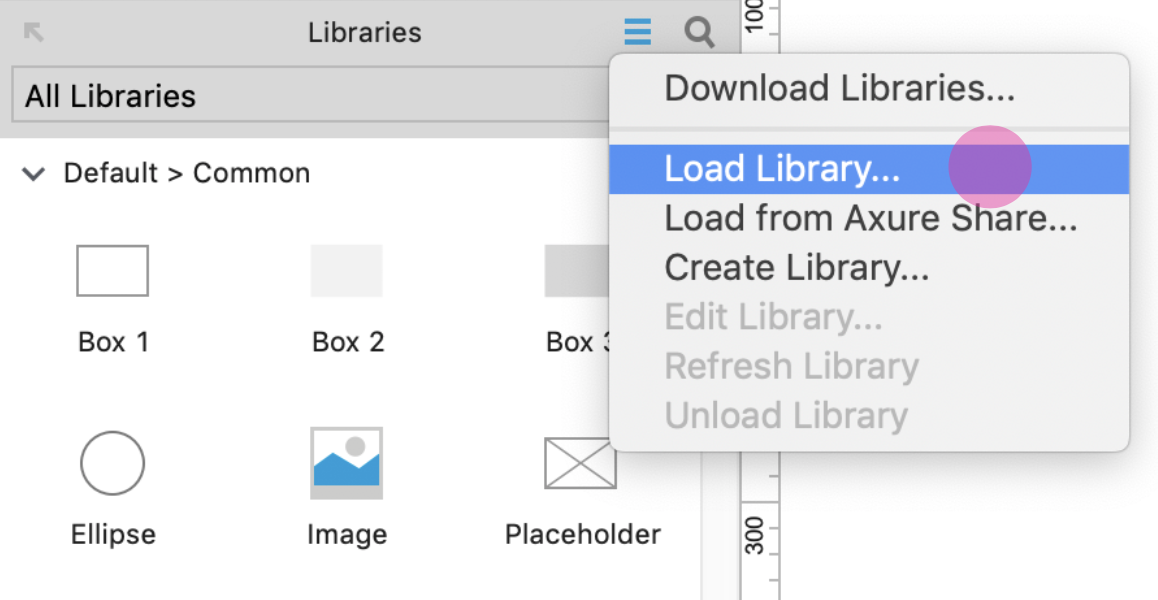
Loading libraries (1)
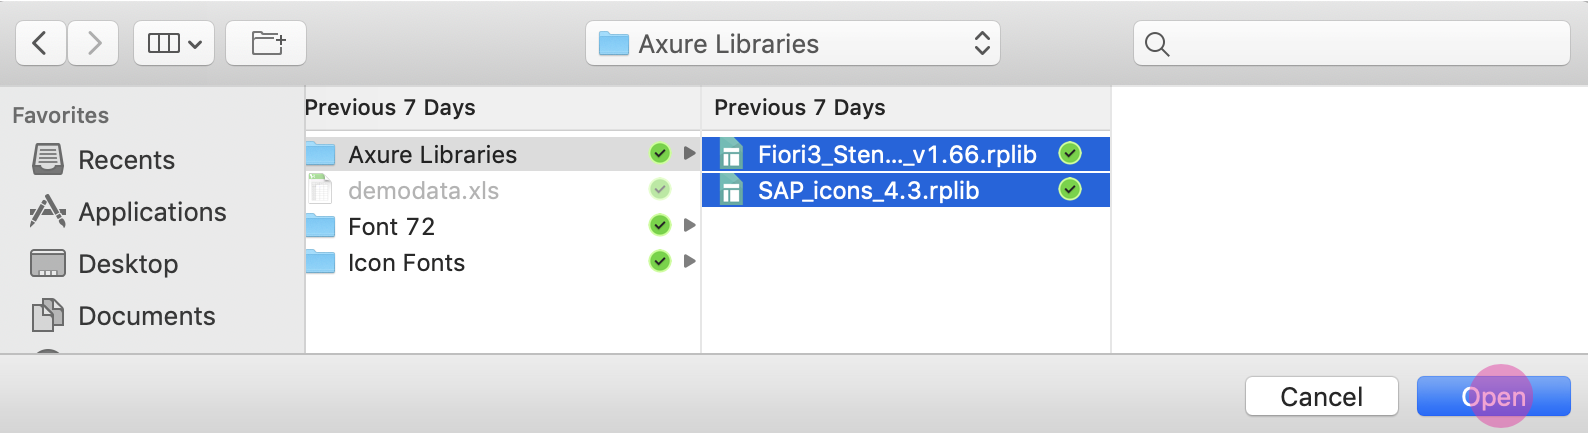
Loading libraries (2)
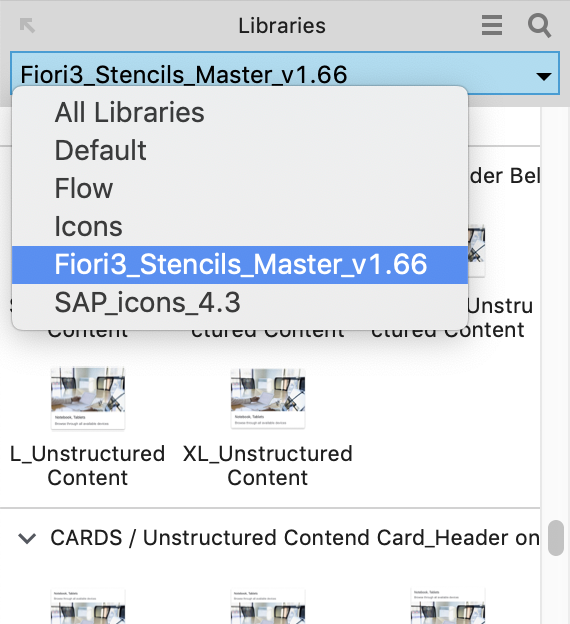
Loading libraries (3)
All the available stencils are now displayed in the library panel on the left and you can easily pull the stencil you need to your canvas board.
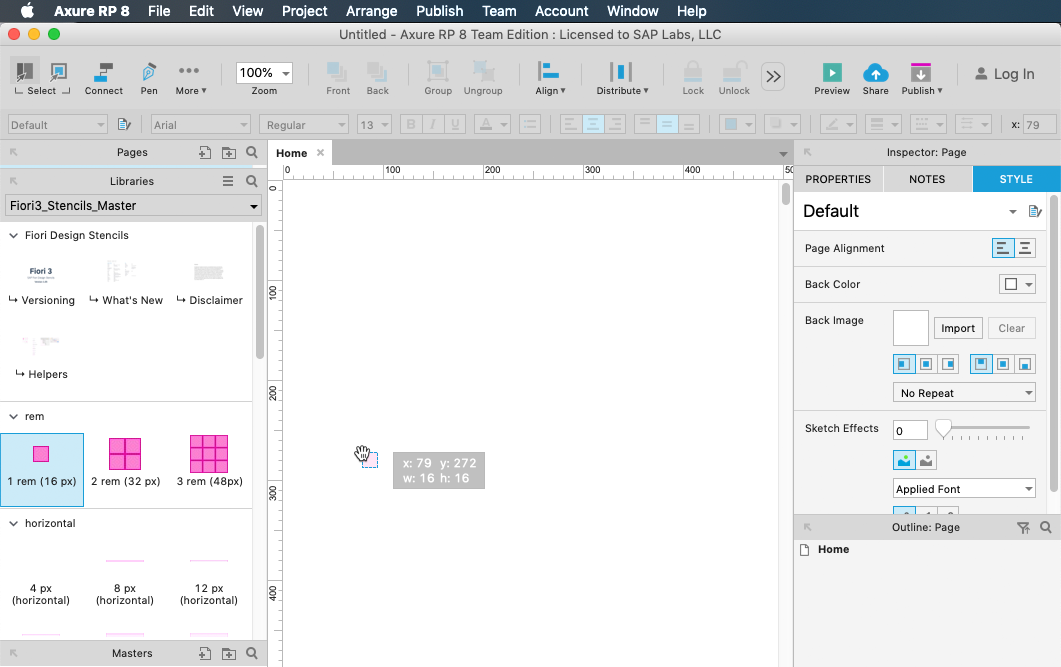
Pulling a stencil to the canvas board
Embedding Font 72 (Optional)
You can use OpenUI5 resources to make font 72 available as an embedded web font in Axure RP web prototypes.
Note that only the styles appearing within the currently implemented design are available as web fonts.
Procedure
- Choose Publish / Generate HTML Files… and select Web Fonts in the dialog menu.
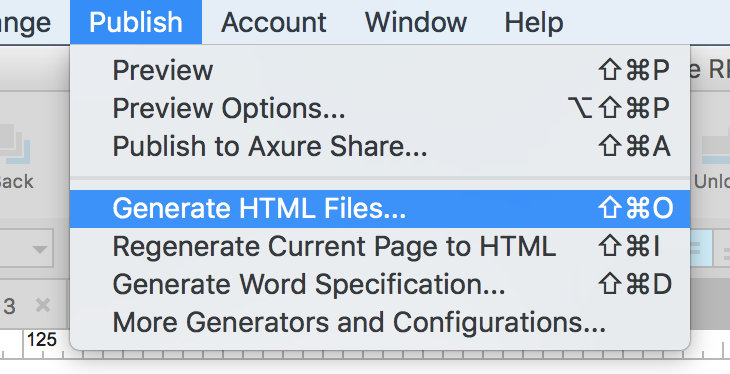
- Add the regular font file by pressing the green “+” button. Name the file “72-Regular”.

- Select the @font-face radio button.

- Paste the following code that specifies the web font format linked to the font provided by OpenUI5:
font-family: '72-Regular';

src: url('fonts/72-Regular.woff') format('woff'),

url('fonts/72-Regular.woff2') format('woff2'),url('https://openui5nightly.hana.ondemand.com/resources/sap/ui/core/themes/sap_belize/fonts/72-Regular.woff') format('woff'),url('https://openui5nightly.hana.ondemand.com/resources/sap/ui/core/themes/sap_belize/fonts/72-Regular.woff2') format('woff2'),

local('72-Regular');
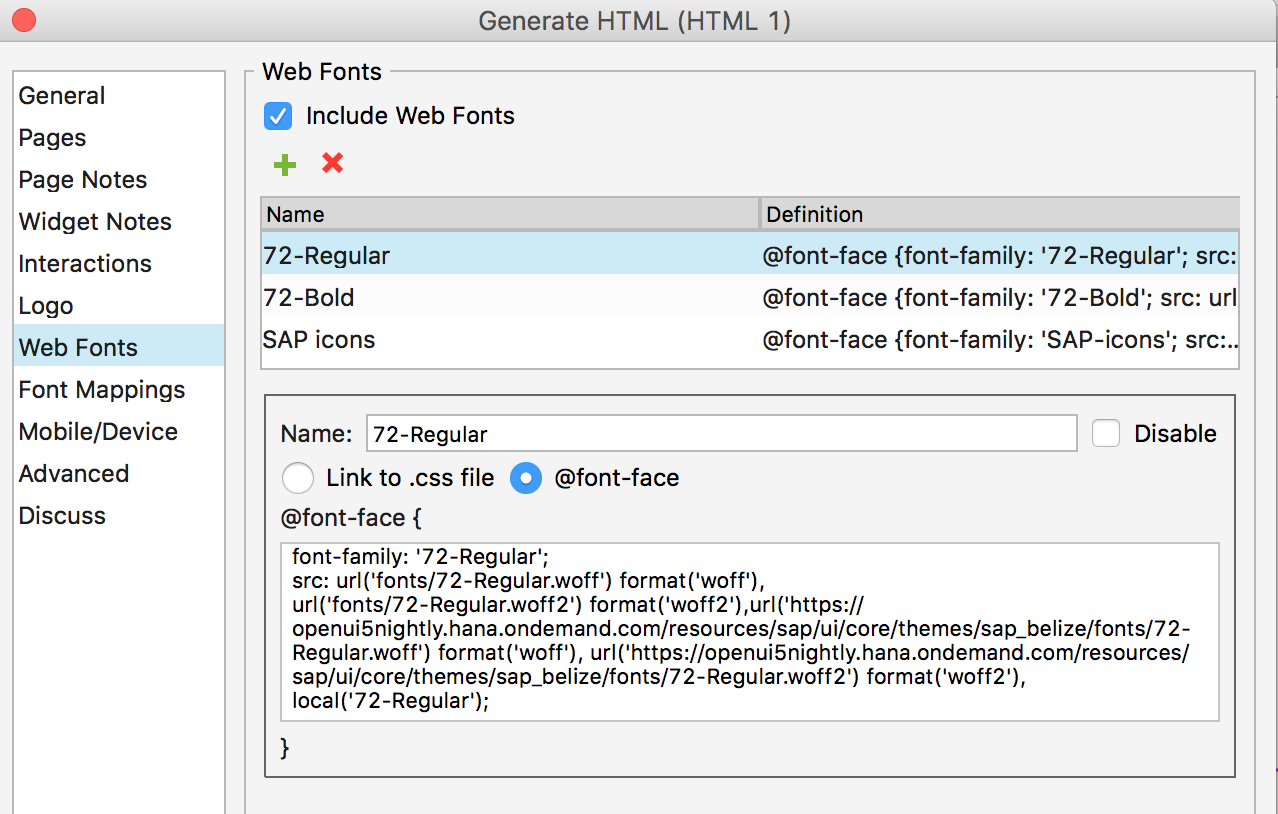
- Add the bold font file by pressing the green “+” button again. Name the file “72-Bold”.
- Select the @font-face radio button and add the following code:
font-family: '72-Bold';

src: url('fonts/72-Bold.woff') format('woff'),

url('fonts/72-Bold.woff2') format('woff2'),url('https://openui5nightly.hana.ondemand.com/resources/sap/ui/core/themes/sap_belize/fonts/72-Bold.woff') format('woff'),

url('https://openui5nightly.hana.ondemand.com/resources/sap/ui/core/themes/sap_belize/fonts/72-Bold.woff2') format('woff2'),

local('72-Bold');
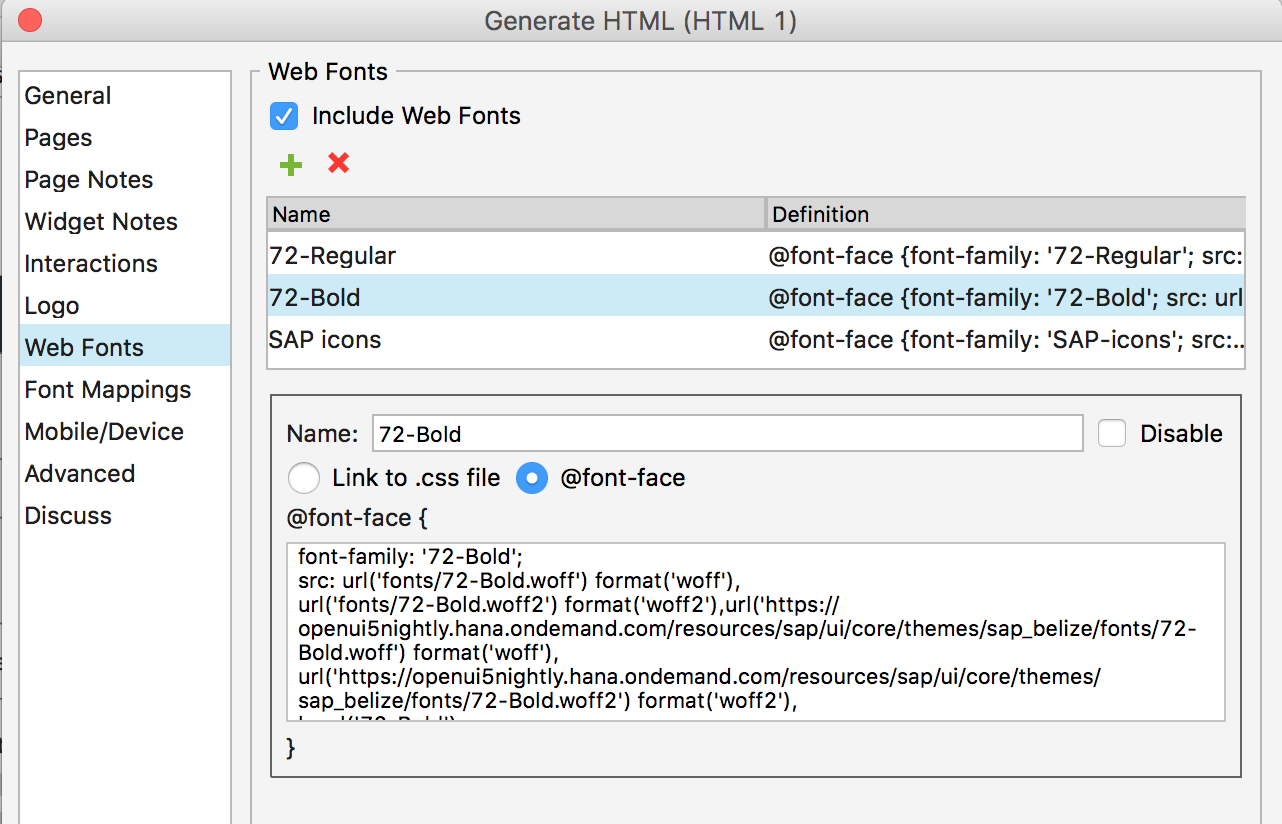
- Map the default font to the 72 embedded font. This will ensure that you generate the correct CSS with the 72 font family.
For more information on font mapping in Axure RP, see Web Fonts and Font Mapping on the Axure RP website.
Top Tips
To learn about using Axure RP, see the tutorials at www.axure.com/learn.
 Your feedback has been sent to the SAP Fiori design team.