|
|
Term
|
Explanation
|
Action Placement
|
Action placement is an important focus in design. You place the action as close to the information that it acts upon so users find them where they need them.
However, because the SAP Fiori elements framework determines where the action is displayed, application developers do not specify the placement with annotations.
For example, they may not be familiar with what you mean by a “finalizing action” in a list report. To implement this type of action, they use the annotation property determining=true.
Below, you can find additional examples of the differences between designer terminology for actions and how the application developers implement them.
| Design Terminology |
Application Development Annotations |
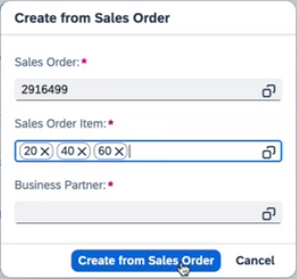
| A finalizing action that leaves the current state or navigates away from the page. |
Determining = true |
An action in a table row or line item that:
- Affects an individual table row or line item.
- Triggers functionality or toggle states.
|
Inline = true |
A table action that:
- Affects the table.
- Is displayed in the table toolbar
|
Determining = false
False is the default value for the property. |
A global action in the toolbar header that
- Changes a state or mode
- Opens other related apps or tools
|
Not applicable. Implementation requires an extension. |
|
Asynchronous Actions
|
Actions that the backend can execute sometime after the users initially trigger it.
Users can continue to work on the UI without any interruption to their flow.
Also see: Synchronous Actions |
Annotations
|
Application developers configure the required controls and their behavior with annotations that provide information about the application data.
For example, annotations and their properties control the:
- Display and position of columns in a table
- Sort order for the table rows
- Measures, dimensions, and sort order in a chart
- Enablement of a navigation button always or only after the user has selected an item
Application developers can also configure the required controls and their behavior through the manifest file. |
App States
|
App states include the:
- Inner app (iApp) state for navigating within the application
- External app (xApp) state for navigating from one app to another
IApp State
When a user navigates within an application, the iApp state stores all the information to retrieve for a specific URL when the user returns to it, for example:
- Filters applied
- Visible table columns
- Sort orders applied
The user can return to the URL via
- A refresh
- Back navigation
- A tile created with Save as Tile
- A link shared with Send email
XApp State
When a user navigates from one source app to another target app, the xApp state stores all the information from the source app to pass the target app, for example:
- Filter values
- Values of the fields in the selected rows
- Page context
- Sort order of the table in the source app
- Other aspects of the presentation
Also see: Navigation |
Content Switches
Icon tab bar
Segmented button
Select control |
These design terms may not be meaningful to developers because they don’t specify the UI control that lets the user switch among views in a list report.
Instead, the SAP Fiori elements framework automatically renders the switch control based on the number of business objects shown in the views and the number of views:
| Content Switch |
Number of Business Objects |
Number of Views |
Example |
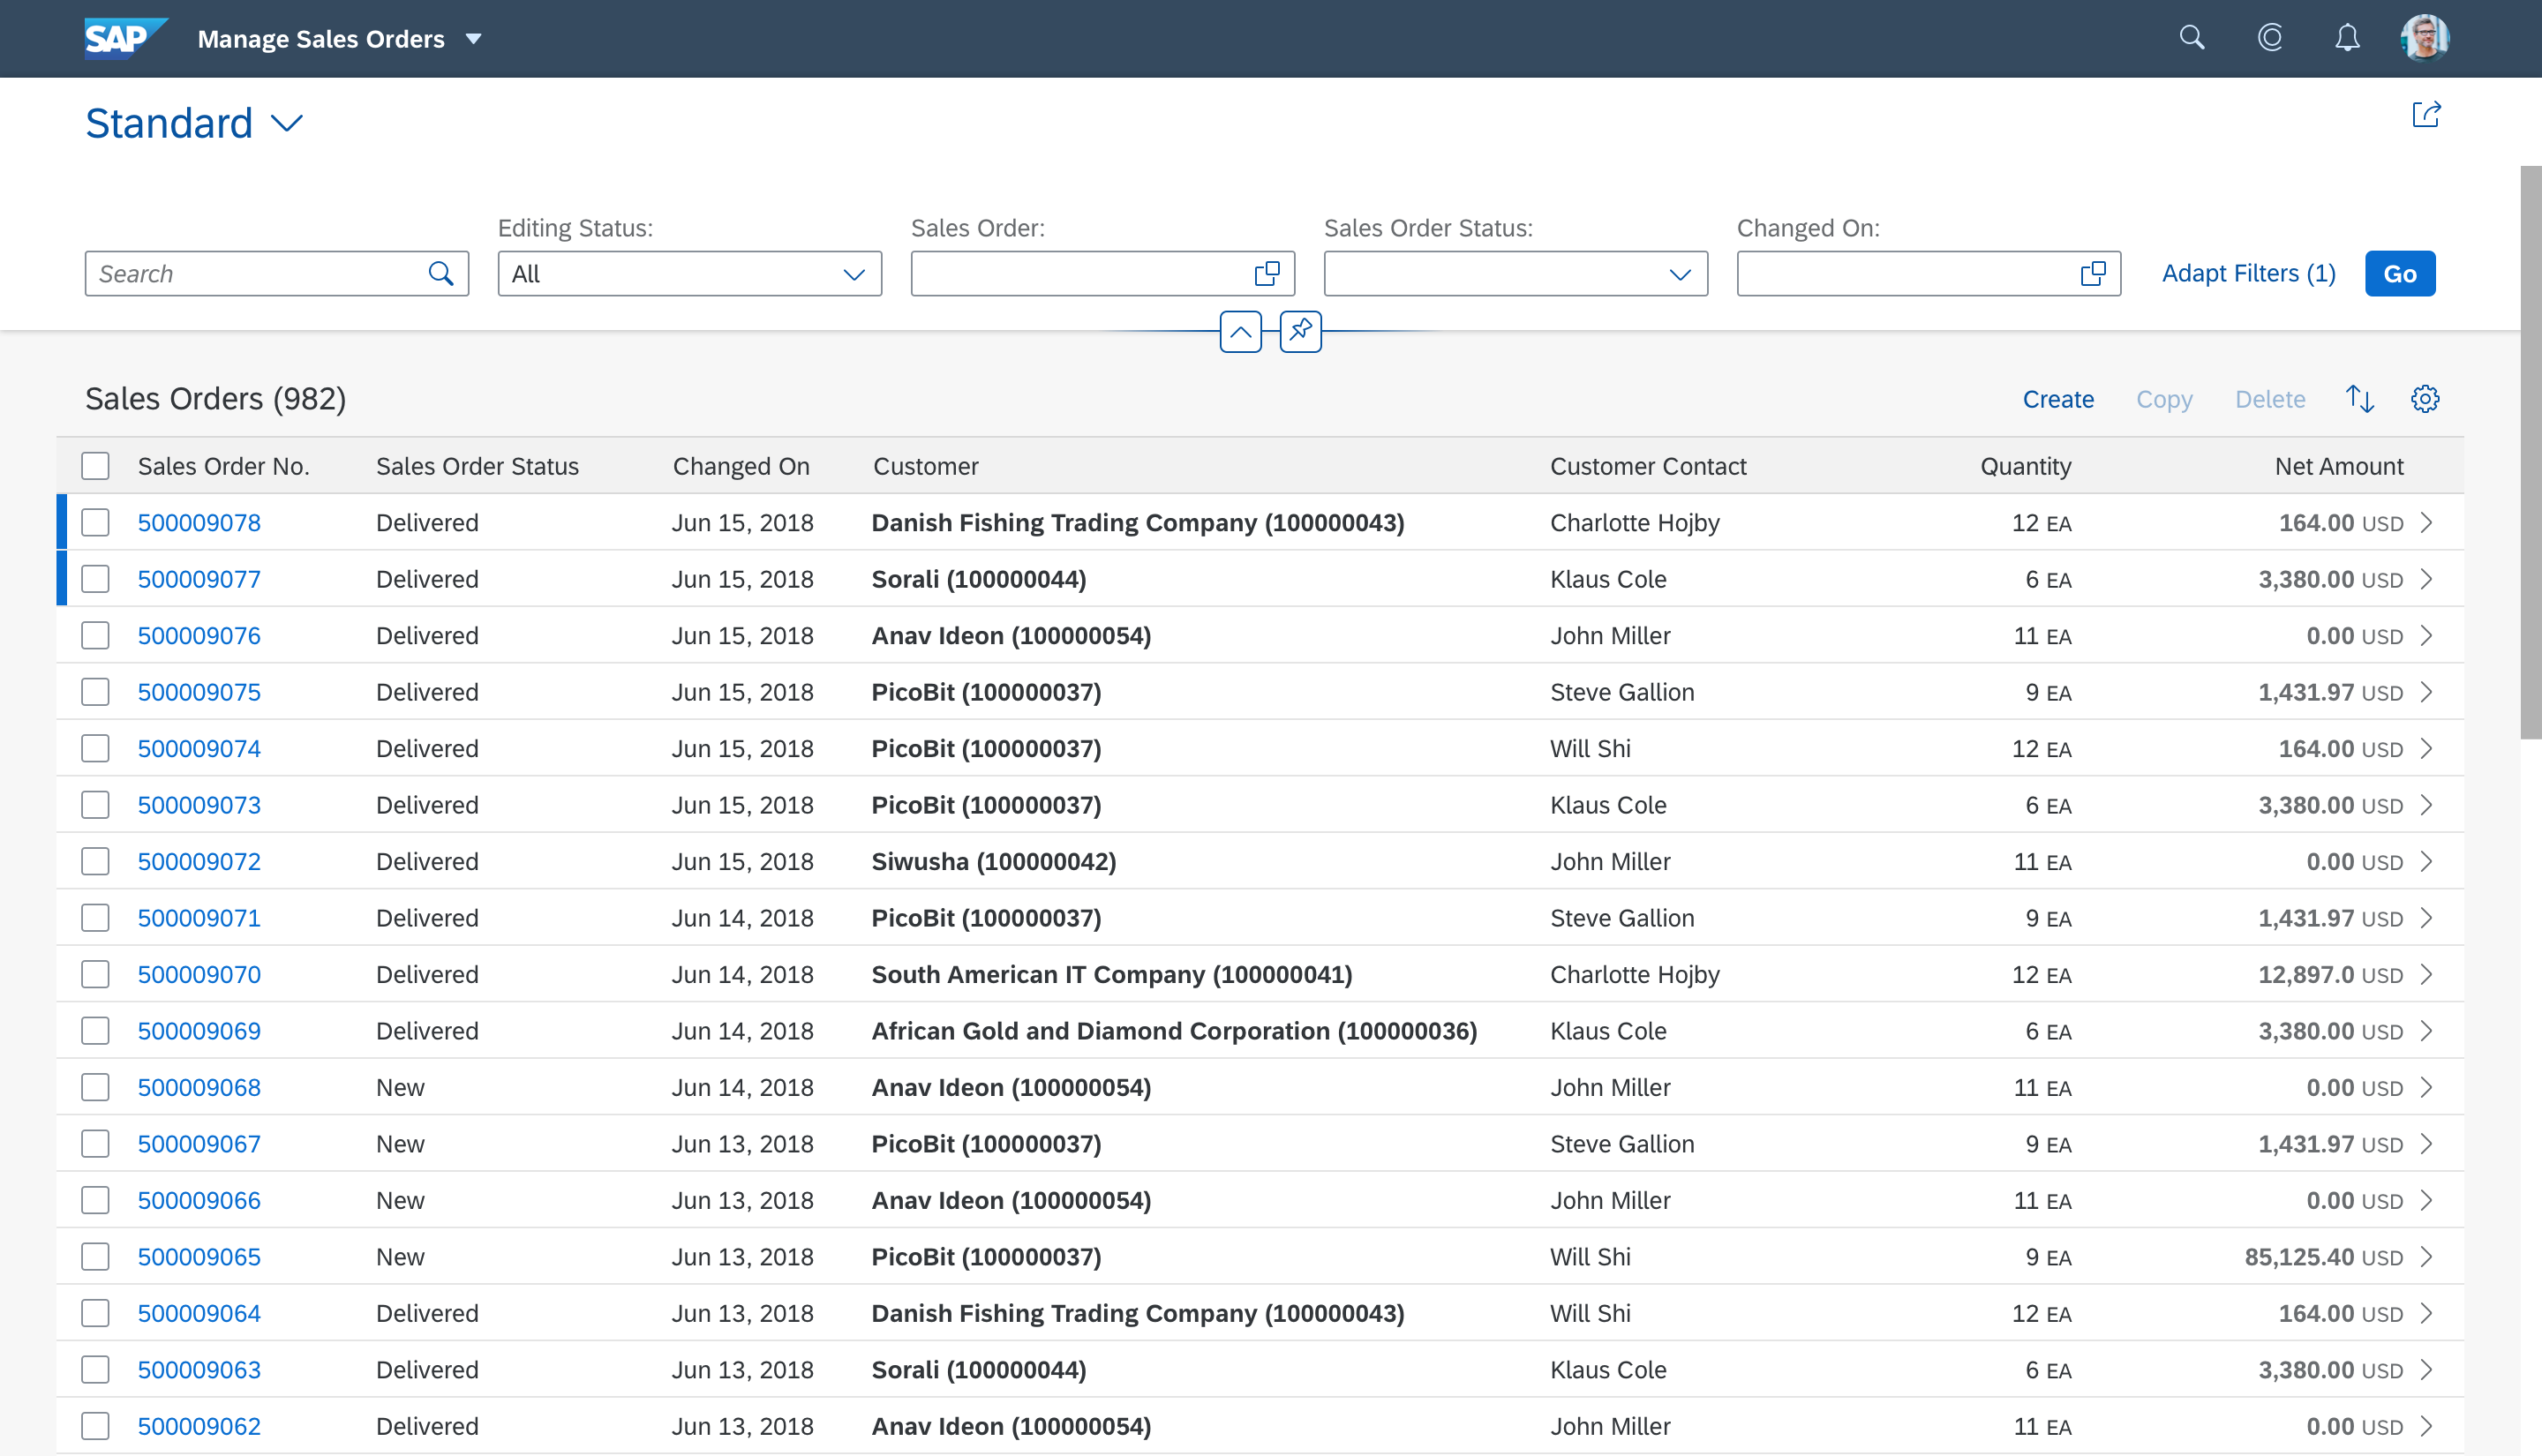
| Segmented button |
1 |
3 maximum |
Business object: sales orders
Each view shows the sales orders prefiltered according to a different status: draft, estimated, ordered, packed, delivered, completed |
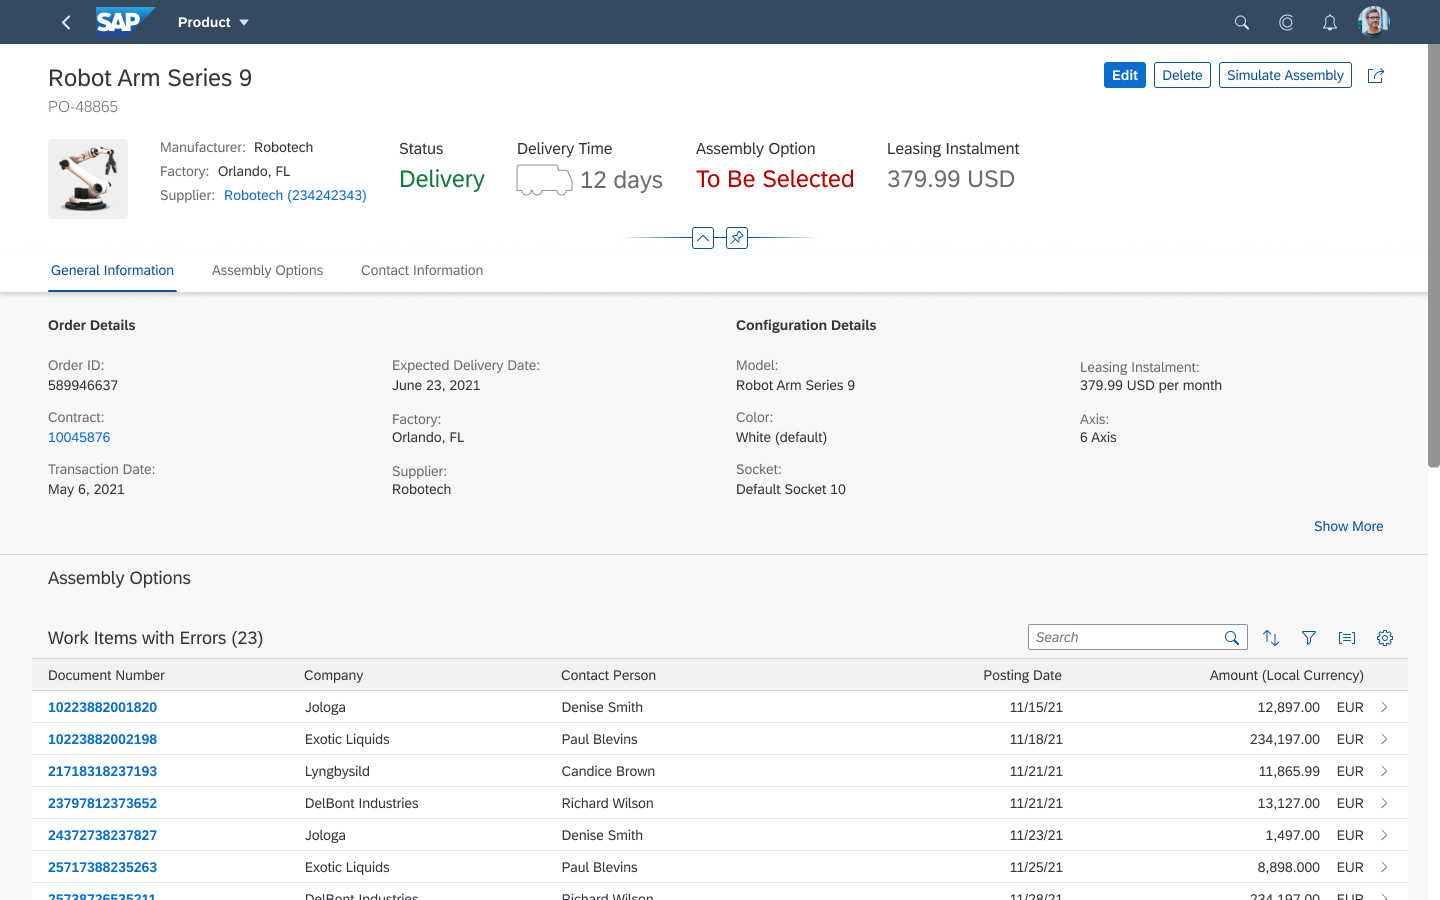
| Select control |
1 |
4 or more |
Business object: sales orders
Each view shows the sales orders prefiltered according to a different status: draft, estimated, ordered, packed, delivered, completed |
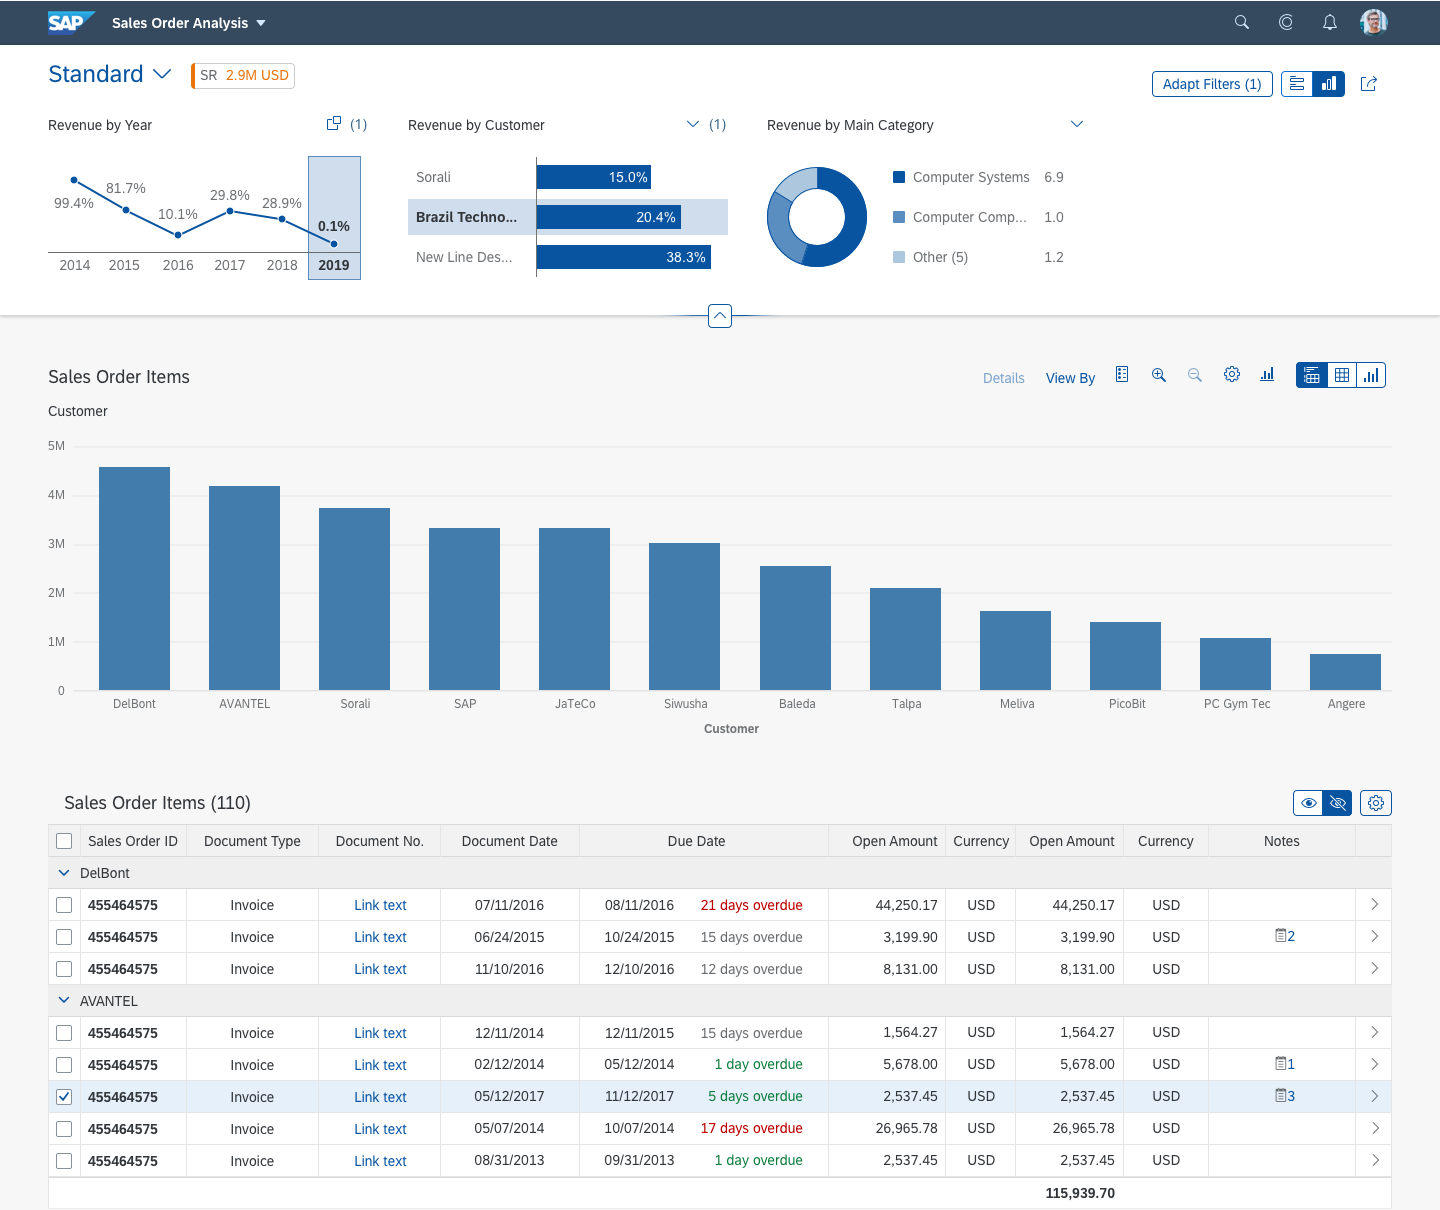
| Icon tab bar |
More than 1 |
More than 1 |
Business objects: customers, deliveries, invoices, payments
The list report shows a customer overview where each view shows the deliveries, invoices and payments. |
For more information, see List Report – Content Area. |
Entity
|
An entity in a data model corresponds to a business object in an application.
For example, for a sales order processing application, the sales order is an entity and the sales order item is its child entity in the data model.
This parent-child association in the data model lets users navigate from the sales order to the sales order item in the application interface. |
Facet
|
As a designer, you use the word facet for a UI element specific to the object page header.
Developers use the word facet more generically to describe a unit for building for the object page so don’t be surprised to hear application developers speaking about “facets” for parts of the object page outside of the header.
For example, they use the annotation ReferenceFacet for what designers call a subsection and CollectionFacet for a section that contains all the subsections.
When you talk to application developers about a “facet,” specify where you want it to display. |
Column in a Table
|
Application developers probably know this term, but may not connect it with the annotations required for columns.
To configure a table, application developers use the LineItem annotation and the datafield property, where each property displays as a column in the table.
For more information, you can refer them to Defining Line Items. |
Manifest
|
The main configuration file for an application where application developers define settings for the application and the interface behavior.
For example, in the manifest, an application developer can configure:
- A filter field to be displayed on the UI as both a compact filter field in the filter bar and a visual filter.
- A table to allow the selection of one or more table rows.
Application developers can also configure the required controls and their behavior through annotations. |
Navigation: Internal, External, Outbound, Inbound
|
Navigation within an app — for example, from a list report to an object page to a subobject page: The application uses an inner app (iApp) state to store the page state and context and restore the same page state and context:
-
- After users navigate away from the page and, then, return to it with a back navigation.
- When users go to the page from a tile created with Save as Tile or from a link shared with Send email.
Navigation across applications — for example, from Managing Sales Orders to Managing Deliveries — uses the external app (xApp) state to pass the context from the source app to the target app.
Just as an outbound train leaves the station and an inbound train arrives at the station:
-
- Outbound navigation is when the user leaves an analytical list page, list report or object page in the current app for another app.
- Inbound navigation is when the user arrives at the analytical list page, list report, or object page in the current app from another app.
|
OData Services
|
OData (Open Data Protocol) is a standard protocol used by the backend to communicate with the user interface.
OData services deliver one or more functionalities or capabilities on the backend system, such as the retrieval of data or execution of a series of actions. The code for the services can be reused for various purposes by different client applications.
SAP Fiori elements support different versions of OData, as their names indicate:
- SAP Fiori elements for OData version 2 (V2)
- SAP Fiori elements for OData version 4 (V4)
|
Paginator Buttons
|
Known by designers as paging buttons ( ) in the object page header toolbar, they let users navigate to the previous or next object page shown in the list report.
For more information, see: Header Toolbar |
Section
|
This designer term may not be meaningful to some application developers because they do not use it in their annotations.
Instead, to build an object page section, application developers use different types of facet annotations. They start with a facet, add a reference facet, and add other controls for a form, table, or chart.
For more information, you can refer them to Defining and Adapting Sections. |
Semantic Key Field
|
This field is the unique identifier for an object used by the search to find the object. |
SideEffects
|
When a user edits an object, changes to the object can impact other object properties.
For example, in an employee record, changing the value for City in the employee address makes the value in the State or Region field invalid. |
Smart Controls and Control Library
|
These UI controls can read both the data from the backend and the annotations on that data.
Consequently, they take the annotations into account in their rendering and behavior.
For example, a smart field isn’t displayed on the UI if it’s marked with the annotation to hide it, UI.Hidden.
SAP Fiori elements for OData V2 uses smart controls.
SAP Fiori elements for OData V4 uses a different control library. |
Synchronous Actions
|
An action that the backend executes immediately after the users trigger it and, thus, blocks them from performing other actions on the interface until the execution is complete.
Also see: Asynchronous Actions |
textArrangement
|
An annotation property that controls the display of text associated with an ID field, such as country and country code. It can set the display of:
- Only the text: Germany
- First the text, then the ID: Germany (001)
- First the ID, then the text: 001 (Germany)
|


 Your feedback has been sent to the SAP Fiori design team.