Action List Item

The action list item control lets the user trigger actions directly from a list. It is used mainly within dialog boxes and popovers.

Action list items
Action list items

The following figure shows examples of popovers for a chart with one and three related actions.

Chart popovers using action list items

Behavior and Interaction

List item behavior and interaction is similar for all list item variants and is therefore described in the list overview article.

Resources

Want to dive deeper? Follow the links below to find out more about related controls, the SAPUI5 implementation, and the visual design.

Elements and Controls

Implementation

Single Planning Calendar

The single planning calendar is a scheduling control that displays the calendar of a single person or resource over a day, work week, or week. Users can view appointments, create new appointments, and delete appointments.

Single planning calendar

Usage

Use the single planning calendar if:

  • You want to enable users to schedule or monitor the calendar of a single person or resource.
  • You want to offer multiple calendar views (day, work week, week).

Do not use the single planning calendar if:

  • You want to compare objects of the same type over a given period (for example, appointments for multiple persons or resources). In this case, use the planning calendar.
  • The main use case is to schedule all-day appointments, and you don’t need to see an hour axis. In this case, use the planning calendar.
  • You need a complex graphical representation or planning application involving activities, resources, hierarchical project structures, relationships, and so on. In this case, use the Gantt chart.

Responsiveness

The single planning calendar is responsive and supports the cozy and compact density modes.

Overflow Behavior

On smaller screens, the custom toolbar utilizes the overflow behavior of the standard SAP Fiori toolbar.

If the available actions do not all fit into the available space on the toolbar, an overflow menu button appears on the right of the toolbar. The rightmost actions move into the overflow menu first.

Single planning calendar - Size L
Single planning calendar - Size M
Single planning calendar - Size S

Components

The single planning calendar consists of the following components:

  1. Header
  2. Toolbar
  3. View switch
  4. Navigation
  5. Date strip
  6. All-day appointment
  7. Timeline
  8. Appointment
  9. Calendar grid
  10. Now marker
Components of the single planning calendar
Developer Hint
To prevent waiting time, app developers should load the sap.ui.unified library.

1. Header

The header contains the toolbar and the navigation.

2. Toolbar

The toolbar consists of the calendar title (optional) and the toolbar actions, including a default view switch. You can add other app-specific actions that are relevant for your use case (such as creating an appointment, search, filter, settings, showing the calendar legend, and so on). Always place actions that affect the entire calendar in the toolbar.

3. View switch

The view switch allows the user to switch between different time intervals. The default views are day, work week, week, and month. The app developer can choose which views to include, depending on the use case.

In the month view, all appointments for the respective day have the same width and height. Each grid cell can hold 4 appointments in compact mode and 3 appointments in cozy mode. The remaining appointments can be accessed with a # More link. In month view, all-day appointments look and behave like regular appointments.

Month view
Month view

You can also create custom views by setting a different number of visible columns in the grid. We only recommend doing this if your use case really requires it. You must also ensure that any custom views are responsive. For anything over 7 days, provide an alternative view for size S.

Custom view 10 days - size L
Custom view 3 days - size S
Developer Hint
If no view is set by the application developer, the single planning calendar renders the week view. If the application developer sets only the day view, the week view is not visible.

4. Navigation

The navigation area contains back and forward arrows, the Today button, a date interval link, and the date strip. Clicking the Today button takes the user to the period containing the current day.

5. Date strip

The date strip is the horizontal axis of the calendar grid, showing the currently visible day or days. Non-working days are a darker color.

6. All-day appointment

All-day appointments are appointments that take up 24 hours. They are located in a dedicated area below the date strip and above the first hour of the timeline.

The option to create all-day appointments must be added at application level. Consider using a switch or checkbox that automatically sets the start and end time of the appointment to 00:00. We recommend reflecting this in the UI for creating the appointment as well. For example, offer a date picker instead of a date/time picker for selecting the start and end of the appointment (as shown in the sample dialog).

There is no limit of the height of the all-day appointments area. However, if your use case involves a lot of all-day appointments (and their area takes up most of the screen), consider using the planning calendar instead.

7. Timeline

The timeline is the vertical axis of the calendar grid, showing the hours.

8. Appointment

Each appointment can have an icon or image, a title, and a subtitle. If there is not enough horizontal space for the text, it is truncated. If an appointment has an icon, the icon remains visible as long as there is space for it, even if that does not leave enough space for the title. If there is not enough vertical space, the subtitle is not shown.

Appointments vary in height, depending on their duration, and in width, depending on how many appointments take place simultaneously. The minimum height of an appointment corresponds to a 30-minute appointment.

The app can set up to 20 types of appointments. Each type has its assigned color. Always choose appointment types with contrasting colors. Make sure that each type is also represented as a text, and not only by the color.

9. Calendar grid

The calendar contains the appointments and all-day appointments, and is controlled by the currently selected view. Non-working days have a darker background color in the calendar grid.

10. Now marker

The now marker is a horizontal line through the calendar grid, which indicates the current time. The current time is visible on the timeline. If the current time falls within 15 minutes of a full hour, it replaces the full hour.

Appointment structure
Now marker - Current time replaces the full hour

Single Planning Calendar Legend

You can highlight special days within the calendar. A legend is used to define the meaning of the highlights. Users open the legend using the legend icon button in the toolbar (  ). Like all other actions in the toolbar, the app developer must add the legend button explicitly.

For details, see the legend sections for the Planning Calendar and Calendar.

Guidelines
Ensure that colors are used consistently within your product area.
Single planning calendar legend

Behavior and Interaction

Date Picker

The visible period is indicated with the date interval link in the navigation. Clicking the link opens a date picker, which helps the user to navigate quickly to a specific day or week.

Creating an Appointment

We recommend offering a Create action in the toolbar.

The UI for creating the appointment must be implemented at app level. The control provides only the underlying functionality for creating appointments. For most use cases, a dialog works best and is recommended (see sample dialog below).

Viewing Appointment Details

The UI for viewing appointment details must be implemented at app level. The control provides only the underlying functionality for displaying appointment details. We recommend using a popover to keep the context for the user (see sample popover below).

Working Hours

You can opt to set working hours in the single planning calendar (properties: startHourendHour). The non-working hours then have a different background and can be hidden (property: fullDay). You can also give the user the option to toggle between working and non-working hours. We recommend offering a toggle button in the toolbar (the button must be added by the app team).

Sticky Header

To keep the context when the user scrolls down the calendar, the header area of the single planning calendar can remain fixed at the top of the screen (property: stickyMode).

At app level, you can choose to have the entire header area sticky (value: All) or only the Navigation area (value: NavBarAndColHeaders).

Drag and drop

You can enable drag and drop for moving appointments (property: enableAppointmentDragAndDrop). Moving an appointment changes its start and end times (for example, if an appointment is scheduled from 1:00-2:00 PM, the user can drag it and change the time slot to 2:00-3:00 PM). When dragged, the appointment is shown as a ghost element on the mouse cursor. A placeholder indicates the target drop area.

Appointments can also be dragged from or to the area for all-day appointments. When the user drags an all-day appointment to the planning area, a placeholder shows the duration of the appointment after dropping (default = 1 hour). Similarly, dragging a regular appointment to the all-day appointments area transforms it into an all-day appointment (default = 1 day).

For desktop devices, you can also enable the following options:

  • Allow users to create new appointments by clicking, dragging, and releasing on an empty space in the content area (property: enableAppointmentsCreate).
  • Allow users to change the duration of an appointment by clicking and dragging one side of the appointment (property: enableAppointmentsResize).
Drag and drop
Drag and drop
Drag and drop into the all-day appointments area
Drag and drop from the all-day appointments area

Resources

Want to dive deeper? Follow the links below to find out more about related controls, the SAPUI5 implementation, and the visual design.

Elements and Controls

Implementation

Smart Field

The smart field creates different user input controls and their read-only equivalents based on an OData (Open Data Protocol) service and its annotations. It comes with additional built-in features, such as autocomplete and suggestions, value help dialogrecently used and recommended valuesvalidation, and message handling.

Information
The smart field is only available for OData version 2.

When to Use

Use the smart field if:

  • You use an OData service for your app (OData version 2 only).
  • The feature set of the smart field fits your app. In this case, the smart field is faster to implement.
  • You use the smart table and your app is not performance-critical. The smart field offers more flexibility than the controls provided directly by the smart table, especially for editing.
  • You use a smart form.

Do not use the smart field if:

  • You use a different technology to OData version 2. Use the corresponding controls directly.
  • You need a different control for entering or displaying data, such as multi input, a multi combo box, step input, a radio button, or a title. In this case, use the corresponding control directly.
  • You need a different dialog for offering value help, such as the select dialog or table select dialog.
  • You use the smart table and your app is performance-critical. In this case, the controls offered directly by the smart table offer less flexibility but better performance.

Components

The smart field consists of a basic UI element and an optional label. The following UI elements are available:

 For details, see the corresponding guideline topics. 

User Input Control

The smart field chooses the control automatically based on the data type (Edm type) and annotations of the OData service and additional properties. The following controls are used:

Read-Only Edit Edm Types / Annotations / Properties Comment
Single-line text Text Input field Edm.String

Configuration: controlType, value: input

Combo box Edm.String

Configuration: controlType, value: dropDownList

Select Edm.String

Configuration: controlType, value: selection

Multi-line text Text Text area Edm.String

MultiLineText

Decimal numbers Text

Object number

One or two input fields
(for number and unit)
Edm.Int16, Edm.Int32, Edm.Int64,
Edm.SByte, Edm.Byte,
Edm.Single, Edm.Float, Edm.Double,
Edm.Decimal
Precision, Scale
Status information Object status Edm.String

criticality, criticalityRepresentationType

Text and ID Text

Object identifier

Object status

Input field TextArrangement

controlProposal

displayBehavior

textInEditModeSource, sap:text,
fetchValueListReadOnly

The following patterns can be selected via displayBehavior:

  • Text (ID)
  • ID (Text)
  • Text
  • ID
Links
(with/without quick view)
Link

Smart link

Edm.String

IsURL, url

semanticObjectController

Dates Text Date picker Edm.DateTime

sap:display-format=”Date”

IsCalendarDate

Configuration: controlType

Dates and times Text Date/time picker Edm.DateTime

Edm.DateTimeOffset

Times Text Time picker Edm.Time
Fiscal periods Text Input field IsFiscalYear, IsFiscalPeriod,
IsFiscalYearPeriod,
IsFiscalQuarter, IsFiscalYearQuarter,
IsFiscalWeek, IsFiscalYearWeek,
IsDayOfFiscalYear
Amounts with currencies Text One or two input fields ISOCurrency or sap:unit with sap:semantics=”currency-code”
Phone numbers Text Input field IsPhoneNumber
Email Text Input field IsEmailAddress
Boolean Checkbox Checkbox Edm.Boolean
Text Combo box Edm.Boolean

valueList

displayBehavior

The text in display mode can be influenced via displayBehavior:

  • Yes/No
  • True/False
  • On/Off
Guidelines

  • Set a default value whenever appropriate (annotation: text, property: value).
  • To show a static unit of measurement, use a description (annotation: text).
  • To display a text and ID in the same place, use the format Text (ID) wherever possible. Use another format only if displaying the text doesn’t make any sense. Be careful when using the text arrangement options in tables: end users will only be able to sort, group, or filter based on the ID, even if the ID isn’t visible.
  • If you are not using the smart field within a smart form or smart table, label the smart field with a smart label (annotation: label, properties: textLabel, showLabel). The standard label doesn’t know the inner structure of a smart field.
  • You can set a tooltip (annotation: QuickInfo), but this should usually be avoided. See Using Tooltips.
  • If data entry is expected in a specific format, set a placeholder (property: Placeholder).

Developer Hint
Performance: Using the TextArrangement annotation to display both the text and ID (in any order) triggers two requests to the back end.

Behavior and Interaction

Context

You can use the smart field in different contexts
(property: controlContext):

  • Standalone
  • Within a form (depending on the form layout)
  • Within a table (depending on the table type)

The context influences:

  • Labels: In most cases, forms provide the label automatically.
  • Empty values in display mode: In forms, empty values are shown as a dash. In tables, the field remains blank.
  • How units of measurement are displayed
Guidelines

  • If the width is not handled by the context, set a meaningful width for the smart field, based on the expected data (property: Width).
  • If you use a “standalone” smart field  in a form-like arrangement, use a dash to show an empty value in display mode.

Switching Between Edit and Display Mode

Switching between edit and display mode can be controlled manually (annotation: FieldControl, property: editable) or automatically by the containing smart form or smart table (property: contextEditable).

Smart field as a select with 'required' indicator in edit mode
The same smart field in display mode
Guidelines

  • Define which fields should be editable (annotations: updateable, creatable, updateable-path, InsertRestrictions, UpdateRestrictions, computed, immutable, fieldControl, fieldControlType).
  • For fields with a unit of measurement, define whether the unit of measurement is editable or static (annotation: FieldControl, property: uomEditable).
  • Make sure that the full text is shown in display mode (property: wrapping), unless this is handled differently for the corresponding context (for example, see guidelines for content in the grid table).
  • When you display the text and ID, the smart field automatically displays both values in display mode, but only the ID in edit mode (annotation: TextArrangement). In most cases, it makes sense to also display both values in edit mode (annotation: sap:text, property: textInEditModeSource, aggregation: Configuration with property: displayBehavior).

Suggestions and Value Help

You can enable suggestions for controls that offer this feature (property: showSuggestions). The list of suggestible values must be provided (annotation: ValueList or ValueListWithFixedValues only for Edm.String, property: entitySet). This list can contain several attributes and is also used for the value help dialog. You can restrict the number of attributes from this list to be shown as suggestions, while all attributes are shown within the value help dialog.

Autocomplete is enabled automatically.

For input fields, the value help dialog is also created automatically. Hide it if it is not needed (property: showValueHelp). The table in the value help dialog can be filled with initial content (annotation: ValueList, property: fetchValues, sap.ui.comp.smartfield.Configuration, property: preventInitialDataFetchInValueHelpDialog)

Both the value help dialog and the suggestion list can be prefiltered (annotation: ValueList, property: valueListParameterIn). The selected items can be used to prefilter other fields (annotation: ValueList, property: ValueListParameterOut). The corresponding filter settings are visible. “Invisible” prefiltering is also supported. To use this option, provide the exact matching filter value (Common.ValueListParameterConstant).

If a value has been entered in the smart field, this value is transferred to the search field of the value help dialog automatically. In the value help dialog, individual values can be valid, deprecated, or revoked. Revoked values are hidden from the value help (annotation: IsConfigurationDeprecationCode).

The following controls are used to offer suggestions or value help:

Smart field as a combo box
Smart field as an input field with suggestions, auto complete, and a value help button
The automatically generated value help dialog for the same smart field

Recently Used Values

Input fields, combo boxes, and selects can provide up to five recently used values automatically on focus if suggestions or value help are available. This can be turned on or off per field (property: historyEnabled). Recently used values are shown by default for input fields, but not for combo boxes and selects.

Guidelines
Do not show recently used values for a field if:

  • There are only a small number of options.
  • The field contains personal sensitive data (annotation: IsPotentiallySensitive).
  • It is unlikely that the same values will be selected again and again.

Recommended Values

In addition to recently used values, a smart field can show recommended values (annotation: RecommendationState).

The corresponding smart field is highlighted and/or prefilled:

  • If no recommendation is available or the current user input matches the recommendation, the smart field is shown in the default state.
  • If a recommendation is available and there is no user input, the smart field is shown in the information state.
  • If a recommendation is available and it differs from the current user input, the smart field is displayed in the warning state.

The recommended values are shown as soon as the user focuses on the smart field.

Validation

The smart field offers the following validations automatically:

  • Validation for required fields: This can be done on the client or server side (property: clientSideMandatoryCheck, annotation: Nullable).
  • Validation for a group of fields: Validation is triggered when the focus moves outside a group of fields, rather than when a single field loses the focus. A group is defined by all smart fields that share the same field group ID (property: fieldGroupIds).
  • Validation for the maximum length of user input: Validation is triggered when a field loses the focus or the ENTER key is pressed (property: maxLength).
  • Validation for combo boxes: Checks if the value entered is available in the dropdown list (property: fixedValueListValidationEnabled).

The validation result is indicated by a value state (property: showValueStateMessage).

When the user edits a smart field showing a text and ID, you can allow any kind of input to avoid unnecessary validation issues (annotation: ValueListNoValidation).

Examples:

  • Allowing the user to enter additional values (which are not in the suggestion list)
  • Typing a text instead of an ID to filter down the suggestion list
  • Using the smart field in a draft
Automatic validation

IDs

The smart field offers automatic validation for number-only ID fields (annotations: IsDigitSequence or sap:display-format="NonNegative"):

  • It checks for non-negative numbers.
  • It shows values containing only “0” digits as empty.
  • It does not show leading zeros.

Units

For decimal number fields and for fields that show an amount with a currency, you can add a unit of measure  (annotations: unit, sap-unit with sap:semantics="unit-of-measure" or sap:semantics="currency-code", property: uomVisible). In display mode, the unit is added to the corresponding number. In edit mode, the unit is shown either as text or, if editable, as a second input field (properties: uomEditable, uomEnabled).

Smart field showing an amount with a currency in display mode
The same smart field in display mode

Sensitive Data

Sensitive data, such as passwords, can be masked. The text is then replaced with asterisks (annotations: IsPotentiallySensitive, masked).

Capitalizing Text Input

Text input can be capitalized automatically (property: IsUpperCase).

States

Smart fields support the following states (annotation: fieldControl):

  • Editable or display only (additional annotations: updateable, creatable, updatable-path, InsertRestrictions, UpdateRestrictions, property: editable)
  • Enabled or disabled
  • Visible or hidden (additional annotations: property: visible, annotation: sap:visible)
  • Required: If set, the smart field must contain a value when validated. This is indicated by an asterisk next to the corresponding label (additional annotation: Nullable, property: mandatory).

The following states for a unit of measurement can be set independently of the corresponding field:

  • If editable, a unit of measurement can be enabled or disabled (property: uomEnabled)
  • The unit of measurement can be visible or hidden (property: uomVisible)
Developer Hint
In the SAPUI5 SDK API Reference for the smart field, the display only state is referred to as read only.

Dependencies between Smart Fields

If the content of a smart field is changed, you can trigger additional changes to other fields on the UI (annotation: SideEffects).

Content Alignment

You can change the horizontal alignment of the text within any kind of input field  (property: textAlign).

Guidelines
Follow the alignment rules for the respective context (responsive table, other tables, form). If you are using the standalone option for the smart field (without a context), apply the rules for the corresponding input fields.

Responsiveness

The smart field acts exactly like the embedded controls. For details see:

Top Tips

  • Always label a smart field if it is not inside a table context.
  • Use suggestions with autocomplete whenever possible and meaningful.
    • Do not show suggestions if there are only a few choices.
    • Use recently used values as appropriate.
    • Reduce the number of attributes shown in the suggestion list to a maximum of 4 or 5.
  • Make use of validation features.

Properties

The following properties, aggregations, and associations are available for sap.ui.comp.smartfield.SmartField:

  • The property: expandNavigationProperties is experimental. Do not use it.
  • The property: importance hides the field if the smart field is placed in a smart form, depending on the importance setting of the smart form. End users have no possibility to show the corresponding fields again. Do not use this property.
  • The property: jsontype is deprecated. Do not use it.
  • The property: name is used in HTML forms that send data to the server via “Submit”.
  • The property: uomEditState is for internal use only. Do not use it.
  • The property: proposedControl is deprecated. Do not use it.
  • The property: textDirection provides support for reading directions in different locales.
  • The aggregation: controlProposal is deprecated. Do not use it.
  • The association: ariaLabelledBy can be used for linking additional labels to the smart field.

Related Links

Elements and Controls

Implementation

Message Box

The message box (sap.m.MessageBox) is a special dialog that allows you to display messages to the user. Compared to the message popover (sap.m.MessagePopover), you can use the message box to display messages that are not related to a field on the UI, such as technical errors.

Formulate messages in plain language (no code), describe the issue precisely, and suggest a constructive solution. Always help your user to recognize, diagnose, and recover from messages. Bear in mind that no message is always preferable to even a good message. When you design your apps, aim to prevent problems from occurring in the first place.

Usage

Use the message box if:

  • You want to display non-field-related messages.
  • You want to interrupt the user while he or she performs an action.
  • You want to display error, warning, success, confirmation, or information messages.
  • You need to interrupt the user for some other reason.
  • You need the user to acknowledge the message.
  • You need the user to make a decision.

Do not use the message box if:

  • You want to display a short success message. (Use a toast instead. For more information, see message toast.)
  • You can show the message directly in a form field.

Responsiveness

The sap.m.MessageBox control has the same responsive behavior as the sap.m.Dialog control. The message box should only be opened in modal mode. Its basic width is 25 em. For more information, see dialog.

Types

The following categories of messages are available:

  • Error
  • Warning
  • Success
  • Information
  • Confirmation

Error Message

Error messages can be triggered after the user has entered incorrect data or a system error has occurred. They should interrupt the user by displaying a dialog. A final action such as Submit cannot be carried out until the user has rectified the error.

Control: sap.m.MessageBox
Icon: sap-icon://message-error
Title: Error
Stretch: False (no full screen on all devices)

Error message with one action
Error message with two actions

Text guidelines for an error message:

  • Do not just describe the problem; tell the user how to resolve it.
  • In the short text, speak the language of the end user. Do not include system or configuration details.
  • If the solution is more involved or technical, add a long text.
  • Do not repeat the short text in the long text. They both appear together on the screen.

Warning Message

Warning messages highlight potential issues, but the user can still continue. This includes unintended data loss scenarios.

Control: sap.m.MessageBox
Icon: sap-icon://message-warning
Title: Warning
Stretch: False (no full screen on all devices)

Use cases for warnings

a) No decision required: Formulate the message as a statement.
Button(s): OK

Warning message with 'OK' button

b) Decision to continue required: Formulate the message as a statement.

Button(s): OK, Cancel

Warning message with 'OK' and 'Cancel' buttons

c) Specific decision required, with one action

Use a relevant action button. The message may also be formulated as a question.
Button(s): Leave Page, Cancel

Warning message with action and 'Cancel' buttons

Success Message

Success messages give feedback to the user that an action has been executed. The user needs to acknowledge the message.

Control: sap.m.MessageBox
Icon: sap-icon://message-success
Title: Success
Stretch: False (no full screen on all devices)
Button(s): OK

Success message
Success message
Information
You should generally use a message toast (sap.m.MessageToast) to display success messages instead of a dialog (sap.m.Dialog).

Information Message

Information messages provide information the user needs to acknowledge, but which does not involve a decision. The message provides information that is useful and relevant, but never critical.

Control: sap.m.MessageBox
Icon: sap-icon://message-information
Title: Information
Stretch: False (no full screen on all devices)

Button(s): OK

Information message
Information message

Confirmation Message

Confirmation messages prompt users to confirm an action that they have triggered. The title of the message box already includes the action that has to be confirmed, such as an intended deletion or an approval.

Control: sap.m.MessageBox
Icon: sap-icon://question-mark
Title:  (such as “Approve”, “Reject”, or “Delete”)
Stretch: False (no full screen on all devices)

Button(s): Approve, Cancel

Confirmation message

Confirmation Message with “Note” Section

Warning
The image belows shows a “Note” section which allows the user to add notes, for example in a “Reject” process. This feature is not provided by the sap.m.MessageBox. Instead, you can use a normal sap.m.Dialog and place those controls inside the confirmation message.

Confirmation messages prompt users to confirm an action that they have triggered. The title of the message box already includes the action that needs to be confirmed, such as an intended deletion or an approval.

Control: sap.m.Dialog
Type: Message
Icon: sap-icon://question-mark
Title:  Such as “Approve” or “Reject”
Stretch: False (no full screen on all devices)

Button(s): ApproveCancel

Confirmation message with note

Confirmation for “Delete”

If the user clicks Delete, display a “Delete” dialog that confirms the delete action.

Control: sap.m.MessageBox
Icon: sap-icon://message-warning
Title: Delete
Stretch: False (no full screen on all devices)

Button(s): Delete, Cancel


Use cases for delete confirmation messages in object page and list reports

a) No context is available. For example, neither the ID nor the description of the business object are available at the time of deletion.
Body text: Delete this <object>?

Confirmation for 'Delete' action

b) The ID of the object is available.
Body text: Delete <object> <object ID>?

Confirmation for 'Delete' action with object ID

c) The object ID and description are both available at the time of deletion.
Body text: Delete <object> <object ID> “<object description>”?

Confirmation for 'Delete' action with object ID and description

Deleting several objects

If more than one object is being deleted, do not display the object ID and description.
Body text: Delete the <n = optional> selected <objects>?

Confirmation for 'Delete' action with several objects
Developer Hint
The default text in SAP Fiori elements will be slightly different, usually using the default term “object” to designate the item to be deleted. When using SAP Fiori elements, replace “object” with the correct business object name. For more information, see Introduction to SAP Fiori Elements – Adjustments.

Components

The message box contains the following sections and options:

Title: Title text appears in the message box header.

Content: This area contains the actual content of the message box.

Footer with actions: Although the message box allows more than two buttons, we recommend limiting the number to two. Available button types are primary and negative path actions. If you require other button types, use sap.m.Dialog instead. If no buttons are defined, the default Close button is shown.

Example of a message box structure

Show Details button

The message displayed for the user should provide sufficient information to ensure that the user knows what has happened. A message box without an explicit details section should be sufficient. Therefore, the Show Details link is only shown if detailed information is available that differs from the message text and is important for the user.

If details are available, the application has three options to display the text. Text can be displayed as:

  • Plain
  • Formatted
  • The original code format
Message details - Plain text
Message details - Formatted text
Message details with code excerpt

Resources

Want to dive deeper? Follow the links below to find out more about related controls, the SAPUI5 implementation, and the visual design.

Elements and Controls

Implementation

Timeline

The timeline control shows entries (such as objects, events, or posts) in chronological order.

A common use case is to provide information about changes to an object, or events related to an object. These entries can be added manually or generated by the system (for example, value XY changed from A to B). The latest entry is always on top.

Another use case is a feed that is driven by user updates and comments. This feed can also be entirely devoid of machine-generated content.

Information
Do not confuse the timeline control with the similar-looking group feed component. While the group feed component was created explicitly for integration with SAP Jam, the timeline is more flexible, fully responsive, and not restricted to a specific source. However, the timeline control doesn’t offer any integration with social collaboration platforms out of the box.

Usage

The timeline does not have a fixed location on the UI. Where you place it depends on your use case.

For example:

  • If the timeline is closely related to the content and needs to be seen in parallel, you can use the dynamic side content floorplan. Alternatively, you can create a separate page with the timeline as the central element and show it next to the main content using the flexible column layout.
  • If the timeline contains only secondary information, or only needs to be accessed occasionally, you can embed it in a tab.
  • If you are using the object page floorplan, you can use the horizontal layout to integrate the timeline (see Orientation in the Styles section below).

These are just some of the ways you can position the timeline on a page.

If you also require social collaboration features, you have two options: For integration with SAP Jam, you can use the group feed component, which offers similar features to the timeline. For integration with other social collaboration solutions, you can use the timeline control, but the integration does not come out of the box and needs to be provided by the app team.

Use the timeline if:

  • You want to display read-only content, such as an object history.
  • Your customers do not use SAP Jam.
  • You expect a long list of posts triggered by the system, the users, or both.
  • You want users to be able to create their own posts.
  • You want to offer custom actions for individual items.

Do not use the timeline if:

  • You expect only a few entries. In this case, use a simple feed.
  • You want to provide a way to upload files. Use the upload set control instead. You can still use the timeline to show automated updates about the user’s uploads.
  • You need SAP Jam integration. In this case, use the group feed component.

Responsiveness

The timeline control is fully responsive and works well with multiple screen sizes.

For better usability, both the single-sided and the double-sided layouts have a maximum width. This prevents the control from being excessively stretched.

For size S (smartphone), we highly recommend using the single-sided layout combined with narrow containers, such as the dynamic side panel. Also use the single-sided layout if the column in the flexible layout is too narrow for the double-sided layout. As soon as you have enough screen real estate, switch to the double-sided version to fully utilize the available space.

The single-sided version has a maximum width of 30 rem, while the double-sided layout has 57.5 rem.

Layout

The timeline control consists of:

  • A header (optional, but highly recommended)
  • A chronological axis
  • Posts/entries

The following optional features can be added:

  • Filter
  • Group
  • Add entries

Header

The title describes the content displayed along the timeline axis. 

Axis

Along the axis, the entries are arranged chronologically. The distance does not correspond to the time between each occurrence.

You can use a vertical or horizontal axis. The timeline can be scrolled along its axis.

By default, the latest entries appear on top. Replies are sorted the other way round.

Post (Entry/Feed Update)

Posts can be entered manually or generated by the system (for example, “Object ABC was changed by Mr. X”). The entry should include information about who changed what, and when (depending on the use case). Typically, posts in the timeline consist of four sections:

  1. A node
    Using icons on a node is optional. Use icons for either all or none of the posts.
  1. A header section, which can contain:
  • An avatar, showing a circular or square image, or an icon.
    (See avatar control for more details.)
  • Text(s) and/or link(s)
  • A time stamp (use SAP Fiori formatting)
  1. An (expandable) content section, which can contain:
  • Text(s) and/or link(s)
  • Structured or unstructured information
  • Images
  1. An optional action section containing actions that can be performed on an item, such as Edit or Delete. Actions are provided by the application.

Note: If a section is not used, it should not take up any space within the bubble.

Timeline – Layout
Timeline – Layout

Here are just a few examples of different visualizations. Because the timeline control is very flexible, there are also numerous other possibilities.

Timeline – Layout examples

Posts can originate from three sources:

  • Manual post: A person actively posts to the timeline (or to another place that supplies updates to the timeline).

Example:
Julie Armstrong: Can someone please have a look at these numbers?

  • Post triggered by user action: The post is triggered by something a person does (such as creating an object, adding a note, or uploading an attachment).

Examples:

Julie Armstrong created sales order 4815162342.
(Followed by an optional preview of the header data)

John Miller uploaded the document Sales-Revenue_Q4.xls
(Followed by an optional preview of the document, if available)

Donna Moore added a note:
(Followed by an optional preview of the note)

Julie Armstrong added the picture our_team.jpg
(Followed by an optional preview of the image)

  • Post triggered by a technical source: Posts can also originate from a purely technical source (for example, if a threshold has been exceeded, or a deadline has been reached).

Examples:

Boiler BB-258/80 has exceeded its maximum temperature.

Server DS209 is running out of space.

Order #052690 is overdue.

Information
Notes vs. Posts: 

Notes are not the same as timeline posts. They must be kept separate and visualized differently. Like attachments, users create notes in the context of a business object, typically within a Notes tab.

In the context of a business object, notes have the same character as attachments.

The difference is even more apparent if you compare posts to complex notes created with a rich text editor. These notes are fundamentally different from timeline posts.

To show notes on the timeline, trigger a feed post with a teaser text. For example, “Julie Armstrong added a new note: Lorem ipsum…”.

Types

The timeline offers many levels of expansion, ranging from a simple read-only history to a highly interactive mode. This flexibility allows the timeline to cater for a wide range of use cases.

For example, you could use a read-only version to show system-generated posts that don’t require any user interaction. Nevertheless, this timeline could still be used to show actions the user has taken within the app (like creating notes and attachments, or making calls). These actions appear in the timeline as application-generated posts.

Example of a basic read-only use case
Example of a highly interactive history feed

Behavior and Interaction

Search

Because a timeline can contain a vast number of entries, always offer a search. A search helps users to find what they are looking for without having to scroll through all the posts and updates.

Interaction – Timeline search

Expand and Collapse

Some updates might be too lengthy to show in full. For these cases, applications can decide to show only a preview and let users expand the post if they want to read it. You can set a limit for the number of lines to be shown (recommended), or for the number of characters.

This example shows a post that previews 3 lines before truncating and showing a more button in the next line. Clicking this button expands the post to its full length and changes the button text to less. Clicking this button again collapses the post to its previous height.

Interaction – Expand/collapse

Filter (Optional)

For timelines with several entries or entry types, it makes sense to enable filtering. You can let users filter the timeline by entry type and by other useful attributes (such as bookmarked). Users can even filter by time range to find posts between two specific dates, months, quarters, or years.

The filter is triggered with the filter icon  icon in the toolbar.

Timeline interaction – Filter

Depending on the complexity of the timeline, you can offer different kinds of filter dialog:

  • Single selection
Timeline interaction – Filter with single selection
  • Multi-selection
Timeline interaction – Filter with multi-selection
  • Multi-faceted filter
    To implement this combination of feed source and filter, use the view settings dialog.
Timeline interaction – Filter with view settings dialog

If a filter is set, inform the user in the infobar.

Timeline interaction – Set filter
Developer Hint
As of SAPUI5 version 1.48, sorting and filtering is no longer restricted to the front end. The timeline offers full filter and sorting support for model binding.

Scrolling

The timeline offers endless scrolling. As soon as the user reaches the end of the pre-loaded list, more posts are fetched from the back end.

Developer Hint
To enable infinite scrolling, set the properties GetLazyLoading and EnableScroll to “true”.

In exceptional cases, it might be more useful to let users trigger the fetching process manually. Once the number of entries displayed in the timeline exceeds the number of entries set, a Show More button appears at the bottom of the list for loading additional posts.

Each app team can determine the number of entries displayed before the Show More button appears, based on the specific use case and app performance.

Use the Show More button instead of infinite scrolling if you expect users to look at only the most recent posts and do not expect them to scroll through longer lists of posts.

Grouping

The timeline allows applications to group posts by certain criteria (for example, by year). Groups can be expanded and collapsed for a better overview.

Grouping is supported by all timeline types and layouts: vertical and horizontal as well as left-, right- and double-sided.

The following example shows two collapsed groups (2021 and 2020) and an expanded group (2019).

Timeline interaction – Grouping

Custom Actions

You can introduce custom actions for timeline posts. Keep in mind that the available space is limited and translated words can take up much more space than their English counterparts. Only offer actions that are essential to your users and reduce the number of actions to a minimum. If more actions or more complex interaction is required, let your users navigate to a separate page for the item they need to work on (such as an object page).

In the first example, the custom actions Edit (1) and Delete (2) have been added to the post.

Behavior – Custom actions 'Edit' and 'Delete'

In the second example, the custom action Download (3) enables the user to quickly download an attachment directly from the post.

Behavior – Custom action 'Download'

Refresh

Instead of showing new posts as soon as they arrive (which would interrupt users while they are reading), the timeline offers a very subtle way of notifying users about new posts.

You can place a message strip directly below the toolbar to show how many new posts are waiting to be retrieved from the back end.

Behavior – Refresh
Behavior – Refresh

If a filter is active, the message strip shows alongside the filter infobar.

Behavior – Refresh and filter

Social Actions

The timeline does not offer integrated social collaboration features out of the box. For integration with SAP Jam, see the group feed component.

If you want to build your own social platform or integrate an existing service other than SAP Jam, the timeline is flexible enough to handle most social collaboration features. The following section gives some guidance on how to design the interaction.

Adding a Post

You can allow users to add their own posts by offering a Post a Comment button in the toolbar on top of the timeline.

Use the Post a Comment button to trigger a popover containing a text area. Set the focus inside the text area to enable the user to start typing right away.

Post sends the user’s text, which then appears in the timeline. To prevent empty posts, keep the button inactive until the user has typed something.

Interaction – Adding a post

Replying to a Post

Alongside the Post function, Reply is probably the most basic and essential social feature. Unlike feed controls (sap.m.FeedInput and sap.m.FeedListItem), the timeline enables communication at item level. Feed controls always add entries to the top of the list; there are no inline replies within the feed. By contrast, the timeline lets users reply directly to a specific entry. The number of replies is shown next to the Reply action, for example, Reply (5).

When the user clicks the Reply link, the app needs to trigger a popover that shows all previous replies, as well as a text area for posting a reply.

Interaction – Reply
Interaction – Reply

Styles

Orientation

There are various layout options. When you choose the layout, consider the type of content and the screen real estate available for displaying the control.
(See guidelines section for more details.)

Vertical

Use the vertical timeline for narrow containers or on smartphones (in portrait mode).

Styles – Vertical (single-sided), right
Styles – Vertical (single-sided), left
Styles – Vertical (double-sided)

Horizontal

You can use the horizontal timeline on wide screens, the object pageor even on smartphones in landscape mode.

You can display both the vertical and horizontal timelines with or without icons.

Styles – Horizontal (single-sided), bottom
Styles – Horizontal (single-sided), top
Styles – Horizontal (double-sided)

Icons vs. Nodes

When you design your application, you can choose between two visualizations for listing posts on the timeline: icons or nodes.

You can use icons if all entry types that will appear in the timeline can be represented by an icon.

If you cannot find icons for all post types, use nodes instead.

Styles – Vertical without icons
Styles – Vertical with icons

Colors

You can use colors to highlight entries in the timeline and to convey semantic information (for example, to indicate the status or urgency of an entry).
Styles – Timeline with icons and semantic colors

Guidelines

  • Only use the speech bubble icon   for posts entered manually by users.
    CSS name: icon-post
    HTML Unicode: & # xe 0 a b ; (remove the spaces)
  • Do not use colors for decoration. Only use colors to convey semantic information (for example, warnings or errors).
  • When using the vertical timeline, use single-sided (right) or double-sided layout, unless the use case calls for the left-sided version.
  • When using the horizontal layout, use the single-sided (bottom) or double-sided version, unless the use case is better supported by the top-sided version.
  • When you choose the layout, consider the type of content and the screen real estate available for displaying the control. For example:
    • In a vertically-oriented dynamic side content container, also use vertical orientation for the timeline. Likewise, if the container is oriented horizontally (either by design or due to responsive behavior), the timeline should also be horizontal.
    • If sections on an object page offer more horizontal than vertical space, use a horizontal timeline. This can be either single-sided (bottom) or double-sided.

Resources

Want to dive deeper? Follow the links below to find out more about related controls, the SAPUI5 implementation, and the visual design.

Elements and Controls

Implementation

P13n Dialog

Intro

The p13n dialog control provides a dialog for tables that allows the user to personalize one or more of the following attributes:

  • Columns (visibility and order of columns)
  • Sort (sorting of table values)
  • Filter (filtering of table values)
  • Group (grouping for specific attributes)

These tabs can be shown in any combination, as the use case requires.

The P13n dialog is intended for complex tables with a large number of columns and the need for complex queries for sorting, grouping, and filtering.
For simple tables, see view settings dialog and table personalization dialog.

The P13n dialog can be triggered in the table toolbar using the corresponding buttons in the top right-hand corner of the table.

The dialog is shown centered, either as a dialog (on desktop and tablet devices) or as a full-screen dialog (on mobile devices).

Dialog buttons within the table toolbar

Usage

Use the P13n dialog if:

  • The user is able to personalize more than 20 or so columns.
  • You need several functions for sorting, grouping, and so on.
  • You are using the analytical table.
  • Complex queries have to be built for the relevant table.

Do not use the P13n dialog if:

  • The user is able to personalize fewer than about 20 columns.
  • You only need a simple column show/hide feature.

Responsiveness

The P13n dialog is available for all display sizes. For sizes L/XL (desktop) and M (tablet), the dialog is shown as a dialog. For size S (smartphones), the P13n dialog is displayed as a full-screen dialog.

Size S – Columns
Size S – Columns
Size M
Size M
Size L
Size L

Components

The P13n dialog consists of four different tabs that can be used separately or combined, as required by the use case:

  • Sort
  • Filter
  • Group
  • Columns

App developers can add more tabs manually.

Behavior and Interaction

Columns

The first tab is the Columns tab. It allows the user to change the table columns that are shown and the order in which they are displayed.

The list contains all of the table’s possible columns in the form of list items with checkboxes. The checkboxes of the currently displayed columns are selected.

Another button next to the search field in the table toolbar allows the user to toggle between showing all columns and only those that are currently selected in the list.

Show/Hide

To show or hide a column, select or deselect the appropriate checkbox.

Reorder

To change the order of the columns, simply mark one list item and use the buttons on the right-hand side of the table toolbar to move them up or down. The order of the columns from top to bottom corresponds to the order on the table from left to right.

Search

If the table has numerous columns, the user can use the search field in the table toolbar to find a specific column more quickly. As soon as the user enters the first letter, the resulting columns are displayed instantly.

Column settings in the P13n dialog

Sort

The second tab is the Sort tab, which allows the user to sort the table content according to the chosen attributes, and also in either ascending or descending order.

The sort criterion consists of two input fields. In the first field, the user can choose a column by which the table is to be sorted. In the second field, the user chooses the sort order (ascending or descending).

For more complex sorting needs, the user can add the required number of criteria by clicking the plus “ ” sign at the end of the line.

The order of the criteria is exactly the same as the order in which sorting is applied to the table.

Sort settings in the P13n dialog
Information
Using the sort feature on column headers replaces ALL sort options in the dialog!

Filter

The third tab is the Filter tab, which allows the user to filter the table information according to specific criteria.

The filter criteria can be included or excluded in the relevant section of the filter. There is only one operation dropdown for both include/exclude operations.

Column

In the first input field, the user selects the column to be filtered. Any of the columns can be selected; even those that are not currently visible.

Option

The second field offers an operator for specifying the filter in more detail. The operators that are available depends on the data type of the selected column.

Filter tab in the P13n dialog

String (Text)

  • between
  • contains
  • equal to
  • begins with
  • ends with
  • greater than
  • greater than or equal to
  • less than
  • less than or equal to

Number

  • between
  • equal to
  • greater than
  • greater than or equal to
  • less than
  • less than or equal to

Date

  • between
  • equal to
  • after
  • on or after
  • before
  • before or on

Boolean (true / false)

  • equal to

The only available operator for excluding values from the filter results is equal to.

Value

The last field contains the value by which the selected column is filtered. The kind of input field that is provided depends on the data type of the selected column.

Two or even more fields can be provided as required by the use case.

For more complex cases, the user can add filters by clicking the plus “ ” button or remove them by clicking the Remove button at the end of each filter item.

Information
If there is a filter bar, use its filter functionality and deactivate the filter feature of the P13n dialog.

Group

The last tab is the Group tab, which enables the user to group the table data by one or more columns.

In the first selection field, all columns are provided for selection. The user can select a checkbox on the right of the column selection field if the selected field is to be displayed as a column anyway.

For more complex grouping scenarios, the user can add more grouping options by clicking the plus “ ” button on the right-hand side of each grouping line. This option only works with the analytical table.

The grouped table shows the selected field as the group header, which can be expanded or collapsed.

Under the group headers, all subgroup headers and all applicable table entries are displayed.

Group tab in the P13n dialog
Information
To group by a specific column, that particular column must be marked as visible on the Columns tab!

Guidelines

For opening the dialog from a table toolbar, use different buttons for each function (sort, filter, group, column settings). With each button, open the P13n dialog with just the corresponding tab. Do not display the other tabs.

Resources

Want to dive deeper? Follow the links below to find out more about related controls, the SAPUI5 implementation, and the visual design.

Elements and Controls

Implementation

Icon Tab Bar

The icon tab bar comprises a series of tabs that each link to a different content area or view. You can use it for navigation within an object, or as a filter.

There are two key use cases:

  • You want to let users navigate between different object facets in the object details area.
  • You want to let users filter lists, and give them the option of calling up the entire list, or only items with a specific attribute.

In both cases, the user switches between tab pages by clicking the respective tab.

Usage

Use the icon tab bar if:

  • Your business objects need to show multiple facets at the same time.
  • You want to allow the user to browse through these facets.
  • You need a prominent or very visual filter on top of a list.
  • You have clear-cut process steps that need to be visualized.

Do not use the icon tab bar if:

  • You plan to use only one single tab.

Responsiveness

The icon tab bar stretches horizontally, and soon runs out of space on small screens. It responds to limited space by offering a scrolling mechanism.

Responsiveness – Text tabs
Responsiveness – Icon tabs

In addition to the responsive overflow behavior, the icon tab bar can be forced into compact mode or even react dynamically to the application’s global density setting. See the Tab Density section for details.

When the screen space does not allow to show all tabs on the main tab bar, an overflow appears on the far right, containing all remaining tabs that do not fit on the screen.

Responsiveness – Overflow

Layout

The horizontal layout of the icon tab bar never changes. The tabs always appear side by side. However, there are several types of tab bar to choose from. These are described in detail below.

Types

You can use the icon tab bar control to build the following types of tab bars:

  • Text only
  • Icon tabs
  • Tabs as filters
  • Tabs as process steps

Text Only

The text-only variant is one of the most common types. It allows longer labels, and can also display counters next to the text to indicate the number of items on the tab page.

Unlike all other tab variants, the labels do not get truncated. The full text is always shown. As a result, you need to ensure that your labels do not become too long. They should still be easy to read on smaller screens.

If you use text-only tabs, make sure that the UpperCase property is disabled and that you enter the labels in title case (for example: Approval Flow).

Types – Text-only without counters
Types – Text-only with inline counters

Counters and Text Tabs

If counters are used, set the property HeaderMode to “Inline” so the counters appear in brackets after the labels.

Do not use the old layout that shows the counters on top of the labels (Headermode = “Standard”).

Do
Counters – Inline layout ('HeaderMode' set to 'Inline')
Don't
Counters – Old layout ('HeaderMode' set to 'Standard')

Icon Tabs

Icon tabs are also common tab types. These round tabs can be populated with any icon from the SAP icon font.

Labels are optional. If you decide to use labels, use them for all tabs. You can use counters as needed.

Types – Icons with counters

Please note that starting with SAPUI5 version 1.40, you should only use the horizontal type of label (icon and label side by side).

If your labels get truncated, consider using shorter labels or text tabs (without icons), since text tabs cannot get truncated.

Types – Icons with counters and labels
Types – Icon-only
Types – Icon-only

Tabs as Filters

If you build the tab bar as a filter, it can comprise two parts:

  • An “all” tab on the left (optional)
    This tab shows the total number of items, and describes the type of item (for example, 189 Products).
  • Tabs for specific filters
    Use the tab text to indicate the filter attribute.
    We strongly recommend showing a counter on every tab.
Types – Filter
Types – Filter

Tabs as Process Steps

You can also use the tab bar to depict a process. In this case, each tab stands for one step.

To connect the steps, use the triple-chevron icon ( ) from the SAP icon font (technical name: process).

Types – Process
Types – Process
Developer Hint
When using icons with labels, add a comment in the properties file to make editors and translators aware that space is limited.
Example: Label for icon tab on detail screen. Max 14-16 characters (depending on character width).

Test whether your labels and their translations are displayed in full, and do not get truncated.

Warning
The overflow behavior changed in SAPUI5 version 1.80. Tabs from the overflow are shown on the main tab bar as long as they are selected. This may disrupt the order of your process and give the impression of a false step order. We are working on a fix for this issue.

Hierarchies

The tab bar supports hierarchies, allowing multiple tabs underneath one main tab. This way, you can group several tabs together, with the main tab acting as a headline.

Subtabs

The example on the right shows the main tab Notes with two subtabs, Internal and External, with no specific hierarchy except for their order.

Types – Subtabs
Types – Subtabs

Nested Tabs

Nesting allows deeper hierarchies with indentations to indicate the level of each tab.

By default, the property maxNestingLevel is “0” (zero). To enable nesting, adjust this value to the highest level of nesting that your app allows.

Types – Nested tabs
Types – Nested tabs

Behavior and Interaction

Clicking a Tab

To navigate through the views, the user clicks the tabs.

Optional behavior: If the user clicks a tab that is already open, the container collapses. It opens again when the user clicks any tab.

Use the expandable property to specify whether users can collapse the tab container (default = “true”):

  • Let users collapse the container if there is additional content below the container, and the information inside the container is not always needed.
  • If there is no content below the tab container, set the expandable property to “false”.

The expandable property controls the initial state of the container. Do not change the default state (“true”).

Changing the Order of Tabs

You can allow users to rearrange the tab order in a desktop environment (property: enableTabReordering). If this feature is enabled, users can drag and drop tabs to reorder them, either directly on the tab bar or inside the overflow menu.

It is also possible to drag and drop tabs from the tab bar to the overflow menu and vice versa.

If nesting is enabled (property maxNestingLevel > 0), users can choose the level at which they want to drop a tab.

Dragging a tab activates a visual indicator for positioning the tab. For example, dragging tab 8 on top of tab 5 makes tab 8 the child of the now highlighted tab 5 (see image 1).

If the user drags a tab between two other tabs, the indicator shows the level at which level the tab will be nested (see image 2).

Interaction - Tab nesting using drag and drop (1 of 2)
Interaction - Tab nesting using drag and drop (2 of 2)
Information
Do not use this feature for tabs as process steps to ensure that consecutive steps do not get mixed up.

Styles

Tab Density

The default responsive design of the icon tab bar applies to both compact and cozy modes. However, in addition to this responsive behavior, the control can be forced into a compact mode, or even react dynamically to the application’s global density setting. This feature can be used to:

  • Save vertical space on the page (applies to both text and icon tabs)
  • Save horizontal space (icon tabs only; this is especially helpful when there are many tabs)
  • Generally use less space on mobile devices
  • Reduce noise when there are already more important visual elements on the screen (primarily icon tabs)

The property for the override is called tabDensityMode, which can be set to “Cozy”, “Compact”, or “Inherit”. “Cozy” is the default setting that renders the control in its regular dimensions. “Compact” reduces the control’s height and icon sizes (if applicable), even if there would be enough space for the cozy design. “Inherit” instructs the control to follow the global density mode defined for the application. For backward compatibility, the default setting is “Cozy”.

The following image shows some types of tabs with their default style (cozy, left) and the reduced density mode (compact, right).

Style – Tab density
Style – Tab density

Colors

The two different styles (round tabs and text only) are discussed in the Types section. In both cases, you can use semantic colors to give users additional orientation.

Only use semantic colors if it is important for users to know that they need to take action (for example, to indicate errors or critical situations requiring action). Otherwise, use the neutral default colors. For more information, see How to Use Semantic Colors.

Developer Hint
To apply semantic colors to the icons and the text-only tabs, you can use the property sap.ui.core.IconColor.

Example

In the example below, one step in the process is indicating an error. Since the other tabs have neutral colors, it is clear that they do not contain errors. Coloring them green to show that they are OK is unnecessary, and would reduce the severity of the red tab.

Styles – Colors
Styles – Colors

Badge

A tab can have an attention badge to indicate that new items were added to that tab. Only display a badge if new items are triggered from outside the app. Do not display a badge when users add new items themselves.

Icon tab with an attention badge

Badge in Default or Semantic State

You can add a badge to all types of icon tab bar.

The badge inherits the state of its tab (default state or semantic state):

  • For the default tab state, the default red badge is displayed.
  • If the tab has a semantic state, the badge inherits the semantic color for the current state.

Don’t mix tabs in the default state with tabs that have a semantic state.

Badge Interaction

The badge becomes part of the active area of the tab. When the user activates a tab with a badge, the badge disappears. If a new item is added to the tab that is currently open, no badge is shown.

In addition, the badge inherits the interaction of its tab. For example, if a tab is moved using drag and drop, the attention badge moves with it.

Interaction example: Activating a tab with a badge

Overflow Menu

If there isn’t enough space to show all the tabs on the main bar, an overflow menu appears on the right, containing all the remaining tabs. A badge on the chevron icon   indicates that a tab within the overflow menu received new items. The tab in question is indicated by a second badge on the item in the overflow menu.

Badge within overflow menu

Guidelines

Apply the styles as follows:

  • Icons only: Use this option if you have only 4-5 tabs that can be very clearly identified by their icon. If a short description is needed, use icons and labels.
  • Text only: Use this option if you have more than 4-5 tabs, or if there are no clear icons to represent the content. The text-only style also allows for longer labels. Set the property HeaderMode to “Inline”.
Do
Counters – Inline layout ('HeaderMode' set to 'Inline')
Don't
Counters – Old layout ('HeaderMode' set to 'Standard')

If you use icon tabs, ensure the following:

  • The icons clearly identify the content on the tab pages.
  • Each tab has a unique icon. Do not use the same icon more than once.
  • The icons are easily distinguishable.
  • Any icons between tabs (for example, as separators or connectors) are visually very different from the icons on the tabs.
  • Either all or none of the icons have labels.

Implement the focus as follows:

  • By default, show the first tab as open. This is the initial setting provided by the control.
    Note: Technically, you can also override the initial selection. However, this is not recommended.
  • Later on, you can show the tab last selected by the user.

Additional guidelines:

  • Do not display a loading indicator above the tab while the number for the item count is loading.
  • Handle empty tabs as follows:
    • Hide tabs that do not contain any information, and do not allow the user to create content..
    • Show empty tabs that allow users to create content, such as notes or attachments.
  • Only use the tab bars to navigate between tabs. Do not use any other navigation links. For example, do not let users click an item in tab A that takes them to tab B. This type of cross-navigation inside a container is confusing, and cannot be handled by the back navigation.

Resources

Want to dive deeper? Follow the links below to find out more about related controls, the SAPUI5 implementation, and the visual design.

Elements and Controls

Implementation

Button

Buttons allow users to trigger an action. There are 4 button types:

  • Simple button for one action
  • Toggle button to switch between different states
  • Segmented button with a group of options
  • Menu button with a group of actions
Common button types
Common button types

Usage

Use the button types as follows:

  • Use simple buttons for specific actions, such as:
    • Create, Edit, Save
    • Approve, Reject
    • Accept, Decline
    • OK, Cancel
  • Use toggle buttons in a toolbar to activate or deactivate an object or element. You can also use toggle buttons to switch between different states.
  • If you want the user to select one option from a small group, offer a segmented button in the toolbar. For example:
    • Year, Month, Day
    • Small, Medium, Large
  • Use the menu button if you need a menu that provides more than one option.

Do not use buttons if:

  • You want to link to a different page or object. Use the link instead.
  • You want to let users upload content. Use the upload set control instead.

Responsiveness

The button usually grows to fit the size of the text. If you set a fixed size for the button, the text truncates.

If the button is used in a responsive container or toolbar, it follows the responsive behavior defined for that element. For example, the button can move to another line.

Buttons with different lengths

Menu Button

The maximum width of the menu button is 12 rem (192 px). If the button text exceeds the maximum or fixed width, it truncates.

On smartphones (size S), the menu opens in a full screen dialog, and the button label becomes the title of the dialog. The footer contains a Cancel button. Items with submenus become navigable. Navigation is similar to that used in a popover, with a Back button.

On tablet and desktop devices (sizes M and L), the menu button triggers a cascading dropdown menu.

Open menu button
Open menu button
Menu button popover on size S

Types

Button

Buttons can trigger primary, secondary, semantic, and negative path actions. These different action types are explained in more detail in the action placement guideline.

Header and Footer Toolbars

Use the following button styling for the different action types in the header and footer toolbar:

  • Primary action: Use the emphasized button style.
  • Secondary action: Use the ghost button style. 
  • Semantic action: Use the semantic buttons for positive and negative actions. Use the “accept” style for positive actions, and “reject” for negative actions. Semantic actions must always be text buttons.
  • Negative path action: Use the transparent button style.

Content Toolbars

Use the following button styling for the different action types in content toolbars (for example, in tables, forms, or charts):

  • Primary action: Use the emphasized button style. Usually, the primary action is positioned in the header or footer toolbar. Note that there can only be one primary action per page. If a page already has a primary action, but you also need to highlight the most important action in a content toolbar, use the ghost styling for this one button in the content toolbar.
  • Secondary action: Use the transparent button style.

The different button styles are designed to give appropriate feedback to users. Don’t use them for decoration purposes.

Button with different styles

Toggle Button

A toggle button switches between two actions. One of the actions is always active, one is inactive. Use the toggle button for secondary actions.

Apply the following button styles for the different toolbars:

  • Header and footer toolbars: Use the ghost button style.
  • Content toolbars: Use the transparent button style.
Toggle buttons
Toggle buttons

Segmented Button

A segmented button shows a group of options. Only one of the options can be active, the others remain or become inactive. Pressing an option activates it. By default, the control for segmented buttons calculates the button width and applies it to all buttons within the group. You can change this by setting the width for individual buttons.

The segmented button is comparable to a radio button group control.

Segmented buttons
Segmented buttons

Menu Button

There are two different types of menu buttons. Both can contain items with submenus.

Regular Menu Button

When the user activates the button, the menu opens. This is the default type.

Split Menu Button

The split menu button is separated into two areas: the text label and the icon. The separator between them signals that the two areas result in different actions. The user has two choices: activating the text label on the button triggers the action. Activating the arrow opens the menu. The split button consolidates a variety of commands, especially when one of the commands is used more often.

In split mode, the text label depends on the default action. If the default action is displayed as an icon only, all the menu items must contain icons.

Split Menu Button Behaviors

The split menu button can have two different behaviors:

  1. The button always triggers the default action set by the app developer. If no default action has been defined, the first item in the menu list becomes the default.
  2. The button triggers the last action chosen by the user. Initially, it also triggers the default action. However, when the user selects a different action, this user action becomes the default, and the button text label changes accordingly. The button has a fixed size and the text truncates if the menu item exceeds the available width (as with the combo box).

Toolbars

Apply the following menu button styles for the different toolbars:

  • Header and footer toolbars: Use the ghost style.
  • Content toolbars: Use the transparent button style.

Do not use any other styling types.

Menu buttons
Menu buttons

Button Content

Text or Icon

A button can contain an icon OR a text.

Always use a text button for primary, secondary, semantic, and negative path actions.

Use icon buttons only if the icon metaphor is easily recognizable. Ideally, it should have same meaning worldwide.  For more information about icons in general, check out the article on iconography.

Badge

Buttons with text (left) and icon (right)

The standard button can contain an optional badge. The badge acts as a visual eye-catcher and attracts the user’s attention. It shows a number and is typically applied in browse and collect use cases. For example, it can display the number of items in a shopping cart.

Use the badge in combination with one of these button styles:

  • Emphasized (as a primary action)
  • Ghost (as a secondary action)
  • Transparent (as a secondary action)

The number of the badge must always be a whole number (1, 2, 3, …) and cannot be smaller than 1. If 0 or minus items are in the basket, the badge is not displayed. If the number exceeds 4 characters, such as 9999, it is truncated to 999+.

The position of the badge (attached to or on a button) can vary depending on the content density.

Buttons with a badge in cozy mode (left) and compact mode (right)

Behavior and Interaction

To trigger the action, the user clicks the button, toggle button, or segmented button using a keyboard, touchscreen or screen reader. The button provides visual feedback for “hover”, “press-down”, and “focused” states.

  • A toggle button remains in the pressed state until it is pressed again.
  • In a segmented button, the chosen option stays active until the user presses one of the other options.
  • menu button displays a dropdown menu on activation.
  • In a split button, selecting the button text triggers that action directly. Activating the arrow opens a dropdown menu. If the user selects a menu item, the action is triggered and the menu closes.

If an action cannot be triggered, or is temporarily unavailable, use the disabled state for the corresponding button.

If you want to switch a text, icon or tooltip after a button click, bear in mind to use the invisible message control to also convey the information to screen reader listeners.

All three button types support the cozy and compact form factors. For more information, check out the article on content density.

Regular state
Regular state
Hover state
Hover state
Press-down state
Press-down state
Disabled state
Disabled state
Focused state
Focused state
Opening a menu button with subitems

Guidelines

Button Text

  • Choose a button text that is short and meaningful. Check out the UI text guidelines for more information.
  • Use a verb in the imperative for all actions (for example: SaveCancel, Edit).
    Note: The grammatical form for actions can differ for other languages. For example, German action labels use the infinitive (Sichern, Abbrechen, Bearbeiten).
  • Keep in mind that the text can be up to 300% longer in other languages.
  • If you need to show the number of items that will be affected by the action of the button, you can add the number in parentheses. For example, Edit (3).
  • Do not change the text or icon of a toggle button when it is pressed. Screen readers announce the “pressed” state for the action. If you use a different text for the pressed state, the screen reader announcement doesn’t make sense.

Icon Buttons

  • Make sure the default accessibility text for the icon is correct for your use case. If the text is not ideal, define an app-specific accessibility text.
  • Offer a tooltip to show the label for icon buttons.
  • Don’t use the icon control for buttons. Use the icon property for the button instead.

Button Shortcut

  • You can use the button shortcut control to show the keyboard shortcut for an action. The keyboard shortcut appears on hover or on keyboard focus, and its positioning (top or bottom) is context-dependent. When a tooltip is needed, it is combined with the shortcut information.
Button with a shortcut hint

Examples

Header toolbar with primary action (emphasized styling) and secondary actions (ghost styling)
Table toolbar with search field, text buttons (ghost and transparent styling), icon buttons (transparent styling), and segmented button
Footer toolbar with standard actions: 'Save' (emphasized) and 'Cancel' (transparent)

Related Links

Elements and Controls

Implementation

Smart Filter Bar

Intro

Information
This article is intended as an aid to designers and developers who want to explore the detail configuration options available for the smart filter bar.

The smart filter bar uses annotations to create a filter bar. It’s a wrapper that analyzes a given OData service and renders a filter bar based on the content defined by the service. For example, the OData service determines whether a field is visible on the filter bar, and whether it supports type-ahead and value help. To configure more settings or overwrite the settings from the OData service, the developer can set additional annotations in an external document (metadata.xml).

The developer can use annotation properties in the classes ControlConfiguration and GroupConfiguration to adapt the filter bar for the purposes of the app.

These annotations let you:

  • Determine the type of control (for example, whether a field is shown as a multi-input field or as a date picker)
  • Enable the autocomplete suggestions feature
  • Enable the value help dialog
  • Overwrite settings from the OData service
  • Set custom filter groups
  • Add custom fields
  • Access all settings for the underlying filter bar

You can also use all the configuration options described here in the smart filter bar for the list report SAP Fiori element.

Warning
Most of the attributes/properties are not dynamic and cannot be changed once the control has been initialized.

Usage

Use the smart filter bar if:

  • An OData service is available.
  • You want to develop quickly and efficiently.

Do not use the smart filter bar if:

  • You need to make extensive changes to the filter bar.

Components

You can use the annotation properties listed below to influence how filters are rendered in the expanded filter bar and in the filter dialog.

Expanded Filter Bar

Properties of the expanded filter bar

1 enableBasicSearch
Defines whether the filter bar includes a basic search. By default, the basic search is not included.

2 FilterRestrictions/NonFilterableProperties
Defines whether a property is available as a filter criterion.

3 FilterRestrictions/RequiredProperties
Defines the filter field as a mandatory filter. Mandatory filters are marked by an asterisk (*).

4 ValueList
Contains annotations that provide information for rendering a value help list that has been set for a property.

5 FilterExpressionType/MultiValue
Defines whether multiple values can be used in a single filter.

6 FilterExpressionType/SingleValue
Restricts the filter to allow only one value entry.

7 LineItem/Label
A short, human-readable text for the filter name.

8 DynamicDateRange
The dynamic date range supports different operators, such as “Today -X / +Y days”. X and Y also support negative values (thus ranges in the past of future can be selected).

8 insertDefaultFilterValue
Inserts a default filter value into the aggregation defaultFilterValues.

9 liveMode
Defines whether the expanded filter bar is shown in live mode (no Go button) or in manual mode. By default, the filter bar is shown in manual mode.


Filter Dialog

Properties of the filter dialog

1 FilterRestrictions/RequiredProperties
Defines the filter field as a mandatory filter. Mandatory filters are marked by an asterisk (*).

2 FieldControlType/Hidden
Defines whether the filter is initially visible on the expanded filter bar.

SelectionFields
Defines whether a filter belongs to the basic group. All filters in the basic group are initially visible on the expanded filter bar.

4 FieldGroup
Defines whether a filter field is initially shown on the filter dialog, and which group it belongs to.

5 FilterRestrictions/NonFilterableProperties
Defines whether a property is available as a filter criterion.

6 LineItem/Label
A short, human-readable text for the filter name.

Fiscal Annotations

As an example, the smart filter bar supports fiscal annotations, like i.e. for fiscal period / data / time information. Such annotations guarantee the correct rendering of such values.

Smart filter bar with filters based on fiscal annotations

Recently Used Values

The smart filter bar provides a history of the most recent values entered in smart filter fields.

  • When the user focuses on a field, the app can display a small number of recently used values. They are shown below the recommended items, which can appear at the same time.
  • When the dropdown list is opened, all values are shown. When the user starts to type, the recently used values are filtered accordingly.

IN / OUT Parameter

In the smart filter bar, a dropdown or suggestion list can only contain a sub-set of items in case a dependent filter is set (IN parameter). It is also possible that selecting a value in a dropdown or suggestion list fills the current plus additional filter fields (OUT parameter).

Data Types

The smart filter bar analyzes and interprets the metadata provided by the OData service. This allows you to create complex UI entities, and to automatically add fields offered by the OData service to the filter bar as editable input fields. (Note that only fields marked with sap:filterable are added automatically.)

The tables below tell you which input controls are used for the key data types. 

General Data Types

DataType ODataMetadata Additional Configuration Edit type Display type Notes
* * Input Text
DateTime sap:display-format=”Date” DatePicker Text
Decimal Precision=”3″ Scale=”0″ Input Text
All Input (with VHD) Text If a matching ValueList annotation is found, the ValueHelp for the Input is enabled.
A ValueHelp Dialog is created automatically, based on the data in the ValueList annotation.
All
sap:semantics=”fixed-values” on the ValueList entity
ComboBox Text If a matching ValueList annotation is found, and the ValueList entity has the semantics=”fixed-values”, a dropdown list is shown.

Filter Bar-Specific Data Types

Input Type sap:filter-restriction display-format     hasValueHelpDialog controlType Resulting Control Type
* * controlType/filterType is specified As specified in additional configuration
DateTime “interval” “Date” NA Date Range Selection
DateTime “anything other than interval” or empty “Date” NA Date Picker
String “single-value” “true” / none Input Field With Value Help Dialog
(with typeAhead according to hasTypeAhead flag)
String “single-value” “false” not specified/input Input Field
(with typeAhead according to hasTypeAhead flag)
String “single-value” “false” dropDownList; hasTypeAhead is not considered here ComboBox
* “single-value” Input Field
String empty or no filter-restriction “true” / none Multi Input Field with Value Help Dialog
String “multi-value” “true” / none If no VL Annotation is found – only show the range selection part
String “multi-value” / empty “false” If no VL Annotation is found – hide the ValueHelpDialog icon
String “multi-value” / empty “false” dropDownList MultiComboBox
* “multi-value” Input Field
* “interval” NA A single Input Field that allows the “-” shortcut notation for intervals

Guidelines

Reduced set of table columns for the tabular suggestion

You have the option to define different columns in the table of the Value Help Dialog and the suggestion list of the Smart Filter Bar.

In the value list annotation, each parameter can be statically annotated as important using the <code>Importance</code> annotation with EnumMember set to High:

<Annotation Term="com.sap.vocabularies.UI.v1.Importance"
        EnumMember="com.sap.vocabularies.UI.v1.ImportanceType/High" />

In the suggestion list only the important parameters are displayed as columns, while in the table of the Value Help Dialog all of the parameters are displayed.

The Importance annotation is optional – if omitted all of the parameters are displayed in both table of the Value Help Dialog and the suggestion list of the Smart Filter Bar.

Formatting option for negative numbers

The OData type “NumericText” together with display-format=”NonNegative” interprets and displays all values containing only “0” (e.g. “0”, “000”) as empty.

Resources

Want to dive deeper? Follow the links below to find out more about related controls, the SAPUI5 implementation, and the visual design.

Elements and Controls

Implementation

Calendar

The calendar control lets users select a single date, multiple days, entire week(s), or a date range. The calendar shows all time-related data (year, month, week, day, date) at a glance. It also allows users to navigate directly from one month or year to another, or to display multiple months.

When to Use

Use the calendar if:

  • You want the user to select a single date, multiple days, entire week(s), or a date range.
  • You want to display multiple months at once.
  • The calendar always needs to be visible and prominent.
  • Users need to see the year, month, week, weekday and date at a glance to decide which date to select. For example, a user might want to select a date based on the day of the week.
  • Users might be used to different locale-specific date formats (such as day-month-year or month-day-year). Enabling them to select the date visually using the calendar bypasses format-specific interpretation.
  • You want to highlight special days or hide/disable specific days.

Do not use the calendar if:

  • The user is a power user who has to enter a lot of data fast. In this case, use the date picker.
  • The keyboard is the primary input device. In this case, use the date picker.
  • The available screen space is limited and displaying the calendar permanently would take up too much space.
  • The user’s primary goal is to select a date range. In this case, use date range selection.
  • You want to display a range of weekdays in a single row. In this case, use the calendar date interval.
  • The user wants to compare calendars from different people. In this case, use the planning calendar.
  • The user wants to select combined date and time values. In this case, use the date/time picker.

Components

The calendar can stand alone as a control, but is also part of many other controls, such as the date picker, date/time picker or the date range selector.

By default, the focus starts on the current day, but can be customized to fit the use case.

Calendar with current date and selected date
Clickable areas of the calendar

The control allows you to show or hide the calendar weeks. You can also customize the calendar by defining the start and end of a week, or by defining the earliest or latest date.

Specific days can also be disabled, for example non-working days or public holidays.

Calendar without calendar weeks and with disabled days

Month and Year View

The control offers a day view, month view, year view, or year ranges.

Month view
Month view
Year view
Year view
Year range
Year range

Legend for Highlighted Days

Within the calendar, special days can be highlighted. A legend is used to define the meaning of the highlights. Application development teams are responsible for using the colors consistently within one product area.

Calendar with highlighted days and legend

Types

The following calendar types are available:

  • Single day selection: The user can select a single day at a time.
  • Single interval selection: The user can select an interval or one entire week.
  • Multiple day selection: The user can select multiple days, which do not have to be next to each other. It’s also possible to select entire week(s) and a date range.
  • Multiple months: Use this calendar type if users need to see more than one month to make their selection. You can offer single day selection or multiple selection (such as multiple days, entire weeks, or date ranges). We recommend showing no more than two or three calendars at the same time.
Single day selection
Single interval selection
Multiple day selection
Multiple month view
Multiple month view

Behavior and Interaction

The behavior and interaction of the calendar depends on the calendar type. Some interactions are only available for specific calendar types.

Selecting a Single Date

Clicking the date selects it. Clicking the date again deselects it.

Single day selection

Selecting a Single Interval

The user selects a single interval by clicking the first and last day of the date range, which also selects all the days in between. Alternatively, the user can select two different dates and press Shift+Enter twice.

Single interval selection

Selecting an Entire Week

To select an entire week, the user clicks the number for calendar week (if displayed). Alternatively, the user can select one day within the week and press Shift+Space simultaneously.

Selection of an entire week by clicking on the calendar week

Selecting Multiple Days

Multiple days are selected by clicking the desired days individually. Clicking the selected days again deselects them.

Selection of multiple days

Changing Months

If the current month is selected, the view changes to the month view and the user can change the month. By clicking a month, the user changes the month and the view changes back to the day view.

Changing the month using the month view

Clicking the arrow in the day view of the calendar shows the next month of the same year.

Changing the month using the arrow

Changing Years

Clicking the current year changes the view to year view. When the user selects a year, the view changes back to the day view.

Changing the year using the year view

Clicking the arrow in the month view shows the same selected month in the next year.

Changing the year using the arrow

Clicking the year range changes the view to year range view. When the user selects a year range, the view changes back to the year view.

Changing the year range in year view

Clicking the arrow in the year view shows the next year range, changing in increments of 20 years.

Changing the year range in year view

Clicking the arrow in the year range switches to the next 180 year span.

Changing the year range

Responsiveness

Use the calendar within a responsive layout container. The calendar control itself is not responsive.

When using the multiple month view, the calendar adapts to the size of the screen. On small screens, only one calendar is displayed.

Related Topics

Elements and Controls

Implementation

Wrapping and Truncating Text

Wrapping and truncation define how text behaves when the length of the text exceeds the available space. The responsive behavior is device-independent and is the same on all form factors. Different controls make use of wrapping and/or truncation. This article provides an overview of best practices.

Types

There are three types of responsive behavior for text that doesn’t fit onto a line:

  • Wrapping
  • Truncation
  • A combination of wrapping and truncation

Wrapping

Excess text moves down to the next line.

Note: If you switch on hyphenation, there is always a minimum of 3 characters at the end of the line before wrapping and at the start of the next line after wrapping.

Text wraps
Text wraps

Truncation

Excess text is cut off and is no longer visible. A truncation indicator appears at the end of the line (…).

Note: The truncation indicator for multiple lines depends on the browser line clamping support. For browsers that support it, this will be shown as ellipsis (…), whereas in other browsers, the overflowing text will just be cut off.

Text truncates
Text truncates

Wrapping and Truncation

Wrapping and truncation are combined. For example, a text might wrap over two lines and then truncate.

Combination: The text wraps over three lines and then truncates

Usage

Follow the best practices below to decide whether to use truncation, wrapping, or a combination of both for your use case.

Use wrapping if:

  • The information is crucial for the user.
  • The user is required to read the full text (for example, in consent forms).
  • You are uncertain about how important the text is for the user.
  • You want to display numbers in a piece of continuous text. In this case, use the text control to avoid truncated numbers.
  • You are using the title control outside of toolbars, the launchpad shell bar, and the dialog header.
  • The text for a list item is crucial for the user. In this case, use the custom list item in combination with the text control.
  • You are using a label, object status, or link. For these controls, use a short, precise text.

Use truncation if:

  • The text contains only secondary information. In this case, provide the user with a quick way to see the full text with one interaction, such as one click. An example might be a text link that opens a popover with the full text and additional information.
  • The control is designed to save vertical space, and only allows one line of text with a limited width (for example, the title of a toolbar).
  • You use complex tables, such as the grid table, analytical table, or tree table to avoid performance issues.
  • You use the standard list item, object list item, input list item, display list item, or action list item. Provide the truncated information in the header of the linked page. If the item has no navigation target, provide the user with another way of displaying the truncated information. One option might be to provide a text link that opens a popover with the full text and addtional information, for example. Do not use a tooltip to show the full text.

Use a combination of wrapping and truncation if:

  • The text is a teaser or serves as an appetizer for a longer text, such as an article. In this case, use the text control with the property MaxLines.
  • The control is designed to save vertical space, and only allows a limited number of lines, with a limited width (for example, tiles with 2 lines for the title).

Do not use wrapping, truncation, or the combination of both techniques if:

  • You want to show a standalone numeric value, such as 1,000.00 EUR. Use the object number with a formatter and a short or medium format instead.
  • The text is inside another UI element that is not intended to wrap (such as a button).

Resources

Want to dive deeper? Follow the links below to find out more about related controls, the SAPUI5 implementation, and the visual design.

Elements and Controls

Implementation

No links

UI Element States

Overview

Using the correct state or combination of states for a UI element helps users to recognize possible options and see where they need to take action.

Depending on the UI element, different types of state are supported:

  • Control states
  • Value states
  • Visual states
  • Additional states

The table shows the possible states for each type.

Control States Value States Visual States Additional States
Enabled
Disabled
Hidden
Read only
Display only
Value help only
Neutral
Error
Warning
Success
Information
Regular
Hovered
Pressed
Focused
Selected
Required

Overview of UI element states 

Control States

A UI element can have only one control state at any given time.

Enabled

“Enabled” is the default state for all UI elements. The UI element is focusable, visible, and – if applicable – editable. The value of the UI element is easy to recognize.

Developer Hint
To achieve the enabled state for input controls, set the “editable” property to “true”.
Enabled button
Enabled button
Enabled checkbox
Enabled checkbox
Enabled input field
Enabled input field

Use the “enabled” state if:

  • A UI element can currently be used.
  • A UI element cannot currently be used, but disabling it is not an option because users might not know how to enable it. In this case, keep the UI element enabled and provide a message if it is used incorrectly.
    Example: Enable a button even if the corresponding action can only be performed if a setting is made on another page or in a completely different subsection on the same page.
  • A UI element is a finalizing action, such as Save, Accept, OK, or Cancel. Finalizing actions are placed on the footer toolbar of a page or dialog.
  • button on a table toolbar does not depend on items in the table being selected.
    Examples: Column Settings, Sort, Filter, Full Screen, Add
  • button on a table toolbar depends on items in the table being selected, and one or more of the items currently selected fulfills the requirements for enabling the button.
  • An action is global, such as Share or Print.

Do not use the “enabled” state if:

  • A UI element cannot currently be used and it would be obvious how enable it. Disable it instead.
  • A UI element cannot be used at all. Hide it instead.

Disabled

Disabled UI elements are visible, but not focusable or editable. Depending on the theme, the value of the UI element might not be recognizable.

Disabled button
Disabled button
Disabled checkbox
Disabled checkbox
Disabled input field

Use the “disabled” state if:

  • A UI element cannot currently be used, and it is obvious how enable it.
    Example:
    The user must click a checkbox to add a value in an input field. The input field is placed directly next to or directly below the corresponding checkbox. Disable the input field if the checkbox is not selected, and enable it as soon as the checkbox is selected.
  • button on a table toolbar depends on items in the table being selected, and the current selection does not include suitable items.
    Examples:

    • Disable Copy if nothing is selected.
    • Disable Compare if fewer than two suitable items are selected.
    • Disable Delete if the current selection contains only items that cannot be deleted, such as locked items.

Do not use the “disabled” state if:

  • A UI element can never be enabled. Hide it instead.
  • It would not be clear why a UI element is disabled. In this case, keep the UI element enabled and provide a message if it is used incorrectly.
  • The input value of a UI element is relevant, and taken into account if a finalizing action is triggered. In this case, users must also be able to read the value. Use the read-only state instead.

Hidden

Hidden UI elements are not visible, not focusable, and not editable. The UI element doesn’t take up any space. If a UI element is hidden at runtime, the freed space is used by subsequent UI elements.

Use the “hidden” state if:

  • A UI element can never be used (for example, because the user has no authorization).
  • Hiding the UI element is a meaningful form of responsive behavior.
    Example: A column of a table is not needed on phones.
  • A UI element is not available in the current mode.
    Example: Buttons that are only available in edit mode should be hidden in display mode.
  • A UI element is not available for the current state.
    Examples:

    • Hide Delete on a page in an undeletable state, such as “sent”.
    • Hide Delete as a line-item action for an undeletable item.
  • Parts of the UI are changed based on a setting.
    Example: When changing the setting, hide UI elements that are not available for the new setting.

Do not use the “hidden” state if:

  • A UI element cannot currently be used, but can be enabled by user actions.
    Examples:

    • A selection does not contain deletable items. In this case, disable Delete.
    • table was filtered down and currently doesn’t contain deletable items. In this case, disable Delete.


Read Only

Read-only UI elements are displayed in edit mode, but are currently not editable. The UI element is visible and focusable. The value can be recognized and selected, but not changed.

Read-only checkbox
Read-only checkbox
Read-only input field

Use the “read only” state if:

  • page or a part of it is in edit mode, and
    • a UI element is currently not editable or changeable.
    • an input value is relevant and needs to be taken into account when triggering a finalizing action.
    • an input value must be readable.

Do not use the “read only” state if:

  • A UI element can never become editable. Use alternatives instead (such as text or display only).
  • page or part of it is in display mode. Use alternatives instead (such as text or display only).

Display Only

The display-only state is used for two cases:

The visualization of display-only UI elements is optimized for reading. The type of UI element does not necessarily need to be recognized. The UI element is not focusable (exception: links), and not editable. Its value is recognizable and shown in full (not truncated). The UI element might also be displayed in a “compressed” format, where the information is displayed differently to the read-only or editable state.

Developer Hint
The display-only state is available for only a few UI elements. For most UI elements, you can achieve the same result by replacing them with display elements, such as text.
Display-only checkbox

Use the “display only” state if:

  • A page or part of it is in display mode.
  • An input value is relevant and needs to be taken into account (for example, it is sent on Submit)
  • page or part of it is in edit mode, and a UI element is never editable (for example, a UI element displaying a generated ID).

Do not use the “display only” state if:

  • page or part of it is editable and a UI element is currently not editable. Use the read-only state instead.

Value Help Only

If the control state is “value help only”, the UI element is displayed in edit mode, and is visible and focusable. The value of the UI element is recognizable. The value can be changed, but only with a value help dialog.

This state is only available for certain user input elements.

Value-help-only input field

Use the “value help only” state if:

  • A UI element can currently be used.
  • User input is limited to specific values, and you don’t want to let users type in values directly.

Do not use the “value help only” state if:

  • You want to allow free text entry.
  • User input should be limited to specific values, but typing them is faster and more efficient. In this case, work with selects, combo boxes, or input fields with suggestions and validation to limit the user input to the permitted values.
  • The surrounding page (or part of it) is in display mode.

Value States

Value states are only available for user input elements. A UI element can have only one value state at any given time. The value states make use of the semantic colors. For more information, see How to Use Semantic Colors.

Neutral

“Neutral” is the default state. Do not change it unless you have a reason to do so.

Neutral input field
Neutral input field

Use the “neutral” state if:

  • There is no reason to use another value state.
  • The user input has not yet been validated.
  • Validation of the user input was successful, without any issues.
  • message contains non-critical, additional information for users.

Do not use the “neutral” state if:

  • User input was validated and a problem occurred. Depending on the severity, use the warning or error state instead.
  • message contains information about a warning or error.

Error

The error state marks a UI element if a validation fails with an error. Errors prevent users from continuing their work.

Checkbox with error
Checkbox with error
Input field with error

Use the “error state” if:

  • Users need to be prevented from finalizing the current mode or page.
  • User input failed a validation, and the problem must be fixed before the user can continue.
  • message contains information about an error.

Do not use the “error” state if:

  • User input was validated successfully. Use the neutral state instead.
  • User input was validated and only minor problems occurred. Users can still finalize the current mode or page. Use the warning state instead.
  • The surrounding page (or part of it) is in display mode.

Warning

The warning state marks a UI element if a validation identifies a minor problem. Users can carry on working, but might run into an error later on.

Developer Hint
In UI5, the warning state is called “Critical”.
Checkbox with warning
Input field with warning

Use the “warning” state if:

  • The current mode or page can be finalized, but doing so might lead to an error later on.
  • User input was validated and a minor problem occurred. It is possible to continue without fixing the problem, but doing so might lead to an error later on.
  • A message contains information about a warning.

Do not use the “warning” state if:

  • User input was validated successfullly. Use the neutral state instead.
  • User input was validated and a major problem occurred. Users must fix the problem before finalizing the current mode or page. Use the error state instead.
  • The surrounding page (or part of it) is in display mode.

Success

The success state marks a UI element if a validation succeeded without errors or warnings.

Input field - Success state

Use the “success” state if:

  • message contains information about a process that was finalized without any issues. Users will need this information later on (for example, values that need to be copied to another app).

Do not use the “success” state if:

  • A process was finalized successfully and a short notification is enough. In this case, use a message toast instead.
  • The surrounding page (or part of it) is in display mode.

Information

The information state marks a UI element to draw attention to the information it provides.

Input field - Information state

Use the “information” state if:

Do not use the “information” state if:

  • The surrounding page (or part of it) is in display mode.
  • User input was validated successfully. Use the neutral state instead.
  • User input was validated and a major problem occurred. Users must fix the problem before finalizing the current mode or page. Use the error state instead.

Visual States

Visual states are handled by the corresponding UI element directly. A UI element can have only one visual state at any given time.

Regular

A UI element is shown in the regular visual state if the user is not interacting with it.

Regular button
Regular button
Regular checkbox
Regular checkbox
Regular input field
Regular input field

Hovered

The hovered state shows that the cursor of a pointing device (such as a mouse or pen) is currently placed on a UI element that is in an enabled, read-only, or value-help-only state.

The hovered state is not available if the UI element is used with keyboard and touch devices.

Button in hovered state
Checkbox in hovered state

Do not use the “hovered” state if:

  • You need to provide additional information for a UI element. The hovered state is only available for some interaction devices. When using other devices, the information gets lost.

Pressed

The pressed state is displayed when a UI element is activated or remains in an activated state (“toggled”). A UI element is activated if a user clicks it.

Pressed button
Pressed button

Additional States

Focused

The focus determines which UI element receives the user input when the user input itself does not supply positioning information (for example, keyboard input).

Only one UI element can have the focus at any given time.

The focus is changed by activating another UI element with an input device that provides positioning information (mouse, pen, touch). Clicking an area without a focusable UI element removes the focus until another UI element gets the focus through a user interaction.

With a keyboard, the focus is changed as follows:

Key(s) Change in Focus
TAB Move forward
Shift+Tab Move backward
F6 Move the focus forward to the first element of the next group.
Shift+F6 Move the focus backward to the first element of the previous group.
Arrow keys Move the focus between items (for example, within liststablescalendars, or charts).

When you move the focus using the keyboard, the newly-focused element does not get activated (“pressed”).


Focused button
Focused button
Focused checkbox
Focused checkbox
Focused input field
Focused input field

Selected

The “selected” state shows that the UI element is currently selected. This state is only available for selectable controls, such as checkboxes, radio buttons, or items.

Developer Hint
Depending on the UI element, the “selected” state could also be named differently (for example, “Checked”).

Selected checkbox
Selected checkbox

Required

The “required” state for a user input element shows that users have to provide an input value. If no value is provided, validation fails.

Required input field

Use the “required” state if:

  • A UI element must contain user input.

Do not use the “required” state if:

  • User input is not mandatory.
  • The UI element is not intended for user input, such as a title.
  • The surrounding page (or part of it) is in display mode.

Guidelines

Combining States

Control States

Use only one control state at any given time. If several control states need to be combined, use the most restrictive state.

List of control states in edit mode, from the most restrictive to the least restrictive:

  • Hidden
  • Disabled
  • Display only
  • Read only
  • Value help only
  • Enabled

In display mode, use only the following control states:

  • Hidden
  • Display only
  • Enabled (for display controls only)

Visual States

Use only one visual state at any given time. If several visual states need to be combined, use the one that requires the most user interaction.

List of visual states, from the most to least user interaction:

  • Pressed
  • Hovered
  • Toggled
  • Regular

Value States

Use only one value state at any given time. If several value states need to be combined, use the most severe state.

List of value states, from the most severe to the least severe:

  • Error
  • Warning
  • Success
  • Neutral

Combining Different Types of State

  • Hidden and disabled UI elements cannot be combined with any other state.
  • Display-only UI elements can be combined with the pressed state (toggle only) and the selected state.
  • Read-only UI elements can be combined with pressed state (toggle only) and with the selected state. In addition, read-only elements can be focused.
  • Value-help-only UI elements can be combined with any visual states. In addition, they can be required and focused.
  • Enabled UI elements can be combined with any visual state, any value state, and any additional state.

Resources

Want to dive deeper? Follow the links below to find out more about related controls, the SAPUI5 implementation, and the visual design.

Elements and Controls

Implementation

No links.

Which Selection Control Should I Use?

Selection controls are UI elements that allow the user to pick one or several values or options. Different selection controls are available, which each support dedicated use cases. This article offers guidance on when to use the following selection controls:

Selecting a Single Value or Option

To enable users to select a single value or option, display either a combo box, an input field, or a select control. A value is usually a single data point, while an option contains several values, such as product attributes.

Combo Box

The combo box allows users to select one option from a predefined list. It’s also possible to type in a value or custom value and filter the predefined selection list (if the application allows it).

Combo box with two-column layout and option to enter custom value

Input Field

The input field allows users to enter and edit text or numeric values in one line. To help the user enter a valid value, you can enable the autocomplete suggestion feature or provide a selection dialog.

The selection dialog opens when the user clicks the input field icon.

Input field
Input field
Input field with a button to open one of the selection dialogs

Select

The select control (also known as a dropdown) is commonly used to select an option from a predefined list.

Select control
Select control

Selecting Multiple Values or Options

The multi-combo box and multi-input field support the selection of multiple single values or options. A value is usually a single data point, while an option contains several values, such as product attributes.

Multi-Combo Box

Use the multi-combo box if users need to select more than one option from a predefined list. The select options in the list have checkboxes that support multi-selection. Users can also type in a value to filter the list (if the application allows it).

Multi-combo box with three selected values
Focused, opened multi-combo box

Multi-Input Field

A multi-input field allows users to enter more than one value. These values are displayed as tokens. To help the user enter a valid value, you can enable the suggestions feature or provide a selection dialog.

Multi-input field with three values
Multi-input field with three values while typing
Multi-input field with values and the option to open a selection dialog

Supporting Selection Dialogs

There are three selection dialogs: the select dialog, the table select dialog, and the value help dialog. These dialogs enable users to pick one or several values or options from a long list. Selection dialogs are useful when users need more than one data point to identify the “right” value, or when they want to search the list to find a particular value.

The selection dialogs are always used in combination with one of the following controls:

  • Input field for selecting one value/option
  • Multi-input field for selecting more than one value/option

Users can open the respective selection dialog from within these controls.

Example

The user wants to pick a certain product. However, because the product names are very similar, it’s difficult to identify the right one. Additional product attributes in the selection dialog, such as an image and the product release date, help the user to pick the correct option.

Select Dialog

The select dialog enables users to select one or more options from a comprehensive list. The select dialog comes with a list of entries containing a few attributes. It also provides a search field to filter the list.

Select dialog with two selected items

Table Select Dialog

The table select dialog enables users to select one or more options from a comprehensive table. Usually, the table displays multiple attributes or other related information for an item. Making this additional information available for an entry helps users to identify the correct option.

The table select dialog reuses the responsive table. It also provides a search field to filter the list.

Table select dialog with two selected items

Value Help Dialog

The value help dialog enables users to find and select single and multiple values/options. It also allows users to define conditions and multiple ranges.

Value help dialog on a mobile device

Best Practices

Depending on the number of entries in the selection list, users might need more information to identify the “right” single value/option or multiple values/options.

Use the criteria in the tables below to choose the most suitable selection control for your use case.


Selecting a Single Value or Option

The user can identify the “right” data point based on… 2-12 entries in the selection list 13-200 entries in the selection list
200-1,000 entries in the selection list
More than 1,000 entries in the selection list
…a single value Select or combo box Combo box
with validator that prohibits custom values
Input field with suggestions and select dialog Input field with suggestions and value help dialog
two values Select or combo box
with two-column layout
Combo box
with validator that prohibits custom values
Input field with suggestions and select dialog Input field with suggestions and value help dialog
...3 or 4 values with/without an image Input field with suggestions and select dialog Input field with suggestions and select dialog Input field with suggestions and select dialog Input field with suggestions and value help dialog
more than 4 values with/without an image Input field with suggestions and table select dialog Input field with suggestions and table select dialog Input field with suggestions and table select dialog Input field with suggestions and value help dialog
several values and option to narrow selection list down (by defining conditions, selecting ranges) Input field with suggestions and value help dialog Input field with suggestions and value help dialog Input field with suggestions and value help dialog Input field with suggestions and value help dialog

Selecting Multiple Values or Options

The user can identify an individual value/option based on… 2-12 entries in the selection list 13-200 entries in the selection list
200- 1,000 entries in the selection list
More than 1,000 entries in the selection list
…a single value Multi-combo box Multi-combo box Multi-input field with suggestions and select dialog Multi-input field with suggestions and value help dialog
two values Multi-combo box
with two-column layout
Multi-combo box
with two-column layout
Multi-input field with suggestions and select dialog Multi-input field with suggestions and value help dialog
3 or 4 values with/without an image Multi-input field with suggestions and select dialog Multi-input field with suggestions and select dialog Multi-input field with suggestions and select dialog Multi-input field with suggestions and value help dialog
more than 4 values with/without an image Multi-input field with suggestions and table select dialog Multi-input field with suggestions and table select dialog Multi-input field with suggestions and table select dialog Multi-input field with suggestions and value help dialog
several values and option to narrow selection list down (by defining conditions, selecting ranges) Multi-input field with suggestions and value help dialog Multi-input field with suggestions and value help dialog Multi-input field with suggestions and value help dialog Multi-input field with suggestions and value help dialog

Resources

Want to dive deeper? Follow the links below to find out more about related controls, the SAPUI5 implementation, and the visual design.

Elements and Controls

Implementation

Using Tooltips

Tooltips appear next to the mouse pointer when it hovers over an element that offers a tooltip. Tooltips are shown only for elements that do not have a label or, in rare cases, to display additional information.

Since tooltips are handled by the browser, the form of tooltips depends on the platform, the browser, and the version.

Usage

Use a tooltip if:

  • You have an element that cannot be attached to a label.
  • You are showing an icon-only button.
  • You want to show in-place information within a map.
  • You are showing a button that contains only an icon and a number.

Do not use a tooltip if:

  • You want to show the full text for a truncated item. Instead, make more space for the item.
  • Text is truncated on a control that doesn’t support wrapping. Instead, show the full content with one click in a popup. See Wrapping and Truncating Text.
  • You don’t want to use a label. You should always use a label.
  • You want to offer an explanation or provide help. Instead, use the Web Assistant.
  • The content of the tooltip would be redundant.

Responsiveness

Tooltips are usually invoked by a mouseover event, which is why they are limited to desktop devices. Most touch-only devices have no way of showing tooltips.

Because tooltips cannot be displayed on all devices, they should never contain critical information. They should also not contain redundant information.

Types

Icon-Only Buttons

Icon-only buttons must have a tooltip to indicate the action the button will trigger.

.

Icon-Only Buttons with Amounts

Icon-only buttons that contain numbers, but no text, must also have a tooltip.

Maps

Within maps, different areas and hotspots can show different tooltips to elaborate the current position.

Guidelines

Overwriting standard icon tooltips

The icon within an icon-only button usually comes with a standard tooltip. However, this default tooltip contains the technical icon name, which may not be the right term for the icon in your context. Always check all icons, and overwrite the default tooltip texts with suitable texts for your specific use case.

Do
Icon with app-specific tooltip (default overwritten)
Don't
Icon with standard tooltip (default)
Warning
Ensure that your tooltips are maintained properly at all times, since they are also invoked for disabled items. Some browsers even invoke tooltips for keyboard actions, such as tabbing through the links.

Resources

Want to dive deeper? Follow the links below to find out more about related controls, the SAPUI5 implementation, and the visual design.

Elements and Controls

Implementation

How To Use Semantic Colors / Industry-Specific Colors

You can use semantic colors and industry-specific colors to visualize the status or state of business data:

  • Semantic colors denote standard value states (such as good, bad, or warning). Each color has the same basic meaning in all contexts.
  • Industry-specific colors reflect the color conventions in a line of business or industry. The meaning of each color depends on the business context.
    In SAPUI5, industry-specific colors are called indication colors.

Nearly all input controls support semantic colors, while industry-specific colors are only supported by a few UI elements.

For more information about the color values, see Belize Colors and Quartz Light Colors.

Object status with semantic colors
Object status with industry-specific colors

Usage

Use semantic colors if:

Do not use semantic colors if:

  • The color has no meaning and is used only for decoration.
  • You want to use colors in an industry-specific context, where the meaning of the colors differs from the standard semantic meaning. Use the industry-specific colors instead.

Use industry-specific colors if:

  • You want to use a color based on industry conventions (for example, when the meaning of a color is defined in an industry standard).

Do not use industry-specific colors if:

  • The color has no meaning and is used only for decoration.
  • No special industry color conventions apply. Use the standard semantic colors instead.

Overview

Semantic Colors

SAP Fiori has five semantic colors that are associated with the following predefined value states:

Semantic checkbox states

Industry-Specific Colors

SAP Fiori has eight generic indication colors that are intended only for industry-specific use cases. You can associate these colors with a specific meaning in a given industry context (for example, to reflect industry standards).

Each application must clearly communicate the meaning of each color. In addition to using a color, you must also provide a text, such as an object status. All colors require a corresponding descriptive text for accessibility purposes.

The indication color palette is supported exclusively by tables and the object status.

Object status with five industry-specific colors
Object status with three industry-specific colors

When To Use Which Semantic Color

Only use a semantic color if you need to convey the meaning defined for that color. This section looks at each semantic color in turn, and offers guidance on when to use each one.

Regular (neutral)

Use this color as the regular, neutral state of all UI elements.

Use the regular (neutral) color if:

  • You want to use the default of a UI element.
  • There is no reason to use another value state.
  • You want to indicate a neutral object status.
  • message contains non-critical, additional information for users.
Radio button, step input, and input in regular state

Good / Positive

This color stands for a good, positive situation, or for the successful completion of a task.

Use the good/positive semantic color if:

  • You want to highlight a good or positive status.
  • message contains information about a process that was finalized without any issues. Users need this information later on (for example, to copy values to another app).

To indicate a successfully completed process, a short notification is enough. In this case, use a message toast and not the good/positive semantic color.

Radio button, step input, and input in positive state

Warning / Critical

This color indicates a critical situation or warning.

Use the warning/critical semantic color if:

  • You want to highlight a critical status.
  • A minor problem has occurred. The user can carry on working, but might run into an error later on.
  • The current mode or page can be finalized, but doing so might lead to an error later on.
  • The user input was validated and a minor problem occurred. The user can continue without fixing the problem, but might run into an error later on.
  • A message contains information about a warning.
Radio button, step input and input in warning state

Bad / Error

Use this color for errors, or to indicate a bad or negative status or consequence.

Use the bad/error semantic color if:

  • Something bad has happened, or is about to happen. The issue requires the user’s attention. Until the issue is resolved, the user can’t carry on working.
  • You want to indicate that a value has caused an error.
  • The user needs to be prevented from finalizing the current mode or page.
  • The user input failed a validation, and the problem must be fixed before the user can continue.
  • message contains information about an error.
Radio button, step input and input in error state

Information

Use this color for an information state.

Use the information semantic color if:

  • You want to draw attention to a control for an important purpose, such as visualizing the recommendations from intelligent systems in input fields.
  • You want to highlight newly added items, such as a new table row.

Don’t use the information color if you want to highlight an information text. The blue text color is explicitly reserved for links. Use bold or italic formatting instead.

Radio button, step input and input in information state

Using Industry-Specific Colors

There is no predefined meaning for the individual colors in the generic palette. If you want to use one or several colors from the industry-specific color palette in your application, proceed as follows:

  • Define the meaning for each color you want to use.
  • Whenever you use an color, provide an additional text indicator (such as an object status) to ensure that the text is clear and accessible.
  • Once you have defined the meaning for a color, use the color/meaning consistently within your application.

Color Overlap

By default, some colors are the same in the semantic palette and the industry-specific color palette (such as red, orange, green, and blue). This is intended. However, the two color palettes can be themed independently, which means that end users might not see the same colors in both.

No Palette Mix

Some UI elements support both the semantic color palette and the industry-specific color palette. However, you can only use one color palette at a time. It is not possible to mix different colors from both palettes.

Color Hierarchy

If an UI element would have multiple semantic or industry-specific color statuses at the same time, the control may need to determine an “overall color” at first.
In this case, the overall color is based on the color hierarchy: colors higher up in the hierarchy take precedence over those lower down. Note that there is only one hierarchy for both semantic colors and industry-specific colors.

Color hierarchy
Color hierarchy

Styles

The semantic colors and industry-specific colors are themeable.

Resources

Want to dive deeper? Follow the links below to find out more about related controls, the SAPUI5 implementation, and the visual design.

Elements and Controls

Implementation

Table Select Dialog

Table select is a commonly-used dialog that helps users to make a selection from a comprehensive table containing multiple attributes or values. With the dialog, users are also able to access additional information about the objects in the table without needing to select them first.

The dialog provides a responsive table layout with additional search, filter, and selection functionalities in the header. A footer toolbar provides actions for canceling or confirming the process.

Usage

Use the table select dialog if:

  • You need to help users select one or more items from a comprehensive list that contains multiple attributes or values.

Do not use the table select dialog if:

  • You need to help users pick one item from a predefined set of options that contains only one value. In this case, use the dropdown box instead.
  • You need to help users with query-based range selection and enhanced filter options. In this case, use the value help dialog instead.
  • Your use case requires tabs, filters, or actions in a select dialog.In this case, use a standard dialog instead.
  • Your use case only requires filtering without selection. In this case, use the filter toolbar instead.
Information
For more information on which selection control to choose, see the selection control overview.

Responsiveness

The table inside the table select dialog behaves like the responsive table. On smaller screens, the columns wrap and build a list that shows all the information. All other elements in the control are also responsive.

On bigger screens, the table select dialog also provides columns
The table in the dialog is responsive and wraps on smaller screens to show a list

Behavior and Interaction

The table select dialog can be called up from any control. The trigger is usually a button with a selection icon in an input field, or an Add button in a toolbar.

Triggers

Input Trigger

This trigger can be useful if users need to select, for example, one customer from a large customer register.

Example of a trigger: the selection icon in the input field

“Add” Button

This trigger can be useful if users need to add an item to a list. For example, the dialog could help users select the product from a large product catalog. Clicking Select in the footer toolbar of the dialog adds the selected products to the list.

“Clear” Button

The Clear button allows users to clear all the selected items.

Example of a trigger: 'Add' button in a table

Sticky Header

The column headers and info toolbar in the table select dialog are “sticky”, which means that they stay fixed on top when scrolling (sap.m.Table, property: sticky).

Information
The “sticky” feature has some browser limitations, and is not supported in Internet Explorer and in Microsoft Edge versions older than 41. In these browsers, the headers of the table select dialog will not be sticky.
Example of sticky headers


Single Select

The single-select version does not need a Select button in the footer toolbar because the selected entry is taken over and closed as soon as a user selects an item from the table. If applicable, the entry is displayed in the field from which the dialog was triggered. Alternatively, a toast message can be shown if necessary.

Multi-Select

The multi-select version of the table select dialog provides checkboxes for users to choose multiple items. The blue infobar above the table indicates the number of selected items. The selection is taken over when the user closes the dialog via the Select button in the footer toolbar. Clicking Cancel closes the dialog without taking over the selected values.

Remembering Selections

If selections need to be memorized in order to help users make corrections, you can set the RememberSelections property to true. This restores the selection to the state it was in when the dialog was last opened as soon as users exit the dialog via Select or Cancel. The interaction flow of the RememberSelections property is shown and explained in the select dialog article.

Grouping

The list can also be displayed as grouped. Group headers divide the table into segments. A pregrouped table is useful for tables with many entries, which can be sorted by a single attribute.

Table select dialog with group headers

Resize and Drag Dialog

You can allow users to resize and drag the table select dialog by setting the resizable and draggable properties to “true”.

  • A resizable dialog makes sense if the items within the dialog can have long names or descriptions.
  • A draggable dialog allows users to see the app content behind the dialog.
Guidelines
Both features are optional. However, if you only need one, always set both properties to “true” for consistency reasons.

Guidelines

Set the information provided in the table select dialog from top to bottom as follows:

Dialog Header

Use the following format for the dialog header:

  • For single selection: Select [Business Object]
    Example: Select Product
  • For multiple selection: Select [Business Objects]
    Example: Select Products.

Search

The first interactive element in the dialog is a standard search field. Two types of search behavior are available:

  • live search, also known as “search-as-you-type,” which is triggered by each character that the user enters or deletes.
  • A manual search, which is triggered explicitly after the user enters text in the search field and clicks theSearch icon or presses the ENTER key. As soon as the user hits the Search button, a Delete icon appears at the end of the input field to delete the keyword and cancel the result list.

App developers need to decide which search to use. We recommend implementing the live search whenever possible. Use the manual search only if the amount of data is too large and if your app would otherwise run into performance issues. For more information, check out the article on searching.

Infobar

In multi-selection mode, an infobar shows the number of selected items. Use the following format:

[Business Objects] Selected: [Number of Items]
Example: Products Selected: 2

“Clear” Button

The “Clear” button for clearing all the selected items is optional. By default, the button is not shown. To display the button, set the showClearButton property to “true”.

Content

The content area provides a table. This behaves like the responsive table, so the columns wrap on smaller screens and display a list.

By default, the table select comes with a growing feature (property: growing = true). We recommend disabling the growing feature and setting this property to “false”. This ensures that all items in the table are loaded at once, and that the “Items selected” count, the search, and select/deselect features all work properly.

Footer Toolbar

In the multi-select version, the footer toolbar contains the Select and Cancel buttons. Select takes over the selection, while Cancel resets the selection to the state it was in when the user opened the dialog.

In the single-select version, only provide Cancel in the footer toolbar because the dialog takes over the selection as soon as the user chooses one.

Resources

Want to dive deeper? Follow the links below to find out more about related controls, the SAPUI5 implementation, and the visual design.

Elements and Controls

Implementation

Tree Toolbar

The tree toolbar always appears above a tree or tree table. The control is used for key actions that impact the entire tree.

Usage

Use the tree toolbar if:

  • There are multiple objects on your page and you need to edit only a single tree.
  • You want to show actions as close to their corresponding controls as possible.
  • You need a title for your tree.

Don’t use the tree toolbar if:

  • You are using single selection and only one or two actions. In this case, place the actions on each line.

Responsiveness

To enable responsiveness, use the overflow toolbar control. For more information, see Toolbar Overview – Responsiveness.

Components

The tree toolbar can contain several components, including a title and several types of button. Actions are grouped by the following action types:

  • Finalizing actions, such as Save or Cancel. Finalizing actions are app-specific, and are used only if the tree is editable.
  • Business actions, such as Edit or Create. Business actions can be app-specific or general object management actions. They also include actions for organizing the tree.
  • Actions for managing the content, such as Sort or Filter. These settings are also known as “view settings”.
  • Actions for managing the layout, such as Maximize or Minimize.
  • Generic actions, such as Export to Spreadsheet.

Between the groups, add a separator line.

The following content can be part of the tree toolbar. Use only the content your users really need. For the remaining content, keep the order shown below:

  • Title
  • Variant management or content switch (for example, as used to switch between multiple views in a list report)
  • Search
  • Finalizing actions:
    • Save
    • Cancel
  • Business actions: Use this action type for app-specific actions. This group contains:
    • App-specific business actions
    • Actions for object management
      • Create (for new items) or Add (for existing items)
      • Edit
      • Delete (if the object itself is deleted) or Remove (if the reference to an item is removed)

The order of actions in this group is not “fixed”. Place the most important action first, followed by the second most important action, and so on. Try to keep Create/Add, Edit, and Delete/Remove together, but only if this is meaningful in your app.

  • Actions for organizing the tree:
    • Cut
    • Copy
    • Paste and / or Paste from Spreadsheet
  • Actions for content management (view settings):
    • Collapse All / Expand All
    • Sort
    • Filter
    • Group
    • Column Settings
  • Actions for managing the layout:
    • Maximize / Minimize
  • Generic actions:
  • View switch (for example, to switch between tree and chart view)
  • Overflow
All mentioned components in the correct order

Behavior and Interaction

App-Specific Business Actions

If needed, you can define your own actions for the app. In this case, use text-only buttons with a short, unambiguous text for the action that the button performs. A button text is usually a single-word verb (for example, Share). Note that text strings can be longer in other languages.

Tree toolbar with app-specific buttons

Title

A title provides a short, meaningful summary of the content, mostly in a single word. To display a title, use the title control.

In addition, the title can be followed by an item counter (the number of items in parentheses).

Use a title if you need the table toolbar, and if the title of the table is not indicated in the surrounding area. To avoid repeating text, you can use a generic text for the table title, such as Items. Note that the title is truncated if there is not enough space.

Title with item counter in the tree toolbar

Variant Management

In trees, a variant stores all the settings that define the table view, such as the column layout, column visibility, sorting, filter settings, and grouping. The variant management control enables users to load, save, and change variants. In most cases, variant management replaces the title.

Variant management in the tree toolbar

Title and Variant Management

If you need both a title and variant management, place the variant management control directly after the title. Use a separator between the title and variant management.

However, since displaying both the title and variant often results in truncated texts, this pattern is not recommended.

Title with variant management

Content Switch

To switch between different predefined views, use a select control or a segmented button. The content switch replaces the title and the variant management control. In the rare case that the content switch is shown together with a title, the content switch follows the title.

A predefined view contains settings for sorting, filtering, grouping, column layout, and column visibility. However, in most cases, the content switch is just used for different filter settings like All, Mine, and Others. In this case, make sure that the content switch doesn’t interfere with other filter settings. For example, remove the corresponding filter from the filter bar. If possible, include an item counter per view.

Another common pattern for content switches are views like By X, and By Y, which are usually defined using group settings.

Use the segmented button and the select control as follows:

  • For a limited set of views (2-3), use the segmented button for desktop and tablet devices. Replace it with a select control if there is not enough screen space.
  • If the number of views can change or is larger than 3, use the select control.

For more information, see multiple views for list reports.

Segmented button with a counter
Segmented text button to switch content
Select control to switch content

Search

For trees with a large number of items, consider adding a search field. Use a search field only if there is no other way to search within the tree (for example, if there is no additional filter bar).

Place the search field on the right side of the toolbar. Since the search field cannot be moved into the overflow menu, always provide a minimum width.

Ideally, search for results in all columns. As a minimum, search in all currently visible columns.

For more information, see Search.

Search in the tree toolbar

Create / Add

Use a text button for Create or Add actions. If the Create or Add action is a main function, never move it into the overflow.

Insert the new item at the following position:

  • If a single node is selected, insert it as a child item to this node
  • If a single leaf is selected, insert it as a sibling to this leaf (within the same node)
  • If no item is selected, insert it into the visible “root” node

If multiple items are selected, disable the Create / Add button.

More information: Object Handling (Create, Edit, Delete)

Tree toolbar with 'Create' button
Tree toolbar with 'Add' button

Edit

There are several options for editing a tree:

Edit a Single Item

To allow the user to edit a single item, show an icon-only Edit button at the end of the item (depending on the tree control, use sap.m.TreeItemBase, property: type, value: sap.m.ListType.Detail or sap.m.ListType.DetailAndActive; or row actions). The user can click the button to trigger the edit event. Use this event to make the item editable.

Editing a single item

Mass Editing

See: Mass Editing

Edit the Whole Tree

To let the user edit a whole tree, use a text-only Edit button. When the user triggers the edit action, switch the table to edit mode. In edit mode, don’t show the Edit button and add the finalizing actions Save and Cancel instead. Remove any actions that are meaningless in edit mode. Keep the view settings available.

Tree toolbar in display mode with 'Edit' as the most important action
Tree toolbar in edit mode

Delete / Remove

Use a text button for Delete or Remove actions. In most cases, Delete is used together with Create, while Remove is used together with Add.

If the Delete or Remove action is a main function, never move it into the overflow.

More information: Object Handling (Create, Edit, Delete)

Tree toolbar with 'Delete' button
Tree toolbar with 'Remove' button

Cut, Copy, Paste

Use icon-only buttons for Cut and for Copy. Offer these actions if the tree structure is editable. Always pair them with drag and drop.

For Paste, use either an icon-only button or an icon-only menu button. In the menu, offer:

  • Paste: to paste cut/copied rows
  • Paste from Spreadsheet: to create new rows with data from the clipboard. Since the clipboard can’t be accessed directly, use this button to show a hint on how to paste via shortcut (Ctrl+V) or browser context menu.

When pasting, insert the item(s) in the following position:

  • If a single node is selected, insert it as a child item to this node
  • If a single leaf is selected, insert it as a sibling to this leaf (within the same node)
  • If no item is selected, insert it into the visible “root” node
Tree toolbar with 'Cut' button, 'Copy' button, and 'Paste' menu button

Collapse All, Expand All

Use icon-only buttons for Collapse All and Expand All.

Collapse All closes all nodes up to the visible root level: only items on the first visible level are shown. Expand All opens all nodes down to the lowest level: all items are visible.

Tree toolbar with 'Collapse All' and 'Expand All' buttons
Developer Hint
To implement the Expand All option, use the expandToLevel method and define a very high number of expendable levels. Bear in mind that expanding every single level takes time, which can have an adverse effect on performance if you are working with deep trees. Weigh this up very carefully before offering Expand All for deep trees.

Sort, Filter, Group

When the user chooses one of these actions, open the view settings dialog or the P13n Dialog with only the corresponding settings.

  • If sorting, filtering, and/or grouping is a common use case in your app, offer one, two, or all three of the corresponding features. Don’t provide these features if the tree is expected to have only a small number of entries (up to 20 in most cases).
  • If filtering is a main use case, don’t offer filtering on the tree toolbar; use the filter bar instead.

Only use the view settings you really need. For example, don’t offer grouping if it doesn’t support your use case.

Ensure a consistent user experience. When a user reopens the app and variant management is not used, show the tree with the same view settings last defined by this user.

For more information, see Table Personalization.

Triggers for the different view settings (sort, filter, and group)

Column Settings

Use the table personalization dialog or the P13n Dialog for adding, removing, and rearranging columns.

Offer column settings if you need more columns than those that fit on a tablet screen (which is usually five) to fulfill 80% of your main use cases.

Ensure a consistent user experience. When a user reopens the app and if variant management is not used, show the tree with the same column settings last defined by this user.

For more information, see Table Personalization.

Tree toolbar with 'Column Settings' button

Maximize / Minimize

Use an icon-only button for Maximize or Minimize. Offer the Maximize button to open the same tree sized to fit the full screen. When maximized, offer the Minimize button to go back to the standard view.

Export to Spreadsheet

The Export to Spreadsheet action allows the user to export table rows. It is represented by an icon-only menu button.

Tree toolbar with the 'Export to Spreadsheet' menu button

Print

The action for printing tree items is represented by an icon-only button.

Tree toolbar with 'Print' button

View Switch

View switches are right-aligned in the toolbar and allow the user to switch between different chart types and different controls for displaying items (for example list, grid list, tree, tree table). Provide the view switch if a chart relies on subtle color differences or gradients of color. In these cases, users with visual impairments can switch to the tree view.

Switches are optional: they don’t have to be provided if there is no need to switch between different charts or trees.

Define the number of chart types and switches with care. Offer only chart types that help to visualize the respective data and that best assist the user. Ideally, offer no more than three types of visualization.

The sequence of chart type switches is not fixed. Sort them in order of importance.

The chart type currently in use is highlighted. To show this, use a segmented button with icons.

For more information about the icons and the chart types they represent, see Chart Toolbar.

Overflow

More information: Toolbar Overview – Overflow.

Styles

On the tree toolbar, use the following button styles:

  • If the single primary action for the whole page is on the tree toolbar, use the emphasized button style.
  • if the single primary action for the whole page is not on the tree toolbar, you can still highlight the most important button by using the ghost button style.
  • For secondary actions and negative path actions, use the transparent button style.
  • For split buttons and menu buttons, use the transparent button style.
  • Don’t use semantic button styles on the tree toolbar.

For more information, see Button and Action Placement.

Guidelines

To indicate if an action can be applied to the current selection:

  • Enable the action if it always works, regardless of whether or not items are selected.
  • Enable the action if it can be applied to all selected items.
  • Enable the action if it can be applied to some of the selected items. If the action is triggered, show a message that informs the user how many items are affected. Let the user choose whether to apply the action anyway or cancel it.
  • Only disable the action if it can be applied to none of the selected items.

For more information, see UI Element States.

Message for an action that applies to a part of a selection

If the items are still available after the action was applied, keep them selected.

For further guidelines, see Toolbar Overview – Guidelines.

Resources

Want to dive deeper? Follow the links below to find out more about related controls, the SAPUI5 implementation, and the visual design.

Elements and Controls

Implementation

Table Toolbar

The table toolbar always appears above the table. The control is used for key actions that impact the entire table.

Usage

Use the table toolbar if:

  • There are multiple objects on your page and you need to edit only a single table.
  • You want to show actions as close to their corresponding controls as possible.
  • You need a title for your table.

Do not use the table toolbar if:

  • You are using single selection and have only one or two actions. In this case, place the actions on each line.

Responsiveness

To enable responsiveness, use the overflow toolbar control. For more information, see Toolbar Overview – Responsiveness.

Components

The table toolbar can contain several components, including a title and several types of button. Actions are grouped by the following action types:

  • Finalizing actions, such as Save or Cancel. Finalizing actions are app-specific and are used only if the table is editable.
  • Business actions, such as Edit or Create. Business actions can be app-specific or general object management actions.
  • Actions for managing the content, such as Sort or Filter. These settings are also known as “view settings”.
  • Generic actions, such as Export to Spreadsheet.

Between the groups, add a separator line.

The following content can be part of the table toolbar. Use only the content your users really need. For the remaining content, keep the order shown below:

  • Title
  • Variant management or content switch (for example, as used to switch between multiple views in a list report)
  • Search
  • Finalizing actions:
    • Save
    • Cancel
  • Business actions: Use this action type for app-specific actions. This group contains:
    • App-specific business actions
    • Actions for object management
      • Create (for new items) or Add (for existing items)
      • Edit
      • Delete (if the object itself is deleted) or Remove (if the reference to an item is removed)
    • Paste

The order of actions in this group is not “fixed”. Place the most important action first, followed by the second most important action, an so on. Try to keep Create/Add, Edit, and Delete/Remove together, but only if this is meaningful in your app.
Exception: Keep Paste as the last action in this category.

All possible components in the correct order

Behavior and Interaction

App-Specific Business Actions

If needed, you can define your own actions for the app. In this case, use text-only buttons with a short, unambiguous text for the action the button performs. A button text is usually a single-word verb (for example, Share). Note that text strings can be longer in other languages.

Table toolbar with app-specific buttons

Title

A title provides a short, meaningful summary of the content, mostly in a single word. To display a title, use the title control.

In addition, the title can be followed by an item counter (the number of items in parentheses).

Use a title if you need the table toolbar, and if the title of the table is not indicated in the surrounding area. To avoid repeating text, you can use a generic text for the table title, such as Items. Note that the title is truncated if there is not enough space.

Title with item counter in the table toolbar

Variant Management

In tables, a variant stores all the settings that define the table view, such as the column layout, column visibility, sorting, filter settings, and grouping. The variant management control enables users to load, save, and change variants. In most cases, variant management replaces the title.

Variant management in the table toolbar

Title and Variant Management

If you need both a title and variant management, place the variant management control directly after the title. Use a separator between the title and variant management.

Since using both controls often leads to truncation problems, this pattern is not recommended.

Title with variant management

Content Switch

To switch between different predefined views, use a select control or a segmented button. The content switch replaces the title and the variant management control. In the rare case that the content switch is shown together with a title, the content switch follows the title.

A predefined view contains settings for sorting, filtering, grouping, column layout, and column visibility. Nevertheless, in most cases, the content switch is just used for different filter settings like All, Mine, and Others. In this case, make sure that the content switch doesn’t interfere with other filter settings. For example, remove the corresponding filter from the filter bar. If possible, include an item counter per view.

Another common pattern for content switches are views like By X, and By Y, which are usually defined using group settings.

Use the segmented button and the select control as follows:

  • For a limited set of views (2-3), use the segmented button for desktop and tablet devices. Replace it with a select control if there is not enough screen space.
  • If the number of views can change or is larger than 3, use the select control.

For more information, see multiple views for list reports.

Segmented button with a counter
Segmented text button to switch content
Select control to switch content

Search

For tables with a large number of items, consider adding a search field. Use a search field only if there is no other way to search within the table (for example, if there is no additional filter bar).

Place the search field on the right side of the toolbar. Since the search field cannot be moved into the overflow menu, always provide a minimum width.

Ideally, search for results in all columns. As a minimum, search in all currently visible columns.

For more information, see Search.

Search in the table toolbar

Edit

There are several options for editing a table:

Edit a Single Item

To allow the user to edit a single item, show an icon-only Edit button at the end of the item (depending on the table control, use sap.m.ListItemBase, property: type, value: sap.m.ListType.Detail or sap.m.ListType.DetailAndActive; or row actions). The user can click the button to trigger the edit event. Use this event to make the item editable.

Editing a single item

Mass Editing

See: Mass Editing

Edit the Whole Table

To let the user edit a whole table, use a text-only Edit button. When the user triggers the edit action, switch the table to edit mode. In edit mode, do not show the Edit button and add the finalizing actions Save and Cancel instead. Remove any actions that are meaningless in edit mode. Keep the view settings available.

 Table in display mode with 'Edit' as the most important action
Table in display mode with 'Edit' as the most important action
Table in edit mode
Table in edit mode

Create / Add

Use a text button for Create or Add actions. If the Create or Add action is a main function, never move it into the overflow.

See also: Object Handling (Create, Edit, Delete).

Table toolbar with 'Create' button
Table toolbar with 'Add' button

Delete / Remove

Use a text button for Delete or Remove actions. In most cases, Delete is used together with Create, while Remove is used together with Add.

If the Delete or Remove action is a main function, never move it into the overflow.

See also: Object Handling (Create, Edit, Delete)

Table toolbar with 'Delete' button
Table toolbar with 'Remove' button

Show Details / Hide Details

Based on the responsive behavior of a table, data can be shown in the pop-in area. With the Show Details / Hide Details function, users can switch between a full data set or a reduced data set.

This function is part of the view settings group and is displayed at the first position of this group.

For more information, see Smart Table.

'Show Details' function to show all data in pop-in area
'Hide Details' function to reduce data in pop-in area

Sort, Filter, Group

When the user chooses one of these actions, open the view settings dialog or the P13n Dialog with only the corresponding settings.

  • If sorting, filtering, and/or grouping is a common use case in your app, offer one, two, or all three of the corresponding features. Do not provide these features if the table is expected to have only a small number of entries (up to 20 in most cases).
  • If filtering is a main use case, do not offer filtering on the table toolbar; use the filter bar instead.

Always use only the view settings you really need. For example, do not offer grouping if it does not support your use case.

Ensure a consistent user experience. When a user reopens the app and if variant management is not used, show the table with the same view settings that were last defined by this user.

For more information, see Table Personalization.

Triggers for the different view settings (sort, filter, and group)

Column Settings

Use the table personalization dialog or the P13n Dialog for adding, removing, and rearranging columns.

Offer column settings if you need more columns than those that fit on a tablet screen (which is usually five) to fulfill 80% of your main use cases. Before you do this, try to reduce the number of columns, for example, by using several lines per column or by using the pop-in feature.

Ensure a consistent user experience. When a user reopens the app and if variant management is not used, show the table with the same column settings that were last defined by this user.

For more information, see Table Personalization.

Table toolbar with 'Column Settings' button

Export to Spreadsheet

The Export to Spreadsheet action allows the user to export table rows and is represented by an icon-only menu button.

Table toolbar with the 'Export to Spreadsheet' menu button

Print

The action for printing table items is represented by an icon-only button.

Table toolbar with 'Print' button

Maximize / Minimize

To allow the user to show the table in full screen mode (property: ShowFullScreenButton), show the   Maximize button.  The user can exit the full screen by clicking the   Minimize button.

Table toolbar with 'Maximize/Minimize' button

View Switch

View switches are right-aligned in the toolbar and allow the user to switch between different chart types and different controls for displaying items (for example list, responsive table, grid list). Provide the view switch if a chart relies on subtle color differences or gradients of color. In these cases, users with visual impairments can switch to the table view.

Switches are optional and do not have to be provided if there is no need to switch between different charts or tables.

Define the number of chart types and switches with care. Offer only chart types that are meaningful for visualizing the respective data and that best assist the user. Ideally, offer no more than three types of visualization.

The sequence of chart type switches is not fixed. Sort them in order of importance.

The chart type currently in use is highlighted. To show this, use a segmented button with icons.

For more information about the icons and the chart types they represent, see Chart Toolbar.

Styles

On the table toolbar, use the following button styles:

  • If the single primary action for the whole page is on the table toolbar, use the emphasized button style.
  • if the single primary action for the whole page is not on the table toolbar, you can still highlight the most important button of the table toolbar by using the ghost button style.
  • For secondary actions and negative path actions, use the transparent button style.
  • For split buttons and menu buttons, use the transparent button style.
  • Do not use semantic button styles on the table toolbar.

For more information, see Button and Action Placement.

Guidelines

To indicate if an action can be applied to the current selection:

  • Enable the action if it always works, regardless of whether or not items are selected.
  • Enable the action if it can be applied to all selected items.
  • Enable the action if it can be applied to some of the selected items. If the action is triggered, show a message that informs the user how many items will be affected. Let the user choose whether to apply the action anyway or cancel the action.
  • Only disable the action if it can be applied to none of the selected items.

For more details, see UI Element States.

Message for an action that applies to a part of a selection

If the items are still available after the action was applied, keep them selected.

For further guidelines, see Toolbar Overview – Guidelines.

Resources

Want to dive deeper? Follow the links below to find out more about related controls, the SAPUI5 implementation, and the visual design.

Elements and Controls

Implementation

Filter Bar

The filter bar filters item lists and tables according to various filter criteria. You can use it for both simple and complex lists, regardless of their size. To handle complex lists with multiple filters, the filter bar provides predefined, customizable filter sets (variants).

The smart filter bar is closely related to the filter bar, as it covers the same use cases. The difference is that the smart filter bar uses annotations to create a filter bar.

Filter bar within the dynamic page
Information
The filter bar now supports the dynamic page. Do not use the filter bar in the sap.m.Page for new SAP Fiori apps. For more information on the differences, see the filter bar guideline for version 1.52.

Responsiveness

Because tables appear in many apps, from simple to complex ones, the filter bar needs to run on all form factors. While the main concept of the filter bar remains stable across the devices, its responsive design adapts the control’s behavior to match the ability of each device.

Size S (Smartphones)

Expanded filter bar - Size S
Collapsed filter bar - Size S
Filter dialog - Size S

Size L (Desktop)

Expanded filter bar - Size L
Collapsed filter bar - Size L
Filter dialog - Size L

Layout

Filter Dialog

The filters inside the filter dialog are arranged in a vertical linear layout. If filter groups are maintained, the filters are visually grouped in sections, with the filter group name at the top. A link at the end of each group allows the user to add or remove filters from that group. The link text is Change Filters if at least one filter is activated, indicating that filters can be added or removed. If no filters have been set for the group, the link text is More Filters, indicating that more filters can be added.
The first group is called “Basic” and contains the preset filters that come with the app. A checkbox next to each filter enables the user to show the corresponding filter on the expanded filter bar. If the checkbox is selected, the filter is shown on the expanded filter bar. If the checkbox is not selected, the filter is only visible within the filter dialog. In both cases, the filter is active if a value is entered.
The vertical layout of the filter dialog remains stable across all devices. To ensure a clean grid layout appearance, the size of the widest input field is inherited by all other filters.
Filter dialog (size L)

Expanded Filter Bar

The expanded filter bar arranges the input fields in a simple horizontal linear layout. If the browser’s window size is reduced or the filters exceed the first line, a simple mechanism opens a new line of filters. The height of the expanded filter bar is not limited and adjusts to accommodate the filters that need to be shown. The label is always above the input field. As in the filter dialog, the size of the widest input field is inherited by all other filters. This avoids having unstable and busy-looking grid layouts.
Filter bar (size L) with one row of filters
Filter bar (size L) with more than one row of filters
Filter bar (size S) with vertical filters

Components

Collapsed Filter Bar

The collapsed filter bar takes up very little space, leaving the bulk of the screen to display the actual results. However, the variant selector in the upper left corner is still available for switching between variants. The user can expand or collapse the filter bar by clicking the header. If required by the use case, the filter bar can be expanded by default.
On desktop and tablet devices, the collapsed filter bar shows a summary of the filters currently applied. It shows Filtered By (x):, where “x” stands for the number of applied filters. This is followed by a comma-separated list of the filters currently applied. Up to 5 filters are listed. If more filters have been applied, an ellipsis (…) shows at the end of the string. If no filters have been applied, the summary text is Not Filtered.
Collapsed filter bar

Expanded Filter Bar

Developer Hint
In addition to the collapsed filter bar, the expanded filter bar shows a user-defined filter subset of the currently selected variant.
The Adapt Filters (x) link opens the filter dialog, and allows the user to add filters or hide them. The Go button triggers the filter. The Go button is only shown in manual mode.
Expanded filter bar
Expanded filter bar

Filter Dialog

Developer Hint

The filter dialog is the central component that shows all filters of the selected variant, allowing the user to add filters to the variant or remove them. Filters are arranged into their respective filter groups. The user can search for a specific filter by name in the search bar at the top.

The footer toolbar at the bottom of the dialog provides the following functions:

  • Cancel: Closes the dialog and undoes all changes
  • OK: Executes the selected filter set

The header area of the filter dialog contains a Reset button. This resets the filter to the initial variant values (you can hide this button if it doesn’t fit the app use case). Before the filters are reset, the user gets a warning.

The user can choose to hide filters on the expanded filter bar by deselecting the relevant checkbox next to the filter in the filter dialog (for example, if a filter is rarely edited, or unimportant).

Information
In analytical list page scenarios, the warning for the reset button is not yet available.
Filter dialog
Filter dialog

Variant Selector

The variant selector is used to select the current variant, and also provides access to variant management.
Variant selector
Variant selector

Filter/Input Controls

Filter/input controls

When designing the filter bar, pick the simplest input control that works for your use case. Avoid unnecessary complexity in the filter bar.

If there is a predefined list for single or multiple selection, use the select control or combo box control. For temporal information, you can use the date picker or date range selector. To help the user enter a valid value for multi-input fields, you can enable suggestions.

For a comprehensive overview of when to use which input field, see Selection Controls – Overview.

Use the value help control only as a last resort. It is especially beneficial if you want to offer an advanced function for selecting single or multiple items either inline (by entering text) or by means of a dialog.

Developer Hint
For development information, see data types for the smart filter bar.

Behavior and Interaction

The filter bar contains the following actions:

Selecting a Variant

The main use case for the filter bar is to select and execute variants that influence the list of items. In this example, the variant applies its filter set automatically. The item list is filtered without the user needing to click Go.

Personalizing the Expanded Filter Bar

Users can hide a filter on the expanded filter bar by deselecting the checkbox next to the relevant filter in the filter dialog. This allows the user to hide filters that are rarely changed from the extended filter bar, giving complex filters a more lightweight appearance.

Saving a New Variant

You can save new filter variants in the variant selector.

Once you have changed an existing variant, an asterisk (*) is displayed next to the current variant name, indicating its “dirty state”.

You can either save the adapted variant with the current name (overwrite), or save it under a new name.

Variant Selector

Open the variant selector and choose Save As. Type your desired variant name into the input field and select OK.

Save new variant in variant selector

Guidelines

Default Variant Filters

For all filter bars, provide a set of predefined default filters that come with the app (“Basic” group in the filter dialog). Include filters that are:
  • Mandatory / crucial to the use case
  • Frequently used
  • Vital for reducing the number of items in the list
Users can hide filters in the “Basic” group, but cannot remove them from the filter dialog.
Default variant
Default variant "Basic"

Default Values

Provide a meaningful default value for as many filters as possible. Meaningful default values depend on your use case.

A default value for date ranges, for example, should reflect the time frame the user would normally apply. App designers need to decide which time frame is appropriate.

Appropriate default values are particularly crucial for filter sets and list reports that operate on large datasets. In this case, consider making certain default filters mandatory to help the user avoid loading very large datasets unnecessarily.

For list reports and overview pages, ensure that mandatory filter fields always have default values. Otherwise, users will see error messages when the page loads.

Filter without default value
Filter with available values
Filter with a default value

Table Filtering and Table Searching

Provide the user with a central location filtering and searching. If you use a filter bar, do not provide filter options or search options for the control below (for example, a table, chart, or list.). Avoiding multiple filter locations also helps to prevent confusing or contradictory entries (for example between the filter bar and a table filter).
Do
Table without filtering option
Don't
Table with filtering option

Initial State

The filter bar can initially be collapsed or expanded, depending on the use case:

Initial State Collapsed

If the app has a default variant that is executed on loading, the table is prefilled, and the user seldom changes the filters, the app can start with a collapsed filter bar.

Initial State Expanded

If the app does not use a default variant and the user has to set a filter to obtain a first result set for the table, start with an expanded filter bar. Also, if a vast number of items are expected, include some mandatory filters with default values. Since the user first has to enter values for these filters, start with an expanded filter bar. If you are in any doubt, start the app with an expanded filter bar.

Note: At least one filter must be defined to begin with. This filter is set within the basic group by app designers. If the use case allows, and depending on the size of the result set, provide a table that is initially filled.

Initial state collapsed
Initial state expanded

Basic Search Field

The basic search field allows the user to filter the results by a given keyword. In contrast to the other input fields, the basic search field has a placeholder text instead of a label.
Note: If you need to provide a search field, use the basic search field. The search field within the table must be deactivated.
Filter bar with basic search field

Live Update / Manual Update

The filter bar is available in two separate modes: Live update mode and manual update mode.

Live Update

In the live update mode, the filter bar reacts instantly to every input change. The result table is updated every time the user changes a filter field or the search field. Therefore, a Go button is not necessary.

The search is triggered with every letter that is entered, starting with the first letter the user types. The table is updated with the results that match all set filters and include the search term.

Manual Update

In the manual update mode, the filter results are only updated when the user clicks Go. A Go button is therefore mandatory in manual update mode. Pressing ENTER on the keyboard also triggers the filter.

Which Mode Should I Use?

The live update mode is more convenient for the user. However, if the user has to configure multiple filters to obtain a useful result set, or if the resulting traffic is expected to be excessively high, consider using the manual update mode instead.

Filter bar in live update mode
Filter bar in manual update mode

Resources

Want to dive deeper? Follow the links below to find out more about related controls, the SAPUI5 implementation, and the visual design.

Elements and Controls

Implementation

Time Picker

The time picker allows the user to select a localized time. It can be used with touch, mouse, or keyboard input.

Usage

Use the time picker if:

  • You want the user to select a time.
  • You want the user to select a time range. In this case, one time picker can be used to set the starting time and a second one to set the end time.
  • You want the user to select a detailed duration, such as 1 minute and 30 seconds.

Do not use the time picker if:

  • You want the user to select a duration such as 15 minutes, 30 minutes, 1 hour, or 2 hours. In this case, use the select control instead.

Responsiveness

The time picker comes with a cozy mode and a compact mode. In the compact mode, the time input field and the button are smaller than in the cozy mode. In the compact mode, there are also arrows that the user can click to set hours, minutes, and so on. For more information, see the article on content density.

On desktop (size L/XL) and tablet (size M) devices, the user can enter a time in the input field of the time picker, or set a time via the time picker dropdown which opens when the user clicks the time picker button.

For mobile (size S) devices, the tap area is the same as for a tablet, and the user can type a time in the time input field. Unlike on a tablet or desktop, the time picker dropdown does not open below the time input field, but rather in a subview.

Cozy and compact mode of the time picker

Components

The time picker consists of a time input field (1) and a time picker button (2). On desktop, tablet, and mobile devices, both elements have their own click area. Clicking the time picker button opens the time picker dropdown.

You can set a predefined time, which shows as the initial value in the time input field and the time picker dropdown. Users can overwrite the initial value manually at any time.

Time picker input
Time picker input

Time Input Field

The time input field allows the user to enter a time directly in the field, or select it using the time picker dropdown. The input is validated and feedback is given to the user.

The time input field can also contain a placeholder (input prompt).

Time Picker Button

When the user clicks the time picker button, the time picker dropdown opens to allow the user to choose a time.

Time Picker Dropdown

In the time picker dropdown, the user can select a time by setting hours, minutes, seconds and AM/PM or a subset of these (with hours and minutes only).

Dropdown with hours and minutes
Dropdown with hours, minutes, seconds, and AM/PM

Behaviour and Interaction

Selecting a Time (Desktop Device)

The user clicks the time picker button, which opens the time picker dropdown. In the time picker dropdown, the user can set the time either with the mouse or by using the keyboard arrows. The Page Up and Page Down keys can also be used to set the current selection to the lowest or highest value, and the Home and End keys can be used to go to the first or last element of the picker.

When the desired time has been selected, the user can confirm this selection by clicking the OK button. If the user wants to close the dropdown without changing the time to the selected time, this can be done by clicking the Cancel button or by clicking outside the dropdown.

Preventing Errors

The user can also select a time by clicking the time picker input field and typing the desired time in the field. You can prevent users from making incorrect entries by not allowing them to type in certain characters (see mask input). If the user enters a time that has the correct format but is invalid (such as 12:60:85), the time picker displays a validation error.

You can switch off the integrated mask input feature, but we strongly advice against doing so. Only deactivate the mask input if you need to make an exception for your use case (for example, if a variable length is required for a specific locale).

Time picker dropdown and input field

Selecting a Time (Tablet or Mobile Device)

On tablets and mobile devices, users can select the time by tapping the time picker button. The timer picker dropdown opens beneath the input field (a subview is opened on mobile devices). The user sets the hour by touching the hour element and then swiping up or down. To set the minutes, seconds, and AM/PM, the user also touches the corresponding element and swipes up or down to set the right value.

To confirm the selected time, the user taps the OK button. Tapping the Cancel button cancels the selection. On tablets, the selection can also be cancelled by tapping outside the time picker dropdown.

Set the time by swiping up and down (mobile)

Style

The Time Picker has five basic value states:

  1. Regular
  2. Information
  3. Success
  4. Warning
  5. Error

The information, warning, and error states can also have a message with additional information below.

Time picker value states

Guidelines

Time Formats

Seconds

Only let the user select time in seconds if this information is really necessary.

Time Zone

If the user has to set a time that is time zone-sensitive, offer a select control next to the time picker control to choose the appropriate time zone.

12-Hour System

In the 12-hour system, the date picker can contain selections for hours, minutes, seconds, and AM/PM.

24-Hour System

In the 24-hour system, the date picker can contain selections for hours, minutes, and seconds. AM/PM is not available in this mode.


For more information, see formatting time.

Properties

AM and PM are locale-dependent. Therefore, the locale can be set using the property “localeId”.

You can set the display format (property: displayFormat) to define the format in which the time input field and the time picker dropdown display the time. For more information about time formats, see the article on formatting dates.

Resources

Want to dive deeper? Follow the links below to find out more about related controls, the SAPUI5 implementation, and the visual design.

Elements and Controls

Implementation

Status Indicator

The status indicator uses a filled shape to visualize a single value. Unlike the progress indicator or the radial micro chart, the indicator provides the user with a meaningful association through its use of icons. You can embed the status indicator in other controls.

Selection of status indicators

Usage

Use the status indicator if:

  • You need to display a single value with an icon that describes its context.
  • You need to display a single value that can be updated in real time without reloading the page.

Do not use the status indicator if:

  • You need to display a single value within a table. Use the progress indicator or radial micro chart instead.
  • You need to show a rating. Use the rating indicator instead.
  • The status indicator does not provide the user with any meaningful information and would be for decoration only.

Responsiveness

The status indicator provides four different sizes: small (size S), medium (size M), large (size L), and extra-large (size XL).

For the small size, the partial fill is replaced by a fully-filled shape that can only indicate the semantic per threshold reached.

Layout

A status indicator can consist of a scalable vector graphics (SVG) shape and additional information, such as a label. The status indicator can be configured as a shape only (default), or as a shape with a fixed label.

Shape Only

By default, the status indicator consists of a single shape. We recommend using this type of status indicator when you need to display a fraction of a value, rather than a specific value.

Status indicator - Shape only

Shape with a Fixed Label

This type of status indicator includes not only a shape, but also a label that uses semantic colors defined for the the value thresholds of the status indicator. In addition, you can switch between different alignment options, such as left, right, top, or bottom. We recommended using this type of status indicator when the user needs to see the exact value.

Status indicator - Shape and label

Types

Linear Fill

Most shapes can be filled linearly. You can set the shape to be filled from the left, right, top, or bottom, or define a specific angle for filling.

Status indicator with linear fill

Circular Fill

For round shapes, you can use the circular fill.

Status indicator with circular fill

Filling Sequence

The sequential fill option is useful when the shape consists of multiple parts. You can fill the parts sequentially one by one, or set your own filling order.

Status indicator with filling sequence

Grouping

You can group several shapes together and decide how the filling should be orchestrated among the shapes in this group.

Status indicator grouping

Thresholds

You can set one or more thresholds for each status indicator and assign a color to each threshold. The color changes when a threshold has been exceeded. Only use thresholds and semantic colors if they are meaningful to the user. Do not use them for decoration.

Status indicator tresholds

Behavior and Interaction

You can define a click event for the status indicator. If the status indicators are grouped, you can define a click event for each status indicator or for the entire group.

Information
When setting a click event for a non-filled shape, we recommend using a darker background color to emphasize that the shape is clickable and not disabled.

Guidelines

Shape Definition

You can download the predefined shapes or create your own custom shapes. For more information on how to create custom shapes correctly, see the API documentation.

Developer Hint
Only circle, rectangle, and path tags are supported inside the SVG file.

Animation Duration

Shape animation follows the motion design principles, with a maximum duration of 250 ms (small moves).

Examples

Status indicator in micro process flow
Status indicator in custom overview page card
Status indicator in object page header
Status indicator in tiles

Resources

Want to dive deeper? Follow the links below to find out more about related controls, the SAPUI5 implementation, and the visual design.

Elements and Controls

Implementation

Smart Field

The smart field creates different user input controls and their read-only equivalents based on an OData (Open Data Protocol) service and its annotations. It comes with additional built-in features, such as autocomplete and suggestions, value help dialogrecently used and recommended valuesvalidation, and message handling.

Information
The smart field is only available for OData version 2.

When to Use

Use the smart field if:

  • You use an OData service for your app (OData version 2 only).
  • The feature set of the smart field fits your app. In this case, the smart field is faster to implement.
  • You use the smart table and your app is not performance-critical. The smart field offers more flexibility than the controls provided directly by the smart table, especially for editing.
  • You use a smart form.

Do not use the smart field if:

  • You use a different technology to OData version 2. Use the corresponding controls directly.
  • You need a different control for entering or displaying data, such as multi input, a multi combo box, step input, a radio button, or a title. In this case, use the corresponding control directly.
  • You need a different dialog for offering value help, such as the select dialog or table select dialog.
  • You use the smart table and your app is performance-critical. In this case, the controls offered directly by the smart table offer less flexibility but better performance.

Components

The smart field consists of a basic UI element and an optional label. The following UI elements are available:

 For details, see the corresponding guideline topics. 

User Input Control

The smart field chooses the control automatically based on the data type (Edm type) and annotations of the OData service and additional properties. The following controls are used:

Read-Only Edit Edm Types / Annotations / Properties Comment
Single-line text Text Input field Edm.String

Configuration: controlType, value: input

Combo box Edm.String

Configuration: controlType, value: dropDownList

Select Edm.String

Configuration: controlType, value: selection

Multi-line text Text Text area Edm.String

MultiLineText

Decimal numbers Text

Object number

One or two input fields
(for number and unit)
Edm.Int16, Edm.Int32, Edm.Int64,
Edm.SByte, Edm.Byte,
Edm.Single, Edm.Float, Edm.Double,
Edm.Decimal
Precision, Scale
Status information Object status Edm.String

criticality, criticalityRepresentationType

Text and ID Text

Object identifier

Object status

Input field TextArrangement

controlProposal

displayBehavior

textInEditModeSource, sap:text,
fetchValueListReadOnly

The following patterns can be selected via displayBehavior:

  • Text (ID)
  • ID (Text)
  • Text
  • ID
Links
(with/without quick view)
Link

Smart link

Edm.String

IsURL, url

semanticObjectController

Dates Text Date picker Edm.DateTime

sap:display-format=”Date”

IsCalendarDate

Configuration: controlType

Dates and times Text Date/time picker Edm.DateTime

Edm.DateTimeOffset

Times Text Time picker Edm.Time
Fiscal periods Text Input field IsFiscalYear, IsFiscalPeriod,
IsFiscalYearPeriod,
IsFiscalQuarter, IsFiscalYearQuarter,
IsFiscalWeek, IsFiscalYearWeek,
IsDayOfFiscalYear
Amounts with currencies Text One or two input fields ISOCurrency or sap:unit with sap:semantics=”currency-code”
Phone numbers Text Input field IsPhoneNumber
Email Text Input field IsEmailAddress
Boolean Checkbox Checkbox Edm.Boolean
Text Combo box Edm.Boolean

valueList

displayBehavior

The text in display mode can be influenced via displayBehavior:

  • Yes/No
  • True/False
  • On/Off
Guidelines

  • Set a default value whenever appropriate (annotation: text, property: value).
  • To show a static unit of measurement, use a description (annotation: text).
  • To display a text and ID in the same place, use the format Text (ID) wherever possible. Use another format only if displaying the text doesn’t make any sense. Be careful when using the text arrangement options in tables: end users will only be able to sort, group, or filter based on the ID, even if the ID isn’t visible.
  • If you are not using the smart field within a smart form or smart table, label the smart field with a smart label (annotation: label, properties: textLabel, showLabel). The standard label doesn’t know the inner structure of a smart field.
  • You can set a tooltip (annotation: QuickInfo), but this should usually be avoided. See Using Tooltips.
  • If data entry is expected in a specific format, set a placeholder (property: Placeholder).

Developer Hint
Performance: Using the TextArrangement annotation to display both the text and ID (in any order) triggers two requests to the back end.

Behavior and Interaction

Context

You can use the smart field in different contexts
(property: controlContext):

  • Standalone
  • Within a form (depending on the form layout)
  • Within a table (depending on the table type)

The context influences:

  • Labels: In most cases, forms provide the label automatically.
  • Empty values in display mode: In forms, empty values are shown as a dash. In tables, the field remains blank.
  • How units of measurement are displayed
Guidelines

  • If the width is not handled by the context, set a meaningful width for the smart field, based on the expected data (property: Width).
  • If you use a “standalone” smart field  in a form-like arrangement, use a dash to show an empty value in display mode.

Switching Between Edit and Display Mode

Switching between edit and display mode can be controlled manually (annotation: FieldControl, property: editable) or automatically by the containing smart form or smart table (property: contextEditable).

Smart field as a select with 'required' indicator in edit mode
The same smart field in display mode
Guidelines

  • Define which fields should be editable (annotations: updateable, creatable, updateable-path, InsertRestrictions, UpdateRestrictions, computed, immutable, fieldControl, fieldControlType).
  • For fields with a unit of measurement, define whether the unit of measurement is editable or static (annotation: FieldControl, property: uomEditable).
  • Make sure that the full text is shown in display mode (property: wrapping), unless this is handled differently for the corresponding context (for example, see guidelines for content in the grid table).
  • When you display the text and ID, the smart field automatically displays both values in display mode, but only the ID in edit mode (annotation: TextArrangement). In most cases, it makes sense to also display both values in edit mode (annotation: sap:text, property: textInEditModeSource, aggregation: Configuration with property: displayBehavior).

Suggestions and Value Help

You can enable suggestions for controls that offer this feature (property: showSuggestions). The list of suggestible values must be provided (annotation: ValueList or ValueListWithFixedValues only for Edm.String, property: entitySet). This list can contain several attributes and is also used for the value help dialog. You can restrict the number of attributes from this list to be shown as suggestions, while all attributes are shown within the value help dialog.

Autocomplete is enabled automatically.

For input fields, the value help dialog is also created automatically. Hide it if it is not needed (property: showValueHelp). The table in the value help dialog can be filled with initial content (annotation: ValueList, property: fetchValues, sap.ui.comp.smartfield.Configuration, property: preventInitialDataFetchInValueHelpDialog)

Both the value help dialog and the suggestion list can be prefiltered (annotation: ValueList, property: valueListParameterIn). The selected items can be used to prefilter other fields (annotation: ValueList, property: ValueListParameterOut). The corresponding filter settings are visible. “Invisible” prefiltering is also supported. To use this option, provide the exact matching filter value (Common.ValueListParameterConstant).

If a value has been entered in the smart field, this value is transferred to the search field of the value help dialog automatically. In the value help dialog, individual values can be valid, deprecated, or revoked. Revoked values are hidden from the value help (annotation: IsConfigurationDeprecationCode).

The following controls are used to offer suggestions or value help:

Smart field as a combo box
Smart field as an input field with suggestions, auto complete and a value help button
The automatically generated value help dialog for the same smart field

Recently Used Values

Input fields, combo boxes, and selects can provide up to five recently used values automatically on focus if suggestions or value help are available. This can be turned on or off per field (property: historyEnabled). Recently used values are shown by default for input fields, but not for combo boxes and selects.

Guidelines
Do not show recently used values for a field if:

  • There are only a small number of options.
  • The field contains personal sensitive data (annotation: IsPotentiallySensitive).
  • It is unlikely that the same values will be selected again and again.

Recommended Values

In addition to recently used values, a smart field can show recommended values (annotation: RecommendationState).

The corresponding smart field is highlighted and/or prefilled:

  • If no recommendation is available or the current user input matches the recommendation, the smart field is shown in the default state.
  • If a recommendation is available and there is no user input, the smart field is shown in the information state.
  • If a recommendation is available and it differs from the current user input, the smart field is displayed in the warning state.

The recommended values are shown as soon as the user focuses on the smart field.

Validation

The smart field offers the following validations automatically:

  • Validation for required fields: This can be done on the client or server side (property: clientSideMandatoryCheck, annotation: Nullable).
  • Validation for a group of fields: Validation is triggered when the focus moves outside a group of fields, rather than when a single field loses the focus. A group is defined by all smart fields that share the same field group ID (property: fieldGroupIds).
  • Validation for the maximum length of user input: Validation is triggered when a field loses the focus or the ENTER key is pressed (property: maxLength).

The validation result is indicated by a value state (property: showValueStateMessage).

When the user edits a smart field showing a text and ID, you can allow any kind of input to avoid unnecessary validation issues (annotation: ValueListNoValidation).

Examples:

  • Allowing the user to enter additional values (which are not in the suggestion list)
  • Typing a text instead of an ID to filter down the suggestion list
  • Using the smart field in a draft
Automatic validation

IDs

The smart field offers automatic validation for number-only ID fields (annotations: IsDigitSequence or sap:display-format="NonNegative"):

  • It checks for non-negative numbers.
  • It shows values containing only “0” digits as empty.
  • It does not show leading zeros.

Units

For decimal number fields and for fields that show an amount with a currency, you can add a unit of measure  (annotations: unit, sap-unit with sap:semantics="unit-of-measure" or sap:semantics="currency-code", property: uomVisible). In display mode, the unit is added to the corresponding number. In edit mode, the unit is shown either as text or, if editable, as a second input field (properties: uomEditable, uomEnabled).

Smart field showing an amount with a currency in display mode
The same smart field in display mode

Sensitive Data

Sensitive data, such as passwords, can be masked. The text is then replaced with asterisks (annotations: IsPotentiallySensitive, masked).

Capitalizing Text Input

Text input can be capitalized automatically (property: IsUpperCase).

States

Smart fields support the following states (annotation: fieldControl):

  • Editable or display only (additional annotations: updateable, creatable, updatable-path, InsertRestrictions, UpdateRestrictions, property: editable)
  • Enabled or disabled
  • Visible or hidden (additional annotations: property: visible, annotation: sap:visible)
  • Required: If set, the smart field must contain a value when validated. This is indicated by an asterisk next to the corresponding label (additional annotation: Nullable, property: mandatory).

The following states for a unit of measurement can be set independently of the corresponding field:

  • If editable, a unit of measurement can be enabled or disabled (property: uomEnabled)
  • The unit of measurement can be visible or hidden (property: uomVisible)
Developer Hint
In the SAPUI5 SDK API Reference for the smart field, the display only state is referred to as read only.

Dependencies between Smart Fields

If the content of a smart field is changed, you can trigger additional changes to other fields on the UI (annotation: SideEffects).

Content Alignment

You can change the horizontal alignment of the text within any kind of input field  (property: textAlign).

Guidelines
Follow the alignment rules for the respective context (responsive table, other tables, form). If you are using the standalone option for the smart field (without a context), apply the rules for the corresponding input fields.

Responsiveness

The smart field acts exactly like the embedded controls. For details see:

Top Tips

  • Always label a smart field if it is not inside a table context.
  • Use suggestions with autocomplete whenever possible and meaningful.
    • Do not show suggestions if there are only a few choices.
    • Use recently used values as appropriate.
    • Reduce the number of attributes shown in the suggestion list to a maximum of 4 or 5.
  • Make use of validation features.

Properties

The following properties, aggregations, and associations are available for sap.ui.comp.smartfield.SmartField:

  • The property: expandNavigationProperties is experimental. Do not use it.
  • The property: jsontype is deprecated. Do not use it.
  • The property: name is used in HTML forms that send data to the server via “Submit”.
  • The property: uomEditState is for internal use only. Do not use it.
  • The property: proposedControl is deprecated. Do not use it.
  • The property: textDirection provides support for reading directions in different locales.
  • The aggregation: controlProposal is deprecated. Do not use it.
  • The association: ariaLabelledBy can be used for linking additional labels to the smart field.

Related Links

Elements and Controls

Implementation

Value Help Dialog

Intro

The value help dialog is a UI pattern that helps the user find and select single and multiple values. The user can also define and select multiple conditions. The value help dialog is generally called from an input field or a multi-input field by clicking the selection icon (value help icon) of the input field.

Usage

Use the value help dialog if:

  • The user is searching within a dataset that contains more than 1,000 items.
  • The user needs to use different attributes to find an object (such as city, company name, and so on).
  • The user needs to define conditions, such as ranges and exclusions.

Do not use the value help dialog if:

  • There is a simpler control that fits the use case. Always start with the least complex control. For example, use the select control if the user needs to select only one item from a short list.
Information
For more information on which selection control to choose, see the selection control overview.

Responsiveness

The behavior of the value help dialog on a phone differs from its behavior on a tablet or desktop device. Both the navigation and the positioning of the selection area differ depending on the device.

Value help dialog - Size S
Value help dialog - Size M
Value help dialog - Size L

Components

The value help dialog contains the following components:

1) Header
2) Icon tab bar / list control (phone)
3) Search template (optional)
4) Basic search
5) Go button
6) Filters
7) Result list
8) Selected items and conditions
9) Footer toolbar
10) Area for defining conditions, such as ranges and exclusions

Header (1)

The header bar contains the dialog title. See the Guidelines section below.

Icon Tab Bar / List Control (Phone) (2)

Depending on the device, the following controls are used to display the content of the value help dialog:

  • Smartphones: The start dialog provides a list (sap.m.List) with the standard list items (sap.m.StandardListItem), Search and Select, and Define Conditions to navigate between the different dialogs.
  • Tablet and desktop devices: The value help dialog contains an icon tab bar (sap.m.IconTabBar) to navigate between the Search and Select and the Define Conditions tab.
  • Both controls have a counter in the title that indicates the number of items/conditions selected.

Search Template (3)

Search templates allow the user to display different or additional fields in the filter area and result list. Depending on the use case, the user can switch between the different search templates in order to use different fields when searching. For example, the search template “Customer (by Company Code)” displays the additional field “Company Code” in the filter area and result list.

Basic Search (4)

The basic search finds all results that are somehow related to the input. For example, the search term “A” returns all the results containing the letter “A”.

Always offer the basic search in the value help dialog. Position the basic search to the right of the search template control. If there is no search template control, left-align the basic search.

Go Button (5)

The Go button triggers the search and filters the result list.

Filters (6)

The filter area offers a filter field for each column in the result list. In some cases, there can be specific filter fields that do not have a corresponding column on the UI. These fields typically come from the back-end service.

Value help dialog - Filters

For the basic search with filters, the filter bar (sap.ui.comp.filterbar.FilterBar) is implemented in advanced mode. Advanced mode differs from basic mode in the following ways:

  • There is no Filters link or a dialog to make additional filter fields visible. All filter fields fields are added automatically to the filter area.
  • There is a toggle button to show and hide the filters.
  • In each of the filter fields, users can use operators like “between” or “lower than” to define conditions.

Always hide the filter area in the value help dialog by default. Only show the filter area by default if the basic search can’t be provided.

Note that the value help icon of the Product ID field in the current value help dialog will open only the Define Conditions screen. The full value help dialog is not shown in order to prevent endless loops. For example, the value help icon of the Product Name or Category field in the value help for a Product field will navigate directly to the Define Conditions: Product screen.

Using the Filters

Users can enter operators (such as “=“) to define the conditions directly within the field without opening the Define Conditions tab.

Users must use the following notation to get results:

Operator Input Notation Example
between valuevalue 000100
equal to =value =0001
contains *value* *1*
starts with value* 001*
ends with *value *5
less than <value <100
less than or equal to <=value <=200
greater than >value >0300
greater than or equal to >=value >=0500
not between !(valuevalue) !(000100)
not equal to !(=value)  !(=0)
does not contain !(*value*)  !(*1*)
does not start with !(value*)  !(001*)
does not end with !(*value)  !(*5)
not less than !(<value) !(<100)
not less than or equal to !(<=value) !(<=200)
not greater than !(>value)  !(>0300)
not greater than or equal to !(>=value)  !(>=0500)
empty <empty>   <empty>
not empty !(<empty>)    !(<empty>)
Using an operator to filter the result list

Result List (7)

  • The result list is populated on initial load by default.
  • If you transferred values from the input field to the basic search field of the value help dialog, the results are filtered accordingly. Only the entered (or modified) value is transferred to the basic search. Type-ahead suggestions are ignored. The search is triggered automatically when the dialog opens.
  • If available, display the ID and description of the business object in the first and second columns. Display additional information in the next columns.
  • We recommend a maximum of five columns in the result list.

Selected Items and Conditions (8)

The selected items and conditions are displayed in a tokenizer (see token for more information). Each selected item or condition is displayed as one token.

There is no longer a visual difference between included and excluded items and conditions. They are now differentiated using operators (see Using the filters).

Footer Toolbar (9)

The footer bar offers the OK and Cancel buttons.

Area for Defining Conditions (10)

In the Define Conditions tab, you can use the following operators to define single and multiple conditions:

  • between
  • equal to
  • contains
  • starts with
  • ends with
  • less than
  • less than or equal to
  • greater than
  • greater than or equal to
  • empty
  • not between
  • not equal to
  • does not contains
  • does not start with
  • does not end with
  • not less than
  • not less than or equal to
  • not greater than
  • not greater than or equal to
  • not empty

For convenience, the operators are grouped into two categories: Include and Exclude.

Each condition is displayed as a token in the Selected Items and Conditions tokenizer.

Information
The operator dropdown list may not contain all the operators listed above. The type of field value determines which operators are available.
Developer Hint
For information on how to manage white space characters (blanks) when users copy and paste text into input controls, see Removing Leading and Trailing White Space.
Define Conditions - Operators List

Behavior and Interaction

Basic Search and Filters

  • The basic search (mandatory) and filters (optional) are triggered by clicking the Go button. The search results are shown in the result list.
  • If data was already entered in input field from which the user triggered the value help, this data is transferred to the basic search and the results are then filtered accordingly.
  • The basic search performs a search across all fields that are displayed in the filter area and the result list.

Selecting Items and Defining Conditions

Depending on your use case, the value help dialog can offer different selection options:

  • Select a single item
  • Define a single condition
  • Select multiple items
  • Define multiple conditions
  • Select multiple items and define multiple conditions

Users open the value help dialog by clicking the value help icon in the input field. The next steps depend on the use case and form factor (smartphone or desktop/tablet).

The different use cases are described in the sections below.

Select a Single Item (Smartphone)

Tapping the value help icon opens the dialog. As soon as an item is selected, the value help dialog closes automatically.

Single item selection on a smartphone

Select a Single Item (Desktop/Tablet)

Clicking the value help icon opens the value help dialog for single selection. The icon tab bar and the Selected Items and Conditions are hidden. As soon as an item is selected, the value help dialog closes automatically.

Single item selection on a desktop/tablet device

Define a Single Condition (Smartphone)

Tapping the value help icon opens the Define Condition tab. Users define a condition by choosing the relevant operator and entering the value or values in the corresponding input field(s).

In this example, we have defined a range.

Defining a single condition on a smartphone

Define a Single Condition (Desktop/Tablet)

Clicking the value help icon opens the Define Condition tab. Users define a condition by choosing the relevant operator and entering the value or values in the corresponding input field(s).

In this example, we have defined a range.

Defining a single condition (desktop/tablet)

Select Multiple Items and Define Multiple Conditions (Smartphone)

Tapping the value help icon displays the start dialog.

  • The Search and Select tab is used to select multiple items.
  • The Define Conditions tab is used to define multiple conditions.
  • The counters in the titles of both tabs represent the number of selected items/defined conditions.

All selected items and conditions are added as tokens to the Selected (n) field at the bottom of the start dialog. The counter n indicates the combined number of items selected and conditions defined.

Start dialog
Start dialog
Selecting multiple items on a smartphone
Defining multiple conditions (smartphone)
Filters on a smartphone

Select Multiple Items and Define Multiple Conditions (Desktop/Tablet)

Clicking the value help icon displays the icon tab bar with the Search and Select and Define Conditions tabs.

  • The Search and Select tab is used to select multiple items
  • The Define Conditions tab is used to define multiple conditions.

All selected items and conditions are added as tokens to the Selected Items and Conditions (n) field at the bottom of the dialog. The counter n indicates the combined number of items selected and conditions defined.

Selecting multiple items and conditions on a desktop

Define Multiple Conditions (Smartphone)

Tapping the value help icon opens the start dialog with the Define Conditions tab.

The selected values are added as tokens to the Selected Conditions at the bottom of the start dialog.

Start dialog
Start dialog
Defining multiple conditions on a smartphone

Define Multiple Conditions (Desktop/Tablet)

Clicking the value help icon opens the Define Conditions tab.

The selected values are added as tokens to the Selected Conditions at the bottom of the start dialog.

Defining multiple conditions on a desktop

Copying and Pasting Multiple Values

The area for defining conditions allows the user to enter multiple values at once (copied from the clipboard).

Users can paste more than one value into the value input field. In this case, the condition row repeats with the previously selected condition and shows one value per row.

If there are more than 10 rows of conditions, pagination is added to top of the respective area.

Copying and pasting multiple values

Guidelines

Dialog Title

The dialog title differs depending on the device and whether multiple or single selection is used.

For smartphones:

  • Start dialog: [Object] (for example, Company)
  • Search and Select Dialog: Search and Select
  • Filters dialog: Show Filters
  • Define single condition: Define Condition
  • Define multiple conditions: Define Conditions

For tablet and desktop devices:

  • Selection of multiple items combined with selection of multiple conditions: [Object] (for example, Company)
  • Single item selection: Select: [Object] (for example, Select: Company)
  • Define single condition: Define Condition: [Object] (for example, Define Condition: Company)
  • Define multiple conditions: Define Conditions: [Object] (for example, Define Conditions: Company)

Filtering

If necessary, also provide value help for fields offered in the filters. However, do not provide the full value help dialog for the ID and description fields of the business object that is being selected. For these two fields, make sure that the value help icon opens only the Define Conditions screen.

For example, in a value help dialog for selecting the customer, do not offer full value help for the Customer ID and Customer Name fields. Instead, try to use the value help in combination with a helpful suggestion.

Related Links

Elements and Controls

Implementation

Form / Simple Form

Information
This article contains general design guidelines for all forms. The guidelines also apply for smart forms.

For additional hints on smart forms, you can still refer to the existing Forms / Simple Forms / Smart Forms article for guideline version 1.52. However, please note that this page is no longer updated.

Intro

A form is used to present data to the user and to allow users to enter data in a structured way.

The form acts as a container for other UI elements (such as labelsinput fieldscheckboxes, and sliders), while structuring these into a specific layout.

In SAPUI5, forms can be built using two different controls:

With a form, you can easily layout a list of properties and input fields. A form is structured into form containers. Each form container consists of form elements. And each form element consists of a label and an input field.

The simple form control gives you the possibility to achieve the same result as with the form control, but in a much easier way. Inside a simple form, a form control is created along with its form containers and form elements:

  • The layout and structure are defined by the content that is entered.
  • Form containers and form elements are created automatically according to the content type.
  • A title (sap.ui.core.Title (API)) automatically starts a new form group (form container), and a label (sap.m.Label (API)) automatically starts a new row (form element).
  • All other controls following this label will be assigned to its row (form element).

Types

There are three types of forms:

  • Display-only: the data is presented only as label-value field pairs without editable fields.
  • Editable: the data is presented as label-input field pairs, so users can enter data.
  • Mixed: some fields are editable and some are not.
Form control in display- only mode
 Form in edit mode
Form in edit mode
Developer Hint
The property editable of the form and simple form only changes the height of labels for vertical alignment to a field (editable = true) or text (editable = false). With the form and simple form, it does not switch the whole form between editable and read-only mode, thus changing fields into text and vice versa.
Information
Please consider, that a read-only state of an input element behaves differently (no border and background of the field) within the sap.ui.comp.smartform.SmartForm.

Responsiveness

The default settings of the control are not ideal for all possible use cases. Instead, applications can use one of the various layouts for the S, M, L and XL sizes.

Column Layout

The  ColumnLayout control renders a form group in a column-based responsive way. Depending on its size, the group is divided into one or more columns.

  • XL – max. 4 columns
  • L – max. 3 columns
  • M – max. 2 columns
  • S – 1 column

To make better use of screen space and give users a better overview without scrolling, you can balance form groups across multiple columns. The group elements are spread out into columns, depending on the number of group elements and their size.

Example:

  • 4 columns and 2 groups: each group will use 2 columns.
  • 3 columns and 2 groups: the larger one will use 2 columns, the smaller one 1 column.

The size of a group element will be determined by the number of visible elements assigned to it. If there are more groups than columns, every group uses only one column. So the last row of the form control will not be fully used. This will result in white space.

The form elements are spread out to the columns of a group arranged in a newspaper-like order. The position of the labels and fields depends on the size of the used column. If there is enough space, the labels are next to the fields, otherwise above the fields.

If you use the default form settings, each form group is displayed in a separate column. Depending on the size of the form group, this can mean that users need to scroll down to see the full form, even though there is unused space on the right side of the screen.


The examples show how forms with one and two form groups are displayed with and without layout balancing.

One form group with default arrangement
One form group with balanced column layout
Two form groups with default arrangement
Two form groups with balanced column layout

Responsive Grid Layout

The responsive grid layout is a form using a responsive grid. Depending on the available space, the groups are rendered in one or multiple columns, and the labels are rendered in the same row as the fields or above the fields. This behavior can be influenced by the properties of this layout control.

By using the responsive grid layout, the form offers a responsive layout based on a 12-column grid. There are two breakpoints, which result in three supported sizes: L, M, and S. These breakpoints are not the L, M, and S breakpoints of the page. In contrast to the page breakpoints, which react to the screen width, the breakpoints of the responsive grid layout react to the width of the form.

Note: For downward compatibility reasons, the default form layout control for the form and simple form is the column layout, not the responsive grid layout. Therefore, you need to assign the responsive grid layout manually to each form or simple form by using the layout property.

Breakpoints

Size S reaches up to 600 px. This means that as soon as the width of the form reaches 601 px, it changes from S to M, because the default value of breakpointM is 600. The value of breakpointM is the first value of the smaller size.

Form with breakpointM – Size S
Form with breakpointM – Size M

The property breakpointL between sizes L and M works in the same way: Size M reaches from 601 px to 1024 px. This means that as soon as the width of the form reaches 1025 px, it changes from M to L, because the default value of breakpointL is 1024.

Form with breakpointL – Size M
Form with breakpointL – Size L

Also the property breakpointXL between sizes L and XL works in the same way as before: Size L reaches from 1025 px to 1440 px. This means that as soon as the width of the form reaches  1441 px, it changes from L to XL, because the default value of breakpointXL is 1440.

Form with breakpointXL – Size L
Form with breakpointXL – Size XL

In general if the page width changes to a smaller size, the width of the form in the next smaller breakpoint is usually reached before the width of the page reaches its breakpoints in that size. For example the width of a form reaches breakpoints M to S before the width of the page reaches the breakpoints from M to S. This happens due to the padding of the container in which the form is placed.

Padding of a container
Developer Hint
To set the form’s breakpoints individually and to synchronize it with the breakpoints of the page, you can use the breakpointS / breakpointM / breakpointLbreakpointXL. If you are using a simple form, set these properties directly in the simple form control.

Label-Field Ratio

For each size, you can define how many grid columns are used for labels (labelSpanXL, labelSpanL, labelSpanM, labelSpanS), fields (implicitly), and empty grid columns (emptySpanXL, emptySpanL, emptySpanM, emptySpanS).

The optional empty grid columns are placed after the input elements. They avoid excessive stretching of the input fields. This ratio is displayed as x:y:z, where x is the number of grids used by the labels, y stands for the fields, and z for empty columns.

We highly recommend to change the default of the label-field-ratio according to your app’s needs. For more information, see the recommended layouts in the Layout section.

Form with a label-field ratio of 3:5:4
Developer Hint
To make the properties labelSpanXL, labelSpanL, labelSpanM, and labelSpanS in the responsive grid layout work as expected (e.g. labelSpanL sets the label span in size L) in Forms and SimpleForms, you must change the property adjustLabelSpan from its default true to false.

Otherwise..

  • labelSpanL is used for labels in forms with several form groups arranged in more than one column; it applies for both – M and L screen sizes.
  • labelSpanM is used for labels in forms arranged in one column; it also applies for both M and L screen sizes.
  • The default value of the property adjustLabelSpan is set to true for reasons of backward compatibility.

Input controls like input fields can be displayed in both – cozy and compact mode (for more information, see content density (cozy and compact)To horizontally align a label next to a field, the form has different CSS in cozy mode and compact mode.

Size S (Smartphones and Dialogs)

The form and simple form use a single-column layout within the responsive grid layout in size S by default. This means that the form groups are positioned below each other in a single column and the labels are positioned above the fields to avoid truncation of the labels.

The label-field ratio is 12:12:0 by default:

  • 12 grid columns of the responsive grid layout are used by the labels.
    (A label handles the space of a whole row.)
  • 12 grid columns of the responsive grid layout are used by the fields.
    (A field handles the space of a whole row.)
  • 0 grid columns of the responsive grid layout are used by empty columns.
    (There is no empty space on the right of the field.)
Form in size S
Form in size S

Size M

Size M of the form and simple form also has a single-column layout within the responsive grid layout by default. However, in size M the labels are positioned in the same row as the corresponding input field or value, and form groups are positioned below each other.

The label-field ratio is 2:10:0 by default:

  • 2 grid columns of the responsive grid layout are used by the labels.
  • 10 grid columns of the responsive grid layout are used by the fields.
  • 0 columns of the responsive grid layout are used by empty columns.

Please change the default 2:10:0 according to your app’s needs (see the recommended layouts in the Layout section).

Form in size M
Form in size M

Size L

The form and simple form in size L use a two-column layout within the responsive grid layout by default. That means that the form groups are placed next to each other to have all the information on one screen and to avoid scrolling. In these columns, the labels are positioned in the same row as the corresponding input field or value. So the form groups adopt the Z layout (reading direction in rows, not in columns).

The label-field ratio is 4:8:0 by default:

  • 4 grid columns of the responsive grid layout are used by the labels.
  • 8 grid columns of the responsive grid layout are used by fields.
  • 0 grid columns of the responsive grid layout are used by empty columns.
Form in size L
Form in size L

Size XL

Like the form and the simple form in size L, the size XL uses also a two-column layout within the responsive grid layout by default. To have all the information on one screen and avoid scrolling, the form groups are placed next to each other.  In these columns, the labels are positioned in the same row as the corresponding input field or value. The form groups adopt the Z layout.

The label-field ratio for size XL is 4:8:0 (technically the value is set to -1 and inherits the value of size L, see also the development hint below) by default:

  • 4 grid columns of the responsive grid layout are used by labels.
  • 8 grid columns of the responsive grid layout are used by fields.
  • 0 grid columns of the responsive grid layout are used by empty columns.
Form in size XL
Form in size XL
Developer Hint
For forms and simple forms, the value of the properties labelSpanXL, emptySpanXL and columnsXL are set to -1 and inherit the value of size L (to enable backward compatibility).

Layout

One Page, One Form

If a form contains only one group, do not use a group title – instead, use the form title.

Form with only one group (form title)

If the form is the only element on the page and if it has more than one group, you can use the group titles to capture the groups. 

One form with several groups (no form title)

If the form is one of several elements on the page, such as tables and lists, use the form title as its caption.

A form as one of several elements on a page (form title)

One Page, Many Forms

If you want to emphasize that some groups are very distinct, use several forms on a page instead of one form with several groups. Visually this looks more separated than using a single form with several groups. Give each form a meaningful title. If necessary, you can structure each form with groups as well. In this case, also give the groups a title.

Several forms on a page (emphasized groups)
Forms with several groups

Various Layouts

The following sections give guidance on how to configure the form so that it meets the needs of different sizes. Depending on where you place the form, we highly recommend changing the default and using one of the following layouts according to your app’s needs.

Size S (Smartphones and Dialogs)

Retain the default behavior (single column layout with a label-field ratio 12:12:0).

Form in size S (12:12:0)

Size M (Tablet) – Full Screen

If you place the form in the details part of a split screen, use a single-column layout with the label-field ratio 4:7:1 (4 grid columns used by the labels, 7 grid columns used by the fields, and 1 grid column used by empty columns).

Form in a split screen – Size M (4:7:1)

If you place the form in a full-screen app, use a single-column layout with the label-field ratio 3:5:4 (3 grid columns used by the labels, 5 grid columns used by the fields, and 4 grid columns used by empty columns).

Form in full screen – Size M (3:5:4)

As explained already in the section Responsiveness (Breakpoints), Size M goes down to 601 px. In this size, the 3:5:4 approach may not be wide enough for longer labels and fields. So if you expect long labels or input values, use the label-field ratio 4:8:0 (4 grid columns used by the labels, 8 grid columns used by the fields, and 0 grid columns used by empty columns).

Form with long labels and fields – Size M (4:8:0)

If you place the form in a full-screen app and it contains several form groups, use a two-column layout with its label-field ratio of 12:12:0 (12 grid columns used by the labels, 12 grid columns used by the fields, and 0 grid columns used by empty columns).

Form with several form groups (two columns) – Size M (12:12:0)
Developer Hint
Unlike all other XL-L-M-S properties, labelSpanL and labelSpanM up to SAPUI5 version 1.34 did not follow the XL-L-M-S size paradigm. LabelSpanL set the label span in layouts that contain more than one column, and labelSpanM set the label span in layouts that contain only one column. This has been changed since version 1.34. Due to downward compatibility, the new parameter adjustLabelSpan was necessary. Also due to downward compatibility, its default value is ‘true’, which causes the old behavior of the labelSpan properties. To achieve the new, correct behavior of the labelSpan properties, you must set the property adjustLabelSpan to ‘false’.

Size L (Desktop Screens)

If the form contains a single form group, use a single-column layout with a label-field ratio of 3:5:4 (3 grid columns used by the labels, 5 grid columns used by the fields, and 4 grid columns used by empty columns).

Form with a single form group (one column) – Size L (3:5:4)

If the form contains multiple form groups, you can also use a two-column layout with a label-field ratio of 12:12:0 (12 grid columns used by the labels, 12 grid columns used by the fields, and 0 grid columns used by empty columns). As explained already in the section Responsiveness (Breakpoints), Size L goes down to 1025 px. In this size, long labels that are put next to the fields might not fit on smaller L-sized screens (especially in split apps). Therefore labels are put above fields.

Form with several form groups (two columns) – Size L (12:12:0)
Developer Hint
Unlike all other XL-L-M-S properties, labelSpanL and labelSpanM up to SAPUI5 version 1.34 did not follow the XL-L-M-S size paradigm. LabelSpanL set the label span in layouts that contain more than one column, and labelSpanM set the label span in layouts that contain only one column. This has been changed since version 1.34. Due to downward compatibility, the new parameter adjustLabelSpan was necessary. Also due to downward compatibility, its default value is ‘true’, which causes the old behavior of the labelSpan properties. To achieve the new, correct behavior of the labelSpan properties, you must set adjustLabelSpan to ‘false’.

Size XL (Desktop Wide Screens)

If the form contains a single form group, use a single-column layout with a label-field ratio of 3:5:4 (3 grid columns used by the labels, 5 grid columns used by the fields, and 4 grid columns used by empty columns).

Form with a single form group (one column) – Size XL (3:5:4)

The responsive grid layout has the new property singleContainerFullSize. This property enables you to insert empty columns in your form: You can for example then set the property columnsXL to 2, fill one column with the single form group in a label-field ratio of 4:8:0 (4 grid columns used by the labels, 8 grid columns used by the fields, and 0 grid columns used by empty columns), and leave the second column empty. For more information, see also the development hint below.

Form with an empty column – Size XL (4:8:0)

If the form is put into a full-screen app, with the property singleContainerFullSize you can also set columnsXL to 3, fill one column with the single form group in a label-field ratio of 12:12:0 (12 grid columns used by the labels, 12 grid columns used by the fields, and 0 grid columns used by empty columns), and leave the second and third columns empty.

Form with single group in a column layout - Size XL - (12:12:0)

If the form contains multiple form groups, you can also use a two-column layout with a label-field ratio of 4:8:0  (4 grid columns used by the labels, 8 grid columns used by the fields, and 0 grid columns used by empty columns).

Form with multiple form groups (two columns) – Size XL (4:8:0)

If the form is put into a full-screen app and it contains multiple form groups, you can also use a three-column layout with a label-field ratio of 12:12:0  (12 grid columns used by the labels, 12 grid columns used by the fields, and 0 grid columns used by empty columns).

Form with two form groups (three columns) – Size XL (12:12:0)
Form with three form groups (three columns) – Size XL (12:12:0)

If you use a three-column layout for XL screens, do not use a two-column layout for L and M screens as it could create a lot of white space. In this case, use a single-column layout instead.

Form with a lot of white space (two columns)
Form with less white space (single-column layout)
Developer Hint
Up to SAPUI5 version 1.34, a group in a form with only this single group covered the entire width, irrespective of the value of the properties columnsM/L. Therefore, it was not possible to create an empty column next to the single group. This had to be changed. However, the default value of columnsL has always been 2. So if single groups no longer cover the entire form, all forms with a single group are automatically changed to two column forms in size L if the default value of the property columnsL has not been changed manually to 1. Therefore, a new property had to be introduced: singleContainerFullSize.If you are using a simple form, set this property directly in the simple form control. Its default value is ‘true’, which reflects the old behavior. A single group covers the entire width of the form, irrespective of  the values of the properties columnsM/L/XL. If it is set to ‘false’, the form with a single group has as many columns as the properties columnsM/L/XL are set to. The new behavior with the empty columns now can be achieved.

Guidelines

  • Order the form logically from a user’s perspective. For example, ask for a user´s name before asking them for their address.
  • Group related information by using form and group titles.
  • Use Column layout instead of Responsive Grid layout, if possible.
  • Try to arrange form groups (especially in size L and XL) in a way that the form:
    • Is easy to read and understand.
    • Does not contain too much white space (split groups if necessary).
  • A label is not a help text. Give each field a meaningful label. Labels should be succinct, short and descriptive.
  • If you have combined fields that contain, for example, a postal code and the name of a city, you can provide one combined label (postal code and city) for this group.
  • The label of a required field is marked with an asterisk (*). There is a corresponding property in the API for this. Do not write the asterisk manually in the label text. Just use the corresponding property and the asterisk will be inserted automatically.
  • At the end of the label, the form container automatically inserts a colon (:), which is triggered by the stylesheet. Do not write the colon manually in the label text.
  • If the form field doesn’t have a value, add an empty state indicator in the display-only mode. This is not a default property, so you will have to add it specifically.
  • Use default settings for labels. (For example, labels are not supported for manual bold formatting.)
  • Less is more: try to minimize the number of labels and their corresponding fields as much as possible.
  • If an input element is in an error or warning state, provide a meaningful message for the user. There is a corresponding property valueStateText in the sap.m.Input API.

Label Alignment

  • We generally recommend placing the label above the field. This is the most usable option, since it best supports the reading flow and avoids unnecessary eye movements.
  • If there is enough space on the screen, you can right-align the labels next to the value. Right-aligned labels minimize the gap between the label and field, and give the eye one line to scan along. Only place labels next to the value if there is also enough space to allow for longer labels in other languages.
Information
The object page can show up to four columns if the screen is wide enough. In most cases, the space available per form column is too narrow to display the label next to the field/value. Because of this, forms within the multi-column layout of an object page only support labels above the fields values. Label lengths can vary greatly, and placing the labels on top reduces the risk of truncation for both the label and the content.

Unit of Measurement

You can add the unit of measurement after certain input controls by using the layout options of the form. Examples of supported input controls include multi-input field, select, combo box, multi combo box, and mask input.

If you display the unit of measurement after the input control, make sure that it’s properly visualized and doesn’t wrap to the next row.

Unit of Measurement
Unit of Measurement

Amount Alignment

When the form is in edit mode (label-value field pairs with editable and non-editable fields), right-align amounts.

When a form is in display mode (label-value field pairs without editable fields), left-align amounts to avoid large gaps between the labels and values, and to improve readability.

Label

To avoid truncation, labels within forms wrap automatically.

Always aim to keep your labels as concise as possible. Remember that a label is not a help text. It must be meaningful, succinct, short, and descriptive. The purpose of the wrapping feature is make the full label text legible and to help avoid unnecessary use of abbreviations. It is not intended as a fallback for very long labels.

Data Loss Message

Provide a data loss message if the user accidentally navigates away from the page, such as when selecting an item in the master list and then using the Back or Home button. For details about how the message is delivered and what text you can use, see message handling.

Form Field Validation

Provide form field validation which describes the validation points and the choreography associated with messaging. For more information, see form field validation.

Field validation and validation report

Input Assistance

Intelligent systems can help users by recommending appropriate content or suggesting an action or input the user may “prefer”. The system assists the user by entering data or filtering data. Typical examples might be a search phrase suggestion, an appropriate form template, or a set of suggested default values for certain fields, based on the user input and interaction history.

Error Prevention

Help the user to avoid errors by using input types (sap.m.InputTypes) and mask input (sap.m.MaskInput). The input fields automatically get a specific format, which helps prevent the user from making invalid entries.

Always start with the least complex control (for example, use select instead of value help if the user needs to select only one item from a short list). Use more intricate controls only if the use case really requires it.

Placeholder

Provide a placeholder (or input prompt) as a short hint (a word or short phrase) to help the user with data entry. A hint can be a sample value or a brief description of the expected format.

Avoid using the placeholder attribute as an alternative to a label. This is important because the placeholder text is overwritten as soon as the form is filled out. Labels are necessary to indicate the meaning of the form fields when the placeholders are no longer visible.

Never repeat the label in the placeholder text. Only offer a placeholder if it provides the user with additional information.

Resources

Want to dive deeper? Follow the links below to find out more about related controls, the SAPUI5 implementation, and the visual design.

Elements and Controls

Implementation

View Settings Dialog

The view settings dialog helps users to sort, filter, or group data within a (master) list or a table. The dialog is triggered by icon buttons in the table toolbar.

Usage

We recommend making each feature (sort, filter, group) available as a separate button in the table toolbar (see Button Placement below). Each button then triggers a separate dialog. If specifically required, you can combine the dialogs into one with a segmented button acting as tabs to switch between the sort, filter and group options. Note: In a combined dialog, the Reset button resets all tabs.

Use the view settings dialog if:

  • Users need to sort line items in a manageable list or table (up to about 20 columns).
  • You need to offer custom filter settings in a manageable list or table (up to about 20 columns).
  • Users need to group line items in a manageable list or table (up to about 20 columns).

Do not use the view settings dialog if:

  • You have complex tables (more than about 20 columns).
  • Users need to rearrange columns within the table. Use the table personalization dialog instead.
  • Users need very specific sort, filter, or column sorting options within complex tables. Use the P13n dialog instead.

Button Placement

Use distinct icon buttons for the sort, filter, and group settings. Place the icons in the following order:   (Sort) (Filter)  (Group).

Do not place Sort, Filter, or Group buttons in the footer toolbar if they refer to a table.

For more information about the button placement, see Sort, Filter, Group (Generic) in the table toolbar article.

Sort, Group, and Filter a List

You can also offer the view setting features for a list.

Responsiveness

The popover dialog appears as a modal window on desktop and tablet screen sizes, but uses the full screen on smartphones.

The view settings dialog is a composite control that consists of a modal dialog with a maximum of three tabs with lists of attributes. Each helps the user to either sort, filter, or group a table or list. If the use case requires only a sort feature, for example, you can hide the filter and group tabs.

The dialog is triggered by one of the icon buttons in the table header
View settings dialog - Size S
View settings dialog - Size M
View settings dialog - Size L

Behavior and Interaction

The sort, filter, and group features can all be applied to a table simultaneously.

Sort

The sort dialog shows two groups of sort settings. The first group offers general Ascending and Descending sort options. The second group offers attributes that fit the use case, such as Product, Supplier, Weight, or Price. The attributes can match the table columns, but because a table column can also contain several data points, such as “Name” and “Surname”, the attributes allow an attribute to be shown for each data point.

Users can select attributes using the radio buttons. Clicking OK closes the dialog and shows the table items in the selected order.

If a combined dialog is used, the first tab is the sort feature.

View settings dialog - Sort

Filter

The filter dialog can offer a single filter selection list, a multi-filter selection list, or a category list. The category list provides an overview, and allows the user to drill down to detailed filter selection lists.

In a combined view settings dialog, filtering is on the second tab.

Filter Selection List – Single Selection

The dialog offers one selection list with radio buttons to select a filter. This list is useful for offering a list of preconfigured filters for a specific use, such as “Products with numbers ‘starting between 100 and 200’ with status ‘in stock’ and color ‘green’”.

Filter Selection List – Multi-Selection

You can also offer a multi-selection list. For example, a user might want to show all open items for both “Company A” and “Company D”.

Show Selected Only

If the user clicks the    button (Show Selected Only), only the selected filters are shown (for example, “Company A” and “Company D”). Clicking the button again shows all of the available filter values.

Multiple filters selected
Multiple filters with 'Show Selected Only' option active - only selected filters are shown

Category List

The filter dialog shows a single list of general filter categories depending on the use case, like Price or Height. The user chooses a category by clicking the list item, such as Price. As this is a simple drilldown, these categories do not have radio buttons. The follow-on dialog shows a list of optional filter settings in the Price category. These filters, such as Less than 100, depend on the use case. The user chooses a specific filter setting by selecting one of the radio buttons offered in this list. Clicking OK closes the dialog and shows the table items filtered by the selected attribute. The infobar shows which filter has been set.

Example: Filter Dialog with Category List

1) Select a category
2) Option to refine filters for the selected category (here: 'Weight')
3) Infobar showing the filter setting for a table view filtered by 'Weight'

Free-Form Apps

You can also customize your own filter UIs, for example, to support date picking.

Filter Values

Filters can correspond to single values as well as groups, such as “<100.00 EUR”.

Filter Reset

The Reset button on the filter tab resets all filter settings.

Removing Filters

In single selection lists, offer a Not Filtered option. This enables users to remove existing filters.

Group

The group dialog shows two groups of attributes. The first group offers a general Ascending or Descending order, which allows the user to select the order in which the defined groups appear. The second group offers attributes that fit the use case, such as Type or Supplier.

You can also offer an attribute like Price to group data in a table.

Users can choose attributes using radio buttons or checkboxes. Clicking OK closes the dialog and shows the table with items grouped below headers.

In a combined view settings dialog, the group feature is the third tab.

Dialog for choosing an attribute from the group tab
Table view grouped by supplier – Group headers divide the list

Naming Group Headers

Be sure to name the group headers as follows: <Category Name>: <Value/Range>

Examples:

  • Category: Accessories
  • Supplier: Red Point Stores.

Guidelines

On the table toolbar, use different buttons for each function (sort, filter, group). With each button, open the View Settings dialog with just the corresponding tab.

If possible, give users the option not to filter or group. For sorting, this is only necessary if the use case calls for an unsorted list. In all three cases, show this option as the first entry in the list of criteria (remember to include the brackets):

  • (Not Sorted)
  • (Not Filtered)
  • (Not Grouped)

Resources

Want to dive deeper? Follow the links below to find out more about related controls, the SAPUI5 implementation, and the visual design.

Elements and Controls

Implementation

Table Overview

A table contains a set of line items and usually comprises rows (with each row showing one line item) and columns. Line items can contain data of any kind, but also interactive controls, for example, for editing the data, navigating, or triggering actions relating to the line item.

To display large amounts of data in tabular form, several table controls are provided. These are divided into two groups, each of which is defined by a consistent feature set:

  • Fully responsive tables
  • Desktop-centric tables

Usage

Use the responsive table if:

  • A table is needed. The responsive table is the default table in SAP Fiori.
  • The table content should be flexible and visually appealing. The responsive table offers the most flexibility in regards to its content because all SAPUI5 controls, and even multiple controls, can be used. In addition, different rows can be based on different item templates.
  • The focus lies on working on line items, not on individual cells.
  • A main use case involves selecting one or more items, for which details are needed in order to choose the correct item.
  • Line items are independent of each other and no operation across columns is needed.
  • You want to have only one implementation for all devices.

Use the list if:

  • You want to display a simple dataset.
  • A table would be too complex.
  • A list of actions is to be displayed.
  • Simple two-level hierarchies are required (by using grouping or navigation).
  • The main use case involves selecting one of several items with only a few details per item.
  • You require a list for a list-detail scenario using the flexible column layout.

For all the cases listed above, use the list control.

Use the tree if:

  • You want to display a simple hierarchical dataset.
  • You want to use a hierarchical list for a list-detail scenario using the flexible column layout.
  • Using a tree table would be too complex.
  • The main use case involves selecting one of several hierarchical items with only a few details per item.

For all the cases listed above, use the tree control.

Use the grid table if:

  • You need to display more than 1,000 rows at the same time.
  • The cell level and the spatial relationship between cells are more important than the line item, such as if users need to recognize patterns in the data, like in waterfall charts.
  • Comparing items is a major use case. The grid table layout remains stable irrespective of the screen width. In addition, a cell only ever contains one control.
  • You need an analytical table, but you cannot provide an analytical binding.

Note that the grid table is not fully responsive. It is available only for desktops and tablets, so you will need to take an adaptive approach by offering an additional UI for smartphones.

Use the tree table if:

  • Data needs to be displayed in a hierarchical manner.

Note that the tree table is not fully responsive. It is available only for desktops and tablets, so you will need to take an adaptive approach by offering an additional UI for smartphones.

Use the analytical table if:

  • You need multilevel grouping as well as grand totals and subtotals.

Note that the analytical table is not fully responsive. It is available only for desktops and tablets, so you will need to take an adaptive approach by offering an additional UI for smartphones.

Types

Fully Responsive Tables

Responsive Table (sap.m.Table)

This is the default table in SAP Fiori. If a table is needed, the responsive table should be the first choice. It is based on the list.

The responsive table provides:

  • An optimized way to show a line item at a glance without the need for horizontal scrolling, regardless of the screen width.
  • Full flexibility in regards to content:
    • Any SAPUI5 control can be used in a cell, including micro charts and forms.
    • Using layout containers, such as a grid layout, allows more than one control to be used in a cell. Consequently, the cell shows more than one data point.
    • Templates with multiple rows are supported, so different items can have different layouts. For example, this can be used to show editable items and read-only items in the same table without switching modes. In this case, the editable items could have a completely different layout than the read-only items.
    • Items with different heights are supported. This allows for more dynamic content in cells, for example, to show lists or use text controls that wrap instead of truncate.
  • Smooth scrolling. This is done by rendering all items on the application background. Thus, the responsive table does not have its own scrollbar but uses the scrollbar for the whole page.
  • A very lightweight design.
  • Touch support.

The responsive table is limited in the following way:

  • Since all items are rendered, the responsive table is limited to approximately 1,000 items on one screen (depending on the complexity of the items and the whole screen). Exceeding this number can lead to decreased rendering performance. On mobile devices, browsers can also run out of memory.
Responsive table
Responsive table

List (sap.m.List)

The list is the basis for the responsive table. It should be used whenever a table is too complex.

The list provides:

  • Full flexibility in regards to its content:
    • There are various specializations for specific list types.
    • With a custom list item, all SAPUI5 controls can be used inside a list. Using layout containers allows more than one control to be used in a custom list item.
    • Templates with multiple rows are supported, so different items can be shown in the same list.
    • Items with different heights are supported.
  • Smooth scrolling. This is done by rendering all items on the application background. Thus, the list doesn’t have its own scrollbar but uses the scrollbar for the entire page.
  • A very lean and lightweight design.
  • Touch support.

The list is limited in the following way:

  • Since all items are rendered, the list is limited to approximately 1,000 items on one screen (depending on the complexity of the items and the entire screen). Exceeding this number can lead to decreased rendering performance. On mobile devices, browsers can also run out of memory.
List
List

Tree (sap.m.Tree)

The tree is based on the list. It should be used whenever a hierarchical view is needed, but a tree table is too complex.

The tree provides:

  • A standard tree item that provides an icon, a text (that wraps), and a counter.
  • Support for items with different heights.
  • Smooth scrolling. This is done by rendering all items on the application background. Thus, the tree doesn’t have its own scrollbar, but uses the scrollbar for the entire page.
  • A very lean and lightweight design.
  • Touch support.

The tree is limited in the following way:

  • Since all items are rendered, the tree is limited to approximately 200 items on one screen (depending on the complexity of the items and the whole screen). Exceeding this number can lead to decreased rendering performance. On mobile devices, browsers can also run out of memory.
Tree
Tree

Desktop-Centric Tables

This group contains three different tables:

  • Grid table: This is the most basic table in this group.
  • Analytical table: This provides the following features on top of the grid table:
    • Grouping by several levels.
    • Automatic calculation of grand totals for a column and subtotals per group level.
  • Tree table: This provides a hierarchical view of the items.

Grid Table (sap.ui.table.Table)

The grid table provides:

  • An optimized way to show large amounts of data. It supports an unlimited number of rows. It also supports a very condensed display of line items on non-touch devices, thus allowing more rows to be displayed on the same screen property.
  • Fixed control height, thus supporting horizontal and vertical scrolling (“viewport scrolling”). However, this also means that there are several vertical scrollbars on the screen for the page and table, which might be cumbersome on smaller screens.
  • Touch devices are supported.

The grid table is limited in the following ways:

  • Content layout is less flexible:
    • The grid table supports only certain controls, mainly for displaying text or getting single-line text input from users. For example, you cannot add micro charts.
    • Only one control can be added per cell.
    • It supports only single-row templates.
    • All items need to have the same height.
  • Vertical scrolling is not smooth. For performance reasons, the content is not really scrolled but exchanged.
  • The design is more complex.
  • Although touch is supported, the grid table works only on desktops and tablets. For smartphones, a fallback solution is needed.
Grid table
Grid table

Analytical Table (sap.ui.table.AnalyticalTable)

The analytical table is based on the grid table and is therefore quite similar to it.

In addition to the grid table, the analytical table provides:

  • Multilevel grouping
  • Display of grand totals per column and subtotals per group

The analytical table is limited in the same way as the grid table, with one addition:

Analytical table
Analytical table

Tree Table (sap.ui.table.TreeTable)

The tree table is based on the grid table and is therefore quite similar to it.

In addition to the grid table, the tree table provides:

  • One hierarchical column

The tree table is limited in the same way as the grid table.

Tree table
Tree table

Resources

Want to dive deeper? Follow the links below to find out more about related controls, the SAPUI5 implementation, and the visual design.

Elements and Controls

Implementation

Process Flow

The process flow control allows you to show flows of multiple types of objects, such as documents and approvals. Document flows can split into numerous branches, while approval flows are usually straightforward.

Usage

Use the process flow if:

  • You need to display document flows.
  • You need to display approval flows.
  • You need to display other kinds of flows with linear and/or branching paths.

Do not use the process flow if:

  • You want to display the process flow header in combination with something other than the flow map. In this case, use the icon tab bar (style: process) instead.

Responsiveness

The process flow reacts to the size of the container it is put into. It has four zoom levels, with level 1 being the largest and level 4 the smallest. In containers wider than 1024 px, level 2 is chosen automatically. For containers from 600 to 1023 px, level 3 is set, and below 600 px, it is level 4. For more information, see Behavior and Interaction.

Process flow – Size S
Process flow – Size M
Process flow – Size L

Layout

The process flow enables different layout forms within the nodes:

  • The default layout contains fixed sections that can easily be filled with content.
  • The freestyle layout comprises an empty container that can be filled with different controls.

Default (Fixed) Layout

At the top of the control is a bar, with the zoom buttons on the left and the full screen toggle on the right.

Below the bar is the process flow header, which can also be used on its own if the complex visualization of nodes is not required. The header consists of multiple steps, each of which is visualized by a circled icon. Each icon is surrounded by a circular chart to indicate the distribution of statuses per column.

The flow map lies beneath the header. The elements belonging to a certain step are vertically aligned beneath one another. Arrows point to the next (follow-up) element or multiple elements. Dotted arrows pointing to semi-transparent elements indicate planned or pending elements.

In turn, each element comprises different sections:

  1. Header (mandatory) – Wraps twice before truncation.
  2. Status (optional) – With semantic color and icon; can wrap once.
  3. Attribute 1 (optional) – Wraps once before truncation.
  4. Attribute 2 (optional) – Wraps once before truncation.
Layout – Sections
Layout – Sections

Naturally, the header information is mandatory because it is the key identifier of an object. The header should contain a brief but meaningful description and, if necessary, an ID in brackets.

Although the status is optional, an icon appears on an item without a status at the smallest zoom level. When the user zooms out completely, only the status icon remains visible on an item. Without it, the element looks broken and does not provide any information.

There are two options to filter the nodes for certain types or attributes. For simple filtering, you can use a filter button in the toolbar to trigger a filter dialog. For more complex filtering, the filter bar control can be placed on top of the process flow.

Freestyle Layout

The freestyle layout gives you the most freedom within the borders of each node. Inside this empty container, you can structure your content as your use case requires. Of course, you still need to conform to the guidelines for each control you use in your layout. The next sections show two examples of freestyle layouts with texts and images.

If text is the main focus of a node, we recommend using the “dog ear” visualization (property FoldedCorners = true, see Styles section for further details). If an image is the most notable content of a node, we advise against using the “dog ear” visualization.

Regardless of the controls you use inside the nodes, ensure that users can easily identify the item or meaning behind a node without having to click it. Users should only have to click to retrieve additional information or to perform an action, but not to identify an item. An exception to this rule is the lowest zoom level, which only shows the most basic information.

What should be displayed at the lowest zoom (level 4) depends on the context and use case of your application. If an image is the centerpiece of the node, a down-sampled version of this image can help users to identify each individual node. In other instances, an icon might be more appropriate to show the status of a node or hint at its content. In both cases, it is mandatory for applications to supply an icon (such as  to indicate that the object is in process, or   to show that the item contains textual information). You can also use status icons with semantic colors if they support the use case.

You can offer actions on the popover or quick view that is triggered to show additional information. If no additional information is required, you can also use the node’s click event to trigger an action sheet. However, use this latter option with caution; for most use cases, you will need to show additional information, especially at the lowest zoom level.

Freestyle Example: Text

If you need to display text inside a node, you can use the built-in click event to show a popover with the full text and any additional actions. While zooming out, less and less text is shown until the smallest zoom level is reached. Since text cannot be previewed in such a small container, use the icon   to indicate that the item contains textual information.

Layout – Freestyle – Text 01
Layout – Freestyle – Text 02
Layout – Freestyle – Text 03
Layout – Freestyle – Text 04

Freestyle Example: Image

The following examples show how images can be displayed inside the process flow nodes – in this case to represent an employee. Additional information, such as the employee’s profile and contact information, can be shown in a quick view. As the node gets smaller with each zoom level, some information needs to be omitted. On the lowest zoom level, only the image is shown.

Layout – Freestyle – Image 01
Layout – Freestyle – Image 02
Layout – Freestyle – Image 03
Layout – Freestyle – Image 04

Components

The process flow control consists of the process flow header and the flow map.

For better usability, it is highly recommended to add a toolbar with zooming controls (    ).

A full-screen switch is optional and can also be put in the toolbar (  ).

Behavior and Interaction

Navigation and Zoom

User can move the whole flow with the left mouse button held down, just like they would move a street map in a browser.

To zoom in or out, the user can use the mouse wheel or, if implemented, click the respective buttons on the bar on top of the flow line. The zoom is semantic: detailed information is added or removed depending on the zoom level.

If the process flow is wider than the available space, a chevron (< or >) appears on the side where the flow extends beyond the visible area. A number also indicates how many process steps lie outside, such as < 2 or 5 >.

Level 1

Larger elements provide the most space for
textual information. However, fewer elements
fit on the screen.

Zoom in (node)
Zoom in (node)
Zoom in (process flow)

Level 2 (automatic preset for screens wider than 1024 px)

The standard size provides the best combination
of content information and overview.

Zoom in – Standard size

Level 3 (automatic preset for screen widths from 600 px to 1023 px)

Elements are reduced to header and status
information to provide a better overview for
large flows.

Zoom in – Elements are reduced to a header and status information

Level 4 (automatic preset for screens below 600 px width)

The smallest zoom level provides a maximum
overview of the flow while the information about
each element is reduced to a status icon.

Zoom in – Element is reduced to a status icon
Zoom in – Elements are reduced to a status icon

When a node is clicked, applications should provide a popover with additional details about this element. It should give users a deeper insight into the status or, in the event of an issue, a way to solve the problem. From the quick overview, users should be able to navigate to the element’s fact sheet.

If no additional information needs to be displayed, an action sheet can be triggered instead of the popover to allow users to perform actions on the item.

Labels on Connections

Some use cases focus on the connections between the nodes as much as on the nodes themselves. For these cases, we provide labels that can be displayed on each connection which, in turn, provide the user with the necessary information.

If multiple paths overlap, applications need to aggregate the respective labels and show the ‘worst’ status.

Labels
Labels
Process flow – Labels (1)

When the user clicks an aggregated label, app developers need to provide a popover showing a list of connection paths for the user to select from.

Process flow – Labels (2)

In the popover, the user should now be able to browse through the paths, while the process flow is updated accordingly.

Process flow – Labels (3)

To give the user more information, a Details button needs to be shown in the footer.

The details must be shown in the same popover, and a back button must be offered that allows the user to return to the path overview.

The footer of the details overview can contain up to two actions.

Labels - Process flow

Highlighted Path

The “highlighted path” feature allows users to focus on specific nodes and their path through the process flow, for example by highlighting a search or filter result.

Example: A user searches for a specific item inside an order. The nodes containing or exclusively representing this item are highlighted, while the rest of the flow is dimmed.

Attention: Do not combine a highlighted path with a selected path. When you set one path type, make sure that the other is deactivated.

Highlight path
Highlight path

Business Focus

The business focus is a rarely used feature. It allows applications to put a visual focus on a node that is separate from (and not to be confused with) the selection or keyboard focus.

If, for example, the process flow is used next to another control (such as the timeline), the business focus can be used to highlight a node that corresponds to a selection in the other control:

  1. The timeline shows an automated post “There is an invoicing problem with Item 0815 from Order 4711.”
  2. The user clicks the post (not onto a specific link).
  3. The respective node in the lane Invoice is highlighted.

If you use the business focus, make sure that only one node is selected at a time.

Business focus
Business focus

Editing

If users can edit a node’s content, offer an Edit button. Place the button on whatever is triggered when the user clicks a node (action sheet, popover, quick view). The editing itself can be handled in a small dialog. The information structure depends on the controls used inside the node. Usually, a form and/or text areas will cover most use cases.

Styles

Two visualizations are available for the nodes inside the flow: a specific visualization for documents, and one for general objects (basically everything except documents). App teams can use the FoldedCorners property to choose the type of objects that the process flow represents.

FoldedCorners = true: This style gives the node a “dog ear”, which makes it very recognizable as a document.

FoldedCorners = false (default): This setting has no specific visual style and is therefore suitable for all object types.

The property affects the entire flow; in other words, it cannot be applied solely to individual nodes. Therefore, it should only be set to true if all the nodes represent documents (or document-like objects). If some or all of the elements are better visualized with the general style, FoldedCorners should be set to false.

Styles – FoldedCorners – True
Styles – FoldedCorners – False

Aggregation

Some flows can be arranged more clearly by using aggregation. Nodes that belong to the same lane (column) can be displayed as a stack by setting the property Type to Aggregated. This means that nodes that would usually be displayed one below the other are shown as a stack of nodes.

The interaction for these stacks is identical to the regular nodes: the control provides a single click event that app developers can use to show a popover with more detailed information.

The description on these stacks should be helpful to users, for example, by telling them how many nodes are in the stack. Aggregated amounts can also be shown.
Use the following format to describe the stack and the number of nodes it contains: <Object Type> (<Counter>). For example, Invoices (8) or Sales Orders (42).

The statuses in the stacks can be heterogeneous. However, it is imperative to show the ‘worst’ status(es) at the top so that users know whether they have to take action.

In the upper example on the right-hand side, the nodes under Delivery and Invoice are shown as stacks instead of individual nodes.
The lower example on the right shows the same stacks when zoomed out (level 4).

Aggregation
Aggregation
Aggregation (zoom)
Aggregation (zoom)

Guidelines

The process flow header is not a substitution for the icon tab bar. For more details, see the Usage section at the top of this article.

Keep the amount of information inside each node to a minimum. Reveal more information via a popover.

Although technically possible, the node titles should not be turned into links. The IsTitleClickable property should be left in its default state (“false”). Titles that the user can click may lead to usability issues. Handle every action or interaction via a popover and/or navigation to a subsequent page.

UI Texts

Use a noun to describe the process phase.
Example: Accounting

If the process and a business object have the same name, add Processing to the process name.
Example: Order Processing (in this case, “Order” is used for the business object)

Resources

Want to dive deeper? Follow the links below to find out more about related controls, the SAPUI5 implementation, and the visual design.

Elements and Controls

Implementation

Category Navigation

You can use the category navigation pattern to replace tree-like structures with only a few levels in a responsive environment. In this pattern, the breadcrumb control replaces the title control. The category navigation pattern is used only in rare cases.

Usage

Use category navigation if:

  • You need to show categorized data in a responsive environment.
  • You need to replace a tree table on tablets and smartphones, and the tree table has a maximum of five levels.
  • You need to show hierarchical data with different details at each level, which cannot be represented in a tree table.

Do not use category navigation if:

  • You need only two levels, and the upper level identifies the category. In this case, use a grouped responsive table instead.
  • You need more than five levels. In this case, use a tree table.
    On a smartphone or tablet device, try to display the data on just five levels. You can do this in one of two ways:

    • Remove unnecessary root levels.
    • Offer the same items in different branches.

Responsiveness

The pattern is based on a responsive table. In contrast to the standard responsive table, the title is used to display a breadcrumb showing the current level.

The breadcrumb control determines the text of the current/last element in the breadcrumb path. It only consists of text (string element).

The responsiveness is handled by the control: As soon as the breadcrumb is truncated, it provides a dropdown menu to access further navigation levels.

Category navigation - Size S
Category navigation - Size M
Category navigation - Size L

Layout

The breadcrumb appears in the toolbar, and replaces the table title.

At any given level, the responsive table contains the individual line items, including their column header, as well as the categories available for further drilldown.

Category navigation - Layout

Components

Use the breadcrumb control to implement the category navigation pattern. Display the navigation levels as text. Use links for the titles of all levels above the current level to enable fast navigation across the levels.

A breadcrumb showing three levels

If only the root level is displayed, there is no link.

A breadcrumb showing the root level only

When the breadcrumb is truncated, breadcrumb control provides a dropdown menu with the hidden navigation levels. The breadcrumb shows the title of the currently selected level.

Breadcrumb changes to a dropdown menu if there is insufficient space

Use one or several responsive tables to list the items for the different levels, depending on the columns shown on each level.

Responsive table
Responsive table

Within the responsive table, use the item navigation mode for container items.

Container item with navigation indicator

Do not use the navigation mode for leaf items.

Leaf item without navigation indicator

Behavior and Interaction

Initial State

Initially, this pattern looks like a standard responsive table with control items.

Navigation to Second Level (Drill-In)

Clicking an item drills into it in one of the following ways:

  • The content of the responsive table is changed (if all columns are the same on the second level).
  • The entire responsive table is changed (if there are different columns on the second level).

Navigation to Third Level

You can offer further navigation at item level. The breadcrumb adapts accordingly.

Leaves at the second level do not offer further navigation.

Initial state
Initial state
State after navigating to the second level
State after navigating to the third level

Guidelines

Navigation to Second Level (Drill-In)

Change the title to a breadcrumb.

Show navigation indicators if there are more levels.

State after navigating to the second level

Navigation to Third Level

Use control items to enable further navigation.

Make sure that the breadcrumb adapts accordingly. Don’t show a navigation indicator for leaves.

State after navigating to the third level

Enable backward navigation via the breadcrumb links. When the user navigates back to a higher level, show exactly the same state as before.

If navigating back, show the former state

If there is not enough space to show the entire breadcrumb, use the dropdown menu provided by the control to show the hidden navigation levels.

Show a dropdown menu within the breadcrumb control on small screens

Within the dropdown menu, show all parent nodes below the current node.

Show the levels of the breadcrumb inside the dropdown menu (select)

When the user navigates between the different levels, change only the responsive table and the breadcrumb. Do not change anything else or navigate to another page.

Placement

Place the breadcrumb control in a way that makes sense to the user.

  • If you are using the breadcrumb in combination with segmented buttons, place the breadcrumb above the toolbar and display the segmented buttons on the very left. That way, the page navigation is on a higher level than the view switch.
Breadcrumb with segmented buttons in hierarchy
  • If you are using the breadcrumb with a tab pattern, replace the table title with the breadcrumb and display it under the tabs.
Breadcrumb with tabs

Related Links

Elements and Controls

Implementation

Analytical Table (ALV)

An analytical table contains a set of data that is structured in rows and columns. It provides several powerful possibilities for working with the data, including advanced grouping and aggregations.

In contrast to other tables, the analytical data binding used by the analytical table allows an aggregated number to be shown automatically in a cell. This means that a number in such a summarized cell is a total sum of several lines in the database.

Usage

Use the analytical table (ALV) if:

  • The cell level and the spatial relationship between cells are more important than the line item. Examples include spreadsheet analyses and waterfall charts. Note that an analytical table is not fully responsive. It is only available for desktops and tablets, so you will need to take an adaptive approach by offering an additional UI for smartphones.
  • You have to work on more than 1,000 rows. In this case, the analytical table is easier to handle. In contrast to the responsive table, the architecture of the analytical table is optimized for handling large numbers of items. Note that an analytical table is not fully responsive. It is only available for desktops and tablets, so you will need to take an adaptive approach by offering an additional UI for smartphones.
  • Comparing items is a major use case. In this case, an analytical table might be more appropriate than a responsive table. In the analytical table, each cell contains only one data point. In contrast, the responsive table is more flexible regarding line items, including the ability to add more data points per cell and also the pop-in function. Both make comparisons more difficult. Note that an analytical table is not fully responsive. It is only available for desktops and tablets, so you will need to take an adaptive approach by offering an additional UI for smartphones.

Do not use the analytical table (ALV) if:

  • You need a table. The responsive table is the default table in SAP Fiori. Additional use cases where you might need the responsive table include:
    • You need to provide a total sum for one column. You can also add totals to the responsive table.
    • The focus is on working on line items, not on cells. The responsive table is optimized for displaying complete items on all devices (such as purchase orders and purchase requisitions).
    • Selecting one or more items is a main use case and details are needed to choose the correct item.
    • Line items are independent of each other and no operation across columns is needed.
    • You want to have only one implementation for all devices.
  • The main use case is choosing one item from a very small number of items with no additional details. A select or combo box might be more appropriate.
  • The main use case is choosing one out of several items with only a few details per item. A list might be more appropriate. Pay attention to the layout of the list item to ensure that it has a pleasant appearance. Examples include the master list and the attachment list.
  • You cannot provide an analytical binding on the technical side. In this case, a grid table will do the work. Note that the grid table provides only one level of grouping, no aggregation options, and is also not responsive.
  • Data needs to be structured in a hierarchical manner. In this case, a tree table might be more appropriate. Although the analytical table can have several grouping levels, it is not as flexible when nodes at several levels contain children. Note that neither the tree table nor the analytical table are responsive. You will need to take an adaptive approach by offering an additional UI for smartphones and tablets.
  • You need an overview of a large amount of data. In this case, use charts.
  • You just need it for layout reasons. In this case, use a layout container like HBox or VBox.
  • You need read-only or editable field-value pairs. Use a form instead. The analytical table is not optimized for form-like input navigation.

Responsiveness

The analytical table is available for desktops and tablets, but not in smartphone sizes. It supports touch devices, but is not optimized for small screens.

If you use an analytical table for desktop use cases, note that you must implement a fallback solution for mobile and touch devices. This fallback solution does not need to support all use cases.

You could create a fallback by using a responsive table. However, a completely different solution, such as showing charts in a read-only case, might be more suitable.

Analytical table (ALV) shown on a desktop
Analytical table (ALV) shown on a tablet

Components

An analytical table does not consist of other elements. However, it is common to use a toolbar above the analytical table.

The toolbar can contain entry points for the view settings dialog and the table personalization dialog or for the p13n dialog, as well as for view switches in the form of a segmented button, and buttons for Add, Edit, and other actions.

Behavior and Interaction

An analytical table is quite restricted in terms of its content, although it provides powerful features for working with the content.

Table Level

Scroll

An analytical table allows horizontal and vertical scrolling (sap.ui.table.AnalyticalTable, property: navigationMode, value: Scrollbar).

You can add any number of line items to the analytical table, which is known as “lazy loading”.

To prevent adverse side effects when scrolling vertically, all line items must have the same height (sap.ui.table.AnalyticalTable, property: rowHeight).

The analytical table is optimized to allow faster scrolling within the first 1000 items.

Scroll bar
Scroll bar

Select

Selection for an analytical table depends on the chosen selection mode. The following options are available:

No selection: Items cannot be selected. (property: selectionMode = None)

Analytical table without item selection

Single selection: One item in the analytical table can be selected. A row selector column is shown. (property: selectionMode = Single)

Analytical table with single selection
  • Multiple selection: One or more items can be selected. The analytical table provides a column with checkboxes on the left-hand side. Clicking a checkbox toggles the state of the corresponding row from deselected to selected and back. The Shift key can be used to select a range. For multiple selection, you can choose between two variants.
    • Multi-toggle mode (property: selectionMode = MultiToggle)
    • Multi-selection plug-in (sap.ui.table.plugins.MultiSelectionPlugin)

    These variants behave differently when the user selects more items than are currently loaded in the front end.

    Multi-toggle

    In multi-toggle mode, you can offer a Select All checkbox to the left of the column header (property: enableSelectAll). Selecting this checkbox selects or deselects all items that are currently loaded in the front end. All other items are not selected/deselected. If the application data is stored in the back end, scrolling down further can reveal additional unselected items. The same can happen with range selections if not all items in the selected range have been loaded to the front end.

    Multi-selection plug-in

    If you use this plug-in instead of the multi-toggle selection mode, the behavior for range selection and Select All changes:

    • By default, a dedicated Deselect All button replaces the Select All checkbox. There is no default UI element for selecting all items.
    • You can set a limit for the number of items that can be selected (sap.ui.table.plugins.MultiSelectionPlugin, property: limit). This limit has the following effect:
      • The range that can be selected using the Shift key is limited to the specified number of items (default = 200). The table automatically scrolls back to the last selected item and a message can appear (sap.ui.table.plugins.MultiSelectionPlugin, property: enableNotification). Users can select more items by selecting additional ranges (the specified limit applies each time).
      • If the selection limit is set to 0, a Select All checkbox is shown. There is also no limit on the number of items that can be selected in a range. All selected items are loaded, which can lead to performance issues for large data sets.
    • If selected items are not already available in the front end, they are loaded automatically by the plug-in and set as selected.
Information
When setting a limit for the number of items that can be selected, keep the following boundaries in mind:

  • The performance of your service: How many items can be loaded at once in a reasonable time? Does this also apply if an end-user shows all available columns?
  • The “minimum limit”: Internally, the analytcial table loads blocks of items as the user scrolls down. Because this block size (sap.ui.table.AnalyticalTable, property: threshold) is usually also based on the performance of the service, it should be safe to assume that the minimum selection limit is twice this size. In this case, loading the data would take as long as scrolling down and loading exactly one more block. Nevertheless, we recommend using larger limits if your service allows.

Analytical table with multiple selection
Using the multi-selection plug-in with a limit

Selection Behavior

An item can be selected in different ways, depending on the configuration of the analytical table (sap.ui.table.Table, property: selectionBehavior):

  • Row: An item is selected by clicking the checkbox or the row. Use this option for multi-selection tables if clicking a row or a cell is not used for anything else.
  • RowSelector: An item is selected only by clicking the checkbox in the selector cell. Use this option if clicking the row (or a cell inside the row) is used for something else, such as navigation.
  • RowOnly: An item is selected only by clicking the row, and not using checkboxes in the selector cells. Use this for single-selection tables if clicking a row or a cell is not used for another purpose, such as navigation.

Compact, Cozy, and Condensed

Like all SAP Fiori controls, the analytical table is shown in compact mode on a desktop and in cozy mode on tablets.

For desktop devices, you can fit even more rows onto the screen by using the condensed mode together with the compact mode. This renders less white space for each item.

Note that the condensed content density must always be set in addition to the compact mode. Do not use the condensed mode on its own. Do not mix condensed with cozy. Doing so could lead to unpredictable or unwanted results, such as cozy-sized controls in condensed-sized containers, missing padding, and so on.

Note that neither compact mode nor condensed mode support touch interaction. Even on a desktop with a touch screen, users will have difficulty selecting rows or using controls inside the cells with their fingers.

For more information on cozy and compact modes, see content density.


Analytical table in compact mode
Analytical table in condensed mode - More items on the same screen real estate

Column Header

The column header provides the label for the corresponding column and access to the column header menu.

Columns are resized as follows:

  • Mouse interaction: The user drags the separator line between two columns (sap.ui.table.AnalyticalColumn, property: Resizable). Double-clicking the line optimizes the column according to the length of the data currently visible and the label of the column header (sap.ui.table.AnalyticalColumn, property: Autoresizable).
  • Touch interaction: The user clicks the column header to reveal two buttons: one to show the column header menu and one for resizing. The user drags the latter to resize the column.

When the user resizes a column, the adaptation of the column width depends on how the column widths are set:

  • If column widths are set in pixel-based units (px, em, rem), the resized column is adapted and subsequent columns are moved accordingly. The width of all other columns is not affected.
    If all the columns together do not use up the full width of the table control, empty space is added. If all the columns together exceed the width of the table control, a scrollbar appears.
  • If all column widths are set as percentages or “auto”, resizing one column automatically resizes one or more other columns. Resizing can also affect the position of the resized column. This option utilizes the full width of the table and ensures that no white space is added. A scrollbar appears only if all or most of the columns become to narrow. To avoid the side effect of undersized columns, you can set a minimum width per column. However, this minimum width is only taken into account if columns are resized automatically. End users can still reduce the column width to below the defined minimum (sap.ui.table.Column, properties: width, minWidth).

Users can rearrange columns by dragging the column header to another position (sap.ui.table.AnalyticalTable, property: enableColumnReordering).

Column header
Column header
Opening the column header menu on touch devices
Columns do not use up the available space

Column Header Menu

For each column, a menu can contain the following menu items (sap.ui.table.AnalyticalColumnMenu, property: Visible):

  • Sort Ascending/Descending (sap.ui.table.AnalyticalColumn, property: showSortMenuEntries)
  • Free text filter (sap.ui.table.AnalyticalColumn, property: showFilterMenuEntries)
  • Group
  • Totals
  • Freeze from the first to the last specified column (sap.ui.table.AnalyticalTable, property: enableColumnFreeze)

For each column, the menu can be replaced by an app-specific menu.

Column header menu
Column header menu

Sort

The column header menu can provide two sort options (sap.ui.table.AnalyticalColumn, properties: sortProperty, showSortMenuEntry):

  • Sort Ascending
  • Sort Descending

The user selects one of these options to sort the corresponding column accordingly (sap.ui.table.AnalyticalColumn, properties: sorted, sortOrder, sortProperty).

Sort settings in column header menu

Filter

The column header menu can provide a search field for entering free text (sap.ui.table.AnalyticalColumn, properties: filterProperty, showFilterMenuEntries).

If the user enters a term in the input field and triggers the search by pressing ENTER when the focus is on the filter input field, the analytical table is filtered by the corresponding column and value (sap.ui.table.AnalyticalTable, properties: filtered, filterProperty, filterValue, filterOperator, sap.ui.table.AnalyticalColumn, property: filterType).

Note that the filter may return zero results, in which case, the table might be empty.

General recommendations for filtering:

  • If filtering is a main use case, choose the filter bar or any other filtering UI over the built-in free text filter.
  • Only use the free text filter if filtering is a secondary use case and if the filter bar is too heavy.
Free text filter in column header menu

Group

The column header menu can provide the option to group by this column (sap.ui.table.AnalyticalColumn, property: sortProperty).

One group collects all items with the same value within the corresponding column.

Group setting in column header menu

If line items are grouped in a column, every group is provided with a collapsible or expandable group header (sap.ui.table.AnalyticalColumn, property: grouped). The header text consists of the column name and the value for the corresponding group (sap.ui.table.AnalyticalColumn, property: groupHeaderFormatter). Several grouping levels are possible.

The corresponding column can be hidden to avoid duplicates (sap.ui.table.AnalyticalColumn, property: showIfGrouped). Exercise caution when using this option since hiding the column changes the table layout and may lead to confusion.

Group headers and the corresponding columns are shown – The relevant data is duplicated
Group headers shown, the corresponding column hidden – No duplicates

Aggregation

The column header menu can provide the option to show or hide aggregation totals for this column.

Aggregation in column header menu

Intermediate aggregations are shown at group level for the corresponding columns if the group contains more than one line item (sap.ui.table.AnalyticalColumn, property: summed).

Group total
Group total

The overall aggregation is shown at the bottom of the analytical table.

Overal aggregation
Overal aggregation

Freeze Columns

The column header menu can provide the option to freeze columns (sap.ui.table.AnalyticalTable, property: enableColumnFreeze). Selecting Freeze freezes all columns up to the one in which the operation was triggered (sap.ui.table.AnalyticalTable, property: fixedColumnCount).

When Freeze is triggered, the menu item changes to Unfreeze for the corresponding column.

Freeze setting in column header menu

Line Item Level

A line item contains a set of cells and provides options for selecting the item.

To prevent adverse side effects when scrolling vertically, all line items must have the same height.

(sap.ui.table.AnalyticalTable, property: rowHeight)

Line item
Line item

Drag and Drop

One or several items can be moved to other UI elements using drag and drop operations (sap.ui.table.AnalyticalTable, aggregation: dragDropConfig). While being dragged, the items are shown as ghost elements on the mouse cursor.

Drop targets can be on items, between items, or both (sap.ui.core.dnd.DropPosition). On a drop target, the mouse cursor changes to either a “copy”, “link”, “move”, or “none” cursor. “None” indicates that the dragged item cannot be dropped in the current position (sap.ui.core.dnd.DropEffect).

Drag and drop is only available on supporting browsers.

Drag and drop
Drag and drop
Whole item as drop target

Cell Level

A cell provides one data point.

It can contain one of the following controls to display this data point:

While it is technically possible to also use other controls, doing so could lead to issues with alignment, condensed mode, screen reader support, and keyboard support.

If you use text, use only single-line text to keep the same row height. Truncate if necessary as this prevents adverse side effects when scrolling vertically (sap.m.Text, property: wrapping, value: false). Do not wrap.

Cell
Cell

Context Menu

You can attach a context menu (sap.m.Menu) to a table. The context menu gives users an alternative way to modify the focused elements by giving them access to context-specific functions.

When opened, the context menu gets the row and column context, except for special columns (such as the selection column) or special rows (like group headers). Context menus can be implemented for a specific table, row, or cell (not recommended for editable cells).

By default, the analytical table provides a context menu on the group headers (for example, Expand, Collapse, …). Otherwise, no default context menus are provided.

Context menus are opened by right-clicking (desktop), long press (mobile), the context menu key, or Shift+F10.

Be aware that using the context menu overrides the browser context menu, which can no longer be opened.

If a control inside a table is the “click target”, and the control also provides a context menu, the control context menu “wins”.

Analytical table with context menu

Guidelines

Data Density vs. Complexity

The analytical table can be used to display and work with large amounts of data. Unfortunately, the analytical table has a high data density and therefore conveys an immediate feeling of complexity.

Only show tables with a lot of data as a last resort. To make the data easier to read, you should instead try the following:

  • Break down the data into manageable chunks and allow the user to navigate or drill down between them.
  • Use charts with drilldown functionality until the amount of data is more manageable.

Try to avoid horizontal scrolling in the default delivery.

Try to minimize the number of columns, especially if there is a large number of rows.

Table Title

Implement the table title by using a title control in a toolbar.

Use a table title only if the title of the table is not indicated in the surrounding area.

Do not use a table title if it simply repeats text that is already above the table. For example:

  • A pricing conditions table is the only control on a tab labeled Pricing Conditions.
  • A section or subsection on an object page contains only one table.

Use a table title if you need the item count, table toolbar, or variant management. To avoid repeating text, feel free to use generic text as a table title, such as Items.
Exception: If the surrounding area contains the table title, and both the item count and toolbar can be added to the surrounding area, no additional table title is needed.
Example: An object page (sub-)section contains only one table. In this case, add the item count and the table toolbar to the (sub-)section header.

If you use a table title, show either a title for the table, with or without variant management, or an item count in the following format:

Items (2,534).

The item count in the table title includes all the visible items that a user can reach by scrolling or expanding groups. Group headers are not included.

Remove the item count in the table title if there are zero items.

Developer Hint
Assistive technologies (such as screen readers) use the title to create a hierarchical site map for faster navigation. In addition, screen readers use the title as the label for the table.

If you don’t use a title (for example, to avoid repetition), make sure that the table is connected to another meaningful on-screen text that can be used as a label for assistive technologies. You can do this using the method addAriaLabelledBy.

Multiple Selection

  • We strongly recommend using the multi-selection plug-in. This ensures that all items selected using Select All or as part of a range are included – even if some items were not initially loaded in the front end. This is not the case if you use the multi-toggle option.
  • Do not limit the range selection for the multi-selection plug-in unless you have to.
    • If the dataset is small and/or completely available in the front-end, set the limit property to 0 to enable the Select All option and allow users to select any range.
    • If you have a large dataset, set a limit on the number of selected items to avoid performance issues. Also bear in mind that some actions won’t be helpful if the dataset is too big (for example, a delete operation on 2 million database entries).
  • When setting a limit, also display the corresponding message when the user selects more items at once than the limit allows (sap.ui.table.plugins.MultiSelectionPlugin, property: enableNotification).

In multiple selection mode (multi toggle), do not show checkboxes in the first data column in the default delivery to avoid confusion.

Don't
Do not add checkboxes to the first column

Loading Data

To indicate that the table is currently loading items, use the busy state (sap.ui.table.AnalyticalTable, property: busy). Do not show any items or text. As soon as the data is loaded, remove the busy state and show all items.

Columns – Best Practices

Minimize the number of columns. Avoid the need to scroll horizontally in the default delivery.

By default, the analytical table assigns the same width to each column. We recommend overwriting this default to provide optimal space for your content (sap.ui.table.AnalyticalColumn, property: width).

If you define the column width in pixels or rems, resizing a column affects only the width of this specific column. Reducing the size of the browser window results in a scrollbar. If the user resizes a column, and the total width of all columns exceeds the table width, a scrollbar appears. If the columns do not take up the full table width, white space appears to the right of the last column.

If you define the column width as a percentage, resizing one column affects the width of several or all columns. Reducing the size of the browser window truncates the texts. This ensures that the columns fill up all the available space. A scrollbar appears only if width of all the columns still exceeds the table width after the automatic width adjustments. To avoid the side effect of undersized columns, you can set a minimum width per column. However, this this minimum width is only taken into account if columns are automatically resized. End users can still reduce the column width to below the defined minimum (sap.ui.table.Column, properties: width, minWidth).

If you set the column width to “auto”, the behavior is the same as for “percentage”. However, unlike “percentage”, “auto” distributes the columns equally.

To decide on how to set the column width (pixel/rem/em vs. percent/auto), keep the following in mind:

  • For tables with only 2 to 3 columns, use pixel-based units. This ensures that the values in the columns are not spread over the whole screen on wide screens, which improves the readability of the line items.
  • For tables with many columns, where a horizontal scrollbar is usually needed, use pixel based units. This avoids unintended side effects when resizing columns.
  • For all other tables, use whatever fits your case better.

Be cautious when mixing columns with pixel-based and percentage-based widths. While this can be helpful in some cases, it can also cause even more side effects when resizing a column. If you are using percentage-based widths for one or more columns, consider not allowing end users to resize columns at all.

Optimize the column width for its initial visible content, including the column header texts. If this is not possible (for example, if showing the full texts would result in extremely wide columns), let the texts truncate. End users can change the width of the column to read the full text, as needed.

Maintain a constant column width and avoid adjusting it automatically when the content changes.

Always keep to one line of text. Do not wrap.

Don't
Don't truncate the initial visible content In the default delivery
Don't
Never wrap texts
Never wrap texts

Column Headers – Best Practices

For each column, provide a label in the column header. In the default delivery, do not truncate the column header texts. Only let the text truncate if showing the full text would make the column too wide. Never wrap the text.

Content Alignment

For alignment of cell content, follow the guidelines below.

Left-align: text, IDs, phone numbers, URLs, passwords, and email addresses.

Left-alignment of text

Right-align: numbers, except IDs, to ensure comparability of numbers and amounts.

Right-alignment of numbers

Right-align amounts with currencies to the cell and align them in terms of their respective decimal points.

This ensures that amounts with different currencies are shown correctly, whether these currencies have 0, 2, or 3 decimals.

For aligning to the decimal point, use the sap.ui.uinified.Currency control.

Alignment to decimal point

Right-align dates and times.

This ensures comparability for most formats and locales.

Right-alignment of dates

Left-align status information.

Left-align status information

Center-align icons.

Left-align micro charts.

XS micro charts in condensed mode

Content Formatting

Key Identifier

Use a bold label or an emphasized link as the key identifier of an item. In the default delivery, show the key identifier in the first column.

Emphasized link
Emphasized link

For strings with IDs, use one of the following:

  • Show the ID in a separate column. Use this format if users need to sort, group, or filter by both the string and the ID.
  • Show the ID in brackets after the corresponding string. In this case, sorting, filtering and grouping is available for either the string or the ID. Use this format only if users don’t need to sort, filter, and group by both values.
Text and ID in two columns – Allows sorting, filtering, and grouping for both
If displayed as a link, use only the string as the link, not the ID
Text and ID in one column – Sorting, filtering, and grouping only by the text
If displayed as a link, use the whole text as the link

Truncation

Avoid truncation of typical content in the default delivery (sap.ui.table.AnalyticalColumn, property: width). However, since the columns are resizable, do not worry too much if truncation occurs as columns can still be enlarged if necessary.

To prevent adverse side effects when scrolling vertically, all line items must also have the same height. If you need to decide between truncation and different row heights, choose truncation. Do not wrap.

Optimize column width for typical content, not all content

Number of Links

Are there too many links? Use subtle links to avoid a wall of links. Standard links are also emphasized more if they are surrounded by subtle links.

For example, a financial table consists of several columns with summarized cells. A summarized cell shows the total sum of several database entries. Each sum should be a link to a report that shows details about which database entries produce the total sum. The line item identifier should also be a link that provides more detail about the line item itself. Use a standard or emphasized link for the item identifier, and subtle links for the summarized cells.

Emphasized links, links, subtle links, and text

Missing Value

If there is no value for a cell, leave it blank. Do not display text as N/A.

Leave empty fields blank

Numbering Items

In terms of numbering items:

  • If the item number is more like an ID with regard to its description, use ID formatting as described above.
  • In all other cases, use a separate column for the item number.
Add a separate column for the item number

Status

For status information, use semantic colors on the foreground elements.

For status information on text, use an object status.

Semantic colors on text

Micro Charts

Use only the following micro charts: Bullet, comparison, stacked bar. When using micro charts, use them in size XS.

Micro charts in an analytical table

Empty Tables

Avoid empty analytical tables. If necessary, provide instructions on how to fill the analytical table with data (sap.ui.table.AnalyticalTable, properties: noDataText, showNoData).

Examples:

  • If a table is initially empty, provide at least a basic text:
    No items available.
    Overwrite this whenever a hint can be provided on how to fill the table with data.
  • If a table is used together with a filter bar (as in the list report), and is initially empty, use the following text:
    To start, set the relevant filters.
  • If a table is used together with a filter bar and the filter does not return results, use the following text:
    No data found. Try adjusting the filter settings.

Adapt the texts above if:

  • The standard text is not precise enough for your use case (for example, a search is also offered, or only the search is offered).
  • The standard text is misleading (for example, if the data is filled based on a master-detail pattern instead of filter settings).
Provide meaningful instructions

Invalid State

To show an invalid state of the analytical table within the list report floorplan, show an overlay on the analytical table and the corresponding toolbar (sap.ui.table.AnalyticalTable, property: showOverlay). The overlay prevents user interactions.

Use this within the list report floorplan if filter settings have been changed but the analytical table has not yet been updated.

Analytical table with invalid data

Item States

To show that an item has been modified, for example, within the global edit flow, add the string (Modified) in an additional column with the label Editing Status.

In the default delivery, add a column directly behind the key identifier.

A modified item
A modified item

To show that a modified item contains an error, for example, within the global edit flow, add the string Contains errors in the Editing Status column and highlight the row accordingly. This string replaces the Modified string.

A modified item with an error

To show that an item is locked, add a transparent-style button with the corresponding icon and the text Locked by [name] in the Editing Status column.

A locked item
A locked item

To show that an item is in draft state, add a transparent-style button with the text Draft in the Editing Status column.

Item in draft state
Item in draft state

Show only one state at a time.

Numbers and Units

Show the unit of measurement in one of the following ways:

The number and unit are in the same cell. Do this if sorting, filtering, or grouping by the unit of measurement are not needed.

Use a currency control to display the concatenated string.

Number and unit of measurement in one cell

The number and unit are in separate columns. Do this if sorting, filtering, or grouping by the unit of measurement are a common use case.

Note that this column can be hidden or moved independently of the column containing the corresponding number. Therefore, be sure to have clear labels for both columns to communicate the dependency.

Number and unit of measurement in two columns

If the unit of measurement is the same for all rows, show the unit of measurement in the column header. Otherwise, show the unit of measurement within the row.

Drag and Drop

Drag and drop is “invisible” on the UI: users can’t see where dragging is available and where it isn’t. In addition, drag and drop is not accessible, since there is no generic keyboard interaction. Drag and drop is also not available on all browsers. For these reasons, provide it only in addition to existing (and visible) UI elements that fulfill the same purpose, such as (toolbar) buttons.

Use drag and drop only in addition to existing visible UI elements

Do not use drag and drop for rearranging items in the analytical table. The analytical table is mainly used for grouping items and for calculating the totals per group and column. Moving items to another group also means that a value of the dropped item changes: because grouping is based on values in a column, the dropped item needs to take on the value of the target group for the corresponding column.

Example:
A table is grouped by availability. An item is moved from the group “Not Available” to the group “In Stock”. In this case, the moved item needs to change its availability to “In Stock” to match the target group. Because changing the value in this way doesn’t make sense, rearranging items is not permitted in analytical tables.

Don't
Do not use drag and drop for rearranging items in the analytical table

Context Menu

Use the context menu only to give users a quick way of accessing functions that are already available elsewhere (for example, as buttons in the toolbar). Don’t just offer actions in the context menu itself, as users might not realize that these actions are available at all.

The context menu can be triggered for the table, row, or cell. However, we do not recommend using context menus for cells: because the content of a cell is a different touch target than the cell itself, opening a cell context menu via touch is quite hard, even in cozy mode.

Do not combine context menus with condensed mode: editable controls fill the entire space inside a cell. Because of this, context menus cannot be opened at all with touch or mouse interaction.

Actions

Multiple Items

To trigger actions on multiple items, use a multiselection analytical table (sap.ui.table.AnalyticalTable, property: selectionMode, value: MultiToggle). Offer the corresponding actions in the table toolbar.

Do not offer action triggering on multiple items if the table is generally expected to have fewer than 10 items. In this case, try to use the responsive table instead of the analytical table.

Single Item

To trigger actions on a single item (sap.ui.table.AnalyticalTable, property: selectionMode, value: Single):

  • Show the actions on the table toolbar.
  • In rare cases, show the actions within the line item. One example would be an Add to Cart button in a shopping application. Since these actions are repeated in every line and thus use a lot of screen real estate, do this only for a maximum of one or two actions. Provide a separate column per action. Use a button, unless the action trigger belongs to a link. Hide the action in rows for which it is not applicable.

Single Cell

To trigger actions on a single cell, create the corresponding click event. Do not use the cell click event if the cell contains interactive controls, such as links.

To trigger navigation on line item level choose one of the following options:

  • Use a link for the attribute that identifies the row. Clicking the link triggers the navigation.
  • Add the RowActions column and show the navigation indicator (  ) at the end of the row. The navigation arrow triggers the navigation.

Special case: Multi-selection in a master-detail scenario
When a multi-selection table is used in a master-detail scenario, it is not clear which item was last opened (for example, which item is currently shown in the second column of a flexible column layout). In this case, you can display a “navigated” indicator to show which item is currently open.

Use the RowActions column only for one or both of the following actions:

  • Navigate to details page ( )
  • Delete ( )

The RowActions column does not provide a column header text. It is fixed and will not scroll away. Users also cannot personalize this column.

Navigate to details page

Single Cell

For triggering actions on a single cell, create the corresponding click event. Do not use the cell click event if the cell contains interactive controls, such as links.

Add Items

For adding items, place an Add or Create text button on the table toolbar.

  • Use Create if the button adds a brand new item that doesn’t yet exist on the database.
  • Use Add if the item already exists and is merely added or assigned to the current object.

Show new items as the first item of the table, with a visual highlight at the beginning of the row.

For more details, see the guidelines for managing objects (including subarticles).

Enabling/Disabling Actions

To indicate if an action can be applied to the current selection:

  • Enable the action if it always works, regardless of whether or not items are selected.
  • Enable the action if it can be applied to all selected items.
  • Enable the action if it can be applied to some of the selected items. If the action is triggered, show a message that informs the user how many items will be affected. Let users choose whether to apply the action anyway or cancel the action.
  • Only disable the action if it can be applied to none of the selected items.

For more details, see UI Element States.

If the action was applied and the items are still available, keep them selected.

Message for action which applies to a part of a selection

Editable Content

For editable content, only use the following controls, and only one control per cell:

Only these controls are optimized for all viewing modes of the analytical table.

If you need edit mode, change your text controls, such as label, text, link, object status, icons, and currencies, to editable controls as soon as you switch to edit mode, but not before. You can do this by exchanging the controls, for example, from sap.m.Text to sap.m.Input.

For mass editing items:

  • Provide multiselection.
  • Provide an Edit button.
  • If several items are selected, clicking the Edit button opens a dialog in which the user edits the corresponding fields for all selected items.

This is similar to mass editing in the split-screen layout floorplan.

Warning
Do not offer editing for summarized cells. A summarized cell shows the total sum of several database entries. Changing the total sum does not make sense since it is unclear how this sum is divided between the different database entries.
Interactive controls – Inline

View Settings

There are several ways to show Sort, Filter, and/or Group settings:

  • Column header menu: In all cases, show the corresponding settings in the column header menu.
  • View settings dialog: Simple and more flexible with regard to filter settings. No advantage for sorting. Allows the user to ungroup grouped columns.tables with a medium amount of items.
  • Table personalization dialog: Provides complex options for sorting items by several levels and allows the user to ungroup grouped columns. It also provides a query-builder-like approach for filter settings. The complexity of the options is also its downside. Use the table personalization dialog for tables with a large number of items.
  • If filtering is a main use case, use the filter bar. In this case, avoid offering additional filter settings on the table. If you do, the filter settings on the table work only on the result set provided by the filter bar.

Always be careful when synchronizing the settings in the dialog with the settings from the column header menu.

Trigger the dialogs in one of the following ways:

  • View settings dialog: Provide several buttons, one for each of these view settings. Each button opens the view settings dialog on the corresponding page.
  • Table personalization dialog: Provide a settings button, which opens the table personalization dialog containing all pages.

Use only the view settings you really need. For example, do not offer grouping if it does not support your use case.


Column header menu with view settings
Table toolbar with triggers for view settings dialog
Table toolbar with trigger for table personalization dialog

Persist the view settings. When a user reopens the app, show the analytical table with the same sort, filter, group, and aggregation settings as last defined by this user.

Sort

To display the current sort state, an icon is shown in the column header of the last sorted column. This icon indicates the sort direction (sap.ui.table.AnalyticalColumn, properties: sorted, sortOrder, sortProperty).

For the default sort setting, sort by the column that identifies the row, which is usually the first column in default delivery. Use a meaningful sort order, such as alphabetical order for text, numeric order for numbers, or chronological order for dates.

Column, sorted ascending
Column, sorted descending

The descending sort order must always be the exact reverse of the ascending sort order.

For each column, provide a meaningful sort order. For example:

  • Sort text alphabetically
  • Sort numbers by their value
  • Sort status information by the severity of the status:
    • Ascending: Sort status information from positive to negative, with neutral last.
    • Descending: Sort status information from negative to positive, with neutral first.
Object status sorted ascending, with neutral status last
Object status sorted descending, with neutral status first
    • Ascending with different values per severity level: Sort status information from positive to negative, with neutral last. Sort different values within a severity level (semantic color) alphabetically.
    • Descending with different values per severity level: Sort status information from negative to positive, with neutral first. Sort different values within a severity level (semantic color) alphabetically.
Object status sorted ascending and alphabetically, from positive to negative with neutral last
Object status sorted descending and alphabetically, from negative to positive with neutral first

Filter

To display the current filter state, an icon is shown in the column header of the filtered column (sap.ui.table.AnalyticalColumn, properties: filtered, filterProperty, filterValue, filterOperator, defaultFilterOperator, filterType).

Column, filtered
Column, filtered

Group

To display the current group state, group headers are shown. Show the following text in the group header (sap.ui.table.AnalyticalColumn, properties: grouped, showIfGrouped, groupHeaderFormatter):

[Label of the grouped column]: [Grouping value]

If there is no grouping value, show the following text:
[Label of the grouped column]: (Not Available)

This is the case if you have a group of items that don’t have a value for the grouped column.


Set the property collapseRecursive to “false” to keep subgroups expanded even after collapsing and expanding the parent group.

Group headers, several levels

On non-touch devices, right-clicking a group header opens the group header menu. On touch devices, the same menu is opened by using the menu icon on the right side of a group header.

The group header menu provides several options:

  • Show/Hide: Shows or hides the column in the table layout, although it is grouped.
  • Ungroup: When the user ungroups a column, the corresponding group headers disappear. If the column was hidden, it is shown again as a separate column.
  • Ungroup All: The columns are shown again.
  • Move Up: Rearranges the grouping levels hierarchy by moving the selected group above the group that is one level higher up in the hierarchy.
  • Move Down: Rearranges the grouping levels hierarchy by moving the selected group below the group that is one level lower down in the hierarchy.
  • Collapse Level: Collapses all groups on the corresponding grouping level.
  • Collapse All: All groups are collapsed.
Group header menu
Group header menu
Group header on touch devices

In general:

  • Offer grouping on objects and attributes.
  • Do not offer grouping on measures.
  • If appropriate, offer reasonable grouping by default, but do not exaggerate. As a rule of thumb, use up to three group levels.
  • Provide more space for the first column. Grouping needs an indent per group level. Extra space in the first column prevents truncated text.

Aggregate

To display the current aggregation state, the total sum of the corresponding column is shown at the bottom of the table.

If items are grouped, an intermediate sum is shown:

  • At the bottom of each group if the group is expanded.
  • In the group header if the group is collapsed.

(sap.ui.table.AnalyticalColumn, property: summed)

When aggregating amounts with different units of measurement, show an asterisk (*) in the aggregation rows.

When sorting an aggregated column, only the leaf nodes of a group are included by default. If each measure column currently displays a single unit of measurement, the order of the groups can also be affected.

For example:
Let’s assume that table items are grouped by Country/Region and aggregated by Total Net Amount. If you sort the Total Net Amount column in descending order, the largest total net amount is shown first.

Warning
Only enable sorting by totals if each column has a single unit of measurement. This prevents inconsistencies in the sorting behavior, which depends on user settings, such as filter settings or the columns currently displayed.
Developer Hint
To allow sorting by totals, the following conditions must be met:

  1. For each measure column, multiple units must not occur in the displayed data, regardless of whether or not totals are shown.
  2. The autoExpandMode of the AnalyticalBinding must be set to Sequential. Note that the default is Bundled.

In general:

  • Offer aggregation on measures, but not on objects or attributes.
  • Avoid aggregations on the first three columns for the default delivery. As soon as grouping is used together with aggregations, collapsing a group shows the aggregation on the group header. This conflicts with the group name.
  • Where appropriate, offer reasonable aggregation by default.
Aggregation and groups

Personalization

Only offer personalization if you need more columns than a tablet screen can display at any one time, which is usually five.

Persist the column layout. When a user reopens the app, show the analytical table with the same column layout settings as last defined by this user.

Add, Remove, and Rearrange Columns

To add, remove, or rearrange columns, use one of the following:

  • The table personalization dialog: It offers some simple settings for column layout. Use this if you have only a few columns to choose from and/or you use the view settings dialog.
  • The p13n dialog: Besides various complex view settings, it also provides settings for column layout. Use this if you have a large number of columns to choose from and/or you use this dialog anyway for view settings.

In both cases, trigger the dialog via the settings button in the table toolbar.

You can also use drag and drop to rearrange columns (sap.ui.table.Table, property: enableColumnReordering). If you allow rearranging via drag and drop as well as via a dialog, keep both places in sync.

Resize Columns

Resizing columns works differently on touch and non-touch devices.

  • Non-touch devices: Drag and drop the column separator on the right side of the column. Double-clicking the column separator optimizes the width of the column for the data currently loaded into the front end, which is usually about 100 rows.
  • Touch devices: Clicking the column header reveals two buttons: one for opening the column header menu, another one for resizing the column. Drag and drop this second button to resize the column.

Freeze Columns

For freezing columns, offer the setting in the column header menu (sap.ui.table.AnalyticalTable, property: enableColumnFreeze).

Selecting Freeze on a column freezes all columns from the first one to the one where Freeze is selected. On this column, the menu entry changes from Freeze to Unfreeze.

Frozen column
Frozen column

Highlight Items

To show that an item needs attention, you can display a highlight indicator in front of the item. The highlight indicator can be used to indicate:

  • A semantic state, such as red or orange for an error or warning. In this case, use semantic colors.
  • Additional information, such as blue to highlight newly added items. In this case, use semantic colors.
  • Industry-specific or process-specific states, such as “out of stock” or “excess of inventory”. In this case, use indication colors.

Be aware that the highlight is just an indication. It does not tell users exactly what is wrong. Make sure that you provide this information within the table row, ideally in the same color.

For details on the use of highlight colors, see How To Use Semantic Colors / Industry-Specific Colors.

(sap.ui.table.AnalyticalTable, aggregation: rowSettingsTemplate)

Highlighted items
Highlighted items

Tables in Object Pages

In the object page, we advise against using analytical, grid, and tree tables. Instead, use a responsive table and offer navigation to a list report with the table types mentioned above.

For more information on the use of tables within the object page, see the Tables section of the Object Page article.

Export to Spreadsheet

On the table toolbar, apps can provide a menu button for exporting table data to a spreadsheet. For the export, use the export to spreadsheet function.

'Export to Spreadsheet' menu button

Properties

sap.ui.table.AnalyticalTable

The following additional properties are available for the analytical table:

  • The property: width defines the width of the analytical table.
  • The property: rowHeight defines the height of each row in the analytical table. Since the height required is calculated automatically by the analytical table, this property is only needed rarely.
  • The property: columnHeaderHeight defines the height of the column headers. Since the height required is calculated automatically by the analytical table, this property is only needed rarely.
  • The property: columnHeaderVisible can be used to hide the column headers. Always show the column headers.
  • The property: showColumnVisibilityMenu provides an additional entry in the column header menu that allows columns to be shown or hidden. In SAP Fiori, columns are shown and hidden via the table personalization dialog or via the table personalization dialog. Do not use this property.
  • The property: columnVisibilityMenuSorter is used for sorting the columns inside the column header menu if showing and hiding columns is provided in the menu. In SAP Fiori, columns are shown and hidden via the table personalization dialog or via the table personalization dialog. Do not use this property.
  • The property: visibleRowCount defines the height of the analytical table. Show as many rows as fit on the screen.
  • The property: visibleRowCountMode defines whether the height of the analytical table is fixed or automatically calculated based on the space provided by the underlying container. For automatic calculation, make sure that all rows have the same height.
  • The property: minimumAutoRowCount defines the minimum number of rows that must be shown if the property: visibleRowCountMode is set to “auto”. Show at least three to five rows.
  • The property: firstVisibleRow defines the first row shown in the visible area of the analytical table. The analytical table is scrolled accordingly.
  • The property: allowColumnReordering is deprecated. Use the property: enableColumnReordering instead.
  • The property: editable does not have a visible effect. Please do not use it.
  • The property: threshold is used for optimizing lazy loading of items. In most cases, the default value is appropriate.
  • The property: enableGrouping is experimental and does not have a meaningful effect on the analytical table. Do not use it.
  • The property: sumOnTop shows additional aggregation values on the group header, even if the group is expanded. Do not use it.
  • The property: enableCustomFilter changes the filter entry in the column header menu from an edit box to Filter…. Selecting this entry throws an event that apps can react to, for example, by opening a dialog. In general, you should choose the built-in filter over your own implementation. Specifically, keep filtering via the column header menu simple, while offering more advanced options via the table personalization dialog.
  • The property: enableBusyIndicator has not yet been fully implemented. Do not use it.
  • The property: title adds a line of text on top of the analytical table. Do not use it. To add a title to the table, use a toolbar.
  • The property: footer adds a short text at the bottom of the table.
  • The property: Busy sets the analytical table to busy state. While in busy state, the whole table cannot be used and items cannot be read due to an overlay.
  • The property: Tooltip does not have an effect. Do not use it.
  • The property: alternateRowColors displays the rows with alternating background colors (“banded rows”). Do not use it.

sap.ui.table.AnalyticalColumn

The following additional properties are available for the analytical column:

  • The property: leadingProperty is used for data binding.
  • The property: inResult is used for data binding.
  • The property: visible defines whether a column is shown or hidden.
  • The property: name defines the name shown in the column header menu for showing and hiding columns. In SAP Fiori, columns are shown and hidden via the table personalization dialog or via the table personalization dialog. Please do not use this property.
  • The property: headerSpan defines whether one column header is used for one or several columns. To prevent adverse side effects, always use one column header for only one single column. Please do not use this property.
  • The property: Tooltip does not have an effect. Please do not use it.

Resources

Want to dive deeper? Follow the links below to find out more about related controls, the SAPUI5 implementation, and the visual design.

Elements and Controls

Implementation

Rating Indicator

The rating indicator can be used to rate content or to indicate a rating. It enables users to rate an item on a numeric scale. The most popular scale is 1 (lowest) to 5 (highest).

Rating indicator
Rating indicator

Responsiveness

The rating indicator runs on all form factors and therefore works on all devices. It is embedded in a container and thus behaves as part of it.

Rating indicator as part of a form – Size S
Rating indicator as part of a form – Size M

Layout

Context

You can use the rating indicator in forms, tables, in a dialog box, or in the filter bar.

Rating indicator as part of a form
Rating indicator in the filter bar / as part of a table
Rating indicator as part of a dialog

Popover with Details

In collaborative rating scenarios, the rating indicator shows an average of all ratings. You may show the sum of ratings in brackets behind the rating indicator as a text or link. You may also add a popover that shows the detailed ratings for the average of all ratings.

Rating details in a popover

Behavior and Interaction

Hover

When the user hovers over the rating indicator, a different icon or image is shown (property: iconHovered). This is an orange star by default.

Select

If enabled for rating, the rating that the user previously selected is shown. When the user performs a rating, an event is triggered.

Types

There are two types of rating indicators:

  • Interactive – used for rating an item
  • Disabled

As the non-interactive state (rating result preview) is not available currently, use the disabled state instead.

Interactive state
Interactive state
Non-interactive state
Display mode
Display mode
Disabled
Disabled

Properties

Rating Symbols

You can also specify the URLs for the images or icons that are used as rating symbols (property: iconUnselected). Five star symbols are used by default. Although you can use other images or icons, we generally recommend that you use the star symbol. You can only choose 1 symbol for the unselected and 1 for the hovered state.

Number of Rating Symbols

You can specify the number of rating symbols (property: maxValue). We recommend using a maximum of 7 symbols, although 5 symbols are preferred.

Float Values

Float values can be visualized as a half or full star (property: visualMode). The rating indicator can display a half star only in preview mode (disabled).

Size of Rating Symbols

The recommended sizes of the image or icon to be displayed are:

  • Large: 2 rem (32 px)
  • Normal: 1.375 rem (22 px) – default
  • Small: 1 rem (16 px)
  • XS: 0.75rem (12px)
Possible sizes of a rating indicator: L, M, S, and XS

Resources

Want to dive deeper? Follow the links below to find out more about related controls, the SAPUI5 implementation, and the visual design.

Elements and Controls

Implementation

Mask Input

The mask input control (sap.m.MaskInput) governs what a user is permitted to enter in an input field. It allows users to easily enter data in a certain format and in a fixed-width input (such as a date, time, phone number, credit card number, currency, and IP address).

Usage

Use mask input if:

  • You have to govern what a user is allowed to enter in an input field.
  • You have to enter data easily in a certain format and in a fixed-width input.
  • You have to enter input such as a date, time, phone number,  serial number, ISBN, or product activation key.

Do not use mask input if:

  • The mask prevents users from entering essential data.
  • The users need to enter data in a format other than the one used by the mask (for example, if users have to enter a phone number with a format for a different region).

Responsiveness

Mask input extends the input control (sap.m.Input) and has all the normal properties of an input field.

Components

The mask input control has a fixed length format to which the user’s input must conform. This can be particularly useful when the user needs to enter text or numbers with specific formatting, such as a phone number, postal code, or credit card number.

Mask input or a placeholder text are not substitutes for the input label. Using a label is mandatory. Placeholder texts in an input field are optional. Note that if there is no placeholder text, the input field will initially look empty. The mask formatting is revealed as soon as the focus is on the field.

Mask input without placeholder text
Mask input with placeholder text

Immutable Characters

When defining the mask format, the developer can place immutable characters, such as brackets and dashes, in specific positions. The format also specifies the range of valid characters for each separate position, thus preventing the user from entering invalid input.

For example, when the user enters a phone number, the area code in brackets and the space between the numbers are already present.

Note that the sap.m.MaskInput control extends sap.m.Input and has all the normal properties of an input field.

When creating a new mask, the developer can change the configuration of some default properties. For example, the default placeholder symbol “_” can be changed to something else.

Behavior and Interaction (incl. Gestures)

Entering Text

  • Mask string appears in the input field on focus.
  • The default placeholder symbol is “_” and can be changed to something else.
Entering text into a mask input

Copying and Pasting

Copying to a mask input field:

Users can copy both formatted and unformatted strings into a mask input field. When the texts are pasted, they take on the format defined for the mask input field.

Example: Mask input field for a number with the format:  (000) 000 000000

Copied source string Value in mask input field after pasting
(555) 333 123456 (555) 333 123456
555-333-123456 (555) 333 123456
555 (333) 12 34 56 (555) 333 123456

Copying from a mask input field:

If you copy a string from a mask input field and paste it elsewhere, the format of the mask input field is copied as well.

Information
For information on how to manage leading and trailing white space (blanks) when copying and pasting text into input controls, please see removing leading and trailing white space.

Deleting Content

Deleting a character from the string leaves the input information unchanged, except for the deleted character, which is replaced by a placeholder. (The mask does not shift if a character is deleted.)

Deleting individual characters in mask input

Select the entire string and delete it. The placeholders will reappear.

Deleting all characters in mask input

Guidelines

Validation Rules

Another option is to define new validation rules, such as allowing lowercase characters from “a” to “e” only. This is particularly flexible because these rules are defined with regular expression syntax.

The mask comes with two predefined validation rules: one for all characters in the English alphabet, and one for the numbers from zero to ten.

Therefore, when the mask format is being defined, the alphabetic rule is represented by the letter “a”, and the numeric rule by the number “9”. For example, a numeric mask format with a length of five characters would be specified as “99999”, a mask that accepts only alphabetical characters would be specified as “aaaaa”, and a mixed mask could be “aaa99”. In the mixed mask example, the user would not be able to enter numeric characters anywhere other than in the last two positions.

When you create the MaskInput instance, you can specify the following settings:

  • Mask: The format specification, such as (123) 999-999.
  • PlaceholderSymbol: A single character used to represent empty positions in a mask value, such as _ _ _ _ _.
  • Rules: A collection of sap.m.MaskInputRule instances.

Unit of Measurement

You can use the layout options of the form to can add the unit of measurement (UoM) after the mask input control. Apps can use the label-field ratio to show the UoM after the field. However, you must make sure that the UoM is properly visualized and doesn’t wrap to the next row.

Developer Hint

For accessibility purposes, you can use “ariaDescribedBy” from the input control.

Properties

Mask string

The mask is defined by its character type (or by its length, as applicable). You should consider the following important facts:

  1. The mask characters normally correspond to an existing rule (one rule per unique character). Characters that do not are considered immutable characters. For example, the mask ‘2099’, where ‘9’ corresponds to a rule for digits, has ‘2’ and ‘0’ as immutable characters.
  2. Adding a rule that corresponds to the symbol placeholder is not recommended and would lead to unpredictable behavior.

Placeholder symbol string  “_”

This defines a placeholder symbol. It is shown in a position where there has not yet been any user input.

Resources

Want to dive deeper? Follow the links below to find out more about related controls, the SAPUI5 implementation, and the visual design.

Elements and Controls

Implementation

Dynamic Side Content

Dynamic side content is a layout control that displays additional content to help the user better understand the data that’s being displayed on the screen.  It is displayed in a way that flexibly adapts to different screen sizes.

App development teams can configure the behavior of the control on smaller screen sizes by following the relevant guidelines.

Dynamic side content layout

Usage

Use dynamic side content if:

  • You want to display information that:
    • Will enrich the main content and will help the user better perform his/her tasks;
    • Only makes sense when displayed next to the main container (side-by-side);
    • Influences the main content (for example, a filter for list; settings for chart, details for map).
  • Users should have access to all of the key functions and critical information in the app even if they do not see the side content. This is important because on smaller screen sizes it may be difficult to display the side content in a way that makes it easy for users to access.

Do not use dynamic side content if:

  • You want to display critical information that should be visible all the time. The dynamic side content is not meant to split the page into two equally important sections.
  • You want to display navigation or drilldown. For drilldown scenarios, use the Flexible Column Layout.
  • You want to display a list-detail scenario. Instead, use the Flexible Column Layout.
Information
Currently Dynamic Side Content is not available in Fiori Elements.

Layout

Dynamic side content is displayed to the left or right of the main content container.

The dynamic side content can be closed by a button that is displayed in its toolbar.

The dynamic side content can be opened, if it set to hidden, with an action within the container to which it is directly related, or by an action displayed in the container-related toolbar, if it is available.

When the dynamic side content is displayed side-by-side to the container, it doesn’t overlay it. The main container narrows down and makes space for the additional content to be displayed.

Responsiveness

The dynamic side content control is built for different screen sizes and layouts.

The default screen layout features the side content on the left or right side of the screen, covering 25% of the screen width on a large desktop (over 1440 px).

Dynamic side content - Default layout

On smaller screen sizes (under 1440 px), the side content occupies 33% of the screen width to accommodate the nested controls. If the side content width falls below 320 px, the side content automatically slides under the main content, unless the app development team specifies that it should disappear.

Dynamic side content - Smaller screen sizes

On screen sizes of less than or equal to 720 px, the side content automatically disappears from the screen (unless specified to stay under the content) and can be triggered from a preset trigger (specified within the app). When the side content is triggered, it replaces the main content. We recommend that you always place the trigger for the side content in the same location, such as the container toolbar.

If only the side content is shown and the user increases the screen size, the main content is automatically displayed again. If the user then decreases the screen size, the side content disappears (unless specified to stay under the content), and can be opened again by the trigger.

Equal split: A special view of the side content is the 50:50 view, which enables users to show more data, for example, for comparison purposes. The responsive behavior of the equal split is the same as in the standard view: The side content disappears on screen widths of less than 720 px and can only be viewed by triggering it.

Dynamic side content - Equal split

The app development team may specify that the side content should slide under the main content when the screen is resized to a smaller width. Sliding the side content under the main content on smaller screens allows it to remain on the screen at all times. However, it may only become visible after scrolling.

Navigation

The side content is always related to the main content, so it must show content that can be triggered from the main content. This also means minimizing navigation, such as drill-ins within the side content, and displaying content that is triggered from the main content area. An example would be showing additional details such as contact information or conversation history. If a different type of data relates to the main content, app developers can implement a switcher in the side content. However, we recommend that you keep the side content free of additional navigation elements.

Triggering the side content

The side content can be set to hidden by default, and it automatically disappears when the screen width is less than or equal to 720 px (except when it is set to be under the main content).The app design team can define the trigger point. Our recommendation is to put a transparent text button with a meaningful label in the container toolbar, or an action inside the container the dynamic side content is related to. Ensure that the user can understand how to trigger the side content. Please, avoid using icons, because they can confuse the user.

Hiding the side content

The side content should be hidden from the header (top) section of the side content. The side content container itself has no header. We therefore strongly recommend that you use a toolbar control with a title, a transparent button labeled Close, and a spacer between them.

Hiding side content – From the header section

Guidelines

Dynamic Side Content in Object Page

Dynamic side content can be used within the object page. Use dynamic side content within a section if you want to give the user additional data related to this section. If you want to display additional information about the object such as a timeline, include this information as a new section.

Do
Correct usage of dynamic side content in object page
Don't
Wrong usage of the dynamic side content in object page
Don't
Wrong usage of the dynamic side content in object page
Do
Correct usage of dynamic side content in object page
Don't
Wrong usage of the dynamic side content in object page
Don't
Wrong usage of the dynamic side content in object page

Do not separate the screen into two panels. Do not use it for navigation, for drilldown, or for displaying information related to the entire object.

Dynamic Side Content in List Report

Do not separate the page into two panels when you are using it inside the list report. The dynamic side content should be placed directly next to the table or the chart container.

Do
Correct usage of dynamic side content in list report
Don't
Wrong usage of dynamic side content in list report

Dynamic Side Content in Dynamic Page

Do not separate the page into two panels if you use dynamic side content within the dynamic page layout. Place the dynamic side content directly next to the page container and under the header container. The header snaps manually and both sections have their own scrollbars.

Do
Correct usage of dynamic side content in dynamic page
Don't
Wrong usage of the dynamic side content in dynamic page

Examples

Dynamic side content in object page, used with map
Dynamic side content in list report, used with planning calendar
Dynamic side content with table

Use of Controls in the Dynamic Side Content

You can use most of the main controls in the dynamic side content, such as text, simple form, chart, list, panel, tree, timeline, or feed and notes. However, you must make sure that the control doesn’t result in the appearance of a horizontal scrollbar.

Do not use complex controls, such as tables.

Resources

Want to dive deeper? Follow the links below to find out more about related controls, the SAPUI5 implementation, and the visual design.

Elements and Controls

Implementation

P13n Dialog

Intro

The p13n dialog control provides a dialog for tables that allows the user to personalize one or more of the following attributes:

  • Columns (visibility and order of columns)
  • Sort (sorting of table values)
  • Filter (filtering of table values)
  • Group (grouping for specific attributes)

These tabs can be shown in any combination, as the use case requires.

The P13n dialog is intended for complex tables with a large number of columns and the need for complex queries for sorting, grouping, and filtering.
For simple tables, see view settings dialog and table personalization dialog.

The P13n dialog can be triggered in the table toolbar using the corresponding buttons in the top right-hand corner of the table.

The dialog is shown centered, either as a dialog (on desktop and tablet devices) or as a full-screen dialog (on mobile devices).

Dialog buttons within the table toolbar

Usage

Use the P13n dialog if:

  • The user is able to personalize more than 20 or so columns.
  • You need several functions for sorting, grouping, and so on.
  • You are using the analytical table.
  • Complex queries have to be built for the relevant table.

Do not use the P13n dialog if:

  • The user is able to personalize fewer than about 20 columns.
  • You only need a simple column show/hide feature.

Responsiveness

The P13n dialog is available for all display sizes. For sizes L/XL (desktop) and M (tablet), the dialog is shown as a dialog. For size S (smartphones), the P13n dialog is displayed as a full-screen dialog.

Size S – Columns
Size S – Columns
Size M
Size M
Size L
Size L

Components

The P13n dialog consists of four different tabs that can be used separately or combined, as required by the use case:

  • Sort
  • Filter
  • Group
  • Columns

App developers can add more tabs manually.

Behavior and Interaction

Columns

The first tab is the Columns tab. It allows the user to change the table columns that are shown and the order in which they are displayed.

The list contains all of the table’s possible columns in the form of list items with checkboxes. The checkboxes of the currently displayed columns are selected.

Another button next to the search field in the table toolbar allows the user to toggle between showing all columns and only those that are currently selected in the list.

Show/Hide

To show or hide a column, select or deselect the appropriate checkbox.

Reorder

To change the order of the columns, simply mark one list item and use the buttons on the right-hand side of the table toolbar to move them up or down. The order of the columns from top to bottom corresponds to the order on the table from left to right.

Search

If the table has numerous columns, the user can use the search field in the table toolbar to find a specific column more quickly. As soon as the user enters the first letter, the resulting columns are displayed instantly.

Column settings in the P13n dialog

Sort

The second tab is the Sort tab, which allows the user to sort the table content according to the chosen attributes, and also in either ascending or descending order.

The sort criterion consists of two input fields. In the first field, the user can choose a column by which the table is to be sorted. In the second field, the user chooses the sort order (ascending or descending).

For more complex sorting needs, the user can add the required number of criteria by clicking the plus “ ” sign at the end of the line.

The order of the criteria is exactly the same as the order in which sorting is applied to the table.

Sort settings in the P13n dialog
Information
Using the sort feature on column headers replaces ALL sort options in the dialog!

Filter

The third tab is the Filter tab, which allows the user to filter the table information according to specific criteria.

The filter criteria can be included or excluded in the relevant section of the filter.

Column

In the first input field, the user selects the column to be filtered. Any of the columns can be selected; even those that are not currently visible.

Option

The second field offers an operator for specifying the filter in more detail. The operators that are available depends on the data type of the selected column.

Filter tab in the P13n dialog

String (Text)

  • between
  • contains
  • equal to
  • begins with
  • ends with
  • greater than
  • greater than or equal to
  • less than
  • less than or equal to

Number

  • between
  • equal to
  • greater than
  • greater than or equal to
  • less than
  • less than or equal to

Date

  • between
  • equal to
  • after
  • on or after
  • before
  • before or on

Boolean (true / false)

  • equal to

The only available operator for excluding values from the filter results is equal to.

Value

The last field contains the value by which the selected column is filtered. The kind of input field that is provided depends on the data type of the selected column.

Two or even more fields can be provided as required by the use case.

For more complex cases, the user can add filters by clicking the plus “ ” button or remove them by clicking the Remove button at the end of each filter item.

Information
If there is a filter bar, use its filter functionality and deactivate the filter feature of the P13n dialog.

Group

The last tab is the Group tab, which enables the user to group the table data by one or more columns.

In the first selection field, all columns are provided for selection. The user can select a checkbox on the right of the column selection field if the selected field is to be displayed as a column anyway.

For more complex grouping scenarios, the user can add more grouping options by clicking the plus “ ” button on the right-hand side of each grouping line. This option only works with the analytical table.

The grouped table shows the selected field as the group header, which can be expanded or collapsed.

Under the group headers, all subgroup headers and all applicable table entries are displayed.

Group tab in the P13n dialog
Information
To group by a specific column, that particular column must be marked as visible on the Columns tab!

Guidelines

For opening the dialog from a table toolbar, use different buttons for each function (sort, filter, group, column settings). With each button, open the P13n dialog with just the corresponding tab. Do not display the other tabs.

Resources

Want to dive deeper? Follow the links below to find out more about related controls, the SAPUI5 implementation, and the visual design.

Elements and Controls

Implementation

Step Input

The step input control allows the user to change the input values in predefined increments (steps).

Usage

Use the step input if:

  • The user needs to adjust amounts, quantities, or other values quickly.
  • The user needs to adjust values for a specific step (for example, in a shopping cart).

Do not use the step input if:

  • The user needs to enter a static number (for example, postal code, phone number, or ID). In this case, use the regular input field control instead.
  • You want to display a value that rarely needs to be adjusted and does not pertain to a particular step. In this case, use the regular input field control instead.
  • You want the user to enter dates and times. In this case, use the date pickerdate range selectiontime picker, or date/time picker instead.

Responsiveness

Size S and M (Smartphone and Tablet)

On smartphones and tablets, the step input is shown in cozy mode. When the focus is in the input field, the keyboard layout for numeric input is displayed.

Size L (Desktop)

On desktop devices, the step input is shown in compact mode.

For more information on the cozy and compact modes, see content density.

Step input - size S/M
Step input - size L
Step input - size L

Components

The step input consists of:

(A) Input field
(B) Button to decrease the value
(C) Button to increase the value

Step input areas
Step input areas

You can show a descriptive reference or unit of measurement after the field (property: description). Depending on your use case, you may need to adjust how the space is distributed between the input field and the descriptive text (property: fieldWidth).

Step input with description

Behavior and Interaction

Default Value

The step input always contains a value. When no value is set, the default value is generally 0. However, app developers can set a different default value (property: value).

If the minimum value is larger than 0, the generic value is the minimum value set by the app team.

Changing the Value

The user changes the value:

  • By pressing the increase/decrease buttons
  • By typing a number
  • With keyboard shortcuts (up/down, page up/down)
  • With the mouse scroll wheel

On desktop devices, clicking the input field places the cursor in the input field. On mobile devices, tapping the input field displays the numeric keyboard.

Clicking the buttons changes the value by a step and does not place the caret in the input field.

When the user clears the value and leaves the input field, the value in the field becomes 0 or the minimum if the minimum is larger than 0.

If the user enters an invalid value, the invalid value remains in the input field. An error state is displayed.

Increasing the Step

To allow the user to change values by a larger step with keyboard shortcuts, app developers can set a multiple of the step (property: largerStep). The default value is two times the set step.

If your use case requires more complex step increments (for example, if you want the step increment to be the closest number that is divisible by the defined step) you can use the stepMode property. For details, please refer to the API reference.

Maximum and Minimum Values

App developers can set a maximum and minimum value for the step input.

When the maximum/minimum values are reached, the Increase/Decrease button and up/down keyboard navigation are disabled.

Display Value

The step input control allows decimal values and can control the number of digits shown after the decimal point (property: displayValuePrecision). When the property is set to a specific value – from 0 (default) to 20 – the control restricts users accordingly as they type or paste a value. Trying to type more digits triggers an error state.

Step input at maximum value (max = 100)
Step input at minimum value (min = -100)

Styles

The step input control has different styles for its value states: error, warning, success, neutral, and information.

Error state
Error state
Warning state
Warning state
Success state
Success state
Neutral state
Neutral state
Information state
Information state

Guidelines

Always provide a meaningful label for the step input.

Width

By default the width of the step input is set to 100% of the container. Avoid setting a fixed width, but rather embed the control in a proper layout such as a form, simple form, or grid layout, and use the layout data property where the width is defined by the 12-column approach to define the responsive behavior for sizes S, M, and L.

When used in forms, the width of the step input control comes from the label:field ratio of the form. The app development team should be able to restrict the width to a proper number of columns (12-grid responsive layout) so that the step input is not too wide.

Ensure an appropriate width for the range of values to be entered for all the sizes S, M, and L. Avoid a larger width than necessary.

Keep in mind the varying lengths of decimals. Limit the number of digits after the floating point if possible in your use case. For more information, have a look at the article on formatting numbers.

Properties

Value States

The step input control offers the five value states listed below. For the error, warning, and information states, you can show an additional value state text when the focus is on the input field.

  • Warning
  • Error
  • Success: No value state message is shown
  • Neutral (default): No value state message is shown
  • Information: Value state message can show additional information, such as recommendations.

For more information on how to use the different semantic states, see How to Use Semantic Colors.

For more information on showing value states in a form, see Form Field Validation.

Error state – With value state text
Warning state – With value state text
Success state – No value state text
Neutral state – No value state text
Information state – With value state text

Editable and Enabled States

Editable

Property settings: editable = true, enabled = true

The step input control is enabled and editable by default. Set the control to editable to allow the user to enter a value.

Not Editable

Property settings: editable = false, enabled = true

Use this state, for example, to display data only.

Disabled

Property settings: editable = not relevant, enabled = false

Set the control to disabled in an edit scenario to indicate that the user cannot change the control, for example, due to missing access rights or previous conditions not having been fulfilled or selected.

Read-only state
Read-only state
Disabled state
Disabled state

Resources

Want to dive deeper? Follow the links below to find out more about related controls, the SAPUI5 implementation, and the visual design.

Elements and Controls

Implementation

Rich Text Editor

The rich text editor (RTE) is a complex control for data input and editing. It allows users to format the text and insert different types of elements within the text, such as images and hyperlinks.

The rich text editor uses the third party component TinyMCE. In addition to the native toolbar, you can also use a toolbar built with SAPUI5 controls. This custom toolbar acts as a wrapper around the native toolbar and takes care of synchronizing the state of the internal controls with the current state of the selection in the editor.

Rich text editor
Rich text editor

Usage

Use the rich text editor if:

  • You want to enable users to enter rich text with different styles and colors.
  • You need to provide an instrument for texts that require additional formatting.

Do not use the rich text editor if:

  • You want to let users add simple text that doesn’t require formatting. Use text area instead.

Responsiveness

The rich text editor is intended primarily for use on desktop devices, even though it still displays smoothly on mobile devices. You can also enable the mobile theme of TinyMCE, but we don’t recommend using it as it comes with some limitations explained in the Mobile Theme section.

Overflow Behavior

On smaller screens, the custom toolbar utilizes the overflow behavior of the standard SAP Fiori toolbar.

If the available actions do not all fit into the available space in the toolbar, the extra actions disappear from the visible part of the toolbar from right to left, and an overflow menu button appears on the right of the toolbar. Clicking the overflow button reveals the hidden options.

Each action has a priority, which determines whether and when the action moves into the overflow menu. You can prioritize the actions in the toolbar by applying one of five statuses:

  • Always overflow: The action always goes into the overflow.
  • Disappear: An action that is not so relevant for the user can disappear if the space is limited.
  • Low: Actions with the priority “Low” overflow first. Assign this status to actions the user rarely needs.
  • High: Actions with priority “High” remain visible in the toolbar until all lower-priority actions have moved to the overflow. Lower-priority actions are those with the priorities “Disappear” or “Low”, and all unprioritized actions.
  • Never overflow: These actions are always visible in the toolbar.
Size S
Size S

Mobile Theme

From version 4.7, TinyMCE provides native mobile support with the mobile theme. If your use case requires it and you have enabled the mobile theme, the custom toolbar cannot be used, and the native TinyMCE toolbar and layout are loaded. This is why we don’t recommend using the mobile theme.

Layout

The rich text editor has two main components – the toolbar and the content area.

  • Toolbar: All available actions are displayed in the toolbar. App development teams can add or remove individual action groups, depending on the use case.
  • Content area: The content area is where users create their text. It visualizes all the changes made using the actions in the toolbar.
Schematic visualization of the rich text editor

Toolbar Types

The rich text editor comes with two types of toolbar: the common TinyMCE toolbar and the custom toolbar.

The first image shows the default (native) toolbar, which comes with its own behavior for smaller screens.

Rich text editor – Native TinyMCE toolbar

The next image shows the custom toolbar, which includes common SAP Fiori controls and utilizes the overflow toolbar behavior. All common actions provided by the native toolbar are also offered by the custom toolbar.

Rich text editor – Custom SAP Fiori toolbar with overflow
Developer Hint
You can decide which toolbar to use. Bear in mind that the type of toolbar is only considered when control is being initialized. It cannot be changed during runtime because of lifecycle incompatibilities between SAPUI5 and the third-party library. You can enable the TinyMCE mobile theme, but once you do so, the native TinyMCE toolbar and layout are always loaded.

Actions in the Custom Toolbar

The custom toolbar includes most of the native TinyMCE actions. The actions are separated into several virtual groups. You can hide each group of actions individually if it is not required by the use case.

Rich text editor – Actions in the custom toolbar

1) Font Styles: A group of four styles that can be applied to individual symbols (Bold, Italic, Underline and Strikethrough). All of the actions can be combined, which means that a preselected text can be bold, italicized, underlined and crossed out at the same time.

2) Align Text: A group of actions for aligning the text: Align Left, Align Right, Center and Justify. By default the text is left aligned. The selected style is applied to the entire paragraph.

3) Styles: Offers a list of predefined styles, including 6 heading levels and a paragraph. The default style is Paragraph.

4) Font: Changes the font family of the text. All the available fonts are displayed in a select control. 17 font families are supported, including popular fonts like Verdana, Tahoma, Arial, Times New Roman, and Helvetica. The change is applied to individual symbols.

5) Font Size: Changes the size of the text. All available font sizes are displayed in a select control. The minimum size is 8 pt and the maximum size is 36 pt. The change is applied to individual symbols.

6) Text Color: Opens a menu with different options for choosing the color of the text, including a color picker dialog. The default text color is black.

7) Background Color: Opens a menu with different options for choosing the color of the background, including a color picker dialog. The default background color is white.

8) List Type: Part of the structure group. There are two types of list: Bulleted List and Numbered List. This action is applied at paragraph level and turns a normal paragraph into a list. The two list types cannot be applied simultaneously.

9) Text Indent: Part of the structure group. These two actions let users increase or decrease the indentation of the text.

10) Link: A group with two actions: Insert/Edit Link and Remove Link.

11) Insert/Edit image: This option opens a dialog for adding and editing images. Users can also define some of the image properties, such as the width, height, and description.

12) Insert Table: Inserts a simple table within the content area.

13) Clipboard: This action group includes the Cut, Copy, and Paste actions.

14) Custom Action: If the use case requires an action that is not available in the set of common actions, you can attach an external plugin to the custom action. Technically, you can add as many custom actions as you like. However, because custom actions are displayed after the common actions, we recommend keeping the number of custom actions down to a reasonable level.

Developer Hint
The rich text editor is actually an SAPUI5 wrapper around the open source TinyMCE editor. TinyMCE’s functionality can easily be extended using plugins, which can also be attached to the custom toolbar.

The general approach for enabling 3rd-party TinyMCE plugins for the rich text editor is:

  1. Create or find a plugin.js file and place it in convenient place in your application. Alternatively, define the plugin directly in your code.
  2. Load or call the plugin after the TinyMCE core library has loaded. This can be done in the rich text editor’s beforeEditorInit hook.
  3. Add the plugin to the TinyMCE instance.
    • If you’ve defined the plugin directly in your code (synchronous), you can also enable the plugin in the beforeEditorInit hook.
    • If the plugin is in external file and is loaded asynchronously, the plugin should be registered in the instance when the plugin file is downloaded. A convenient place to enable the plugin is the rich text editor’s ready or readyRecurring event.
  4. Optional: If the rich text editor is instantiated with the custom toolbar, be sure to add a custom button to it to make the functionality available.

Important: Third-party plugins are not supported by SAP. We cannot guarantee that there will not be any issues with their enablement.

Behavior and Interaction

General Information

The rich text editor is only available in edit mode of the floorplan it is displayed in. In display mode the content is shown as it is formatted by the user. The user-defined formatting cannot be overwritten.

The toolbar is always visible and the user has access to all the action groups. To start typing, the user has to click inside the content area.

To apply any of the actions from the toolbar, the user has to select the text to be formatted upfront.

Some of the actions can be preselected and applied prior to typing the text. These actions are:

  • Font family, font size and styling (bold, italic, underline)
  • Paragraph alignment
  • Color selection (text color and background color)

Font Styles

The user selects the font style using the respective icon toggle buttons (Bold, Italic, Underline, Strikethrough). The style is applied to a preselected text and remains active until the user clicks the button again or moves the marker to an area where a different style is applied, or no style is applied.

Alignment

The user can change the alignment of the text (Align Left, Align Right, Center, Justify).

By default the text is left-aligned. The selected style is applied to the entire paragraph. To apply any of the styles, the user selects the text and then clicks on the Align Text button  . It is also possible to select the alignment upfront, but in this case only the text written after the selection will have the desired alignment.

Font

The user selects the desired font family from a list of all available font families. The selected font family can be applied to a preselected text, or selected upfront. The default font family is Verdana.

Font Size

The user selects the desired font size from a list of font sizes from 8 pt to 36 pt. The selected font size can be applied to a preselected text, or selected upfront.

List Types

The user can create two types of lists, both of which are triggered by toggle buttons: bulleted lists   and numbered lists  . List formatting is applied at paragraph level. To apply list formatting, the user preselects the relevant paragraphs and selects the relevant list type action.

Text Indent

The text indent defines the amount of empty space in front of a paragraph. The user can increase the indentation  , or decrease it  . Both actions are triggered by standard buttons, and are applied at paragraph level. To change the indentation, the user selects the paragraph (or just positions the cursor within the text) and selects the indent action. The text is moved 30 px left or right, depending on the action chosen.

Color Selection

The user can change the text color and the background color. The chosen colors can be applied to a preselected text or selected upfront.

To choose a color, the user clicks on the color arrow button for the font or background (the right-hand segment of the split button). This opens a popover where users can choose the default color (black for text, white for background), select one of 15 predefined colors, or open a separate color picker dialog.

Within the color picker dialog, the following options are available:

  • Move the circle inside the color field
  • Define RGB values
  • Define HSL values
  • Enter the HEX value
  • Use the horizontal color slider

Users can also define the transparency with the transparency slider.

Clicking OK confirms the selection.

The user can also apply the most recent font or background color without opening the color palette or the dropdown menu. This is done by pressing the left-hand segment of the split button.

Inserting, Editing, and Removing Links

The Insert/Edit Link button opens a dialog for entering the link details. These include the URL, the link text, a title, and the target for the link (same or new browser window) .

It is also possible to attach a link to a preselected text and to edit details for an existing link.

The Remove Link button   is only active when an existing text link has been selected.

Inserting and Editing Images

The Insert/Edit Image button opens a dialog for entering the image URL, a description, and the size.

Beforehand, the user must upload the image to a library that can be accessed by the application. In the dialog itself, users can only enter an existing image link. Images cannot be uploaded directly to the server.

To change the alignment of the inserted image, the user selects the image and applies the relevant alignment action. The text around the image is positioned as follows:

  • Right-aligned image: The text is displayed to the left of the image.
  • Left-aligned image: The text is displayed to the right of the image.
  • Centered image: Only the image is displayed in the center of the paragraph.

Users can also edit the URL, description, and size of an existing image by selecting the image and choosing Insert/Edit Image.

Guidelines

Minimum Width

Although the control allows a minimum width of 6 rem (96 px), we recommend setting the width to at least 17.5 rem (280 px). Any less will make the editor practically unusable.

Minimum Height

The minimum height of the control is 12.5 rem (200 px), which ensures that the editor is usable.

Number of Actions in the Toolbar

Only offer actions that are relevant for the use case. If you just need simple text formatting (such as bold, italic, underline, and strikethrough), remove the other groups.

Custom Plugins

Exercise judgement when adding custom plugins to the editor. Only offer a reasonable number of additional options.

Use self-explanatory icons for custom actions. Do not use a text label, or combine a text label with and icon.
As for all icons, offer a tooltip with a text label instead.

Additional Guidelines

The guidelines for the following controls also apply:

Resources

Want to dive deeper? Follow the links below to find out more about related controls, the SAPUI5 implementation, and the visual design.

Elements and Controls

Implementation

Image

Images are not only for decoration. They can be a powerful way to capture the user’s attention and communicate your message. You can use the image control to integrate images into your apps. Images are visual representations of objects or functions.

Responsiveness

The size of the image is simply adjusted to the amount of space available.

Size S (Smartphones)

Object page (size S)

Size M (Tablets)

Object page (size M)

Size L (Desktops)

Object view (size L)

Layout

Images can be used in various locations in the app, such as in a list cell or object header, and also in the content area. App developers determine the most appropriate area. See the examples below.

Images placed in a table
Image placed in the object header
Image placed in a carousel
Image placed in a select dialog

Behavior and Interaction

Clicking an Image (Optional)

Various options are available in terms of size setting, and the images can also be combined with actions. The most common behavior is clicking the image to enlarge it, which opens a lightbox.

Properties

  • The original image size can be modified.
  • An image can be connected to an image map.
  • Connection to an on-screen user assistance is supported.

Guidelines

  • Provide each image with an alternative text for screen reader users, in case the image is not available or cannot be displayed. In general, the alternative text should contain a description of the visual content, dedicated for blind users’ use.
  • An image can be decorative only. It is considered decorative if the primary focus is on the text and the image content is secondary.
  • Do not use placeholder images if you do not plan to replace them with real images.
  • Do not use icons as images. There is a separate icon font for such cases, which consists of more than 500 scalable pictograms in SAP’s illustrative style.
  • It is extremely important that you choose the right file format when saving your images. Three image formats are used consistently in browsers – PNG, JPG, and GIF.
  • When choosing the format for your image, you should always be conscious of the image quality and file size.
  • High-resolution images that are unnecessarily large in file size can drastically slow down page speed. Optimize your images in this case.
Good quality
Good quality
Poor quality
Poor quality

Resources

Want to dive deeper? Follow the links below to find out more about related controls, the SAPUI5 implementation, and the visual design.

Elements and Controls

Implementation

  • Image (SAPUI5 samples)
  • Image (SAPUI5 API reference)

Dynamic Date

The dynamic date is a smart control that is currently only available in the smart filter bar. When the user enters a value in the date field, it suggests corresponding fixed and dynamic dates. It also offers a value help feature that lets users choose between different time periods and define them further. The list of values offered must be defined by the app.

Information
The dynamic date control can only be used in the smart filter bar. If you are not using the smart filter bar, use the date range selection control instead.

Usage

Use the dynamic date control if:

  • You need flexibility between fixed and dynamic dates.
  • You need dynamic dates that can be saved in the variant management (for example, show values from today regardless of when you open the app).
  • You are using the smart filter bar.
  • The user only needs to select one value.

Do not use the dynamic date control if:

  • Users need to enter a date and a time. In this case, use the date picker or the date/time picker instead.
  • Selecting ranges is not the user’s primary goal. In this case, use the simple date picker.
  • You are not using the smart filter bar.

Responsiveness

The dynamic date control is fully responsive. It provides a touch-friendly screen in sizes S and M (cozy mode) and is smaller in size L (compact mode). For more information on cozy and compact modes, see the article on content density.

Value help for dynamic date range – Size S
Value help for dynamic date range – Size L

Components

The two clickable areas of the dynamic date control

The dynamic date consists of two components:
(A) Date input field with suggestions
(B) Value help popover

On all devices, users can either use the input field to type a date, or use the value help button to open the popover.

Dynamic Date Input Field

The user can type data directly into the input field. Upon user input, a list of suggestions appears.

Value Help Popover

The value help popover offers all available values the user can choose from. Depending on the selected time period, the popover shows different controls. It either shows:
(A) An input field
(B) One or two date pickers
(C) A read-only text with the chosen date range
(D) A select control

Value help popover – Input field
Value help popover – Date pickers
Value help popover – Read only
Value help popover – Select control

Values Offered

  • From
  • To
  • Date Range
  • Today
  • Today -X / +Y days
  • Last X days
  • Next X days
  • This week
  • Last week
  • Last X weeks

Offered Values

  • Next week
  • Next X weeks
  • Month
  • This month
  • Last month
  • Last X months
  • Next X months
  • This quarter
  • Last quarter
  • Last X quarters
  • Next quarter

Offered Values

  • Next X quarters
  • First quarter
  • Second quarter
  • Third quarter
  • Fourth quarter
  • This year
  • Last year
  • Last X years
  • Next year
  • Next X years
  • Year to date

Behavior & Interaction

Typing data into the date range input field

The user can type keywords or numbers into the date range input field.  For example, if the user types a number, the system automatically suggests possible dates. All dynamic dates show the actual dates to help the user select the right value.

List of suggestions shown after typed input

Opening the value help and selecting a time period

Clicking the value help icon opens a popover with additional options for defining the time period. The user can choose from several time periods by clicking the down arrow in the select control. Once a time period has been chosen, the selection box closes.

Opening the value help popover and selecting a time period

Defining a custom time period (X)

If the user selects a custom time period with “X”, such as Last X days, the control shows a simple input field for entering the number. The text in the date input field changes according to the user’s input.

Custom time period with a simple input field

Selecting a date range

If the user selects a time period that requires input of a start and end date, two date pickers appear. These can be opened by clicking the calendar icon. The text in the date range input field changes according to the user’s input.

Selected time period with two date pickers (start date and end date)

Styles

Validation

Use inline validation to give the user feedback, especially for errors and warnings. The possible states are “warning”, “error”, and “success”.

The dynamic date input field in question is highlighted by a frame in the corresponding color. If the focus is inside the field, an explanation is shown. Ensure that this explanation is as specific as possible.

Visible frame that shows an error when the field is out of focus
Error state with meaningful text – The date range input field is in focus

Guidelines

See the Date Picker and Date Range Selection articles for the guidelines. They also apply to the dynamic date control.


List of Options

  • Only provide values that are relevant for the use case in the list of options.
  • You can also add your own values, if necessary.
  • If you use your own values, provide human readable text.

Resources

Want to dive deeper? Follow the links below to find out more about related controls, the SAPUI5 implementation, and the visual design.

Elements and Controls

Implementation

Checkbox

A checkbox lets the user set a binary value (such as “true/false”). When the user clicks the checkbox, it toggles between checked and unchecked. Checked means that the state described by the checkbox text applies, or that the item has been chosen.

The checkbox text describes the positive action (as in “true” or “yes”). The text can be either a label control to the left of the checkbox, or a checkbox text that appears to the right of the box.

  • If there is only one checkbox, you can use a label or text depending on the form format.
  • If there is more than one checkbox, the label describes the whole group of checkboxes. In this case, use the text property of the checkbox to describe the individual checkboxes.

Within a group of checkboxes, each checkbox can be checked or unchecked. The user can check multiple options.

A checkbox does not apply a setting right away; the changes take effect after user confirmation via a triggering action button (such as Save).

Checkbox enabled/disabled

Usage

Use the checkbox control if:

  • Only one option can be selected or deselected, for example to accept terms of use. Use it only if the meaning is obvious (single checkbox).
  • You have a group or a list of options that can be selected independently of each other (checkbox group).
  • Your use case requires all available options to be displayed right away without any user interaction (also in read-only cases).
  • The values of the option list are primary information and need to be displayed right away.
  • Changes to the settings need to be confirmed and reviewed by the user before they are submitted. This helps prevent users from changing settings accidentally.
  • You want to group multiple suboptions under a parent option, and require an intermediate selection state (tri-state). The tri-state indicates that some (but not all) suboptions are selected.

Do not use the checkbox control if:

  • The user needs to choose multiple options from a large list. Use a multi-combo box instead.
  • The user can choose only one option from a list. For a small list, use a radio button group instead. For a large list, use the select control or a list with multi-selection functionality.
  • You want to offer two options for a “yes/no” or “on/off” type of decision. Consider using a switch control instead.
  • The user needs to perform instantaneous actions that do not need reviewing or confirming. Consider using the switch control instead.
  • There is not enough space available on the screen. Use the combo box control instead.

Responsiveness

A checkbox can appear in two different sizes. In cozy mode, it is bigger than it is in compact mode. This makes the checkbox easier to select on touch devices. For more information on cozy and compact modes, see the article on content density.

Compact and cozy mode

In both sizes, the touch/click area around the checkbox is bigger than the checkbox itself, making the checkbox easier to select. Clicking inside this area toggles the checkbox.

Note: Because the touch/click area does not include the label on the left, clicking the label will not toggle the checkbox.

Checkbox touch/click area without label
Checkbox touch/click area with label

Layout

The checkbox control consists of a box and a text that describes the purpose of the checkbox.

If the checkbox is checked, an indicator is shown inside the box.

Although the clickable area to select/deselect a checkbox covers a wider area than the box (see the Responsiveness section), the focus is indicated by a dotted line that surrounds only the box.

If the checkbox appears alone inside a form, the text can be omitted if the label in front of the checkbox takes over its function.

Note: Because the touch/click area does not include the label on the left, clicking the label does not toggle the checkbox.

If there are several options to choose from in a form, the label describes the entire checkbox group, and the texts describe the individual checkboxes.

Since checkbox texts are also a type of label, use title case to be consistent with other labels. If the label is long, it can wrap in order to fit the text into the visible area of the content holder. There is no limit on the number of lines a text can wrap.

Exception: If one or several of the checkbox texts is very long, or is formulated as a phrase, use sentence case and appropriate ending punctuation.

For forms with labels above the fields, place the label above the checkbox group, or do not use a label. For a single checkbox, use only a checkbox text.

For forms with labels to the left of the field, place the label next to the group, aligned with the first checkbox field, or do not use a label. For a single checkbox, use only a label, or only a checkbox text.

Developer Hint
Do not use empty labels to arrange the checkboxes. Creating a label in front of each checkbox and leaving the text empty looks fine – nobody sees the label, and the checkboxes are aligned correctly underneath each other. However, the screen reader will notice these labels and read each of them as “label”. Instead, use the layout data property (layoutData) for the checkbox. In this property, force a line break (linebreak) and set the value of the indents in sizes L and M (indentL, indentM) according to the value of the label span in the simple form (labelSpanL, labelSpanM).
Checkbox layout
Checkbox layout
Short checkbox text in title case; Long checkbox text in sentence case
Checkbox text wrap
Checkbox text wrap
Checkbox group with label aligned to the left or on top
Checkbox group without label
Single checkbox with label or with text

Behavior and Interaction

Clicking a checkbox toggles the state of the checkbox between checked and unchecked.

Tri-State

The main purpose of this state is to represent the mixed selection states of dependent input fields. If some (but not all) of the dependent fields are selected, the checkbox shows a partially selected state. This is only a visual state and can’t be achieved by a direct user interaction.

Checkbox interaction states

Properties

You can set the width of the element containing the checkbox and the text manually (property: width).

If the text exceeds the available width, it can wrap. The touchable area for toggling the checkbox ends where the text ends.

If the width allows more space than the text requires, white space is added. The touchable area for toggling the checkbox is increased according to the manually-set width.

The text can be positioned manually in this space (property: textAlign). However, we do not recommend using the right-align option, which can result in a large amount of white space between the checkbox and the checkbox text.

States

If a checkbox is part of an editable form, it can be edited in when the form is in edit mode. In display mode, the checkbox uses its “display-only” state (property: displayOnly), and two icons replace it to represent the checked and unchecked states.

If the checkbox appears in a read-only form, set the checkbox to read-only (property editable = “false”).

Do not combine the settings “disabled” and “read-only”. This is technically possible, but does not make any sense.

The checkbox can represent a mixed selection state, or tri-state (property: partiallySelected). The visual state depends on the value of the selected property.

Don't
Checkbox text - Don't format the checkbox incorrectly
Checkbox interaction value states

Resources

Want to dive deeper? Follow the links below to find out more about related controls, the SAPUI5 implementation, and the visual design.

Elements and Controls

Implementation

Display List Item

The display list item is the simplest list item. It shows content in the form of labels and text.

As forms are generally the preferred control for combining labels and fields, display list items are seldom used.

Display list items
Display list items

Responsiveness

Labels and text generally occupy 100% of the space they need. If a combination of the label and text is too long for the total space available, one or both are truncated so that each occupies a maximum of 50% of the space.

Truncated display list item

Behavior and Interaction

List item behavior and interaction is similar for all list item variants and is therefore described in the list overview article.

Resources

Want to dive deeper? Follow the links below to find out more about related controls, the SAPUI5 implementation, and the visual design.

Elements and Controls

Implementation

Input List Item

The input list item contains a label and any sort of input UI element.

Single input list item

Responsiveness

In input list items, only the labels become truncated if the text is too long for the space available.

Behavior and Interaction

Input list items are mainly used for entering data in a similar way to entering data in forms.

Therefore, the general behavior of list items, such as navigation, is usually not enabled when input list items are used.

Guidelines

The input list item was introduced with the original mobile-focused version of SAPUI5. However, SAP Fiori applications currently run across multiple devices and therefore tend to use the form for input purposes rather than the now rarely used input list item.

Resources

Want to dive deeper? Follow the links below to find out more about related controls, the SAPUI5 implementation, and the visual design.

Elements and Controls

Implementation

Responsive Table – Content Formatting Cheat Sheet

A table often implies a “boring” layout. It contains plain text, one value per cell, and fails to catch the user’s attention. In contrast, the responsive table is much more flexible and eye-catching. It also contains many options for formatting the table content. Due to small screen widths on mobile devices, these options are necessary in order to reduce the number of visible columns.

This cheat sheet shows you how you can transform a plain table into the cutting edge style of SAP Fiori. Take a look at the example below.

Usage

Use this cheat sheet if:

Do not use this cheat sheet if:

Guidelines

Step
01
Starting point: A “traditional” table with one line of text per cell.

Traditional table
Traditional table
Step
02
Change the alignment:

  • Left-align text, IDs, phone numbers, URLs, passwords, email addresses, and status information.
  • Right-align numbers (except IDs and phone numbers), dates, and times.

Change the alignment
Step
03
Use the object identifier control to display key identifiers.
Use the object identifier control for key identifiers
Step
04
Use the object number control (sap.m.ObjectNumber, property: emphasized) to emphasize the key attribute (usually the value of a value-unit combination).
Use the object number control to display key attributes
Step
05
To indicate status information, use an object status control with semantic text colors. For more information on semantic colors, see colors.
Use the object status control to display status information
Step
06
Remove columns by displaying the ID in brackets after the corresponding name.
Use ID-formatting to reduce the number of columns
Step
07
To gain even more width per column, remove additional columns by combining them.
Combine columns
Combine columns

And you’re done. With just a few simple steps, you can easily bring the SAP Fiori style to a plain table.

Resources

Want to dive deeper? Follow the links below to find out more about related controls, the SAPUI5 implementation, and the visual design.

Elements and Controls

Implementation

Busy Dialog

The busy dialog informs the user about an ongoing operation. During the operation, the entire screen is blocked.

Usage

Use the busy dialog if:

  • The user should not be able to start any other activity during an operation, and the screen needs to be blocked while the operation is ongoing.
  • The operation lasts more than one second.
  • You want to indicate loading in a page-to-page navigation.

Do not use the busy dialog if:

  • The operation lasts less than one second.
  • The screen is not supposed to be blocked. In this case, use the busy indicator or busy state of the control instead.

Responsiveness

The busy dialog is fully responsive and can be shown in compact and cozy mode.

Busy dialog - Compact mode
Busy dialog - Cozy mode
Busy dialog on smartphone
Developer Hint
To switch to compact mode for a dialog, you need to use:

jQuery.sap.syncStyleClass(“sapUiSizeCompact”, this.getView(), this._oDialog);

For more information, see the SAPUI5 Demo Kit.

Components

The busy dialog can consist of several components and is configurable. The following properties can be set:

  • Title: By default, it has no title. Define a title if you need to provide more context.
  • Text: Additional text can be added above the busy animation.
  • Cancel:(Property:showCancelButton) A Cancel button is displayed. There is no Cancel button by default. The label is also configurable via Property.cancelButtonText.
  • Icon: A custom animation icon can be set via Property:customIcon.

If no title, text, or Cancel button is set, the busy dialog displays only the busy icon (busy dialog, lightweight version).

Busy dialog with 'Cancel' button
Busy dialog without 'Cancel' button
Busy dialog - Lightweight version

Guidelines

Lightweight Version (No Title, Text, or Cancel Button)

  • Use the lightweight version for page navigation (see live example).
  • If you do not show a title or text, use the invisible text control (sap.ui.core.InvisibleText) to provide the reason for the busy state to users with assistive technologies.

Developer Hint

The additional text should be associated to the busy dialog using ariaLabelledBy association.

Busy Dialog with Text

  • Do not use the title of the busy dialog.
  • If a busy dialog is triggered directly by the user, provide a precise text describing the operation. The text can be as short as one verb:
    • Loading…
    • Refreshing…
    • Sending…
  • If the busy dialog is not directly initiated by the end user, use at least one sentence to describe the operation. Start either the first or the last sentence with Please wait. For example: The system is busy searching data. Please wait until data is loaded.
  • Recommendation: Do not use the invisible text control when you show text in the busy dialog.

Busy Dialog with Text and Cancel Button

  • Offer Cancel if you expect the process to run more than 10 seconds. In addition, always display text that precisely describes the ongoing operation.
  • Do not change the mouse cursor to indicate the ongoing operation.
  • Recommendation: Do not use the invisible text control when you show text in the busy dialog.

Timing and Duration

We recommend displaying the busy dialog one second after the process has been triggered and for a minimum time of 500 ms to avoid flickering. For processes that last less then one second, a busy dialog is not displayed at all.

Example: A process takes 1.3 s in total. After one second, the busy dialog is displayed. The process finishes in 1.3 seconds. To avoid flickering, you should display the busy dialog for at least 500 ms, so you will need to add 200 ms to avoid flickering.

Resources

Want to dive deeper? Follow the links below to find out more about related controls, the SAPUI5 implementation, and the visual design.

Elements and Controls

Implementation

Select Dialog

The select dialog enables users to select one or more items from a comprehensive list. The select dialog comes with a list of entries and a search field to filter the list.

A more enhanced dialog for single selection and multiselection is the value help dialog as it offers range selection and excluding functions.

Usage

Use the select dialog if:

  • Users need to select one or more entries from a comprehensive list that contains multiple attributes or values.

Do not use the select dialog if:

  • Users need to pick one item from a predefined set of options that contains one attribute or value only such as languages. In this case, consider using the combo box or select instead.
  • Your use case requires more enhanced functionalities such as a selection based on ranges. For the selection of values, consider using the value help dialog instead.
  • Your use case requires tabs, filters, or an Add New functionality in the select dialog. In this case, use a standard dialog instead.
Information
For more information on which selection control to choose, see the selection control overview.

Responsiveness

The display of the select control depends on the device. On phones, the selection list takes up the whole screen. On desktop and tablet devices it appears as a popover.

Size S

Single select dialog in full screen on smartphone
Multi-select dialog in full screen on smartphone

Size M

Single select dialog on tablet
Multi-select dialog on tablet

Size L

Single select dialog on desktop
Multi-select dialog on desktop

Components

Dialog Header

You need to set the title of the dialog header (1). We recommend the following form:

Single selection

Select

Example: Select Product

Multi-selection

Select

Example: Select Products

Search

The first element in the dialog is a standard search field (2).

Info Toolbar

The info toolbar (3) is only available in multi-selection mode. It shows the number of selected items in the following form:

Selected :

Example: Selected Products: 2

Content

The content area (4) can be filled with any list content inherited from the list item base, such as standard list items, display list items, and feed list items. You can set the content to be displayed as grouped.

Button Toolbar

The button toolbar (5) contains two buttonsSelect and Cancel. Select takes over the selection, while Cancel resets the selection to the state it was in when the dialog was opened.

Components of the select dialog. Left: single select, right: multi select

Behavior and Interaction

The select dialog can be called up from any control. The most common trigger is an input field with selection icon, also known as a “value help field”, or F4. Alternative triggers are buttons or icons, which add items to an existing list or the infobar in the master list in order to apply a contextual filter.

Single Select

Once users select an entry, the select dialog is closed and the selected entry is taken over. If applicable, the entry is displayed in the field from which the dialog was triggered.

Multi-Select

In the multi-select version of the select dialog, checkboxes are provided for choosing multiple entries. The selection is taken over when the user closes the dialog via OK. Cancel closes the dialog without taking over the selected values. An infobar indicates the number of selected items.

Search

The user can search items.

Resize and Drag Dialog

You can make the select dialog resizable and draggable by setting the corresponding properties (also called resizable and draggable) to “true”.

A resizable dialog makes sense if the items inside have long names or descriptions.

A draggable dialog allows users to see the app content behind the dialog.

Guidelines
Both features are optional. However, even if you only need one, always set both of them to “true” to ensure consistency.

Guidelines

List Options

If you need to indicate that none of the selection options are selected, or you need to allow the user not to select an option, provide (None) as an option and place it at the beginning of the list.

If you need to indicate that all items apply (for example, as a list filter), provide All as an option and place it at the beginning of the list.

Select list with '(None)'

Search Behavior

Two types of search behavior are available:

(1) A live search, also known as “search-as-you-type” (property: liveChange), which is triggered by each character that the user enters or deletes.

(2) A manual search, which is triggered explicitly after the user enters text in the search field and clicks the Search icon or presses the ENTER key.

Although app developers need to decide themselves which search to use, we recommend implementing the live search whenever possible. Use the manual search only if the amount of data is too large and your app would otherwise run into performance issues. For more information, check out the article on search.

Reset/Remember Selections

By default, the selection is reset when the dialog is closed. This allows users to make a new selection when they reopen the dialog and makes sense when users need to add multiple items to a table.

Selection is reset after the dialog is closed

However, if your use case requires selections in a dialog to be remembered so that the user can make corrections, you can set the rememberSelections function in the select dialog to “true”. When users exit the dialog by clicking Cancel, the selection is then restored to the state it was in when the dialog was opened.

Selection is remembered after the dialog is reopened

This also works in single-select dialogs. There, if users click the remembered item again, the dialog closes and they do not have to explicitly click Cancel.

Infobar

In multi-selection mode, an infobar shows the number of selected items. Use the following format:

Selected: [Number of selected items]
Example: Selected: 2

Note that the infobar is not “sticky”. When the user scrolls down the list, the infobar scrolls off the screen.

Infobar States

The infobar has two states – active and non-active (non-clickable). For more information see Infobar States.

Infobar - Active state
Infobar - Non-active state

“Clear” Button

The Clear button allows users to clear all the selected items. By default, the button is not shown. To display the button, set the showClearButton property to “true”.

Select dialog with 'Clear' button

Content

By default, the select dialog comes with a growing feature (property: growing = “true”). We recommend disabling the growing feature and setting this property to “false”. This ensures that all items in the table are loaded at once, and that the “Items selected” count, the search, and select/deselect features all work properly.

Resources

Want to dive deeper? Follow the links below to find out more about related controls, the SAPUI5 implementation, and the visual design.

Elements and Controls

Implementation

  • No links

Color Picker

The color picker allows users to choose any color and provides different input options for selecting colors.

Color picker
Color picker

Usage

Use the color picker if:

  • Selecting any color freely is the typical use case.

Do not use the color picker if:

  • Users need to select one color from a predefined set of colors. Use the color palette instead.
  • Selecting a color from a predefined palette is the typical case, but users should still be able to define their own colors. Use the color palette popover instead.

Responsiveness

The color picker supports cozy and compact content densities.

Size S: Color picker opens in responsive popover
Size M – Cozy form density
Size L – Compact form density

Layout

The color picker consists of the following elements:

  • The color picker box for setting lightness and saturation
  • Sliders for setting the hue and transparency (“alpha channel”)
  • Form elements for:
    • Displaying the current and new color settings (Prior to any selection, the default color is white. However, the app developer can set a different predefined color using the setSelected method.)
    • Setting the color as a hexadecimal value
    • Setting the color as red/green/blue (RGB) value (0 to 255 each) (optional)
    • Setting the color as hue/saturation/lightness (HSL) value (hue: 0 to 360 degrees, saturation: 0% to 100%, lightness: 0% to 100%) (optional)
    • Switching between RGB and HSL values (if applicable)
    • Setting the transparency (“alpha channel”) value of the color (0.00 for full transparency to 1.00 for opaque)
Schematic visualization of the color picker

Types

The color picker comes in 3 flavors:

  • Simplified: The simplified color picker offers settings for hue, saturation, and lightness, but not for the alpha channel. It shows the current and new color. Text input is only possible for hex values.
'Simplified' color picker
  • Default: The default color picker allows all settings. It displays input fields either for red / green / blue / alpha or for hue / saturation / lightness / alpha. End users can switch between both sets of input fields.
'Default' color picker
  • Large: The large color picker allows all settings and displays all fields at the same time.
'Large' color picker

Behavior and Interaction

  • Mouse/touch: Users select a combination of saturation and lightness in the color picker box (click and drag). Hue and alpha values are selected with sliders.
  • Keyboard: The tab key is used to set the focus on the sliders and input fields. Values are entered using the corresponding input controls. The sliders react on arrow keys, page up / page down keys, as well as on home and end keys. The color picker box is not keyboard-enabled.

Guidelines

  • Do not place the color picker directly on a page. Always offer the picker in a popover or dialog.
  • Use the simplest color picker type that does the job.

Resources

Want to dive deeper? Follow the links below to find out more about related controls, the SAPUI5 implementation, and the visual design.

Elements and Controls

Implementation

Action Sheet

An action sheet consists of a list of options a user can select from to complete an action. Actions can be clustered if there is not enough space on the screen.

Warning
This control has a number of limitations, which were addressed with the introduction of the menu button. Use the menu button instead of the action sheet whenever possible.
Example of an action sheet popover

Usage

Use the action sheet if:

  • You need an option that provides more than one action.
  • It is really important that the user stays in context on a phone.
  • You only have a small number of actions.

Do not use the action sheet if:

  • The menu provides only one option. In this case, consider using a button instead.
  • You need to show a hierarchical menu. In this case, use the menu button instead.
  • Your users would benefit more from a split button, which offers an easy-to-access default action, with the option to include additional actions.

Responsiveness

The action sheet is fully responsive. On smartphones, the actions are displayed as a list inside a dialog. On tablets and desktop devices, the actions are displayed in a popover.

Size S (Smartphone)

Action sheet dialog
Action sheet dialog

Size M (Tablet)

Action sheet popover

Size L (Desktop)

Action sheet popover

Layout

All elements in the action sheet are left-aligned. Actions are always arranged in order of importance, from top to bottom. The Cancel button uses a negative button type and is centered to differentiate it from the other app actions. The cursor/focus area for buttons within the action spans the full width of the action sheet (which in turn depends on the longest button).

Action sheet popover

Components

The following UI elements can be placed in the action sheet:

Behavior and Interaction

Clicking

A click on the overflow icon (“…”) opens either a popover or a dialog. The user can trigger an action or close the action sheet by clicking anywhere on the screen. On a smartphone, the dialog can be closed only with the Cancel button.

If the user triggers an action, the action sheet closes automatically and the system provides a message toast.

Guidelines

  • Never use only icons in the action sheet. Display text only or a combination of icon and text.
  • On smartphones, provide a Cancel button to enable the user to close the dialog without triggering an action.
  • Avoid scrolling in action sheets. If you include too many buttons in an action sheet, users have to scroll to see all the actions in the list. Not only does it take users longer to distinguish between actions, but they also find it difficult to scroll without clicking a button by mistake.
Action sheet dialog
Action sheet dialog

Resources

Want to dive deeper? Follow the links below to find out more about related controls, the SAPUI5 implementation, and the visual design.

Elements and Controls

Implementation

Invisible Text

The invisible text control provides a simple hidden text which can be used by assistive technologies such as screen readers to provide contextual information to sighted users.

Responsiveness

The invisible text control is not visible and therefore works on all devices.

Guidelines

  • Provide short and meaningful texts. Adhere to the text guidelines of labels.
  • Do not use an invisible text as a replacement for a label. (Property: text)
  • Just adding the invisible text control would not work. As with labels, developers need to assign the invisible text to the corresponding control. Unlike with labels, this does not happen automatically in forms.
Developer Hint
To assign the invisible text to a control, add the ID of the invisible text to the ariaLabelledBy association of the corresponding control.

Properties

The properties “busy”, “busyIndicatorDelay”, and “visible” do not have an effect. Therefore, do not use them.

Usage

When to Use Invisible Text

  • If you need to provide contextual information also for users of assistive technologies like screen readers.
  • If you need to provide a title (such as for a form or table), which sighted users do not need.
  • If you need to provide a label (such as for a group of radio buttons), which is not needed by sighted users.
A group with radio buttons without any visible label
  • If you need a form row with more than one form element. Use the concatenated label for sighted users, and use single invisible texts for users of assistive technologies.
A form with two fields in one row
  • If you need to explain a visual element without any kind of label, such as a loading animation.
  • If you build your own controls and need to provide information about uncommon states or properties.
Buttons use the invisible text control to announce their type

When Not to Use Invisible Text

  • If you want to provide additional information for users of assistive technologies which is not available for sighted users. While you should not discriminate users of assistive technologies, you should also not provide “privileges” to them.
  • If you want to hide information. It might still be available for users of assistive technologies.
  • If you want to hide long texts. The information is probably important enough to be shown! Furthermore, short texts are far more convenient, even for users of assistive technologies.

Resources

Want to dive deeper? Follow the links below to find out more about related controls, the SAPUI5 implementation, and the visual design.

Elements and Controls

Implementation

Feed and Notes

Feeds and notes are commonplace in many SAP Fiori applications. The sap.m.FeedInput control allows users to input and post plain text, while the sap.m.FeedListItem control handles and displays this text. Both can be used individually, but they also complement each other well to create a simple feed or notes control.

Usage

Feed Input

Use the feed input if:

  • A user needs to input small amounts of text without formatting.
  • You expect multiple instances, such as notes or feed entries.

Do not use the feed input if:

  • The user needs to format the text (rich text editor).
  • You need only a single text box instance. In this case, use the text area (for multiple lines) or the text control (for a single line).

Combination of Both Controls (as Feed or Notes Control)

Use both controls if:

  • You need a feed to show textual posts.
  • Your users need to input notes.

Do not use both controls if:

  • You expect extensive social interaction in the feed.
  • Users need to reply at item level instead of creating a new post.
  • You want to display SAP Jam feeds.

In these cases, use the social timeline instead (requires SAP Jam).

Responsiveness

Due to their responsive behavior, both controls can be used in small and large view ports or screens.

For better usability, we highly recommend that you do not stretch the controls across the full width on large screens – 2/3 or even 1/2 works just fine. This can easily be achieved using the grid layout .

Feed – Size S
Feed – Size S
Feed – Size M
Feed – Size M
Feed – Size L
Feed – Size L

When the width of the available space falls below 25 rem (for example, in portrait mode on smartphones), the two controls respond as follows:

  • If a user image previously appeared in the feed input, it will be omitted in narrow screens to give the text field more space.
  • If there is no user image, there will be no visual change.
Feed input – Responsiveness

In the feed list item, the user’s name, image, and the time stamp move on top of the text. If there is no image, the name and time stamp are left-aligned together with the text.

Feed list item – Responsiveness – With image
Feed list item – Responsiveness – Without image

Layout

Feed Input

The feed input consists of:

  • A text input field with a placeholder (input prompt)
    Example: Add a comment
  • A Send button
  • An optional user image

You can also choose not to show user images at all. In this case, the size of the input area increases automatically.

Feed input – Layout – With user image
Feed input – Layout – With generic user image
Feed input – Layout – Without user image

Feed List Item

The feed list item consists of the user’s name and an optional picture of the user who wrote the note or update. The name can contain a link that triggers a quick overview of the user’s profile data. The actual text written by the user follows the name. Below it is a separate byline that can contain a time stamp and an attribute in the form of free text. This allows you to put in your own attribute, such as Approval, Internal, or External. Both the time stamp and the attribute are optional.

If the name is a link, the picture should also be linked with the same attributes.

Feed list item – With user image and linked name

If the user does not have a picture assigned, a placeholder is shown instead:

Feed list item – With generic user image and linked name

The name (and picture) can also be read-only, that is, without a link:

Feed list item – With user image but without links

If the app does not support user images, they can be omitted:

Feed list item – Without user image but with linked name

Here, too, the name can be read-only:

Feed list item – Without user image and read-only name

It’s also possible to display rich text (formatted text) in the feed list item. This feature should be handled with care as it allows for countless custom layouts.

Please see that you use it responsibly and provide your users with a consistent experience. Only deviate from the default layout and font if absolutely required by the use case.

Example use case: Render URLs as links.

Feed list item – Layout – Rich text
Information
The items in the feed list must be homogeneous. This means that they must contain the same layout and visualization. For example, it is not possible to have a feed containing both linked and plain names, or both user images and default images.

Special Case: Multiple Types of Notes

Apps sometimes need to discern between different types of notes. There is an easy way to allow users to choose which type they want to see or add to the list.

You can place a toolbar containing a select control at the top of the feed input control. From there, users can select the type of notes, such as Internal Notes or External Notes. The list of notes must contain only the type selected. If the user adds a note via the feed input, the type must be set automatically according to the selection.

Interaction – Note Types

Components

The feed input and feed list item do not contain subcontrols. However, you can easily combine them to create a simple feed or notes control.

Although the feed input counts as a single control, the input area inherits its behavior from the sap.m.TextArea control.

Behavior and Interaction

Send Message

Initially, the feeder contains a placeholder (input prompt), and the Send button is disabled, with reduced opacity.

Clicking into the input field puts the focus on the field and allows to start typing.

When the user starts to type, the placeholder disappears and the Send button becomes active and more prominent.

If the available width is below 25 rem (for example, in portrait mode on a smartphone), the picture is removed.

To send the text, the user must explicitly click the Send button. Pressing Enter on the keyboard (on-screen or physical) results in a line break.

Feed input – Behavior

Show More Text

When the text exceeds a certain number of characters (you can overwrite the default value), the rest of the text is truncated and a MORE link appears after the truncated section.

The MORE link indicates the possibility of expanding the section of the feed list item itself. Hovering over the link underlines it.

Show Less Text

When the user expands the text, the name of this link changes to LESS,  but still behaves the same way as before.

Both texts for the “MORE” / “LESS” links can be modified to suit a particular use case.  There is a possibility to use uppercase, lowercase or a mix of them.

MORE link (1)
MORE link (1)
MORE link (2)
MORE link (2)

Feed and Notes in Tables

In tables, users sometimes need to see if an object has a comment (or feed or note) without further navigation, and even be able to add/edit right from the table.

Add an additional column, named according to the type of user input, such as Comment, Note, or Feed.

Place a link inside each cell with the appropriate action (row: Comment, link: Comment/ row: Feed, link: Post).
If there can be more than one item, add a counter after the text as well (see example on the right).

This solution works with every table control.

Feed and notes in tables (1)

Optional:
Depending on the use case, it might help users if they can see the latest note. The responsive table allows the feed list item (sap.m.FeedListItem) to be used inside a cell.

Reduce the property “maxCharacters” to an amount that your table can handle.
Note that once the maximum number of characters has been reached, a MORE link allows users to expand the text. Technically, this is no problem for the responsive table, but you need to ensure that the layout of your page allows this kind of expansion.

Place a link below the feed list item to allow users to add something (as described above).

Feed and notes in tables (2)

When the user clicks a link, such as Comment or Note, display a dialog showing all comments (notes, feed entries, and so on) along with possible actions, such as Add or Edit, depending on your use case.

There are several ways to show notes (comments, feed entries, and so on) in a dialog:

  • You can use the feed list item (and feed input) as described in this article.
  • If only one single note is allowed, you can use the text area.
  • For a large feed, you can use the timeline control (SAP Jam is required for social features).

Actions On Feed List Items

Applications can define actions that users can perform on individual feed posts. The two most typical actions are Edit and Delete. Other actions can be introduced as required by the use case. To keep the feed as lightweight as possible, don’t overwhelm users with too many actions or complicated actions (max. 5 per post).

Interaction - Actions

Styles

By default, feed entries are separated by divider lines. We recommend that these separators remain enabled, since they help distinguish between individual posts. However, if your list is expected to hold only a handful of entries, you can disable the separators by setting the showSeparators property at list level (not at list item level) to none.

Guidelines

Because the feed list item is built on the basis of the standard list item, it inherits multiple properties that may not make sense in a feed use case.

Use only properties that are described in this article. Especially making the entire feed list item clickable can lead to functional issues and usability problems.

Don’t stretch the feed input or the feed list items across large screens (size L and beyond). This will have a negative effect on usability and readability. Instead, only use 1/3 or even 1/2 of the screen. Implement this with the grid layout .

If you display formatted text (rich text) in the feed list item, use formatting that is beneficial to users, not decorative formatting. Use formatting responsibly, and provide your users with a consistent experience. Deviate from the default layout and font only if absolutely required by the use case (example: render URLs as links).

Resources

Want to dive deeper? Follow the links below to find out more about related controls, the SAPUI5 implementation, and the visual design.

Elements and Controls

  • No links.

Implementation

Button

Buttons allow users to trigger an action. There are 4 button types:

  • Simple button for one action
  • Toggle button to switch between different states
  • Segmented button with a group of options
  • Menu button with a group of actions
Common button types
Common button types

Usage

Use the button types as follows:

  • Use simple buttons for specific actions, such as:
    • Create, Edit, Save
    • Approve, Reject
    • Accept, Decline
    • OK, Cancel
  • Use toggle buttons in a toolbar to activate or deactivate an object or element. You can also use toggle buttons to switch between different states.
  • If you want the user to select one option from a small group, offer a segmented button in the toolbar. For example:
    • Year, Month, Day
    • Small, Medium, Large
  • Use the menu button if you need a menu that provides more than one option.

Do not use buttons if:

  • You want to link to a different page or object. Use the link instead.
  • You want to let users upload content. Use the upload collection control instead.

Responsiveness

The button usually grows to fit the size of the text. If you set a fixed size for the button, the text truncates.

If the button is used in a responsive container or toolbar, it follows the responsive behavior defined for that element. For example, the button can move to another line.

Buttons with different lengths

Menu Button

The maximum width of the menu button is 12 rem (192 px). If the button text exceeds the maximum or fixed width, it truncates.

On smartphones (size S), the menu opens in a full screen dialog, and the button label becomes the title of the dialog. The footer contains a Cancel button. Items with submenus become navigable. Navigation is similar to that used in a popover, with a Back button.

On tablet and desktop devices (sizes M and L), the menu button triggers a cascading dropdown menu.

Open menu button
Open menu button
Menu button popover on size S

Types

Button

Buttons can trigger primary, secondary, semantic, and negative path actions. These different action types are explained in more detail in the action placement guideline.

Header and Footer Toolbars

Use the following button styling for the different action types in the header and footer toolbar:

  • Primary action: Use the emphasized button style.
  • Secondary action: Use the ghost button style. 
  • Semantic action: Use the semantic buttons for positive and negative actions. Use the “accept” style for positive actions, and “reject” for negative actions. Semantic actions must always be text buttons.
  • Negative path action: Use the transparent button style.

Content Toolbars

Use the following button styling for the different action types in content toolbars (for example, in tables, forms, or charts):

  • Primary action: Use the emphasized button style. Usually, the primary action is positioned in the header or footer toolbar. Note that there can only be one primary action per page. If a page already has a primary action, but you also need to highlight the most important action in a content toolbar, use the ghost styling for this one button in the content toolbar.
  • Secondary action: Use the transparent button style.

The different button styles are designed to give appropriate feedback to users. Don’t use them for decoration purposes.

Button with different styles

Toggle Button

A toggle button switches between two actions. One of the actions is always active, one is inactive. Use the toggle button for secondary actions.

Apply the following button styles for the different toolbars:

  • Header and footer toolbars: Use the ghost button style.
  • Content toolbars: Use the transparent button style.
Toggle buttons
Toggle buttons

Segmented Button

A segmented button shows a group of options. Only one of the options can be active, the others remain or become inactive. Pressing an option activates it. By default, the control for segmented buttons calculates the button width and applies it to all buttons within the group. You can change this by setting the width for individual buttons.

The segmented button is comparable to a radio button group control.

Segmented buttons
Segmented buttons

Menu Button

There are two different types of menu buttons. Both can contain items with submenus.

Regular Menu Button

When the user activates the button, the menu opens. This is the default type.

Split Menu Button

The split menu button is separated into two areas: the text label and the icon. The separator between them signals that the two areas result in different actions. The user has two choices: activating the text label on the button triggers the action. Activating the arrow opens the menu. The split button consolidates a variety of commands, especially when one of the commands is used more often.

In split mode, the text label depends on the default action. If the default action is displayed as an icon only, all the menu items must contain icons.

Split Menu Button Behaviors

The split menu button can have two different behaviors:

  1. The button always triggers the default action set by the app developer. If no default action has been defined, the first item in the menu list becomes the default.
  2. The button triggers the last action chosen by the user. Initially, it also triggers the default action. However, when the user selects a different action, this user action becomes the default, and the button text label changes accordingly. The button has a fixed size and the text truncates if the menu item exceeds the available width (as with the combo box).

Toolbars

Apply the following menu button styles for the different toolbars:

  • Header and footer toolbars: Use the ghost style.
  • Content toolbars: Use the transparent button style.

Do not use any other styling types.

Menu buttons
Menu buttons

Button Content

Text or Icon

A button can contain an icon OR a text.

Always use a text button for primary, secondary, semantic, and negative path actions.

Use icon buttons only if the icon metaphor is easily recognizable. Ideally, it should have same meaning worldwide.  For more information about icons in general, check out the article on iconography.

Badge

Buttons with text (left) and icon (right)

The standard button can contain an optional badge. The badge acts as a visual eye-catcher and attracts the user’s attention. It shows a number and is typically applied in browse and collect use cases. For example, it can display the number of items in a shopping cart.

Use the badge in combination with one of these button styles:

  • Emphasized (as a primary action)
  • Ghost (as a secondary action)
  • Transparent (as a secondary action)

The number of the badge must always be a whole number (1, 2, 3, …) and cannot be smaller than 1. If 0 or minus items are in the basket, the badge is not displayed. If the number exceeds 4 characters, such as 9999, it is truncated to 999+.

The position of the badge (attached to or on a button) can vary depending on the content density.

Buttons with a badge in cozy mode (left) and compact mode (right)

Behavior and Interaction

To trigger the action, the user clicks the button, toggle button, or segmented button using a keyboard, touchscreen or screen reader. The button provides visual feedback for “hover”, “press-down”, and “focused” states.

  • A toggle button remains in the pressed state until it is pressed again.
  • In a segmented button, the chosen option stays active until the user presses one of the other options.
  • menu button displays a dropdown menu on activation.
  • In a split button, selecting the button text triggers that action directly. Activating the arrow opens a dropdown menu. If the user selects a menu item, the action is triggered and the menu closes.

If an action cannot be triggered, or is temporarily unavailable, use the disabled state for the corresponding button.

If you want to switch a text, icon or tooltip after a button click, bear in mind to use the invisible message control to also convey the information to screen reader listeners.

All three button types support the cozy and compact form factors. For more information, check out the article on content density.

Regular state
Regular state
Hover state
Hover state
Press-down state
Press-down state
Disabled state
Disabled state
Focused state
Focused state
Opening a menu button with subitems

Guidelines

Button Text

  • Choose a button text that is short and meaningful. Check out the UI text guidelines for more information.
  • Use a verb in the imperative for all actions (for example: SaveCancel, Edit).
    Note: The grammatical form for actions can differ for other languages. For example, German action labels use the infinitive (Sichern, Abbrechen, Bearbeiten).
  • Keep in mind that the text can be up to 300% longer in other languages.
  • If you need to show the number of items that will be affected by the action of the button, you can add the number in parentheses. For example, Edit (3).
  • Do not change the text or icon of a toggle button when it is pressed. Screen readers announce the “pressed” state for the action. If you use a different text for the pressed state, the screen reader announcement doesn’t make sense.

Icon Buttons

  • Make sure the default accessibility text for the icon is correct for your use case. If the text is not ideal, define an app-specific accessibility text.
  • Offer a tooltip to show the label for icon buttons.
  • Don’t use the icon control for buttons. Use the icon property for the button instead.

Button Shortcut

  • You can use the button shortcut control to show the keyboard shortcut for an action. The keyboard shortcut appears on hover or on keyboard focus, and its positioning (top or bottom) is context-dependent. When a tooltip is needed, it is combined with the shortcut information.
Button with a shortcut hint

Examples

Header toolbar with primary action (emphasized styling) and secondary actions (ghost styling)
Table toolbar with search field, text buttons (ghost and transparent styling), icon buttons (transparent styling), and segmented button
Footer toolbar with standard actions: 'Save' (emphasized) and 'Cancel' (transparent)

Related Links

Elements and Controls

Implementation


  • No links

Smart Table

Intro

The smart table creates a responsive table, grid table, tree table, or analytical table based on an OData (Open Data Protocol) service and its annotations. The table toolbar comes with additional built-in features, such as personalization, export to spreadsheet, and variant management.

When to Use

Use the smart table if:

  • You use an OData service for your app (OData version 2 only).
  • The feature set of the smart table fits for your app. In this case, the smart table is faster to implement.
  • You need more than one of the major features of the smart table. Otherwise, you might not benefit from a shorter implementation time. For example, if you just need the export to spreadsheet feature, creating a responsive table directly is usually faster than using the smart table.

Do not use the smart table if:

  • You use a different technology to OData version 2. Use the corresponding table control directly.
  • You need more flexibility in the content design, such as several different row templates or less complex personalization features. Use the responsive table directly.
  • You do not have complex data. Another control like a select, combo box, list, grid list, tree, or smart list might do the job better.
  • You have very complex data. Did you check the chart?
  • Users need to switch between a chart and table. The smart table is not designed to work inside an existing chart container. In this case, use either the smart chart or the corresponding table directly.
  • You need to layout different controls in a table-like grid. Use a flexible grid instead.
  • You need to layout different input fields with labels. Use a form, simple form, or smart form.

Components

The smart table consists of a table toolbar (1), an infobar (2), and a table (3).

The components of a smart table

Table Toolbar

Toolbar with all features provided by the smart table out-of-the-box

The table toolbar is generated automatically. The following toolbar content is provided by the smart table out-of-the box:

  1. Title
  2. Item counter
  3. Variant management
  4. Show Details / Hide Details
  5. View Settings
  6. Export to Spreadsheet
  7. Maximize / Minimize

In addition, you can add app-specific actions.

Title

The title is optional (property: header).

Guidelines
Add a title whenever the title is not indicated in the surrounding area.
Developer Hint
If you don’t provide a title, ensure that you support screen reader users: create a simple table in the XML view, use ariaLabelledBy to point to the corresponding text, and add this table to the smart table. Make sure that the table type within the smart table is set accordingly. The smart table will take care of the rest (creating columns, and so on).

Item Counter

The item counter is optional and only available if you show a title (property: showRowCount).

Guidelines
Show the item counter together with the table title, unless:

Variant Management

Variant management is optional (properties: useVariantManagement, currentVariantID, association: smartVariant).

Guidelines
Use variant management only if really needed.

Show Details / Hide Details

Show Details / Hide Details is mandatory with and only available for the responsive table. It shows/hides columns with low priority in the pop-in area (properties: demandPopin, showDetailsButton, annotation: UI.Importance). The button only appears if there are corresponding columns in the pop-in area.

View Settings

View Settings are optional. The button triggers a P13n Dialog (property: useTablePersonalisation). The View Settings dialog can also be opened with the shortcut Ctrl+Comma.

Guidelines
Offer view settings only if they are really needed. Tables with just a few columns and rows do not need to be sorted, filtered, or grouped.

Sort and Filter

Sorting, filtering, and column settings are automatically available for all columns in all tables. For single columns, you can remove the sort and filter settings (annotations: SortRestrictions, FilterRestrictions).

  • The current sort state and sort order is displayed as an icon in the column header of the sorted columns.
  • The current filter state is displayed as follows:
    • In the responsive table, an infobar is shown if filters have been set in the table personalization settings.
    • For all other tables, filtering is indicated by an icon in the column header of each filtered column.

When amounts with different currencies appear in a single column, you can change the sort behavior to sort these columns first by currency, then by amount (annotation: ApplyMulitUnitBehaviorForSortingAndFiltering). This behavior is applied for all such columns in the smart table. It cannot be defined per column.

Guidelines

  • Do not turn off the info bar (property: useInfoBar).
  • In the default delivery, sort items in a meaningful order. This works only for the grid table, tree table, and analytical table. You can also provide default filter settings (all tables) and grouping (responsive table and analytical table only) (annotation:
    PresentationVariant).
  • If the smart table is used together with a filter bar (property:
    smartFilterId), do not offer filtering for the smart table itself.

Developer Hint
The smart table can be linked to a smart filter bar. If linked, the filter bar settings are automatically applied to the smart table (sap.ui.comp.smarttable,SmartTable, property: smartFilterId).

Group

Group settings are only available for the responsive table (all columns, one level only) and the analytical table (dimension columns only, multiple levels).

The following text is usually shown on the group header:
[Label of the grouped column]: [Grouping value]

Within the analytical table, the grouped column remains visible by default if it is grouped using the P13n Dialog. The column is hidden if it is grouped using the column header menu.

Guidelines
In some cases, the group header text may not be shown automatically as described. This applies to special cases in the analytical table (for example, if the displayed text is not taken directly from the data source), as well as custom columns in both responsive and analytical tables. In such cases, you must set and format the group header text yourself.

Column Settings

Column settings are used to show and hide columns. For the grid table, tree table, and analytical table, the column settings automatically enable resizing via the column header and size-to-fit for text-only columns (double-click on column separator line).

Guidelines
If sorting, grouping, and/or filtering are needed, also show the column settings (sap.ui.comp.smarttable.SmartTable, property: useTablePersonalisation).
Developer Hint
Only offer column settings if you need more columns than a tablet screen can display at a time (usually more than five).

Export to Spreadsheet

Export to Spreadsheet is optional. The button triggers either a front-end export using the export to spreadsheet utility, or a back-end export via Gateway (properties: useExportToExcel, exportType). The front-end export allows for additional settings and can also be triggered with the shortcut Ctrl+Shift+E.

Guidelines

  • Only offer the Export to Spreadsheet option if your end users typically export the data shown in the table to work with it in a spreadsheet application.
    • This is usually the case if data is collected from several systems and analyzed in the spreadsheet application.
    • This is not usually the case for worklists, attachment lists, tables with only a few items, shopping carts, or data that does not need to be analyzed.
  • If you offer the Export to Spreadsheet button, use the front-end export.
  • If your table has columns with non-textual content, provide a textual equivalent for those columns. Non-textual content is not exported.

Warning
With both methods, the file size is limited by the available browser memory. As a result, exporting large tables can lead to memory overflows and crash the export process.

Apply the following size restrictions as a rule-of-thumb:

  • For the front-end export, do not export more than 2 million table cells on desktop browsers or 100,000 table cells on tablets and phones.
  • For the back-end export, do not export more than 100,000 table cells.

For larger tables, consider using custom-built, specialized export solutions instead.

Maximize / Minimize

Maximize / Minimize is optional. It allows users to show the table in full screen mode and to exit full screen mode (property: showFullScreenButton).

Guidelines

App-Specific Actions

App-specific actions can only be added using a custom toolbar (aggregation: customToolbar).

Developer Hint

Infobar

Infobar with filter information

The infobar is only available for the responsive table. It indicates which filter settings are currently active. If no filters are set, the infobar is hidden (property: useInfoToolbar, value: Auto).

Guidelines

Table

A responsive table within a smart table

The table is generated automatically. The sections below describe the behavior and different possibilities:

Table

The table provides the following features:

Guidelines

  • Use the responsive table wherever possible. Use the other table types only if really needed. If you use another table, provide a fallback solution for phones.
  • For the responsive table, the smart table initially loads 20 items and shows a More button for loading additional items. Change this behavior if:
    • You expect fewer than 200 items. Load all items from the start (sap.m.Table, property: growing).
    • You expect more than 200 items. Adapt the number of items initially loaded to cater for large screens, and load additional items automatically when the user scrolls down (sap.m.Table, property: growingScrolllToLoad).

Developer Hint
To change the growing behavior, create a responsive table with just the settings for the growing behavior, and hand it over to the smart table. The smart table then takes care of the rest (such as adding columns, and so on).
Developer Hint

  • The property tableBindingPath defines the path from which the data is fetched.
  • The property enableAutoBinding fetches the data automatically as soon as the corresponding OData model is initialized and the smart table is created.

Developer Hint
To change the selection mode, add a navigation indicator to single rows, or add a highlight to specific rows, you need to create a table with the corresponding settings. You do not need to define anything else. Hand this table over to the smart table. The smart table then takes care of the rest (such as adding columns, and so on). This method allows you to use the multi-selection plug-in with the grid table, tree table, and analytical table.

Column Visibility

  • Columns are created automatically. Items are rendered based on the properties and metadata of the underlying OData service (annotation: LineItem, properties: entitySet, tableBindingPath, initiallyVisibleFields, ignoreFields). A column is generated for each property.
Developer Hint
If a column needs to be in the model but should not be shown, you can hide it from both the table and the P13n dialog (property: ignoredFields, annotation: UI.Hidden).

Use this option if:

  • A column is needed to provide an ID that is used for navigation purposes only. However, you only want to display the corresponding text on the UI, and not the ID.
  • The values of a column are needed to perform calculations, but only the results are shown on the UI.

You can use the property requestAtLeastFields to request additional (technical) columns with every request, regardless of whether these columns are currently visible. This does not work with the analytical table.

The property ignoreFromPersonalization is only available with the analytical table. It loads additional key fields that are needed for aggregations but are never visible.

Developer Hint
Columns can be removed at runtime. This is useful if the same table is used for similar, but slightly different objects. For one of the objects, specific columns need to be shown, for others they must be hidden, and users must not be able to add them in the personalization settings (function: deactivateColumn).
  • You can define which columns are initially visible when the app is first launched. All other columns are initially hidden (annotation: PresentationVariant/ LineItem, property: initiallyVisibleFields).
Guidelines

  • Keep the number of initially visible columns to a minimum. Avoid pop-in behavior (responsive table) or horizontal scrolling (all other tables) on a tablet screen size in the default delivery (annotation: PresentationVariant/ LineItem).
  • Also keep the number of additional columns offered in the personalization settings to a minimum. You can use the P13n dialog to let users show/hide the columns. Select the columns offered in the P13n dialog carefully. Do not just show all columns available in the backend tables (annotation: sap:visible, value: false).

  • For each column that is initially visible, the LineItem annotation includes a DataField record, which allows you to influence the content rendering of the smart table.
    For columns that are initially invisible, the content rendering can also be influenced via the annotation DataFieldDefault.
Developer Hint
If the same column is defined via LineItem and via DataFieldDefault, LineItem wins.

Column Layout

  • For the grid table, tree table, and analytical table, a default column width is calculated for each column based on the data displayed in it (annotations: MaxLength, Precision, Scale). Apps can change this default width if it does not fit (annotation: CSSDefaults).
  • By contrast, the responsive table uses the same width for each column. To change this, use a custom column. End users cannot change the column width in the responsive table.
Guidelines
Choose a column width which avoids truncation for the initial data as well as for the column header label. If the default column width does not fit, change it.
  • If the automatically generated content does not fit for your use case, you can override the automatic behavior with your own column template.
    You can also add further columns. This allows you to provide columns with app-specific or inline actions, columns which show calculated values (based on more than one property), or – for responsive tables – columns that show more than one control.
Developer Hint
To add or override columns (“custom columns”):

  • Use an XML view to define the underlying table with just the columns to be added/overridden.
  • To override columns, provide the column key of the column you want to exchange.
  • Add this “unfinished” table to the smart table. The smart table adds all the automatically generated columns and additional features.

Make sure that the sortProperty and the filterProperty are set (define p13nData via the aggregation CustomData). If you offer the export to spreadsheet option,  ensure that it works as expected.

If you are using a responsive table, also make sure that the responsive behavior for this column works as expected (sap.m.Column, property: importance).

Column Headers

  • You can specify a column header text for each column (annotation: sap:label).
Guidelines
Provide a column header text for each column. (annotation: sap:label).
  • The column headers contain the following settings:
    • Sort
    • Filter: Opens the P13n Dialog. If this does not fit for your use case, exchange this menu item (property: enableCustomFilter)
    • Group (only analytical table, only on dimension columns)
    • Total (only analytical table, only on measure columns): This setting is not persisted (annotation: sap:aggregation-role, value: measure).
      If a column contains entries with different units of measurement, a Show Details link appears instead of the total. Clicking the link opens a popover showing the subtotals per unit of measurement.
    • Freeze (only available for grid table, tree table, and analytical table): Must be added manually.
Guidelines
Offer column totals by default for all columns where totals make sense (annotation: PresentationVariant).
Developer Hint
To add a Freeze option manually, declare the corresponding table inside the smart table in the XML view, and use the corresponding settings for this inner table.
Column header menu for a dimension column of an analytical table within a smart table
Column header menu for a measure column of an analytical table within a smart table

Content

The smart table provides two options for creating columns automatically:

  1. The smart table is rendered in either read-only or edit mode. In this case, the smart table renders the controls as described below. This is the default and recommended way to render content and fits for most use cases (property: editable).
  2. If users need to switch between read-only and edit mode at runtime, the smart table uses smart fields for both modes. This limits the rendering options (aggregation: customData, key: useSmartField, property: smartToggle), but also allows for:
    • Better control of the visibility of a field per row (smart field, annotation: FieldControl)
    • Use of value help for input fields

For option 1, the following controls are used:

Read-only Edit Annotations / Edm type Comment
Static text Text Input field Edm.String
Decimal numbers Text Input field Precision, Scale, Edm.Byte, Edm.Decimal, Edm.Double, Edm.Int16, Edm.Int32, Edm.Int64, Edm.SByte, Edm.Single
Status information Object status or Icon Input field CriticalityType,
CriticalityRepresentationType
Key identifier Object identifier (responsive table)
Text
(all other tables)
Input field for the ID SemanticKey,
Common.EditableFieldFor
Text and ID Text, object status, or object identifier Input field for the ID TextArrangement Use together with the annotation mentioned above for static text, status information, or key identifier.
Links with/without quick view Smart link Smart link SemanticObject Smart links can be customized using the aggregation: semanticObjectController
Dates Text Date picker sap:display-format, value: date,
IsCalendarDate
Dates and times Text Date/time picker Edm.DateTime, Edm.DateTimeOffset
Times Text Time picker Edm.Time
Fiscal periods Text Input field IsFiscalYear, IsFiscalPeriod, IsFiscalYearPeriod, IsFiscalQuarter, IsFiscalYearQuarter, IsFiscalWeek, IsFiscalYearWeek, IsDayOfFiscalYear
Amounts with currencies Two text controls Input field for the amount sap:semantics, value: currency-code In edit mode, the currency is shown as static text next to the input field.
Phone numbers Link Input field IsPhoneNumber Opens the system application for making phone calls.
Email Link Input field IsEmailAddress Opens the system application for writing emails.
Pictures Image Input field IsImageURL Only available for the responsive table. In edit mode, the input field contains the URL to the image.
Boolean Text Checkbox Edm.Boolean For read-only, the displayed text is Yes or No.

For option 2, the smart field is used in all cases.

For both options, the smart table automatically takes care of the content alignment and formatting (except for custom columns).

Input fields can be accompanied by a value help dialog (annotation: ValueList). If annotated, triggering the value help button opens a value help dialog. Within this dialog, you can provide a search field (annotation: ValueList, property: SearchSupported).

If no ValueList annotation is provided, you can restrict the number of characters for an input field (annotation: MaxLength).

You can provide additional controls, such as micro charts, rating indicators, progress indicators, and buttons, as custom columns (using an XML view). For custom columns, you must provide any read-only and editable content manually.

Guidelines
For inline actions, use a text-only or an icon-only button. Make sure the icon communicates the function clearly enough. Otherwise, use a text-only button.

If the smart table is used with the responsive table, you can show the status of an item by displaying a highlight indicator on the left of the item (property: highlight).

Behavior and Interaction

The behavior is generally inherited from the underlying table, toolbar, variant management, export to spreadsheet, and P13n dialog (see the corresponding articles for details.) Note that the smart table provides limited options and not all settings of the underlying controls are available.

Empty Tables

If there is no data to show, the smart table renders a default text. This text can be overwritten by the app development team. The default texts are:

  • If a table is initially empty:
    No items available.
    Overwrite this whenever a hint can be provided on how to fill the table with data.
    (property: initialNoDataText, value: $NO_FILTERBAR)
  • If a table is used together with a filter bar (as in the list report), and is initially empty, use the following text:
    To start, set the relevant filters.
    (property: initialNoDataText, value: $FILTERBAR)
  • If a table is used together with a filter bar and the filter does not return results, use the following text:
    No data found. Try adjusting the filter settings.
    (aggregation: noData, changeable at runtime)
  • If the user has hidden all of the columns in the personalization settings, the following text is shown:
    Right now, there are no visible columns in the table. Please select the columns you need in the table settings.
    This text cannot be changed.
Guidelines

  • For all other cases, provide instructions on how to fill the table with data (aggregation: noData).
  • The “no data” text can be exchanged at runtime. Use specific texts for different situations.
  • Avoid displaying a table without any items, especially when the app is initially loaded.

An empty smart table

Responsiveness

The smart table acts exactly like the embedded controls. For details see:

  • Toolbar Overview
  • Infobar
  • Responsive Table via auto pop-in mode
    (sap.ui.comp.smarttable.SmartTable, property: demandPopin, value: true).
    You can use the UI.Importance annotation to influence the priority of each column.
    You can provide a Show Details button to let users show/hide columns with low importance (property: showDetailsButton).
  • Grid Table, Tree Table, Analytical Table:
    These controls are not intended for use on smartphones. If you use a smart table with this configuration, ensure that you implement a fallback solution for small screens.
Guidelines
If used with the responsive table, enable the pop-in behavior (sap.ui.comp.smarttable.SmartTable, property: demandPopin, value: true). Ensure that the most important columns stay in the tabular layout as long as possible (annotation: UI.Importance). The most important columns are those that contain the following information:

  • The column that identifies the line item.
  • The column that contains the key attribute.

Examples

Responsive table within a smart table
Grid table within a smart table

Top Tips

  • If you are using the responsive table, enable and configure the auto pop-in mode and use the Show Details / Hide Details button.
  • For custom columns, follow the guidelines of the respective table. If needed, use responsive paddings for aligning the content.
  • Enable only the features that are needed for your use case. Very small tables do not need to be sorted, filtered, grouped, and rarely exported. Don’t just add unnecessary features for consistency purposes.
  • If the page has a filter bar, don’t offer filtering for the table.
  • If you are using custom columns, make sure that any export and personalization features you are using also work for these columns.

Properties

The following properties are available for sap.ui.comp.smarttable.SmartTable:

  • The property: toolbarStyleClass is deprecated. Do not use it.
  • The property: useOnlyOneSolidToolbar is deprecated. Do not use it.

Related Links

Elements and Controls

Implementation

3D Viewport

You can use the the 3D viewport control to enable 3D viewing in your SAP Fiori application. This control is available in the Visual Interaction toolkit library. The 3D viewport control can display simple and complex 3D objects in SAP Fiori, and offers basic user interaction with the 3D environment and its objects.

3D objects in the 3D viewport control

You can use the 3D viewer in various locations in the app, such as the object page, the dynamic side content control, dialogs, or popovers.

Usage

Use the 3D viewport control if:

  • You want to show 3D models in an SAP Fiori environment.
  • You want to let users view 3D files in the browser without downloading any browser plugins.
  • You want to enable users to interact with 3D models stored locally or remotely.
  • You want to load multiple 3D models at the same time.

Do not use the 3D viewport if:

  • There is not enough space for users to interact with 3D content (in other words, the 3D viewport is too small to interact with 3D models).
  • You require simple visual representations of objects or functions. In this case, use sap.m.Image instead.


Developer Hint
The 3D viewport control was designed to help developers load and display 3D content quickly and easily. It does not require knowledge of 3D space or the programming techniques needed for correct data visualization.

If you need more control over the elements in the 3D viewport, or if you require extended functionality, you can use an API within the Visual Interaction toolkit to manipulate or interrogate 3D content.

The 3D viewport control uses the SAPUI5 logging mechanism to log various messages, which may include information, warnings or errors. For more information, see the SAPUI5 log page: https://ui5.sap.com//sdk/#/api/jQuery.sap.log

Responsiveness

If you use the 3D viewport in conjunction with SAP Fiori page layouts or floorplansresponsiveness is determined by the respective layout or floorplan, such as the dynamic page layout or flexible column layout.

The 3D viewport adjusts its size to fit within the available space.

Example: 3D viewport within an object page - Sizes XL/L, M, and S

Behavior and Interaction

The 3D viewport supports a range of specific mouse and touch gestures by default. The available gestures are determined by the viewport component with which you interact.

When a 3D model is loaded into the 3D viewport, you can pan, zoom, rotate, and click or tap the model with the following actions:

Action Touch Gesture Mouse Gesture Keyboard Shortcut
Select or deselect an object in the scene Tap Left click N/A
Zoom onto and visually focus on an object in the scene Double tap Double click N/A
Rotate the scene Tap and drag Left click + drag Cursor keys
Pan the scene Two-finger tap and drag Hold mouse middle button and drag

or

Hold both left and right buttons and drag

Shift + cursor keys
Zoom out of the model Pinch Mouse wheel scroll forward

or

Right click + move mouse up

Minus key (-)
Zoom into the model Stretch Mouse wheel scroll backwards

or

Right click + move mouse down

Plus key (+)


The recommended selection behavior is known as “sticky” selection (default):

  • When a user clicks on an object, it is marked as selected.
  • Clicking another object selects that object, along with all previously selected objects.
  • Clicking a selected object deselects it.
  • Clicking empty space deselects all objects.
Information
There are no keyboard shortcuts for object selection. As a scene can have thousands of objects, direct interaction with the Viewport using a pointing device is required to select objects.

Resources

Want to dive deeper? Follow the links below to find out more about related controls, the SAPUI5 implementation, and the visual design.

Elements and Controls

No links.

Implementation

Map

Maps are used to visualize data in an easy and intuitive way. A map is a symbolic visual illustration of areas, regions, and themes. SAP Visual Business supports analytic maps and geographic maps.

The analytic map shows regions such as continents or countries. Another term for this kind of map is a choropleth map.

In the context of a business application, the analytic map is useful for displaying quantitative or qualitative data by coloring various regions.

The analytic map is the best choice if you want to visualize region-specific values, such as for visualizing the sales revenue for different countries.

Analytic map
Analytic map

The geomap displays geographic elements like roads, cities, forests, and other details and is mostly used for navigation. In the context of a business application, a geomap is useful for displaying points of interest, area objects, or other charts over the map.

The geomap is the best choice if you have location-based data, and you want to show a road map, satellite map, or another specialist map in the background. For example, a geomap is good for visualizing the revenue of stores.

Geomap
Geomap

In addition to the analytic map and geomap control, the SAP UI5 map container control provides you with a toolbar on top of the map. It also enables you to switch between maps and charts, includes personalization, provides a full screen mode, and enables you to include a list panel stack for displaying content on top of the map.

Components

A map can include any of the following elements:

  • Toolbar (optional)
  • Navigation tools:
    • Legend (optional)
    • Navigation control (optional) and scale (optional)
  • Symbols for improved visualization of use cases:
    • Spots (optional)
    • Labels (optional)
    • Circles/geocircles (optional)
    • Areas (optional)
    • Routes (optional)
    • Container (optional) – here an arbitrary SAPUI5 control or chart can be shown on a map

Toolbar

If you need a toolbar, use the SAP UI5 map container control.

Navigation Tools

Legend

A panel containing a legend is displayed and expanded by default. You can collapse, expand, hide, or move the legend anywhere on the map if necessary.

The legend can be used interactively, in which case you have to enable the legend click event, which is provided by the control.

Legend
Legend

Navigation Control and Scale

Use the navigation control only if you do not use the chart container toolbar.

The navigation control is responsive and adapts to mobile and desktop devices. For mobile devices, the zoom function is visualized by using “+” and “”, while an extended navigation tool is used for the desktop version.

The scale of a geomap is shown by default, although for analytic map it is not.

Desktop navigation
Desktop navigation
Navigation for mobile devices

Symbols for Improved Visualization of Use Cases

Spots

You can use spots to visualize specific locations on the map. There are five different types of spots: the default blue spot without any semantic value and the four semantic spots with icons. Adding numbers or text to a spot will replace an existing icon on the spot.

If you want to use a number with more than one digit, or text with up to five characters, you can use the relevant predefined spots that are provided. Spots are available for numbers containing up to one, three, and five digits. For text, spots are available for up to five characters (in all five colors). Use the label for numbers or text that exceed these limits. Ensure that numbers and texts on spots are not translated; if this is necessary, use labels.

Default spot
Default spot
Spots with default icons
Spots with numbers or text

Labels

You can use a label to provide more information about a symbol. The label supports multiple lines and should be equally aligned for a group of symbols; for example, use the same alignment for all labels of spots.

For routes, the position of the label adapts to the map section. In other words, the label moves on the route so you can always see it at any zoom level. If a label is not sufficient, we recommend you use a container with the appropriate SAPUI5 control.

The label is available in five different colors: the default (neutral) white label and the semantic labels. The label adapts to the number of digits, and the content of the labels is translated if necessary.

In cases where a spot is insufficient, for example, if you want to include content that needs to be translated or that exceeds five characters, you can use a label instead of a spot. The label is available in four semantic colors, with or without anchors. It can be used as a standalone without any other symbols, like spots or routes.

Default label on a route
Standalone labels with semantic colors, with and without anchors

Circles/Geocircles

You can use circles to visualize specific, quantitative parameters, while geocircles can be used to visualize specific sizes or measures. The difference between circles and geocircles is as follows:

  • Circles: Radius is given in pixels – constant screen size.
  • Geocircles: Radius is given in meters – constant size in reality.

A use case for circles on a map might be to show the size of the biggest towns in a region or the revenue of a company per production location.

Analytic map displaying two parameters
Geomap with circles
Geomap with circles

Areas

You can visualize personalized areas. This can be used, for example, for visualizing regions such as countries or zip code zones.

Analytic map with areas (based on regions)
Geomap with areas
Geomap with areas

Routes

Routes can be displayed on maps with varying levels of detail, such as a map of the world or a local/national map depicting transport networks. For both levels of detail, app developers can adjust the following properties:

  • Dot width: The default dot width for a route is zero, which results in a solid line. You can adjust the dot width to enable dotted or dashed lines, or a combination of dots and dashes.
  • Route width: App developers can choose an appropriate route width. We recommend a route width of 3 px.
  • Color: We recommend that you use the SAP Fiori chart colors.
  • Arrow head: The route does not have an arrow head by default. You can enable an arrow head for the start and end points by changing the start or end property to 1.
  • Direction indicator (only if arrow heads are enabled): The direction indicator is not set by default. If the direction of a route should always be visible, you can use the direction indicator, which displays additional arrows/triangles on the route as soon as the start or end point arrows are outside the visible area. In addition to the direction indicator, we recommend that you also use a white borderline.
  • Borderline: No borderline is set by default. For accessibility reasons, we recommend that you only use a borderline to make a route more visible on the map.
  • Curved route: Routes are displayed as straight by default. You can change them from straight to curved to display flight routes or bidirectional routes.

For accessibility reasons, we recommend that you use not only color, but also dot width for differentiation purposes. For example, use a solid line for planned routes and a dashed line for unplanned routes.

Analytic map with route
Analytic map with flight routes
Geomap with route
Geomap with route

Container

You can use containers to display an arbitrary SAPUI5 control on the map. The map control only provides the container. The default container is transparent without a border. The app team can personalize the container (in terms of fill, border, and size) and add an arbitrary SAPUI5 control.

Analytic map with container containing another SAPUI5 control

Behavior and Interaction

Zoom

There are four ways of performing a zoom:

  • Navigation tool: use the navigation controls to zoom in and out.
  • Mouse wheel: use the mouse wheel to zoom in and out.
  • Gesture: on a touchscreen, use the ‘pinch and spread’ gestures.
  • Keyboard: use the ‘+’ and ‘-‘ keys to zoom in and out, or use the ‘Z’ key to use the rectangular zoom.

Thumbnail Mode (Minimized Map Control)

The map control can be minimized to a thumbnail, which can be used for tiles on the SAP Fiori launchpad or for the object page. Note that the thumbnail is a full-scale VBI control. If you use data binding, the thumbnail is updated automatically.

The app development team can specify the size of the thumbnail.

In the minimized state, only the thumbnail click event is available; all other mouse, keyboard, and touch events are disabled.

Clustering

To avoid cluttered screens with too many objects on the map, you can use one of three cluster algorithms:

  • Grid clustering: Visual objects are clustered based on a grid. You can have multiple grid-based clusters. The visualization object is placed in the center of the grid cell with a specified offset.
  • Tree clustering: Complex clustering based on Voronoi diagrams. The clustering itself is based on the areas in the Voronoi diagram, and cluster objects are aggregated to a hierarchy over several levels of detail.
  • Distance clustering: Visual objects are clustered based on the visible distance between them. Objects are aggregated to a cluster object as long as they are within a specified range from the start object. The start object of a cluster is not specifically defined; only the nearest object that does not belong to a cluster is taken. The visualization objects are placed in the center of gravity of the covered objects. Thus the actual distance between them may vary. This type of clustering is fast, but the results may not be very convincing.

The control for visualizing clusters provides cluster icons in the four semantic colors (four types). If no type or text has been set, the default neutral, gray cluster is used. App developers can personalize the icons provided as follows:

  • Change color
  • Change icon
  • Add text
  • Replace the cluster icons provided with their own
Default cluster
Default cluster
Cluster icons provided (four types; without text)
Unclustered spots
Unclustered spots
Example: distance clustering with personalized semantic cluster icons
Example: grid clustering with personalized semantic cluster icons

Select

You can choose different selection modes: single selection to select a single item, and rectangular or lasso selection to select multiple items. You can also use the Shift key to add items to an existing selection, and the Ctrl key to select/deselect items.

Single Selection

This is the default selection mode. You can click your mouse button to select an object, while at the same time deselecting a previously selected object.

Rectangular Selection

You can switch to rectangular-selection mode by pressing the ‘R’ key. The cursor changes and you can use your left mouse button to draw a rectangle. Each object that lies within the rectangle is considered selected. Press the ‘R’ key again to leave this selection mode and return to single-selection mode.

Lasso Selection

You can switch to lasso-selection mode by pressing the ‘A’ key. The cursor changes and you can use your left mouse button to make a lasso selection. Each object that lies within the lasso is considered selected. Press the ‘A’ key again to leave this selection mode and return to single-selection mode.

View Tooltip

For desktops, a tooltip is enabled to provide additional information about the symbol.

Keyboard Shortcuts (desktop only)

Action Shortcut
Lasso selection A
Rectangular selection R
Zoom in +
Zoom out
Rectangular zoom Z
Move ← ↑ → ↓
Go to initial start position H

Styles

Analytical Map

Colors

For general rules about using colors in charts, see Chart – Color Palettes. You can define colors programmatically for each region.

Default Colors

Water and regions have default colors. The color of water cannot be changed. The color of each region can be changed individually. Keep the default color if the region has no data.

Default colors for analytic map

Regions Only

Colors from Qualitative Palette

Use colors from the qualitative palette to highlight particular regions. Use the first color of the qualitative palette. Also use colors from the qualitative palette to separate regions into distinct groups. Note that colors from the qualitative palette have no semantic value. For example, do not choose a color because it is blue or green as the hue associated to these colors may change in the future or may be customized by the customers. Start by using the first color and then the second color and so on, unless there is a good reason for not doing so. If there is no data for a region, keep the default color.

Map with one color
Map with one color
Map with multiple qualitative colors

Colors from Sequential Palette

Use colors from the sequential palette to encode quantitative differences, that is, to visually represent the idea of level, progression, or graduation. If there is no data for an item, keep the default color. See the section on How to Use the Sequential Palette in the Chart – Color Palettes article.

Map with colors from the sequential palette

Colors from Semantic Palette

Use colors from the semantic palette to show that data points are bad, neutral, or good. If there is no data for an item, keep the default color.

Map with colors from the semantic palette

Colors for Symbols

Symbols and Regions

Map with Circles/Geocircles

If you need to display circles over a map and use sequential colors for the regions, use the sequential palette with the following colors:

Region Circle After
Multiple brightness of the first hue sapUiChartPaletteSequentialHue2; Opacity: 60% @sapUiLightestBorder

See the section on How to Use the Sequential Palette in the Chart – Color Palettes article.

Visualizing two parameters of interest

Guidelines

General Guidelines

  • If you want to include a toolbar and/or show additional content on a map, use the SAP UI5 map container control.
  • Use the sequential color palette if there are no more than six different states. If you have more than three states, we recommend that you use the tooltip or legend in addition to the colors to provide detailed information. The reason for this is that the contrast of the colors for maps is too low to differentiate all colors at first glance. The sequential palette aims to highlight the most interesting states by using the darkest and the lightest color.
  • Use the qualitative color palette if you want to visualize various states that are independent of each other, such as election areas.
  • Use the semantic palette if you want to express good versus bad states, such as with revenue figures.
  • If you want to display two regions with specific parameters, a combination of coloring the regions and using circles would be the best choice. Avoid overlaps by providing different aggregation levels at different zoom levels. Note that there could be problems with relating a parameter to the radius of a circle because a user will compare the area and not the radius. The area has a quadratic relation to the radius. Consequently, a smaller number looks very small and cannot be visually compared with other values.

Resources

Want to dive deeper? Follow the links below to find out more about related controls, the SAPUI5 implementation, and the visual design.

Elements and Controls

Implementation

Breadcrumb

A breadcrumb (or breadcrumb trail) is a type of secondary navigation that indicates the position of a page in its application hierarchy. It is typically used for drilldown scenarios where users navigate through related object pages, tables, and charts.

Usage

Use a breadcrumb if:

  • You want to show secondary navigation on the object page
  • You want to show navigation in a table
  • You want to show navigation in charts

Use a breadcrumb only when the drilldown scenario leads to related object pages: parent object page / child object page 1 / child object page 2 / child object page 3.

Do not use a breadcrumb if:

  • Your hierarchy contains only one level.

Do not include these elements in your breadcrumb path:

  • Other floorplans, such as overview pages and list reports
  • Cross-application navigation to other object pages
  • Standalone object pages, such as fact sheets

These cases are covered in the global navigation concept for SAP Fiori 2.0.

Responsiveness

Breadcrumbs are responsive. If there is insufficient horizontal space, the links in the breadcrumb trail collapse into a dropdown menu (sap.m.Select):

  • The first link in the breadcrumb (the point of origin) collapses first, followed by the next link in the hierarchy.
  • The last element in the breadcrumb is always visible, and should never collapse into the dropdown menu.
  • The last element is truncated if the horizontal space is insufficient.
Breadcrumb – Size L
Breadcrumb – Size L
Breadcrumb – Size M
Breadcrumb – Size M
Breadcrumb – Size S
Breadcrumb – Size S
Breadcrumb – Size S (dropdown menu selected)

Layout

The horizontal layout of the breadcrumb never changes. Links always appear next to each other.

Types

There are two types of breadcrumb:

  • Standard breadcrumb
    The standard breadcrumb shows the current page as the last item in the trail. The last item contains only plain text and not a link.
  • Breadcrumb without the current page
    Use this breadcrumb for the object page only. The breadcrumb shows the position of the object page in the application hiearchy, without the current page. All items in the breadcrumb are links.
Standard breadcrumb
Standard breadcrumb
Breadcrumb without the current page

Components

A breadcrumb can contain both links and text (standard breadcrumb), or just links (breadcrumb without current page).

Behavior and Interaction

Navigation

The purpose of the breadcrumb is to trigger navigation. The action is triggered when the user clicks a link in the breadcrumb trail.
For link behavior and interaction, see Link.

Styles

You can define the style of the separator between the breadcrumb links using the separatorStyle property.

The available values are:

  • Slash
  • Backslash
  • Double slash
  • Double backslash
  • Greater than
  • Double greater than

To find out about the different link styles, see Link.

Guidelines

  • In the dropdown menu on desktop and tablet devices, show only the links that are not visible in the breadcrumb trail.
  • In the dropdown menu on smartphones, show all the links in the breadcrumb trail in their hierarchical order.

Resources

Want to dive deeper? Follow the links below to find out more about related controls, the SAPUI5 implementation, and the visual design.

Elements and Controls

Implementation

Select

The select control (also known as a dropdown) is commonly used to enable users to select an item from a predefined list.

Usage

Use select if:

  • Users need to select one item exclusively from a short list of options (for example, fewer than 12 items).
  • The values of the option list are of secondary importance and do not need to be displayed right away.

Do not use select if:

  • Users need to choose between two options, such as On or Off and Yes or No. In this case, consider using a switch control instead.
  • Users need to pick one item from a very large set of options. In this case, consider using the combo box instead.
  • You need to display more than one attribute. In this case, consider using the input field with a select dialog or a value help dialog instead.
  • The user needs to search on multiple attributes. In this case, consider using the input field with select dialog or value help dialog instead.
  • Your use case requires all available options to be displayed right away, without any user interaction. In this case, consider using radio buttons or a radio button group instead.
Information
For more information on which selection control to choose, see the selection control overview.

Responsiveness

The display of the select control depends on the device. On smartphones, the selection list takes up the whole screen. On desktop and tablet devices, it appears as a popover.

Size S

Select option list in full screen - Size S

Size M

Select option list – The option list opens above the field if there is not enough space below it - Size M

Size L

Select option list – The option list opens above the field if there is not enough space below it - Size L

Layout

The select control can be placed in toolbars, such as chart toolbarsfooter toolbars, or header toolbars, as well as in forms or tables:

Components

Select Trigger

The trigger to open the option list is either the Select field (1), which also displays the current selection, or an icon (3).

Option List

The option list (2) displays all the items available to the user. The selection is always highlighted. Selecting another option from the list moves the highlight to the selected option.

Full Screen Title Bar for Size S

Opening the select control on a smartphone brings up the option list in full screen mode. The full screen mode can be closed using the icon on the top right corner (5).

You need to set a title for the full screen mode (4). We recommend the following format:

Single selection

Select [Entity]

Example: Select Product

Multi-selection

Select [Entities]

Example: Select Products


Anatomy of the select control
Anatomy of the select control - Size S

Behavior and Interaction

Clicking

The Select field always displays the current selection. The user clicks the field to display a list of options to choose from. Once the user selects an option, the list box closes and the selected option is displayed in the field. If there is no Select field but an icon, the user clicks the icon to open the list of options. The currently selected item is always highlighted in the list to help the user identify what has been selected.

Guidelines

Option List

The option list can contain either text-only values (a) or text values with an icon in front (b). Keep the text values as short as possible because the list uses single lines only. Values that are too long may be truncated. This is especially important when you use icons.

Only use icons if they help users better identify or understand the presented options. To set icons, use the icon property for each list entry.

If you need to indicate that none of the selection options are selected, or you need to allow the user not to select an option, provide (None) (1) as an option and place it at the beginning of the list.

If you need to indicate that all items apply, for example, as a list filter, provide All as an option and place it at the beginning of the list.

If your use case requires a blank input field instead of (None), use a combo box instead.

If the select control is placed in a toolbar with an icon as a trigger for sorting, grouping or filtering a set of items, consider the following guideline:

Sort, Group, and Filter:

  • (Not sorted)
    Note: In most cases, this option is not necessary; just show the default sort settings instead.
  • (Not filtered)
  • (Not grouped)

For more information about the toolbar, see toolbar overview.

Define a default selection whenever possible (2). If the selected item is not specified, the first one is selected.

(a) Text-only version; (b) icon and text
(1) Selection option list with (None); (2) first value selected

Label

The select control can be displayed with or without a label. If the field is attached to another field, you do not need to define a second label.

Information

Do not provide a blank value to indicate that nothing is selected.

Sorting

The sort option list contains all the items that are available to the user. Choose one of the following styles to order the content:

Logical: Sort items into a meaningful order. Group related options together and show the most common options first, followed by less common options. Sort the options alphabetically if more than eight select options are available. This helps the user find the right option quickly.

Example of logical sorting

Alphabetical: Sort currencies, names, and similar content alphabetically.

Example of alphabetical sorting

Numeric: Sort numeric values into a sequential order, with the lowest number first.

Example of numeric sorting

Chronological: Sort time-related information into chronological order, with the most recent first.

Example of chronological sorting

Width

The select control is usually used in forms, where the width is determined by the form element or container in which the select control is embedded.

If you need to restrict the width to a defined value, you can set the width accordingly. However, we do not recommend defining a fixed width. Where possible, use layout containers (such as a form, simple form, or responsive grid layout), and define the width via the layout data property.

Do not allow the control to auto-adjust based on the selection.

Information
If the text length is fixed and doesn’t require localization (for example, currency codes), consider reducing the width.

Width of the Option List

By default, the width of the option list adapts to the width of the longest entry. The maximum width of the option list is set to 600 px.

Maximum width of the option list

Text Wrap in the Option List

The option list doesn’t support horizontal scrolling. By default, entries that exceed the maximum width of 600 px for the dropdown are truncated. If you expect the dropdown to contain longer entries, we recommend wrapping items in the option list to enable users to read the full text, (property: wrapItemsText). If wrapping is enabled, the text can wrap to multiple lines.

Option list with wrapped text

Unit of Measurement

You can use the layout options of the form to can add the unit of measurement (UoM) after select. Apps can use the label-field ratio to show the UoM after the field. However, you must make sure that the UoM is properly visualized and doesn’t wrap to the next row.

Developer Hint

For accessibility purposes, you can use “ariaDescribedBy” from the input control.

Semantic Colors

Different value states or meanings can be indicated by using semantic colors. The visual states are shown below in their regular state (left) and focused (right). Note that the positive/success state does not show a message on focus.

For more details on the correct usage, see How To Use Semantic Colors.

Neutral
Neutral
Neutral (focus)
Neutral (focus)
Information
Information
Information (focus)
Information (focus)
Success
Success
Success (focus)
Success (focus)
Error
Error
Error (focus)
Error (focus)
Warning
Warning
Warning (focus)
Warning (focus)

Value State Text

The select control can display the value state text even if the dropdown is open. This ensures that the value states are shown in all situations and on all devices. When the user opens the dropdown, the value state sticks to the top and does not scroll away. The control also supports multi-line text for the value state.

Value state text displayed when the dropdown is open

Read-Only

The select control can be displayed as read-only (property: editable, default = “true”). If the editable property is set to “false”, interaction with the control is disabled. The control remains focusable, but the background and border are changed to indicate that it is read-only.

Select read-only
Select read-only

Resources

Want to dive deeper? Follow the links below to find out more about related controls, the SAPUI5 implementation, and the visual design.

Elements and Controls

Implementation

Standard List Item

The standard list item is a type of list item used in simple lists. You can use it to display a simple data point (title) or a set of data, such as a product title and a few product attributes.

Standard list item with title only
Standard list item with image, title, and short description

Usage

Use the standard list item if:

  • You want to display a simple set of data in a list.
  • You want to display a simple set of data as part of a list within the select dialog.

Do not use the standard list item if:

Components

The standard list item can consist of the following parts:

  • Title (mandatory). By default, the title font is larger if there’s no description. If you have list items with and without a description, this results in differently sized titles that are harder to read. In this case, switch off the title size adaptation (property: AdaptTitleSize).
  • Visual: icon or image (optional): Either displayed in the form of an icon from the SAP icon font or as an image.
  • Short description (optional).
  • Status (optional): This semantic information is equivalent to the object status. It’s usually displayed as colored text and displays the status. As an alternative, you can invert the display to place a stronger focus on the status (property: infoState). Use the inverted display only if the status is critical for your use case and requires immediate action.
Standard list item with all options (image, title, short description, status)

Responsiveness

The title and short description can wrap and truncate. However, we recommend keeping the text as short as possible. The semantic information text is always displayed in full.

Standard list item with a truncated title
Standard list item with wrapped and truncated title and description

Behavior and Interaction

The list item behavior is identical for all list item types. For more information, see the interaction details in the list overview article.

Examples

Here are a few examples of standard list items:

Standard list items in a list
Standard list item with a title and status
Standard list item with a title and short description
Standard list item with a title, short description, and status
Standard list item with an icon, title, and short description
Standard list item with an icon, title, short description, and checkbox for selection

Resources

Want to dive deeper? Follow the links below to find out more about related controls, the SAPUI5 implementation, and the visual design.

Elements and Controls

Implementation

Rating Indicator

The rating indicator can be used to rate content or to indicate a rating. It enables users to rate an item on a numeric scale. The most popular scale is 1 (lowest) to 5 (highest).

Rating indicator
Rating indicator

Responsiveness

The rating indicator runs on all form factors and therefore works on all devices. It is embedded in a container and thus behaves as part of it.

Rating indicator as part of a form – Size S
Rating indicator as part of a form – Size M

Layout

Context

You can use the rating indicator in forms, tables, in a dialog box, or in the filter bar.

Rating indicator as part of a form
Rating indicator in the filter bar / as part of a table
Rating indicator as part of a dialog

Popover with Details

In collaborative rating scenarios, the rating indicator shows an average of all ratings. You may show the sum of ratings in brackets behind the rating indicator as a text or link. You may also add a popover that shows the detailed ratings for the average of all ratings.

Rating details in a popover

Behavior and Interaction

Hover

When the user hovers over the rating indicator, a different icon or image is shown (property: iconHovered). This is an orange star by default.

Select

If enabled for rating, the rating that the user previously selected is shown. When the user performs a rating, an event is triggered.

Types

There are two types of rating indicators:

  • Interactive – used for rating an item
  • Disabled

As the non-interactive state (rating result preview) is not available currently, use the disabled state instead.

Interactive state
Interactive state
Non-interactive state
Display mode
Display mode
Disabled
Disabled

Properties

Rating Symbols

You can also specify the URLs for the images or icons that are used as rating symbols (property: iconUnselected). Five star symbols are used by default. Although you can use other images or icons, we generally recommend that you use the star symbol. You can only choose 1 symbol for the unselected and 1 for the hovered state.

Number of Rating Symbols

You can specify the number of rating symbols (property: maxValue). We recommend using a maximum of 7 symbols, although 5 symbols are preferred.

Float Values

Float values can be visualized as a half or full star (property: visualMode). The rating indicator can display a half star only in preview mode (disabled).

Size of Rating Symbols

The recommended sizes of the image or icon to be displayed are:

  • Large: 2 rem (32 px)
  • Normal: 1.375 rem (22 px) – default
  • Small: 1 rem (16 px)
  • XS: 0.75rem (12px)
Possible sizes of a rating indicator: L, M, S, and XS

Resources

Want to dive deeper? Follow the links below to find out more about related controls, the SAPUI5 implementation, and the visual design.

Elements and Controls

Implementation

Smart Link

Intro

Like the quick view, the smart link triggers a popover from a text link. This popover shows additional information, such as simple object details, and offers links to related apps for the user to take action. The user can choose which links are shown in the popover by selecting them in a separate dialog.
The smart link is a smart control that uses metadata annotations to offer user-specific navigation. It analyzes the user’s assigned apps and offers only relevant navigation targets.

When to Use

Use the smart link if:

You want to offer direct navigation to a related app. For example:

  • Navigate from a product list to the app for changing the pricing
  • Navigate from a sales order list to the app that shows a customer’s balance

You want to show a popover with contextual information or navigation. For example:

  • Offer navigation to multiple related apps
  • Display simple object details

Do not use the smart link if:

  • You want to display more or complex information about an object. Use the object page or charts instead.
  • No metadata is accessible, and only a direct link to a website, document or application is needed. Use the standard link instead.
  • You need to structure information in a deeper hierarchy. Use the quick view or a list drilldown instead.

Components

The smart link popover contains the following areas:

  1. The header bar of the smart link popover is only visible on mobile devices (see example image for responsiveness, size S).
  2. The title area contains a title and a subtitle. You can also show the title as a link, which can be used to navigate to the corresponding object or fact sheet. You can use the subtitle to show an object ID, for example.
  3. The content area shows object-related information, such as details about a product or contact information. You can use any UI control, based on what best fits your use case.
  4. The link area offers links to all other apps that are relevant for a user role. The link list includes all semantic objects defined for the app, and can also include additional links defined manually by the application development team. The link area can have two states:

Link area is empty:
If no links have been selected for the app, or if there are more than 10 links, the link area is initially empty. Instead, the user sees a Define Links button, which opens a dialog for selecting the links to be shown.

Links are shown:
As soon as the link area contains links, the button text changes to More Links. This opens the same selection dialog.

Only the header bar is mandatory (for mobile devices). All the other sections are optional. For example, you might choose to show only a content area or a only a link area, depending on your use case.

The areas of the smart link (header bar not shown)

Behavior and Interaction

The smart link and its popover are always triggered by clicking a text element that appears as a link. You can place this text element in any list, table, or other container. You can also set the link label individually. Clicking outside the popover closes it. If only one link is offered, and there is no additional information, the smart link control navigates directly to the target without opening the popover.

If the semantic object annotation is not set, the smart link is rendered as sap.m.Text by default. However, you can also opt to render any other control.

Link Selection Dialog

Clicking the More Links or Define Links button opens the Define Link List dialog. There, the user can select the app links to be displayed in the link area. The links offered in the selection list are modifiable semantic objects suggested by the smart link control. The app team can remove links from the selection list, change the link texts, or manually add links to any website or app.

Exception: Within SAP Fiori elements, the links offered in the Define Link List dialog are generated automatically. App teams cannot adapt the list.

You can switch off the More Links / Define Links option by setting the property enableAvailableActionsPersonalization to “false”. By default, it is set to “true”.

Smart Links in a Smart Table

Within a smart table, the link label of the smart link is set automatically using the semantic object annotation. In other words, you can’t change the description. If there are no navigation targets, the smart link is rendered as sap.m.Text.

Define link list dialog with a list of application links

Responsiveness

The responsiveness of the smart link is based on the responsiveness of the popover that overlays the content.

On desktop devices, clicking anywhere outside the popover closes it.

On mobile devices, the smart link opens a full screen dialog with a Close icon ( ) on the top right.

Size S – On smartphones, the smart link overlays the content
Sizes M/L/XL - Smart link shown in a table on a desktop device

Top Tips

  • Check the related apps you offer carefully. Only display those that are relevant for the user.
  • Use meaningful link names in the link area. Do not use the same link name more than once. If necessary, rename the links to suit your context (for example, “Add Product” instead of “Manage Products”).

Related Links

Elements and Controls

Implementation

Table Personalization Dialog

The table personalization dialog allows you to display and modify table settings. It is a UI pattern that defines the column order and visibility.

Usage

Use the table personalization dialog if:

  • You have small tables.
  • You have a manageable number of columns.

Do not use the table personalization dialog if:

  • You have large tables.
  • You have a lot of columns to manage.

For larger tables you can use the P13n dialog (sap.m.P13nDialog) instead.

Responsiveness

On a desktop and tablet, the control appears as a dialog window.

On smartphone devices, always display the table personalization dialog in full screen mode.

Table personalization dialog - Smartphone - Size S
Table personalization dialog - Tablet - Size M
Table personalization dialog - Desktop - Size L/XL

Layout

Position on the Screen

The dialog always opens in a modal window in the center of the screen.

For smartphones, stretch the dialog to fill the entire screen. For tablet and desktop devices, keep the modal window.

Layout of the Dialog

The table personalization dialog comprises the following five areas:

(1) Header

(2) Toolbar

(3) Subtoolbar

(4) Column list

(5) Footer toolbar

Table personalization dialog – Overview

Components

The table personalization dialog contains the following sections:

Header

The header displays the dialog title and the Reset button to revert to the initial state.

Table personalization dialog – Header

Toolbar

The toolbar displays the Move Column Up and Move Column Down buttons and the Search field.

Table personalization dialog – Toolbar

Subtoolbar

The subtoolbar displays the Select All checkbox for selecting all columns.

Table personalization dialog – Subtoolbar

Column list

The column list displays the available columns. The user can filter the selection using the search field in the toolbar.

Table personalization dialog – Column list

Footer toolbar

The footer toolbar displays an OK and a Cancel button.

Table personalization dialog – Footer toolbar

Behavior and Interaction

Open the Dialog

To open the table personalization dialog, the user clicks the  (Settings) button on the right-hand side of the table toolbar.

Table personalization dialog – Table
Table personalization dialog – Open dialog

Show or Hide Columns

To show or hide columns, the user selects or deselects the checkbox for a column (list item).

(1) Columns are visible in the table.

(2) Columns are hidden in the table.

Table personalization dialog – Show/Hide

The user can also show or hide all columns with just one click. A checkbox on the left-hand side of the subtoolbar enables all list items to be selected or deselected.

(1) Columns are visible in the table.

(2) Columns are hidden in the table.

Table personalization dialog – Show all
Table personalization dialog – Hide all

Move Columns

Users can change the order of the columns in the table using the   (Move Column Up) and   (Move Column Down) buttons in the toolbar.

Table personalization dialog – Move buttons

Move Column Up

(1) Select a column (by clicking on the list item).

(2) Use the Move Column Up button to move the column to the left in the table.

Note: The Move Column Up button is disabled for the first item in the list.

Table personalization dialog – Select
Table personalization dialog – Move Column Up

Move Column Down

(1) Select a column (by clicking on the list item).

(2) Use the Move Column Down button to move the column to the right in the table.

The Move Column Down button is disabled for the last item in the list.

Table personalization dialog – Select
Table personalization dialog – Move Column Down

Search/Filter Columns

Users can search for or filter columns using the search field in the toolbar.

Table personalization dialog – Search field

The search is a live search (also known as “search-as-you-type”), which is triggered by each character the user enters or deletes. For more information, see search.

Table personalization dialog – Search column

To clear the filters, the user can delete all characters manually, or use the  icon.

The list then shows all columns again.

Table personalization dialog – Search reset

Reset Personalization

The Reset button in the dialog header resets all settings to the initial state.

If the table personalization dialog is used together with variant management, the button resets the changes to the initial state of the selected variant.

Table personalization dialog – Undo

Confirm/Cancel Changes

The changes are applied when the user closes the dialog with the OK button.

The Cancel button closes the dialog without applying the changes.

Table personalization dialog – OK/Cancel

Resources

Elements and Controls

Implementation

Table Personalization (Overview)

Intro

Table personalization can be used to modify the display and settings of a table.

It is a UI pattern that is used to change one or more of the following attributes:

  • Visibility of columns
  • Order of columns
  • Sorting
  • Grouping
  • Filtering

Table personalization can be applied to simple tables (up to about 20 columns) and complex tables (more than about 20 columns) using different controls.

Usage

Use the view settings dialog if:

  • The user is able to personalize fewer than about 20 columns.
  • A combination of sorting, filtering, and grouping is needed.

Use the table personalization dialog if:

  • The user is able to personalize fewer than about 20 columns.
  • Columns need to be shown/hidden and reordered.

Use the view settings dialog AND the table personalization dialog if:

  • The user wants to personalize fewer than about 20 columns.
  • A combination of show/hide and one other function is needed.

Use the P13n dialog if:

  • You are using an analytical table (ALV).
  • The user is able to personalize more than about 20 columns.
  • Complex queries have to be built for the respective table.

Do not use table personalization at all if:

  • The table has very few columns and rows.
  • A very complex filter is needed. In this case, consider using a filter bar instead of the filter tab.

Types

Simple Table Personalization

Table Personalization Dialog

All table personalization dialogs are opened via the Settings button on the right-hand side of the table toolbar.

The table personalization dialog can show/hide and reorder columns.

Hide/Show

To show or hide columns, the user only needs to select or deselect the checkboxes of the respective list item. Alternatively, the user can select all the items at once.

Reorder

Two buttons on the left-hand side enable a selected column to be moved up or down.

The user confirms the dialog to apply the options to the table.

For more information, see table personalization dialog.

Table personalization dialog

View Settings Dialog

The sort, filter, and group features can all be applied to a table simultaneously.

Sort

The first tab in the view settings dialog is the sort feature, which allows the table content to be sorted according to the chosen attribute.

The dialog offers two sort features:

  • The first group sorts the table by a general ascending or descending order.
  • The second group lets the user choose an attribute that fits either a column or part of a column since there are also columns that contain more than one data point.

Filter

The second tab in the view settings dialog is the filter feature, which can offer a single filter selection list or a category list. The category list provides an overview and guides the user to detailed filter selection lists via drilldown. The options available are single selection, multiselection, a category list, a predefined list, and a custom filter.

Group

The third tab in the view settings dialog is the group feature, which also offers two groups of attributes:

  • The first group offers a general ascending or descending order that controls the order in which the defined groups appear.
  • The second group offers attributes with which to group the corresponding data in the table.
View settings dialog – Sort tab
View settings dialog – Filter tab
View settings dialog – Group tab

Complex Table Personalization

P13n Dialog

The P13n dialog is the most complex personalization option for tables. It is used if none of the other options are sufficient. Like the view settings dialog, it can combine any of the tabs available. By allowing inclusion and exclusion filters, as well as several group options (for some tables only), it can form more complex queries than the other options.

Columns
The P13n dialog offers the most options for changing the table columns that are shown and the order in which they are displayed.

It can show/hide a column and alter the order of the columns.

Columns tab in the P13n dialog

Sort
It also allows the user to sort the table content according to the columns that are chosen and in a specific order.

For more complex sorting needs, the user can add the required number of criteria by clicking the  button (Add New Line) at the end of the line.

P13n dialog – Sort tab

Filter
A filter option allows the user to filter the table information according to specific filter criteria, which can be included or excluded in the relevant section of the filter.

Each filter criterion consists of a column, an operator (depending on the data type of the column), and a value by which the selected column is filtered.

For more complex cases, the user can add filters by clicking the   button (Add New Line), and remove them by clicking the  button (Remove Line) at the end of each filter item.

P13n dialog – Filter tab

Group
The Group tab enables the user to group the table data by one or more columns.

For more complex grouping scenarios, the user can add more grouping options by clicking the   button (Add New Line) at the right-hand side of each grouping line (only available for the ALV table).

P13n dialog – Group tab

Resources

Want to dive deeper? Follow the links below to find out more about related controls, the SAPUI5 implementation, and the visual design.

Elements and Controls

Implementation

Grid Table

A grid table contains a set of data that is structured in rows and columns. It allows the user to scroll in both directions and can handle large numbers of items and columns.

Usage

Use the grid table if:

  • The cell level and the spatial relationship between cells are more important than the line item. Examples include spreadsheet analyses and waterfall charts. Note that a grid table is not fully responsive. It is only available for desktops and tablets, so you will need to take an adaptive approach by offering an additional UI for smartphones.
  • You have to work on more than 1,000 rows. In this case, the grid table is easier to handle. In contrast to the responsive table, the architecture of the grid table is optimized for handling large numbers of items. Note that a grid table is not fully responsive. It is only available for desktop and tablets, so you will need to take an adaptive approach by offering an additional UI for smartphones.
  • Comparing items is a major use case. In this case, a grid table might be more appropriate than a responsive table. In the grid table, each cell contains only one data point. In contrast, the responsive table is more flexible regarding line items, including the ability to add more data points per cell and also the pop-in function. Both make comparisons more difficult. Note that a grid table is not fully responsive. It is only available for desktops and tablets, so you will need to take an adaptive approach by offering an additional UI for smartphones.
  • You need an analytical table, but you cannot provide an analytical binding on the technical side. In this case, a grid table will do the work. Note that the grid table provides only one level of grouping, no aggregation options, and is also not fully responsive. It is only available for desktops and tablets, so you will need to take an adaptive approach by offering an additional UI for smartphones.

Do not use the grid table if:

  • You need a table. The responsive table is the default table in SAP Fiori. Additional use cases where you might need the responsive table include:
    • The focus is on working on line items, not on cells. The responsive table is optimized for displaying complete items on all devices, such as file browsing and a list of documents you want to act on, like purchase orders and purchase requisitions.
    • Selecting one or several items is the main use case and details are needed to choose the correct item.
    • Line items are independent of each other and no operation across columns is needed.
    • You want to have only one implementation for all devices.
  • The main use case is choosing one item from a very small number of items with no additional details. A select or combo box might be more appropriate.
  • The main use case is choosing one out of several items with only a few details per item. A list might be more appropriate. Pay attention to the layout of the list item to ensure that it has a pleasant appearance.
  • Data needs to be structured in a hierarchical manner. Use a tree table instead. Note that neither the tree table nor the grid table are responsive. You will need to take an adaptive approach by offering an additional UI for smartphones and tablets.
  • You need an overview of a large amount of data. In this case, use charts.
  • You just need it for layout reasons. In this case, use a layout container such as HBox or VBox.
  • You need read-only or editable field-value pairs. Use a form instead. The grid table is not optimized for form-like input navigation.

Responsiveness

A grid table is available for desktops and tablets, but not in smartphone sizes. It supports touch devices, but is not optimized for small screens.

If you use a grid table, note that you have to implement a fallback solution for small screens. This fallback solution does not need to support all use cases.

You could create a fallback by using a responsive table, but a completely different solution, such as showing charts in a read-only case, might be more appropriate.

Grid table shown on a desktop
Grid table shown on a tablet

Layout

  1. Select All – The Select All checkbox selects or deselects all items.
  2. Column header – The column header allows the user to resize and rearrange columns. It also provides access to a menu with column-specific commands.
  3. Selector cells – The selector cells allow the user to select one or more items.
  4. Items – The collection of items, or rows, occupies the main part of the grid table.
Schematic visualization of the grid table

Components

A grid table does not consist of other elements. However, it is common to use a toolbar above the grid table.

The toolbar can contain entry points for the view settings dialog and the table personalization dialog or for the p13n dialog, as well as view switches in the form of a segmented button, and buttons for Add, Edit, and other actions.

Behavior and Interaction

A grid table is quite restricted in terms of its content.

Table Level

Scroll

A grid table allows horizontal and vertical scrolling (sap.ui.table.Table, property: navigationMode, value: Scrollbar).

You can add any number of line items to the grid table, which uses “lazy loading”.

To prevent adverse side effects when scrolling vertically, all line items must have the same height (sap.ui.table.Table, property: rowHeight).

The grid table is optimized to allow faster scrolling within the first 1000 items.

Scrollbar
Scrollbar

Select

Selection Mode

Selection for a grid table depends on the chosen selection mode. The following options are available:

No selection: Items cannot be selected. (property: selectionMode = None)

A non-selection grid table

Single selection: One item in the grid table can be selected. A row selector column is shown. (property: selectionMode = Single)

A single-selection grid table

Multiple selection: One or more items can be selected. The grid table provides a column with checkboxes on the left-hand side. Clicking a checkbox toggles the state of the corresponding row from deselected to selected and back. The Shift key can be used to select a range.

For multiple selection, you can choose between two variants.

  • Multi-toggle mode (property: selectionMode = MultiToggle)
  • Multi-selection plug-in (sap.ui.table.plugins.MultiSelectionPlugin)

These variants behave differently when the user selects more items than are currently loaded in the front end.

Multi-toggle

In multi-toggle mode, you can offer a Select All checkbox to the left of the column header (property: enableSelectAll). Selecting this checkbox selects or deselects all items that are currently loaded in the front end. All other items are not selected/deselected. If the application data is stored in the back end, scrolling down further can reveal additional unselected items. The same can happen with range selections if not all items in the selected range have been loaded to the front end.

Multi-selection plug-in

If you use this plug-in instead of the multi-toggle selection mode, the behavior for range selection and Select All changes:

  • By default, a dedicated Deselect All button replaces the Select All checkbox. There is no default UI element for selecting all items.
  • You can set a limit for the number of items that can be selected (sap.ui.table.plugins.MultiSelectionPlugin, property: limit). This limit has the following effect:
    • The range that can be selected using the Shift key is limited to the specified number of items (default = 200). The table automatically scrolls back to the last selected item and you can display a corresponding message (sap.ui.table.plugins.MultiSelectionPlugin, property: enableNotification). Users can select more items by selecting additional ranges (the specified limit applies each time).
    • If the selection limit is set to 0, a Select All checkbox is shown. There is also no limit on the number of items that can be selected in a range. All selected items are loaded, which can lead to performance issues for large data sets.
  • If selected items are not already available in the front end, they are loaded automatically by the plug-in and set as selected.
Information
When setting a limit for the number of items that can be selected, keep the following boundaries in mind:

  • The performance of your service: How many items can be loaded at once in a reasonable time? Does this also apply if an end-user shows all available columns?
  • The “minimum limit”: Internally, the grid table loads blocks of items as the user scrolls down. Because this block size (sap.ui.table.Table, property: threshold) is usually also based on the performance of the service, it should be safe to assume that the minimum selection limit is twice this size. In this case, loading the data would take as long as scrolling down and loading exactly one more block. Nevertheless, we recommend using larger limits if your service allows.

A multiselection grid table
Using the multi-selection plug-in with a limit

Selection Behavior

An item can be selected in different ways, depending on the configuration of the grid table (sap.ui.table.Table, property: selectionBehavior):

  • Row: An item is selected by clicking the checkbox or the row. Use this option for multi-selection grid tables if clicking a row or a cell is not used for anything else.
  • RowSelector: An item is selected only by clicking the checkbox in the selector cell. Use this option if clicking the row (or a cell inside the row) is used for something else, such as navigation.
  • RowOnly: An item is selected only by clicking the row, and not using checkboxes in the selector cells. Use this for single-selection grid tables if clicking a row or a cell is not used for another purpose, such as navigation.

Compact, Cozy, and Condensed

Like all SAP Fiori controls, the grid table is shown in compact mode on a desktop and in cozy mode on tablets.

For a desktop, you can also display even more rows on the same screen height by adding the condensed mode in addition to the compact mode. This renders less white space for each item.

Note that the condensed content density has always to be set in addition to compact. Do not use condensed on its own. Do not mix condensed with cozy. Doing so could lead to unpredictable and / or unwanted results, e.g. cozy sized controls in condensed sized containers, missing padings, etc.

Note that neither compact mode nor condensed mode can be interacted with via touch. Even on a desktop with a touch screen, users will have difficulty selecting rows or using controls inside the cells when using their fingers.

Furthermore, condensed mode is not available for Internet Explorer 9. If condensed mode is to be used, please provide a fallback.

For more information on cozy and compact modes, see content density.

Column Header

The column header provides the label for the corresponding column and access to the column header menu.

Columns are resized as follows:

  • Mouse interaction: The user drags the separator line between two columns (sap.ui.table.Column, property: Resizable). Double-clicking the line optimizes the column according to the length of the currently visible data and the label of the column header (sap.ui.table.Column, property: Autoresizable).
  • Touch interaction: The user taps the column header to reveal two buttons – one to show the column header menu, and one for resizing. The user drags the latter to resize the column.

After resizing a column, the adaptation of the column widths depends on how the column width is set:

  • If column widths are set in pixel-based units (px, em, rem), the corresponding column is adapted and the columns that follow are moved accordingly. The width of all other columns is not affected.
    If all the columns together take up less width than the table control, an empty space is added. In case all columns together take up more width than the table control, a scrollbar appears. (sap.ui.table.Column, property: width)
  • If all column widths are set in percentage or “auto”, resizing one column might also lead to the automatic resizing of some or all other columns. The position of the resized column might also be affected. This is done to ensure that the whole table width is used and no white space is added. A scrollbar appears only if all or most of the columns shrink significantly. To avoid the side effect of undersized columns, a minimum width can be set per column. Please be aware that this minimum width is only taken into account if columns are automatically resized. End users are still able to reduce the column width below the provided minimum. (sap.ui.table.Column, properties: width, minWidth)

Columns can be rearranged by dragging the column header to another position (sap.ui.table.Table, property: enableColumnReordering).

Column header
Column header
Opening the column header menu on touch devices
Fewer columns than space available

Column Header Menu

For each column, a menu can contain the following menu items (sap.ui.table.ColumnMenu, property: visible):

  • Sort Ascending/Descending (sap.ui.table.Column, property: showSortMenuEntries)
  • Free text filter (sap.ui.table.Column, property: showFilterMenuEntries)
  • Group (sap.ui.table.Table, property: enableGrouping)
  • Freeze from the first to the last specified column (sap.ui.table.Table, property: enableColumnFreeze)

For each column, the menu can be replaced by an app-specific menu.

Column header menu
Column header menu

Sort

The column header menu can provide two sort options (sap.ui.table. Column, properties: sortProperty, showSortMenuEntry):

  • Sort Ascending
  • Sort Descending

The user selects one of these options to sort the corresponding column accordingly (sap.ui.table. Column, properties: sorted, sortOrder, sortProperty).

Sort settings in column header menu

Filter

The column header menu can provide a search field for entering free text (sap.ui.table.Column, properties: filterProperty, showFilterMenuEntries).

If the user enters a term in the input field and triggers the search by pressing Enter when the focus is on the filter input field, the grid table is filtered by the corresponding column and value (sap.ui.table.Table, properties: filtered, filterProperty, filterValue, filterOperator, sap.ui.table.Column, property: filterType).

Note that the filter may return zero results, in which case, the table might be empty.

General recommendations for filtering:

  • If filtering is a main use case, choose the filter bar or any other filtering UI over the built-in free text filter.
  • Only use the free text filter if filtering is a secondary use case and if the filter bar is too heavy.
Free text filter in column header menu

Group

The column header menu can provide the option to group by this column (sap.ui.table.Column, property: enableGrouping).

A group collects all items with the same value within the corresponding column.

Group setting in column header menu

If line items are grouped in a column, every group is provided with a collapsible or expandable group header. The header text consists of the name of the value and the number of items in the specific group. Only one grouping level is possible.

Group header
Group header

Once line items have been grouped, the corresponding column is hidden. There is no built-in option to ungroup the grid table again. Therefore, provide a view settings dialog or table presonalization dialog to offer an additional way to group by a column and a way to ungroup the complete table.

An exception to this is when the table is grouped from the start and should not be ungrouped at all.

Group headers shown, the corresponding column hidden: no duplicates, but a confusing change
Warning
Note that grouping the grid table is experimental and currently works only on items loaded to the front end. Thus, scrolling down the table leads to data not being grouped as expected.

Only use this feature if you have just a few line items, all of which are loaded to the front end. If this is the case, consider using a responsive table instead of a grid table.

Freeze Columns

The column header menu can provide the option to freeze columns (sap.ui.table.Table, property: enableColumnFreeze). Selecting Freeze freezes all columns up to the one in which the operation was triggered (sap.ui.table. Table, property: fixedColumnCount).

When Freeze is triggered, the menu item changes to Unfreeze for the corresponding column.

Freeze setting in column header menu

Line Item Level

A line item contains a set of cells and provides options for selecting the item.

To prevent adverse side effects when scrolling vertically, all line items must have the same height (sap.ui.table.Table, property: rowHeight).

Line item
Line item

Drag and Drop

One or several items can be repositioned within a table or moved to other UI elements using drag and drop operations (sap.ui.table.Table, aggregation: dragDropConfig). While being dragged, the items are shown as ghost elements on the mouse cursor.

Drop targets can be on items, between items, or both (sap.ui.core.dnd.DropPosition). On a drop target, the mouse cursor changes to either a “copy”, “link”, “move”, or “none” cursor. “None” indicates that the dragged item cannot be dropped in the current position (sap.ui.core.dnd.DropEffect).

Drag and drop is only available on supporting browsers.

Drag and drop
Drag and drop
Whole item as drop target

Context Menu

You can attach a context menu (sap.m.Menu) to a table. The context menu gives users an alternative way to modify the focused elements by giving them access to context-specific functions.

When opened, the context menu gets the row and column context, except for special columns (such as the selection column) or special rows (like group headers). Context menus can be implemented for a specific table, row, or cell (not recommended for editable cells).

Context menus are opened by right-clicking (desktop), long press (mobile), the context menu key, or Shift+F10.

Be aware that using the context menu overrides the browser context menu, which can no longer be opened.

If a control inside a table is the “click target”, and the control also provides a context menu, the control context menu “wins”.

Grid table with a context menu

Cell Level

A cell provides one data point.

It can contain one of the following controls to display this data point:

While it is technically possible to also use other controls, doing so could lead to issues in regards to alignment, condensed mode, screen reader support, and keyboard support.

If you use text, use only single-line text to keep the same row height. Truncate if necessary as this prevents adverse side effects when scrolling vertically (sap.m.Text, property: wrapping, value: false). Do not wrap.

Cell
Cell

Guidelines

Data Density vs. Complexity

The grid table can be used to display large amounts of data. Unfortunately, the grid table has a high data density and therefore conveys an immediate feeling of complexity.

Only show tables with a lot of data as a last resort. Try the following instead:

  • Break down the data into manageable chunks and allow the user to navigate or drill down between them.
  • Use charts with drilldown functionality until the amount of data is more manageable.

Try to avoid horizontal scrolling in the default delivery.

Try to minimize the number of columns, especially if there is a large number of rows.

Table Title

Implement the table title by using a title control in a toolbar.

Use a table title only if the title of the table is not indicated in the surrounding area.

Do not use a table title if it simply repeats text that is already above the table. For example:

  • A pricing conditions table is the only control on a tab labeled Pricing Conditions.
  • A section or subsection on an object page contains only one table.

Use a table title if you need the item count, table toolbar, or variant management. To avoid repeating text, feel free to use generic text as a table title, such as Items.
Exception: If the surrounding area contains the table title, and both the item count and toolbar can be added to the surrounding area, no additional table title is needed.
Example: An object page (sub-)section contains only one table. In this case, add the item count and the table toolbar to the (sub-)section header.

If you use a table title, show either a title for the table, with or without variant management, or an item count in the following format:

Items (2,534).

The item count in the table title includes all the visible items that a user can reach by scrolling or expanding groups. Group headers are not included.

Remove the item count in the table title if there are zero items.

Developer Hint
Assistive technologies (such as screen readers) use the title to create a hierarchical site map for faster navigation. In addition, screen readers use the title as the label for the table.

If you don’t use a title (for example, to avoid repetition), make sure that the table is connected to another meaningful on-screen text that can be used as a label for assistive technologies. You can do this using the method addAriaLabelledBy.

Multiple Selection

  • We strongly recommend using the multi-selection plug-in. This ensures that all items selected using Select All or as part of a range are included – even if some items were not initially loaded in the front end. This is not the case if you use the multi-toggle option.
  • Do not limit the range selection for the multi-selection plug-in unless you have to.
    • If the dataset is small and/or completely available in the front-end, set the limit property to 0 to enable the Select All option and allow users to select any range.
    • If you have a large dataset, set a limit on the number of selected items to avoid performance issues. Also bear in mind that some actions won’t be helpful if the dataset is too big (for example, a delete operation on 2 million database entries).
  • If you set a limit, also display the corresponding message when the user selects more items at once than the limit allows (sap.ui.table.plugins.MultiSelectionPlugin, property: enableNotification).
Information
When setting a limit for the number of items that can be selected, keep the following boundaries in mind:

  • The performance of your service: How many items can be loaded at once in a reasonable time? Does this also apply if an end-user shows all available columns?
  • The “minimum limit”: Internally, the grid table loads blocks of items as the user scrolls down. Because this block size is usually also based on the performance of the service, it should be safe to assume that the minimum selection limit is twice this size. In this case, loading the data would take as long as scrolling down and loading exactly one more block. Nevertheless, we recommend using larger limits if your service allows.

  • In multiple selection mode (multi toggle), do not show checkboxes in the first data column in the default delivery to avoid confusion.
Don't
Do not add checkboxes to the first data column in the default delivery

Loading Data

To indicate that the table is currently loading items, use the busy state. (sap.ui.table.Table, property: busy). Do not show any items or text. As soon as the data is loaded, remove the busy state and show all items.

Grid table in busy state while loading data

Columns – Best Practices

Minimize the number of columns. Avoid the need to scroll horizontally in the default delivery.

The grid table assigns the same width to each column by default. It is recommended that you overwrite this default to provide optimal space for your content (sap.ui.table.Column, property: width).

If you define the column width in pixels or rems, resizing a column affects only the width of this specific column. Reducing the browser window size results in a scrollbar. After resizing a column, a scrollbar appears if the width of the table is not enough to show all columns. If the columns use less space than available, white space appears on the right side of the last column.

If you define the column width as a percentage, resizing one column affects the width of several or all columns. Text becomes truncated when the browser window size is reduced. This is done to make sure that all columns together fill the space of the table. A scrollbar appears only in case the automatic change of the column widths is not enough for showing all columns. To avoid the side effect of undersized columns, a minimum width can be set per column. Please be aware that this minimum width is only taken into account if columns are automatically resized. End users are still able to reduce the column width below the provided minimum.

If you define the column width as “auto”, the behavior is the same as for “percentage”. In contrast to percentage, “auto” distributes the columns equally.

To decide on how to set the column width (pixel / rem / em vs. percent / auto), keep the following in mind:

  • For tables with only 2 to 3 columns, use pixel-based units. This ensures that on wide screens the values in the columns are not spread over the whole screen, which improves the readability of line items.
  • For tables with many columns, where a horizontal scrollbar is usually needed, use pixel-based units. This avoids unintended side effects when resizing columns.
  • For all other tables, use whatever fits your case better.

Be cautious with mixing columns with pixel-based and percentage-based widths. While this can be helpful in some cases, it could also cause even more unexpected side effects when resizing a column. When using percentage-based widths for one or more columns, think of the possibility to not allow end users to resize columns at all.

Optimize the column width for its initial visible content, including the column header texts. If this is not possible (for example, if showing the full texts would result in extremely wide columns), let the texts truncate. End users can change the width of the column to read the full text, as needed.

Maintain a constant column width and avoid adjusting it automatically when the content changes.

Always keep to one line of text. Do not wrap.

Don't
Don't truncate the initial visible content in the default delivery
Don't
Never wrap texts
Never wrap texts

Column Headers – Best Practices

For each column, provide a label in the column header. In the default delivery, do not truncate the column header texts. Only let the text truncate if showing the full text would make the column too wide. Never wrap the text.

Content Alignment

For alignment of cell content, follow the guidelines below.

Left-align the following: text, IDs, phone numbers, URLs, passwords, and email addresses.

Left-alignment of text

Right-align numbers (except IDs).

This ensures comparability of numbers and amounts.

Right-alignment of numbers

Right-align amounts with currencies to the cell and align them in terms of their respective decimal points.

This ensures that amounts with different currencies are shown correctly, whether these currencies have 0, 2, or 3 decimals.

For aligning to the decimal point, use the sap.ui.uinified.Currency control.

Alignment to decimal point

Right-align dates and times.

This ensures comparability for most formats and locales.

Right-alignment of dates

Left-align status information.

Left-align status information

Center-align icons.

Left-align micro charts.

XS micro charts in condensed mode

Content Formatting

Locale Settings

Be locale-aware: show dates, times, numbers, and so on in the format corresponding to the user’s locale settings.

Key Identifier

Use a bold label or an emphasized link as the key identifier of an item. In the default delivery, show the key identifier in the first column.

Emphasized link
Emphasized link

For strings with IDs, use one of the following options:

  • Show the ID in a separate column. Use this format if users need to sort, group, or filter by both the string and the ID.
  • Show the ID in brackets after the corresponding string. In this case, sorting, filtering and grouping is available for either the string or the ID. Use this format only if users don’t need to sort, filter, and group by both values.
Text and ID in two columns – Allows sorting, filtering, and grouping on both
If displayed as a link, use only the text as the link, not the ID
Text and ID in one column – Sorting, filtering, and grouping only on the text
Text and ID in one column - If displaying a link, show the whole string as the link (text and ID)

Truncation

Avoid truncation of typical content in the default delivery (sap.ui.table.Column, property: width). However, since the columns are resizable, do not worry too much if truncation occurs as columns can still be enlarged if necessary.

To prevent adverse side effects when scrolling vertically, all line items must also have the same height. If you need to decide between truncation and different row heights, choose truncation. Do not wrap.

Optimize column width for typical content, not all content

Number of Links

Are there too many links? Use subtle links to avoid a wall of links. Standard links are also emphasized more if they are surrounded by subtle links.

Emphasized links, links, subtle links, and text

Missing Value

If there is no value for a cell, leave it blank. Do not display text as N/A.

Leave empty fields blank

Numbering Items

In terms of numbering items:

  • If the item number is more like an ID with regard to its description, use ID formatting as described above.
  • In all other cases, use a separate column for the item number.
Add a separate column for the item number

Status

For status information, use semantic colors on the foreground elements.

For status information on text, use an object status.

Semantic colors on text

Micro Charts

Use only the following micro charts: Bulletcomparisonstacked bar. When using micro charts, use them in size XS.

Micro charts in a grid table

Empty Tables

Avoid empty grid tables. If necessary, provide instructions on how to fill the grid table with data (sap.ui.table.Table, properties: noDataText, showNoData).

Examples:

  • If a table is initially empty, provide at least a basic text:
    No items available.
    Overwrite this whenever a hint can be provided on how to fill the table with data.
  • If a table is used together with a filter bar (as in the list report), and is initially empty, use the following text:
    To start, set the relevant filters.
  • If a table is used together with a filter bar and the filter does not return results, use the following text:
    No data found. Try adjusting the filter settings.

Adapt the texts above if:

  • The standard text is not precise enough for your use case (for example, a search is also offered, or only the search is offered).
  • The standard text is misleading (for example, if the data is filled based on a master-detail pattern instead of filter settings).
Provide meaningful instructions

Invalid State

To show an invalid state of the grid table within the list report floorplan, show an overlay on the grid table and the corresponding toolbar (sap.ui.table.Table, property: showOverlay). The overlay prevents user interactions.

Use this within the list report floorplan if filter settings have been changed but the grid table is has not yet been updated.

Grid table with invalid data

Item States

To show that an item has been modified, for example, within the global edit flow, add the string Modified in an additional column with the label Editing Status.

In the default delivery, add a column directly behind the key identifier.

A modified item
A modified item

To show that a modified item contains an error, for example, within the global edit flow, add the string Contains errors in the Editing Status column and highlight the row accordingly. This string replaces the Modified string.

A modified item with an error

To show that an item is locked, add a transparent-style button with the corresponding icon and the text Locked by [name] in the Editing Status column.

A locked item
A locked item

To show that an item is in draft state, add a transparent-style button with the text Draft in the Editing Status column.

Item in draft state
Item in draft state

Show only one state at a time.

Numbers and Units

Show the unit of measurement in one of the following ways:

Number and Unit in Same Cell

The number and the unit are in the same cell. Do this if sorting, filtering, or grouping by the unit of measurement are not needed.

Use a currency control to display the concatenated string.

Number and unit of measurement in one cell

Number and Unit in Separate Columns

The number and unit are in separate columns. Do this if sorting, filtering, or grouping by the unit of measurement are a common use case.

Note that this column can be hidden or moved independently of the column containing the corresponding number. Therefore, be sure to have clear labels for both columns to communicate the dependency.

Number and unit of measurement in two columns

Show the unit of measurment on the column header, if the unit of measurement is the same for all rows. If not, show the unit of measurement within the row.

Drag and Drop

If you offer drag and drop for rearranging items within the table, use drop targets that are between items (sap.ui.core.dnd.DropPosition.Between). This provides better feedback on where the item will be inserted. Show the “move” mouse cursor (sap.ui.core.dnd.DropEffect.Move).

Drop targets in between items

Do not combine rearranging items and sorting. If you really need to do so, make sure that there is a dedicated sort criterion for the user-defined sort order, and only offer options for rearranging items if this sort order is set.

Don't
Do not combine rearranging items with sorting

Drag and drop is “invisible” on the UI: users can’t see where dragging is available and where it isn’t. In addition, it is not accessible, since there is no generic keyboard interaction. Drag and drop is also not available on all browsers. For these reasons, provide it only in addition to existing (and visible) UI elements that fulfill the same purpose. For example, offer (toolbar) buttons for moving or for copying and pasting items.

Use drag and drop only in addition to existing visible UI elements

When combining rearranging items with grouping, be aware that moving items to another group also means that a value of the dropped item changes: because grouping is based on values in a column, the dropped item needs to take on the value of the target group for the corresponding column. If this is not wanted, do not allow users to rearrange items in grouped tables.

Example:
A table is grouped by availability. An item is moved from the group “Not Available” to the group “In Stock”. In this case, the moved item needs to change its availability to “In Stock” to match the target group. If changing the value doesn’t make sense make sense, only allow users to rearrange the items within the same group, or don’t allow rearranging at all.

Don't
Do not combine rearranging items with grouping, unless you know exactly what you're doing.

Context Menu

Use the context menu only as a quick way of accessing functions that are already available elsewhere (for example, as buttons in the toolbar). Don’t just offer actions in the context menu itself, as users might not realize that these actions are available at all.

The context menu can be triggered for the table, row, or cell. However, we do not recommend using context menus for cells: because the content of a cell is a different touch target than the cell itself, opening a cell context menu via touch is quite hard, even in cozy mode.

Do not combine context menus with condensed mode: editable controls fill the entire space inside a cell. Because of this, context menus cannot be opened at all with touch or mouse interaction.

Actions

Multiple Items

To trigger actions on multiple items, use a mutliselection grid table (sap.ui.table.Table, property: selectionMode, value: MultiToggle). Offer the corresponding actions in the table toolbar.

Do not offer action triggering on multiple items if the table is generally expected to have fewer than 10 items. In this case, try to use the responsive table instead of the grid table.

Single Item

To trigger actions on a single item (sap.ui.table. Table, property: selectionMode, value: Single):

  • Show the actions on the table toolbar.
  • In rare cases, show the actions within the line item. One example would be an Add to Cart button in a shopping application. Since these actions are repeated in every line and thus use a lot of screen real estate, do this only for a maximum of one or two actions. Provide a separate column per action. Use a button, unless the action trigger belongs to a link. Hide the action in rows for which it is not applicable.

To trigger navigation on line item level, choose one of the following options:

  • Use a link for the attribute that identifies the row. Clicking the link triggers the navigation.
  • Add the RowActions column and show the navigation indicator (  ) at the end of the row. The navigation arrow triggers the navigation.

Special case: Multi-selection in a master-detail scenario
When a multi-selection table is used in a master-detail scenario, it is not clear which item was last opened (for example, which item is currently shown in the second column of a flexible column layout). In this case, you can display a “navigated” indicator to show which item is currently open.

Use the RowActions column only for one or both of the following actions:

  • Navigate to details page ( )
  • Delete ( )

The RowActions column does not provide a column header text. It is fixed and will not scroll away. Users also cannot personalize this column.

Navigate to details page

Single Cell

To trigger actions on a single cell, create the corresponding click event. Do not use the cell click event if the cell contains interactive controls, such as links.

Add Items

For adding items, place an Add or Create text button on the table toolbar.

  • Use Create if the button adds a brand new item that doesn’t yet exist on the database.
  • Use Add if the item already exists and is merely added or assigned to the current object.

Show new items as the first item of the table, with a visual highlight at the beginning of the row.

For more details, see the guidelines for managing objects (including subarticles).

Enabling/Disabling Actions

To indicate if an action can be applied to the current selection:

  • Enable the action if it always works, regardless of whether or not items are selected.
  • Enable the action if it can be applied to all selected items.
  • Enable the action if it can be applied to some of the selected items. If the action is triggered, show a message that informs the user how many items will be affected. Let the user choose whether to apply the action anyway or cancel the action.
  • Only disable the action if it can be applied to none of the selected items.

For more details, see UI Element – States.

If the action was applied, and if the items are still available, keep them selected.

Message for an action that applies to a part of a selection

Editable Content

For editable content, only use the following controls, and only one control per cell:

Only these controls are optimized for all viewing modes of the grid table.

If you need edit mode, change your text controls, such as label, text, link, object status, icons, and currencies, to editable controls as soon as you switch to edit mode, but not before. You can do this by exchanging the controls, for example, from sap.m.Text to sap.m.Input.

For mass editing items:

  • Provide multiselection.
  • Provide an Edit button.
  • If several items are selected, clicking the Edit button opens a dialog in which the user edits the corresponding fields for all selected items.

For more information, see Mass Editing.

Interactive controls – In line

View Settings

There are several ways to show Sort, Filter, and/or Group settings:

  • Column header menu: In all cases, show the corresponding settings in the column header menu.
  • View settings dialog: Simple and more flexible with regard to filter settings. No advantage for sorting. Allows the user to ungroup grouped columns.tables with a medium amount of items.
  • Table personalization dialog: Provides complex options for sorting items by several levels and allows the user to ungroup grouped columns. It also provides a query-builder-like approach for filter settings. The complexity of the options is also its downside. Use the table personalization dialog for tables with a large number of items.
  • If filtering is a main use case, use the filter bar. In this case, avoid offering additional filter settings on the table. If you do, the filter settings on the grid table work only on the result set provided by the filter bar.

Always be careful when synchronizing the settings in the dialog with the settings from the column header menu.

Trigger the dialogs in one of the following ways:

  • View settings dialog: Provide several buttons, one for each of these view settings. Each button opens the view settings dialog on the corresponding page.
  • Table personalization dialog: Provide a settings button, which opens the table personalization dialog containing all pages.

Use only the view settings you really need. For example, do not offer grouping if it does not support your use case.

Column header menu with view settings
Table toolbar with triggers for view settings dialog
Table toolbar with trigger for table personalization dialog

Be persistent. When reopening the app, show the analytical table in the same view settings (sort/ filter/ group/ aggregation settings) as last defined by this user.

Sort

To display the current sort state, an icon is shown in the column header of the most recently sorted column. This icon indicates the sort direction (sap.ui.table.Column, properties: sorted, sortOrder, sortProperty).

For the default sort settings, sort by the column that identifies the row, which is usually the first column in default delivery.

Column, sorted ascending
Column, sorted descending

The descending sort order must always be the exact reverse of the ascending sort order. For each column, provide a meaningful sort order. For example:

  • Sort text alphabetically
  • Sort numbers by their value
  • Sort status information by the severity of the status:
    • Ascending: Sort status information from positive to negative, with neutral last.
    • Descending: Sort status information from negative to positive, with neutral first.
Object status sorted ascending, with neutral status last
Object status sorted descending, with neutral status first
    • Ascending with different values per severity level: Sort status information from positive to negative, with neutral last. Sort different values within a severity level (semantic color) alphabetically.
    • Descending with different values per severity level: Sort status information from negative to positive, with neutral first. Sort different values within a severity level (semantic color) alphabetically.
Object status sorted ascending and alphabetically, from positive to negative with neutral last
Object status sorted descending and alphabetically, from negative to positive with neutral first

Filter

To display the current filter state, an icon is shown in the column header of the filtered column (sap.ui.table.Column, properties: filtered, filterProperty, filterValue, filterOperator, defaultFilterOperator, filterType).

Column, filtered
Column, filtered

Group

To display the current group state, group headers are shown. Show the following text in the group header:

[Grouping value] – [Item count for the group]

Group headers
Group headers

In general, offer reasonable grouping by default if appropriate. Enable the user to ungroup via the view settings dialog or via the table personalization dialog.

Personalization

Only offer personalization if you need more columns than those that fit on a tablet screen, which is usually five, to fulfill 80% of your main use cases.

Persist the column layout. When a user reopens the app, show the grid table with the same column layout settings as last defined by this user.

Add, Remove, and Rearrange Columns

To add, remove, or rearrange columns, use one of the following:

  • The table personalization dialog: It offers some simple settings for column layout. Use this if you have only a few columns to choose from and/or you use the view settings dialog.
  • The p13n dialog: Besides various complex view settings, it also provides settings for column layout. Use this if you have a large number of columns to choose from and/or you use this dialog anyway for view settings.

In both cases, trigger the dialog via the settings button in the table toolbar.

You can also use drag and drop to rearrange columns (sap.ui.table.Table, property: enableColumnReordering). If you allow rearranging via drag and drop as well as via a dialog, keep both places in sync.

Resize Columns

Resizing columns works differently on touch and non-touch devices.

  • Non-touch devices: Drag and drop the column separator on the right side of the column. Double-clicking the column separator optimizes the width of the column to the data currently loaded into the front end, which is usually about 100 rows.
  • Touch devices: Clicking the column header reveals two buttons: one for opening the column header menu, another one for resizing the column. Drag and drop this second button to resize the column.

Freeze Columns

To freeze columns, offer the setting in the column header menu (sap.ui.table.Table, property: enableColumnFreeze). Selecing Freeze on a column freezes all columns from the first one to the one where Freeze is selected. On this column, the menu entry changes from Freeze to Unfreeze.

Frozen column
Frozen column

Highlight Items

To show that an item needs attention, a highlight indicator can be shown in front of the item. The highlight indicator can be used to indicate:

  • A semantic state, such as red or orange for an error or warning. In this case, use semantic colors.
  • Additional information, such as blue to highlight newly added items. In this case, use semantic colors.
  • Industry-specific or process-specific states, such as “out of stock” or “excess of inventory”. In this case, use indication colors.

Be aware that the highlight is just an indication. It does not tell users exactly what is wrong. Make sure that you provide this information within the table row, ideally in the same color.

For details on the use of highlight colors, see How To Use Semantic Colors / Industry-Specific Colors.

(sap.ui.table.Table, aggregation: rowSettingsTemplate)

Highlighted items
Highlighted items

Tables in Object Pages

In the object page, we advise against using the analytical, grid, and tree tables. Instead, use a responsive table and offer navigation to a list report with the table types mentioned above.

For more information on the use of tables within the object page, see the Tables section of the Object Page article.

Export to Spreadsheet

On the table toolbar, apps can provide a menu button for exporting table data to a spreadsheet. For the export, use the export to spreadsheet function.

'Export to Spreadsheet' menu button

Paste

The browser paste function can be used to paste data from the clipboard to the table (Ctrl+V or browser context menu).

  • If the focus is on row level, the app has to take the data from the clipboard and add it to the corresponding controls within the table.
  • If the focus is on an editable control within the table, the control gets the data automatically.

Pasting via the context menu does not work if a custom context menu is used.

Properties

sap.ui.table.Table

The following additional properties are available for the grid table:

  • The property: width defines the width of the grid table.
  • The property: rowHeight defines the height of each row in the grid table. Since the height required is calculated automatically by the grid table, this property is only needed rarely.
  • The property: columnHeaderHeight defines the height of the column headers. Since the height required is calculated automatically by the grid table, this property is only needed rarely.
  • The property: columnHeaderVisible can be used to hide the column headers. Always show the column headers.
  • The property: showColumnVisibilityMenu provides an additional entry in the column header menu that allows columns to be shown or hidden. In SAP Fiori, columns are shown and hidden via the table personalization dialog or via the table personalization dialog. Do not use this property.
  • The property: visibleRowCount defines the height of the grid table. Show as many rows as fit on the screen.
  • The property: visibleRowCountMode defines whether the height of the grid table is fixed or automatically calculated based on the space provided by the underlying container. For automatic calculation, make sure that all rows have the same height.
  • The property: minAutoRowCount defines the minimum number of rows that must be shown if the property: visibleRowCountMode is set to “auto”. Show at least three to five rows.
  • The property: firstVisibleRow defines the first row shown in the visible area of the grid table. The grid table is scrolled accordingly.
  • The property: allowColumnReordering is deprecated. Do not use it. Use the property: enableColumnReordering instead.
  • The property: editable does not have a visible effect. Do not use it.
  • The property: enableGrouping turns the experimental grouping on or off. Handle with care.
  • The property: enableCustomFilter changes the filter entry in the column header menu from an edit box to Filter…. Selecting this entry throws an event to which apps can react, for example, by opening a dialog. In general, you should choose the built-in filter over your own implementation. Specifically, keep filtering via the column header menu simple, while offering more advanced options via the table personalization dialog.
  • The property: enableBusyIndicator has not yet been fully implemented. Do not use it.
  • The property: title adds a line of text on top of the grid table. Do not use this. To add a title to the table, use a toolbar.
  • The property: footer adds a short text at the bottom of the table.
  • The property: Busy sets the grid table to busy state. While in busy state, the whole table cannot be used and items cannot be read due to an overlay.
  • The property: Tooltip does not have an effect. Do not use it.
  • The property: alternateRowColors displays the rows with alternating background colors (“banded rows”). Do not use it.

sap.ui.table.Column

The following additional properties are available for the column:

  • The property: visible defines whether a column is shown or hidden.
  • The property: name defines the name shown in the column header menu for showing and hiding columns. In SAP Fiori, columns are shown and hidden via the table personalization dialog or via the table personalization dialog. Do not use this property.
  • The property: headerSpan defines whether one column header is used for one or several columns. To prevent adverse side effects, always use one column header for only one single column. Do not use this property.
  • The property: Tooltip does not have an effect. Do not use it.

Resources

Want to dive deeper? Follow the links below to find out more about related controls, the SAPUI5 implementation, and the visual design.

Elements and Controls

Implementation

Slider

A slider is a control that enables the user to adjust single values within a specified numerical range.

Slider example
Slider example

Usage

Use the slider to change values with graphical support.

Responsiveness

The slider itself is not responsive. It adjusts to the responsiveness of its parent container by recalculating and resizing the width of the control.

The slider supports the cozy and compact form factors. The compact form factor is used for apps that run on devices operated by a mouse and keyboard.

Types

Only a horizontal slider is available.

Behavior and Interaction

Changing the Value

If the slider is editable, the hand cursor appears when the user hovers over the grip.

The user can change the slider setting in two ways:

  • By using drag and drop to adjust the grip
  • By clicking the bar. The grip then moves to this new position.

The grip can be moved with or without increments based on the predefined steps.

Changing the value
Changing the value

Slider with Text Fields

The slider can be used with text fields instead of tooltips. In this case, the value of the grip is displayed.

Slider with text field

Slider with Input Fields

The slider can be used with input fields instead of text fields. This allows the user to enter a specific value.

Slider with input field

Slider with Tick Marks

You can apply tick marks to the slider. The tick marks are related to the step property, and are responsive. If the distance between 2 tick marks is less than 8 px, all tick marks except for the first and last disappear.

Slider with tick marks

Slider with Tick Marks and Labels

If tick marks are set, you can define labels for the tick marks. The labels are displayed below the tick marks and show the corresponding value of the tick mark. The labels must always be numbers, and must never overlap. You can also define labels only for specific tick marks if you don’t need a label for every tick mark on the slider. The application developer is responsible for defining a reasonable set of tick marks.

If there is not enough horizontal space to display all the labels, a responsive mechanism is activated. The first and the last label are always visible.

Slider with tick marks and labels

Custom Values

You can define custom values as labels. This can be useful if your scenario requires descriptive intervals, such as as dates. Always keep the values as short and meaningful as possible.

Slider with custom values as labels
Developer Hint
In order to use custom scales in a slider, you must map them to the floats for the slider scale.

Styles

The slider can be shown with or without a progress bar. By default, the progress bar is shown.

Examples

Slider without progress bar
Slider with progress bar

Properties

  • The step property must be positive. If a negative number is provided, the default value 1 is used instead.
  • The minimum, maximum, and value properties can be decimals (float values). The slider automatically sets the minimum value to 0 and maximum value to 100 by default.
  • The width of the control can be provided in %, em, px, and all possible CSS units. The slider automatically sets the width of the slider to 100% by default.

Resources

Want to dive deeper? Follow the links below to find out more about related controls, the SAPUI5 implementation, and the visual design.

Elements and Controls

Implementation

Range Slider

A range slider is a user interface control that enables the user to select a value range within a predefined numerical interval.

Range slider
Range slider

Usage

Use the range slider if you want to select a value range within a predefined numerical interval. If you want to specify only a single value within a predefined numerical interval, use the slider instead.

Responsiveness

The range slider itself is not responsive. It adjusts to the responsiveness of its parent container by recalculating and resizing the width of the control. The range slider supports the cozy and compact form factors.

Types

Only a horizontal range slider is available.

Components

The range slider consists of:

  • Progress line
  • Minimum and maximum value
  • Grips
  • Tooltips or input fields
Range slider components

Behavior and Interaction

Changing Values

If the range slider is editable, the hand cursor appears when hovering over the range slider with the mouse. A tooltip also appears when hovering, displaying the current values of each grip. The grips move together with the corresponding tooltips.

The user can change the value range on the slider in two ways:

  • By using drag and drop to adjust the grips
  • By clicking the bar outside the value range. The corresponding grip then moves to the new position.

The grips can be moved with or without increments based on the predefined steps.

Range slider on hover

Range Slider with Input Fields

The range slider can be used with input fields instead of tooltips.

Range slider with input fields

Moving the Entire Range

Users can move the entire value range by dragging and dropping the progress line.

Range slider - Moving the entire range

Equal Values

The grips of the range slider can be positioned on the same value.

Range slider with equal values

Overlapping

The grips of the range slider can be moved across each other. The minimum can become the maximum, and vice versa.

Tick Marks

You can apply tick marks to the range slider. The tick marks are related to the step property. For example, if you have a range from 1 to 100 and a step of 10, the range slider will have 11 tick marks. The tick marks are responsive. If the distance between 2 tick marks is less than 8 px, all tick marks except for the first and last disappear.

Range slider with tick marks

Tick Marks and Labels

If tick marks are set, you can define labels for the tick marks. The labels are displayed below the tick marks and show the corresponding value of the tick mark. The labels must never overlap. You can also define labels only for specific tick marks if you don’t need a label for every tick mark on the slider. The application developer is responsible for defining a reasonable set of tick marks.

If there is not enough horizontal space to display all the labels, a responsive mechanism is activated. The first and the last label are always visible.

Range slider with tick marks and labels

Custom Values

You can define custom values as labels. This can be useful if your scenario requires descriptive intervals, such as as dates. Always keep the values as short and meaningful as possible.

Range slider with custom values as labels
Developer Hint
In order to use custom scales in a slider, you must map them to the floats for the slider scale.

Properties

  • The step property must be positive. If a negative number is provided, the default value 1 is used instead.
  • The minimum, maximum, and value properties can be decimals (float values). The slider automatically sets the minimum value to 0 and the maximum value to 100 by default.
  • The width of the control can be provided in percentage (%), em, px, and all possible CSS units. The slider automatically sets the width of the slider to 100% by default.
  • The range property determines the range in which the user can select values. If the value is lower/higher than the allowed minimum/maximum, a warning message is displayed.
  • The inputsAsTooltips property indicates whether input fields are being used as tooltips for the grips.

Resources

Want to dive deeper? Follow the links below to find out more about related controls, the SAPUI5 implementation, and the visual design.

Elements and Controls

Implementation

Infobar

The infobar is a type of toolbar that appears above a list or panel, and shows filter or selection settings:

  • Filter criteria: The infobar indicates the filter criteria that have been applied for a filter or contextual filter. Do not show the infobar if no filter is applied.
  • Selected items: In a multi-select dialog, the infobar shows the number of selected items.
The infobar is placed above the content and shows the applied filters

Responsiveness

The bar has the same height, text size, and icon size in both cozy and compact formats. The text inside the bar will be truncated if there’s not enough space.

Text is truncated on a small screen. The example shows an infobar for a contextual filter.

Types

There are three situations in which an infobar is shown:

  1. After a general filter has been applied.
  2. After a contextual filter has been applied.
  3. After the user has selected multiple items in a select dialog.

General Filter

All applied filters are shown as labels in the infobar.

Infobar after a filter has been applied

Contextual Filter

The contextual filter allows the user to see a prefiltered view of a list. The title on the left side and an icon on the right side display the filter criteria. The Filter icon should represent the filter category. Do not use a generic filter icon, otherwise it may be confused with the user-triggered filters. For more information, see contextual filter.

Infobar after a contextual filter has been applied

Multiselection

If the user selects multiple items, the infobar shows the number of selected items. For more information, see select dialog.

Infobar after multiselection has been applied

Components

The infobar is a toolbar that consists of a label on the left side and an icon on the right side.

The label shows the filter criteria, and the icon selected depends on the use case.

General Filter and Multiselection

No icon is shown. The only exception is the Cancel icon, which is used to reset the current filter criteria. For more information, see contextual filter and responsive table.

Infobar with optional 'Cancel' icon

Contextual Filter

The icon is mandatory and represents the current filter criterion.

There is one exception in which it is useful to be able to cancel the contextual filter. In this special case, the contextual filter is used to prefilter the listed items in a select dialog. For this case, use the Cancel icon instead of the Filter icon. For more information, see contextual filter.

In all other use cases, show an icon that represents the filter criterion.

Contextual filter with mandatory filter icon

Behavior and Interaction

The bar can have two active areas: either the entire bar can be active, or if an icon is added, it creates a second active area. We recommend that you use the active behavior for the bar and the icon.

Bar Area

When the user clicks the bar, the filter dialog from the view settings dialog is shown. If only one filter is applied, the filter can be changed directly in the detailed filter selection. If more than one filter is applied, the filter dialog shows a list with general filter categories.

Clicking the infobar with a single filter shows the detailed filter selection
Clicking the infobar with multiple filters shows the filter categories

Icon Area

  • Cancel: The user clicks the icon to delete the current filter settings. We recommend that you use the cancel icon.
  • Filter (only contextual filter): Clicking the icon has the same effect as clicking the bar. The filter dialog is shown.

States

The infobar has two states – active and non-active (non-clickable). If set to non-active, the whole bar turns gray and the user cannot interact with it.

Infobar - Active state
Infobar - Non-active state

Properties

The contextual filter is not a separate control. If you want to build an infobar, you need to use the sap.m.toolbar control. To achieve the infobar design, set the design toolbar property to “info”.

Resources

Want to dive deeper? Follow the links below to find out more about related controls, the SAPUI5 implementation, and the visual design.

Elements and Controls

Implementation

Footer Toolbar

The footer toolbar always appears as floating footer at the bottom of the screen. The floating footer property creates some padding between screen and toolbar, improving visibility.

The control is used for closing or finalizing actions that impact the whole page. It is only visible when actions appear, when message handling is visible, or when the draft indicator is displayed. One main advantage of the footer bar is that this bar is always visible and will not scroll away.

Our general guideline is to use only icon buttons or text buttons. Icon and text should not be combined into one button. Buttons are always right-aligned.

Buttons are sorted from frequently-used to seldom-used. This ensures that the most important buttons will go into the overflow last.

Usage

Use the footer toolbar:

  • If you have closing or finalizing actions on your page that apply to the whole page.

Do not use the footer toolbar:

  • If you have different containers on your page (such as charts, tables, and forms) and the action influences only certain items. In this case, place the action as close to the corresponding item(s) as possible.
  • If you have global actions (such as Edit or Delete) that are not finalizing or closing actions. In this case, use the header toolbar instead.

Responsiveness

To enable responsiveness, use the OverflowToolbar control. For more information, please refer to the corresponding section in the toolbar overview article.

The height of the toolbar changes on desktops (compact mode), tablets, and smartphones (cozy mode). For more information about cozy and compact modes, see content density.

Footer toolbar - Size S
Footer toolbar - Size M
Footer toolbar - Size XL

Components

The footer toolbar can contain the following components:

  • Message indicator
  • Draft indicator
  • Finalizing/closing actions
Examples of possible components

All closing or finalizing actions are placed on the right side of the toolbar.

The footer toolbar can also include a message and draft indicator. For more information, see draft handling and messaging.

Behavior and Interaction

Our general guideline is to use only icon buttons or text buttons. Icon and text should not be combined into one button. Buttons are always right-aligned.

The buttons are sorted from frequently-used to seldom-used. This ensures that the most important buttons go into the overflow last.

App-Specific Actions

If needed, you can define your own action for the app. Use text-only buttons with a short, unambiguous text for the action the button performs. A button text is usually a single-word verb (for example, Save). Note that text strings can be longer in other languages.

Text vs. Icon Buttons

Use text-only buttons for all finalizing/closing actions (such as Save).

Styles

  • Use button styles only if they help the user, and not for decoration.
  • Use the emphasized button for primary actions, such as Save.
  • Use the ghost button style for secondary actions, such as Return, and the transparent button for negative path actions, such as Cancel.
  • Use the semantic button for positive/negative actions (property: typeaccept or reject).
  • Use only one emphasized button per toolbar and never mix emphasized and semantic buttons.
    Exception: Additional messaging button for the message popover.

For more information, see Button and Action Placement.

Resources

Want to dive deeper? Follow the links below to find out more about related controls, the SAPUI5 implementation, and the visual design.

Elements and Controls

Implementation

Header Toolbar

The header toolbar always appears in the header of the page. One main advantage of the header bar is that this bar is always visible and will not scroll away. It contains actions that are relevant for the entire page.

Our general guideline is to use only icon buttons or text buttons. Icon and text should not be combined into one button. Buttons are always right-aligned.

Buttons are sorted from frequently-used to seldom-used. This ensures that the most important buttons go into the overflow last.

Usage

Use the header toolbar if:

  • Your page contains several controls, and the actions are valid for the entire page.

Do not use the header toolbar if:

  • You have closing or finalizing actions for the whole page. Place them in the footer toolbar instead.
  • You have actions that belong to a specific UI element. Place them as close as possible to the corresponding object (for example, in a table or chart toolbar).

Responsiveness

To enable responsiveness, use the OverflowToolbar control. For more information, see the corresponding section in the Toolbar Overview article.

The height of the toolbar changes on desktops (compact mode), tablets, and smartphones (cozy mode). For more information about cozy and compact modes, see Content Density.

Header toolbar – Size S
Header toolbar – Size M
Header toolbar – Size XL

Components

The header toolbar can contain the following components:

  • App-specific business actions
  • Generic actions


The following actions count as generic:

  • Flag and Favorite
  • Share menu
  • Overflow
  • Paging

Behavior and Interaction

Business Actions

If needed, the app team can define their own actions for the app. In this case, the text buttons should contain a short, unambiguous text that explains what action the button performs. A button text is usually a single-word verb (for example, Synchronize). Note that translated UIs may increase the length of the text string.

Text vs. Icon Buttons

Use text-only buttons for all business actions (such as Edit and Create).
Use icon buttons only for generic actions (such as  for Share). For icons, always provide a suitable text label as a tooltip.

Business action with icon button in header toolbar
Actions in the header toolbar

Edit and Delete (1)

If you want to perform a global edit action, use the Edit button.

If you want to perform a global delete action, use the Delete button.

Add / Create (2)

Place the Add or Create (item or row) action as close to the content as possible.

If the Add or Create action is a main function, don’t move the action into the overflow.

For more information on when to use add or create, see UI Text Guidelines

Favorite and Flag (Generic) (3)

Users can mark objects as a favorite or flag objects for quick subsequent retrieval. The user does this by clicking the relevant generic Favorite or Flag button in the header toolbar. For more information, see Flag and Favorite.

Share (Generic) (4)

The Share menu allows users to work with content outside the app they are currently using. It can include a variety of actions. All the buttons contain either text only or a combination of an icon and text. The following actions can be used and complemented by each app:

  • Send Email (icon: email  )
  • Discuss in SAP Jam (icon: discussion-2  )
  • Share in SAP Jam (icon: share-2  )
  • Send Message (icon: post  )
  • Save as Tile (icon: add favorite  )
  • Print (icon: print  )
  • Export as Excel (icon: Excel attachment  )
  • Export as PDF (icon: pdf attachment  )
  • Export As…
  • Open In…

If you expect the user to use the Open In… functionality frequently, place it directly in the header toolbar.

The Share action can appear on the full screen or the details screen, and is never moved into the overflow menu. It is always right-aligned. The overflow starts to the right side of the Share icon.

Possible actions in the 'Share' menu
Open share popover in header toolbar

Overflow (Generic) (5)

If apps use the overflow toolbar, the overflow is generated automatically. The overflow is activated if there is not enough space for all the actions on the toolbar, or if some actions are considered less important than others. In this case, the app team decides that only certain actions appear in the overflow.

The app team also decides whether some actions are so important that they should never move into the overflow.

The  “” (overflow) button can be used to toggle the overflow menu on and off.

The user clicks the overflow button to open a popover. In this action sheet, all icon buttons are labeled with text and the user can overflow the following controls:

  • sap.m.SegmentedButton – when in the overflow, the segmented button is in select mode and looks like a select button, although it is technically still a segmented button
  • sap.m.Select – when in the overflow, it is always in default mode to take advantage of the extra space, even if it was set to icon-only mode in the toolbar
  • sap.m.ToggleButton
  • sap.m.Checkbox
  • sap.m.Input
  • sap.m.SearchField
  • sap.m.ComboBox
  • sap.m.DateTimeInput

Split-screen layouts have their own overflow menus.

All buttons go into the overflow from right to left. This ensures that the most important buttons are the last to be moved into the overflow menu.

Header toolbar with open overflow

Paging (Layout)

Use the paging buttons if you want to navigate to the previous or next object.

Use the following tooltip labels:

  • Icon: Up arrow
    Tooltip label: Previous [Object]
    Example: Previous Purchase Order Item
  • Icon: Down arrow
    Tooltip label: Next [Object]
    Example: Next Purchase Order Item

To avoid translation issues, never use “Next” and “Previous” as standalone labels. Always state the object you are navigating to.

If you are using the Share button, place paging buttons to the right of the Share button.

Paging buttons in header toolbar

Styles

  • Use button styles only if they help the user, and not for decoration.
  • Use them for primary actions, such as Edit and Create.
  • Use a positive/negative style (property: type = accept or rejector an emphasized style (property: type emphasized).
  • Use only one emphasized button per toolbar and never mix emphasized and semantic buttons.
    Exception 1: Messaging button appears
    Exception 2: Object has been flagged or marked as a favorite

For more information, see Button.

Guidelines

For more information, see the Guidelines section in the toolbar overview article.

Resources

Want to dive deeper? Follow the links below to find out more about related controls, the SAPUI5 implementation, and the visual design.

Elements and Controls

Implementation

Message Page

Message pages give feedback to the user when an app or list is empty, or when an error has occurred. There are different use cases for showing a message page. The layout is the same, but the text and icon can change depending on the use case. You can use the message page in the following situations:

  • Filtering with no results
  • Searching with no results
  • Empty app
  • Too many items
  • Item saved as a tile that is not longer available
  • Error

Responsiveness

The size of the message page adjusts to fit the available space.

Size S (Smartphone)

Search with no results on a smartphone

Size M (Tablet)

Search with no results on a tablet

Size L (Desktop)

Search with no results on a desktop device

Types

The layout of the message page is always the same. Only the texts and the icon change, depending on the use case and the user’s location in the app. The different types are described below.

Filter

The user has set a filter and there are no results:
  • Display the following text: No matching [entities] found. Check the filter settings. For example: “No matching items found. Check the filter settings.”
  • Show the filter icon.
No matching items found

Search

The user has searched for something but there are no results:
  • Display the following text: No matching [entities] found. For example: “No matching items found.”
  • Show the search icon.
Search with no results

No Items

The app contains no items:
  • Display the following text: No [entities] are currently available. For example: “No items are currently available.”
  • Show the product icon or an icon that matches your use case.
No products can be shown

Too Many Items

If there are too many items, the user has to perform a search to see results:
  • Display the following text: Search for [entities]. For example: “Search for opportunities.”
  • Show the search icon.

Loading

 The app is loading:
  • Display the busy state without any explanatory text, such as “Loading”.

Save as Tile

The item saved by the user is no longer available:
  • Display the following text on the page and specify the entity. Where relevant, you can also include the ID: This [entity] is no longer available, or [Entity] [ID] is no longer available. Examples: “This product is no longer available.” or “Purchase order 123456 is no longer available.”
  • Show the product icon or an icon that matches your use case.

Error

The app cannot show any content due to an error:

  • Display the following text: “Sorry, we can’t find this page.”
  • Provide a link to the app start screen if you can.
  • Show the document icon.
Error case – With link
  • Otherwise, display the following text:Sorry, we can’t find this page. Please check the URL you are using to call the app.”
  • Show the document icon.
Error case
Error case

Formatted Text and Buttons

You can apply formatting to the text on the message page (such as bold, italic, underline, and bullet points), and add buttons. Do not place more than 2 buttons on a page.

Message page with buttons
Message page with formatted text

Components

The following UI elements can be placed on the message page:

  • Icon
  • Text
  • Formatted text
  • Link
  • Button

Guidelines

  • The icon in the message page is mandatory.
    Exception: If you can’t find a suitable icon for your message, leave out the icon.
  • Always include a message short text, and add a description with further details if needed. Do not show only the state of the message (like error or warning), but rather try to describe the problem. Help the user to recognize, diagnose, and resolve the issue.
  • Keep your message as concise as possible.
Different texts are displayed for different use cases. In general, follow these guidelines:
  • Use the plural forms of the business objects. Ensure that the business objects are in sentence case.
  • Sometimes, your app will simply be loading. In this case, use the busy state without an explanatory text. Do not show the “No data”  message, which could mislead users.

Resources

Want to dive deeper? Follow the links below to find out more about related controls, the SAPUI5 implementation, and the visual design.

Elements and Controls

Implementation

Progress Indicator

The progress indicator visualizes the current advancement of a process or a degree of accomplishment. The inside of the progress indicator is filled with color to indicate the state of progress. The advancement depends on the specific process. The progress is shown either using absolute numbers or the current percentage of completion together with a progress bar.

Within SAP Fiori, the progress indicator is used as a “meter” or micro chart. It indicates a current object status and is not related to any process that is currently running.

Usage

Use the progress indicator if:

  • You need to visually show a current status.
  • You need to visually strengthen a current status.
  • You need to make different states comparable to each other at a higher level.
  • You want to show custom values as well as percentages.

Do not use the progress indicator if:

  • Visual feedback is needed for an ongoing operation. Use a busy indicator instead.
  • The progress is indeterminate. Use a busy indicator instead.
  • You want to display a single value in the form of a fillable shape or a group of shapes that describe their context. Use the status indicator instead.

Responsiveness

The progress indicator itself is not responsive. There is no visual difference between the cozy and compact form factors. The compact form factor is used for apps that run on a device operated by a mouse and keyboard. For more information, see Content Density (Cozy and Compact).

Progress indicator in compact mode

Layout

Show the current progress as a percentage value between 0% and 100% (property: percentValue).

Progress indicator displaying 10% progress
Progress indicator displaying 50% progress
Progress indicator displaying 80% progress

Alternatively, you can show the current progress as text in addition to the bar. In this case, the text is shown on the right of the bar if the progress is 50% or less. In all other cases, the progress is shown right-aligned on the bar itself (property: showValue).

Textual presentation for progress of 50% or less
Textual presentation for progress of more than 50%
Progress indicator without textual representation

You also have the option of showing any application-specific text instead of a percentage (property: displayValue).

App-specific textual representation of progress

Styles

Enabled/ Disabled

The progress indicator can be enabled or disabled (property: enabled).

For more information, see UI Element – States.

Enabled progress indicator
Disabled progress indicator

Display State

For usage in read-only forms or read-only tables, the progress indicator provides a “display” state. This state is optimized for reading environments.
The default height is lower, the bar color darker (property: displayOnly).

For more information, see UI Element – States.

Progress indicator in display state

Value States

The progress indicator can visualize different value states that are represented by various theme-dependent semantic colors. The states are: normal, success, warning, error, and information (property: state).

For more information on how to use the different semantic states of the control, see How to Use Semantic Colors.

Value states can be combined with the “enabled” and “display” states.

Progress indicator in success state
Progress indicator in warning state
Progress indicator in error state
Progress indicator in information state

Guidelines

Use the progress indicator to add clarity and weight to an important state that needs to be perceived very quickly.

Progress indicator used for status display

Label

Always provide a label for the progress indicator.

Exception: If the progress indicator is used as a single control inside a cell of a responsive table, the column header text is used as a label.

Progress indicator in a responsive table

Text Truncation

If the length of the text exceeds the available space in the progress indicator, the text truncates. In this case, clicking the progress indicator displays an information popover with the full text.

For more information, see Truncation.

The information popover is active only when the text is truncated.

Progress indicator with information popover

Group

Use a group of up to five bars to help users compare different states at a high level. Note that in a group of more than five bars, slight differences are much harder to perceive than a numeric display.

If the user has to compare a group of values, be sure to use the same visual display for all of them (only bars or only numbers).

Group of progress indicators

Animation

Although the progress indicator supports an animation mode, do not use it. The animation is slow and does not provide additional value.

Additional Guidelines:

Progress indicators are typically used within (but not restricted to) the following controls:

Do not disable a progress indicator. A progress indicator is not interactive, therefore disabling it has no effect.

Exception: The progress indicator is shown inside a disabled UI area, such as a completely disabled form or panel.

Properties

The following additional properties are available for the progress indicator:

  • The width property defines the width of the progress indicator. The height property defines the height of the progress indicator. Adapt it only if the default height does not fit into the surrounding context. Do not use a height below 1.5 rems if text is shown inside the progress indicator.
  • The textDirection property is used for localiaztion (right-to-left languages).
  • The busy property sets the progress indicator to busy state.
  • The visible property shows or hides the progress indicator.
  • The tooltip property does not have an effect.

Resources

Want to dive deeper? Follow the links below to find out more about related controls, the SAPUI5 implementation, and the visual design.

Elements and Controls

Implementation

Select Dialog

The select dialog enables users to select one or more items from a comprehensive list. The select dialog comes with a list of entries and a search field to filter the list.

A more enhanced dialog for single selection and multiselection is the value help dialog as it offers range selection and excluding functions.

Usage

Use the select dialog if:

  • Users need to select one or more entries from a comprehensive list that contains multiple attributes or values.

Do not use the select dialog if:

  • Users need to pick one item from a predefined set of options that contains one attribute or value only such as languages. In this case, consider using the combo box or select instead.
  • Your use case requires more enhanced functionalities such as a selection based on ranges. For the selection of values, consider using the value help dialog instead.
  • Your use case requires tabs, filters, or an Add New functionality in the select dialog. In this case, use a standard dialog instead.
Information
For more information on which selection control to choose, see the selection control overview.

Responsiveness

The display of the select control depends on the device. On phones, the selection list takes up the whole screen. On desktop and tablet devices it appears as a popover.

Size S

Single select dialog in full screen on smartphone
Multi-select dialog in full screen on smartphone

Size M

Single select dialog on tablet
Multi-select dialog on tablet

Size L

Single select dialog on desktop
Multi-select dialog on desktop

Components

Dialog Header

You need to set the title of the dialog header (1). We recommend the following form:

Single selection

Select

Example: Select Product

Multi-selection

Select

Example: Select Products

Search

The first element in the dialog is a standard search field (2).

Info Toolbar

The info toolbar (3) is only available in multi-selection mode. It shows the number of selected items in the following form:

Selected :

Example: Selected Products: 2

Content

The content area (4) can be filled with any list content inherited from the list item base, such as standard list items, display list items, and feed list items. You can set the content to be displayed as grouped.

Button Toolbar

The button toolbar (5) contains two buttonsSelect and Cancel. Select takes over the selection, while Cancel resets the selection to the state it was in when the dialog was opened.

Components of the select dialog. Left: single select, right: multi select

Behavior and Interaction

The select dialog can be called up from any control. The most common trigger is an input field with selection icon, also known as a “value help field”, or F4. Alternative triggers are buttons or icons, which add items to an existing list or the infobar in the master list in order to apply a contextual filter.

Single Select

Once users select an entry, the select dialog is closed and the selected entry is taken over. If applicable, the entry is displayed in the field from which the dialog was triggered.

Multi-Select

In the multi-select version of the select dialog, checkboxes are provided for choosing multiple entries. The selection is taken over when the user closes the dialog via OK. Cancel closes the dialog without taking over the selected values. An infobar indicates the number of selected items.

Search

The user can search items.

Resize and Drag Dialog

You can make the select dialog resizable and draggable by setting the corresponding properties (also called resizable and draggable) to “true”.

A resizable dialog makes sense if the items inside have long names or descriptions.

A draggable dialog allows users to see the app content behind the dialog.

Guidelines
Both features are optional. However, even if you only need one, always set both of them to “true” to ensure consistency.

Guidelines

List Options

If you need to indicate that none of the selection options are selected, or you need to allow the user not to select an option, provide (None) as an option and place it at the beginning of the list.

If you need to indicate that all items apply (for example, as a list filter), provide All as an option and place it at the beginning of the list.

Select list with '(None)'

Search Behavior

Two types of search behavior are available:

(1) A live search, also known as “search-as-you-type” (property: liveChange), which is triggered by each character that the user enters or deletes.

(2) A manual search, which is triggered explicitly after the user enters text in the search field and clicks the Search icon or presses the ENTER key.

Although app developers need to decide themselves which search to use, we recommend implementing the live search whenever possible. Use the manual search only if the amount of data is too large and your app would otherwise run into performance issues. For more information, check out the article on search.

Reset/Remember Selections

By default, the selection is reset when the dialog is closed. This allows users to make a new selection when they reopen the dialog and makes sense when users need to add multiple items to a table.

Selection is reset after the dialog is closed

However, if your use case requires selections in a dialog to be remembered so that the user can make corrections, you can set the rememberSelections function in the select dialog to “true”. When users exit the dialog by clicking Cancel, the selection is then restored to the state it was in when the dialog was opened.

Selection is remembered after the dialog is reopened

This also works in single-select dialogs. There, if users click the remembered item again, the dialog closes and they do not have to explicitly click Cancel.

Infobar

In multi-selection mode, an infobar shows the number of selected items. Use the following format:

Selected: [Business Objects] Selected: [Number of Items]
Example: Products Selected: 2

Note that the infobar is not “sticky”. When the user scrolls down the list, the infobar scrolls off the screen.

“Clear” Button

The Clear button allows users to clear all the selected items. By default, the button is not shown. To display the button, set the showClearButton property to “true”.

Select dialog with 'Clear' button

Content

By default, the select dialog comes with a growing feature (property: growing = “true”). We recommend disabling the growing feature and setting this property to “false”. This ensures that all items in the table are loaded at once, and that the “Items selected” count, the search, and select/deselect features all work properly.

Resources

Want to dive deeper? Follow the links below to find out more about related controls, the SAPUI5 implementation, and the visual design.

Elements and Controls

Implementation

  • No links

Tree Table

A tree table contains a hierarchical set of data structured in rows and columns and grouped into nodes. The analytical table (also know as ALV) can provide additional details in several non-hierarchical columns per line item. 

Usage

Trees are used to display and work with large amounts of hierarchical data. They have a high data density and therefore convey an immediate feeling of complexity. Ideally, you should only show trees with a lot of hierarchical data as a last resort. Try the following instead:

  • Break down the data into manageable chunks and allow the user to navigate or drill down between them.
  • Use charts with drilldown functionality until the amount of data is more manageable.

Responsiveness

A tree table is available for desktops and tablets, but not in smartphone sizes. It supports touch devices, but is not optimized for small screens.

If you use a tree table, note that you have to implement a fallback solution for small screens. This fallback solution does not need to support all use cases.

Possible fallback solutions are as follows:

  • Use navigation to different pages instead of a tree structure. This works well for structures that are no more than four levels deep.
  • Remove levels until only one or two remain. Replace a single-level tree by a table, and a two-level tree by a grouped table or a split-screen layout.
  • Use filtering instead of a tree structure.

You can try to create a fallback based on these ideas, but a completely different solution, such as showing charts in a read-only case, might be more appropriate.

Tree table shown on a desktop
Tree table shown on a tablet

Types

Like all SAP Fiori controls, the tree table is shown in compact mode on a desktop and in cozy mode on tablets.

For a desktop, you can also display even more rows on the same screen height by adding the condensed mode in addition to the compact mode. This renders less white space for each item.

Note that the condensed content density has always to be set in addition to compact. Do not use condensed on its own. Do not mix condensed with cozy. Doing so could lead to unpredictable and / or unwanted results, e.g. cozy sized controls in condensed sized containers, missing padings, etc.

Note that neither compact mode nor condensed mode can be interacted with via touch. Even on a desktop with a touch screen, users will have difficulty selecting rows or using controls inside the cells when using their fingers.

Furthermore, condensed mode is not available for Internet Explorer 9. If condensed mode is to be used, please provide a fallback.

For more information on cozy and compact modes, see content density.

Compact Mode

Tree table – Compact mode

Condensed Mode

Tree table – Condensed mode

Components

Column Header

The column header provides the label for the corresponding column and access to the column header menu.

Resizing columns works in the following ways:

  • Mouse interaction: Dragging the separator line between two columns (sap.ui.table. Column, property: Resizable). Double-clicking optimizes the column according to the length of the currently visible data and the label of the column header (sap.ui.table.Column, property: Autoresizable).
  • Touch interaction: The user taps the column header to reveal two buttons: one for showing the column header menu and one for resizing. Drag the latter to resize the column.

After resizing a column, the adaptation of the column widths depends on how the column width is set:

  • If column widths are set in pixel-based units (px, em, rem), the corresponding column is adapted and following columns are moved accordingly. The width of all other columns is not affected.
    If all the columns together take up less width than the table control, an empty space is added. If all the columns together take up more width than the table control, a scrollbar appears.
  • If all column widths are set in percentage or “auto”, resizing one column might also lead to the automatic resizing of some or all other columns. The position of the resized column might also be affected. This is done to ensure that the whole table width is used and no white space is added. A scrollbar appears only, if all or most of the columns get very small. To avoid the unintended side effect of undersized columns, a minimum width can be set per column. Please be aware that this minimum width is only taken into account if columns are automatically resized. End users are still able to reduce the column width below the provided minimum. (sap.ui.table.Column, properties: width, minWidth)

Columns can be rearranged by dragging the column header to another position (sap.ui.table.TreeTable, property: enableColumnReordering).

Tree table – Column header
Opening the column header menu on touch devices
Fewer columns than space available

Line Item

A line item contains a set of cells and provides options for selecting the item.

To prevent adverse side effects when scrolling vertically, all line items must have the same height (sap.ui.table.TreeTable, property: rowHeight).

Tree table – Line item

In rare cases, show the actions within the line item. One example would be an Add to Cart button in a shopping application. Since these actions are repeated in every line and thus use a lot of screen real estate, do this only for a maximum of one or two actions. Provide a separate column per action. Use a button, unless the action trigger belongs to a link. Hide the action in rows for which it is not applicable.

Tree Column

The first colum (tree column) provides the hierarchical structure.

Tree table – Tree column

Expand/Collapse Button

The expand/collapse button is offered on container nodes to allow the child items of the corresponding container to be shown or hidden.

Tree table – Collapse
Tree table – Expand
Tree table – Expand

Container Node

A container node is a line item that contains child elements.

Tree table – Container node

Leaf Node

A leaf node is a line item that does not contain child elements.

Tree table – Leaf node

Cell

Each cell provides one data point. It can contain one of the following controls to display the data point:

While it is technically possible to also use other controls, doing so could lead to issues in regards to alignment, condensed mode, screen reader support, and keyboard support.

If you use text, use only single-line text to keep the same row height. Truncate if necessary as this prevents adverse side effects when scrolling vertically (sap.m.Text, property: wrapping, value: false).

Tree table – Cell
Tree table – Cell

Tree Cell

A tree cell is a cell inside the tree column. Besides its data point, it provides a collapse/expand button on container nodes, and it indents the different hierarchy levels.

Tree table – Tree cell

Column Header Menu

For the tree column, the column header menu can contain the menu item Freeze and a Filter field, in which the user enters free text.
For all other columns, only the free text filter is available.

Tree table – Tree column header menu

Selection Cells

For multiselection tree tables, the first column contains checkboxes for selecting line items. Besides multiselection, the tree table offers a single-selection mode and also a read-only mode, in which line items are not selectable.

Tree table – Selection cells

Select All

For multiselection tree tables, the column header can contain a checkbox above the selection cells for selecting or deselecting all line items.

Tree table – Select all

Scrollbar

The tree table allows horizontal and vertical scrolling. You can add any number of line items to the tree table, which uses “lazy loading”.

To prevent adverse side effects when scrolling vertically, all line items must have the same height (sap.ui.table.TreeTable, property: rowHeight).

The tree table is optimized to allow faster scrolling within the first 1000 items.

Tree table – Vertical scrollbar

Behavior and Interaction

Selection

The tree provides the following possibilities:

No selection: Items cannot be selected. (property: selectionMode = None)

Tree table – No selection

Single selection: One item in the tree table can be selected. A row selector column is shown. (property: selectionMode = Single)

Tree table – Single selection

Multiple selection: One or more items can be selected. The tree table provides a column with checkboxes on the left-hand side. Clicking a checkbox toggles the state of the corresponding row from deselected to selected and back. The Shift key can be used to select a range.

For multiple selection, you can choose between two variants.

  • Multi-toggle mode (property: selectionMode = MultiToggle)
  • Multi-selection plug-in (sap.ui.table.plugins.MultiSelectionPlugin)

These variants behave differently when the user selects more items than are currently loaded in the front end.

Multi-toggle

In multi-toggle mode, you can offer a Select All checkbox to the left of the column header (property: enableSelectAll). Selecting this checkbox selects or deselects all items that are currently loaded in the front end. All other items are not selected/deselected. If the application data is stored in the back end, scrolling down further can reveal additional unselected items. The same can happen with range selections if not all items in the selected range have been loaded to the front end.

Multi-selection plug-in

If you use this plug-in instead of the multi-toggle selection mode, the behavior for range selection and Select All changes:

  • By default, a dedicated Deselect All button replaces the Select All checkbox. There is no default UI element for selecting all items.
  • You can set a limit for the number of items that can be selected (sap.ui.table.plugins.MultiSelectionPlugin, property: limit). This limit has the following effect:
    • The range that can be selected using the Shift key is limited to the specified number of items (default = 200). The table automatically scrolls back to the last selected item and a message can appear (sap.ui.table.plugins.MultiSelectionPlugin, property: enableNotification). Users can select more items by selecting additional ranges (the specified limit applies each time).
    • If the selection limit is set to 0, a Select All checkbox is shown. There is also no limit on the number of items that can be selected in a range. All selected items are loaded, which can lead to performance issues for large data sets.
  • If selected items are not already available in the front end, they are loaded automatically by the plug-in and set as selected.
Information
When setting a limit for the number of items that can be selected, keep the following boundaries in mind:

  • The performance of your service: How many items can be loaded at once in a reasonable time? Does this also apply if an end-user shows all available columns?
  • The “minimum limit”: Internally, the grid table loads blocks of items as the user scrolls down. Because this block size (sap.ui.table.TreeTable, property: threshold) is usually also based on the performance of the service, it should be safe to assume that the minimum selection limit is twice this size. In this case, loading the data would take as long as scrolling down and loading exactly one more block. Nevertheless, we recommend using larger limits if your service allows.

Tree table – Multiple selection
Multi-selection plug-in with a limit

Selection Behavior

An item can be selected in different ways, depending on the configuration of the tree table (sap.ui.table.Table, property: selectionBehavior):

  • Row: An item is selected by clicking the checkbox or the row. Use this option for multi-selection tree tables if clicking a row or a cell is not used for anything else.
  • RowSelector: An item is selected only by clicking the checkbox in the selector cell. Use this option if clicking the row (or a cell inside the row) is used for something else, such as navigation.
  • RowOnly: An item is selected only by clicking the row, and not using checkboxes in the selector cells. Use this for single-selection tree tables if clicking a row or a cell is not used for another purpose, such as navigation.

Set the property collapseRecursive to “false” in order to keep the selection on subnodes even after collapsing and expanding the root node.

Drag and Drop

One or several items can be repositioned within a table or moved to other UI elements using drag and drop operations (sap.ui.table.TreeTable, aggregation: dragDropConfig). While being dragged, the items are shown as ghost elements on the mouse cursor.

Drop targets can be on items, between items, or both (sap.ui.core.dnd.DropPosition). On a drop target, the mouse cursor changes to either a “copy”, “link”, “move”, or “none” cursor. “None” indicates that the dragged item cannot be dropped in the current position  (sap.ui.core.dnd.DropEffect).

Drag and drop is only available on supporting browsers.

Drag and drop
Drag and drop

Column Header Menu

Sort

The column header menu can provide two sort options (sap.ui.table.Column, properties: sortProperty, showSortMenuEntry):

  • Sort Ascending
  • Sort Descending

The user selects one of these options to sort the corresponding column accordingly (sap.ui.table.Column, properties: sorted, sortOrder, sortProperty).

Sort settings in column header menu

Filter

The column header menu can provide a search field for entering free text. If the user enters a term in the input field and triggers the search by pressing Enter, the tree is filtered by the tree column and the corresponding value. If no items match the filter values, the filtered tree table may be empty.

Tree table – Filter
Tree table – Filter

Freeze Columns

The Freeze/Unfreeze option is provided in the column header menu of all columns. Using Freeze on one column freezes all columns from the first one to the selected one.

Tree table – Freeze
Tree table – Freeze

Column Handling

Show/Hide Columns

Columns can be shown and hidden. If the tree column is hidden, the following column is the tree column.

Rearrange Columns

The user rearranges columns by dragging and dropping the corresponding column header. The tree column is always the first column and cannot be dragged.

Resize Columns

Columns are resized as follows:

  • Mouse interaction: The user drags the separator line between two columns (sap.ui.table. Column, property: Resizable). Double-clicking the line optimizes the column according to the length of the currently visible data and the label of the column header (sap.ui.table.Column, property: Autoresizable). Note that auto-resizing works only if the cells in this column contain one of the following controls: text, label, link, or input.
  • Touch interaction: The user clicks or taps the column header to reveal two buttons: One to show the column header menu, and one for resizing. The user drags the latter to resize the column.

Context Menu

You can attach a context menu (sap.m.Menu) to a table. The context menu gives users an alternative way to modify the focused elements by giving them access to context-specific functions.

When opened, the context menu gets the row and column context, except for special columns (such as the selection column) or special rows (like group headers). Context menus can be implemented for a specific table, row, or cell (not recommended for editable cells).

Context menus are opened by right-clicking (desktop), long press (mobile), the context menu key, or Shift+F10.

Be aware that using the context menu overrides the browser context menu, which can no longer be opened.

If a control inside a table is the “click target”, and the control also provides a context menu, the control context menu “wins”.

Tree table with context menu

Cell Content

The tree is traditional in that each cell can contain only one data point in one single line.

Apart from plain read-only text, cells can contain the following:

While it is technically possible to also use other controls, doing so could lead to issues in regards to alignment, condensed mode, screen reader support, and keyboard support.

If you use text, use only single-line text to keep the same row height. Truncate if necessary as this prevents adverse side effects when scrolling vertically (sap.m.Text, property: wrapping, value: false).

Guidelines

Filtering

What exactly needs to stay or be removed is highly dependent on the kind of structure and data your tree table displays. For many trees, the following approach works well if you want to apply filters only to the leaves of a tree:

  • Remove all leaves that don’t fit the filter criteria
  • Remove empty nodes

Where nodes need to be filtered, keep the following in mind:

  • A node may or may not fit the filter criteria.
  • A node can contain items (nodes and/or leaves) that fit the filter criteria.

Because of this, the results might contain more nodes than those that are relevant for the filter criteria.

Developer Hint
The tree table itself has no influence on the filter result. It sends a filter request and displays whatever comes back. Make sure that the result set is meaningful.

Sorting

First of all: Is sorting meaningful in your tree? If so, decide on a meaningful default sort order.

If sorting is meaningful, is it meaningful on all levels? Or does the tree structure need to be stable? In the latter case, sort only leaves, but not nodes.

To display the current sort state, an icon is shown in the column header of the most recently sorted column. This icon indicates the sort direction (sap.ui.table.Column, properties: sorted, sortOrder, sortProperty).

The descending sort order must always be the exact reverse of the ascending sort order. For each column, provide a meaningful sort order. For example:

  • Sort text alphabetically
  • Sort numbers by their value
  • Sort status information by the severity of the status:
    • Ascending: Sort status information from positive to negative, with neutral last.
    • Descending: Sort status information from negative to positive, with neutral first.
    • Ascending with different values per severity level: Sort status information from positive to negative, with neutral last. Sort different values within a severity level (semantic color) alphabetically.
    • Descending with different values per severity level: Sort status information from negative to positive, with neutral first. Sort different values within a severity level (semantic color) alphabetically.

Loading Data

To indicate that the table is currently loading items, use the busy state (sap.ui.table.TreeTable, property: busy). Do not show any items or text. As soon as the data has been loaded, remove the busy state and show all items.

Initital Display

Think of the initial expand / collapse state of a tree: If your structure contains many items on the root level, it might make sense to collapse the whole tree in the beginning.

In contrast, if the main items to work with are displayed on a deeper level (e.g. the parent nodes are just some kind of categorization), the tree should be expanded up to the first level where the needed items appear.

Selection

  • We strongly recommend using the multi-selection plug-in. This ensures that all items selected using Select All or as part of a range are included – even if some items were not initially loaded in the front end. This is not the case if you use the multi-toggle option.
  • Do not limit the range selection for the multi-selection plug-in unless you have to.
    • If the dataset is small and/or completely available in the front-end, set the limit property to 0 to enable the Select All option and allow users to select any range.
    • If you have a large dataset, set a limit on the number of selected items to avoid performance issues. Also bear in mind that some actions won’t be helpful if the dataset is too big (for example, a delete operation on 2 million database entries).
  • When setting a limit, also display the corresponding message when the user selects more items at once than the limit allows (sap.ui.table.plugins.MultiSelectionPlugin, property: enableNotification).
  • In multiple selection mode, do not show checkboxes in the first data column in the default delivery to avoid confusion.

Empty Table

Try to avoid empty tables. If necessary, provide instructions on how to fill the tree table with data.

Remove the item count in the table title if there are zero items.

Add Items

For adding items, place an Add or Create text button on the table toolbar.

  • Use Create if the button adds a brand new item that doesn’t yet exist on the database.
  • Use Add if the item already exists and is merely added or assigned to the current object.

Enable the shortcut Ctrl+Enter to trigger the Add and Create buttons.

Show new items as the first item of the tree table or node:

  • If nothing is selected, add the new item to the root.
  • If a single node is selected, add the new item to the selected node.
  • If a single leaf is selected, add the new item as child of this leaf. The original selected item becomes a node.

If your tree doesn’t support adding items to the root, selected node, or selected leaf, disable Create or Add for the corresponding levels.

Disable Create or Add if more than one item is selected.

For more details, see the guidelines for managing objects (including subarticles).

Enabling/Disabling Actions

To indicate if an action can be applied to the current selection:

  • Enable the action if it always works, regardless of whether or not items are selected.
  • Enable the action if it can be applied to all selected items.
  • Enable the action if it can be applied to some of the selected items. If the action is triggered, show a message that informs the user how many items will be affected. Let the user choose whether to apply the action anyway or cancel the action.
  • Only disable the action if it can be applied to none of the selected items.

For more details, see UI Element – States.

If the action was applied and the items are still available, keep them selected.

Message for an action that applies to a part of a selection

Columns

Minimize the number of columns. Avoid the need to scroll horizontally in the default delivery. In the first column, show the hierarchical data, which should identify the line item. Choose the name over the ID, but if both are needed, show the name first, then the ID.

The tree table assigns the same width to each column by default. It is recommended that you overwrite this default to provide optimal space for your content (sap.ui.table.Column, property: width).

If you define the column width in pixels or rems, resizing a column affects only the width of this specific column. Reducing the browser window size results in a scrollbar. After resizing a column, a scrollbar appears if the width of the table is not enough to show all columns. If the columns use less space than is available, white space appears on the right side of the last column.

If you define the column width as a percentage, resizing one column affects the width of several or all columns. Text becomes truncated when the browser window size is reduced. This is done to make sure that all columns together fill the space of the table. A scrollbar appears only in case the automatic change of the column widths is not enough to display all columns. To avoid the side effect of undersized columns, a minimum width can be set per column. Please be aware that this minimum width is only taken into account if columns are automatically resized. End users are still able to reduce the column width below the provided minimum. (sap.ui.table.Column, properties: width, minWidth)

If you define the column width as “auto”, the behavior is the same as for “percentage”. In contrast to percentage, “auto” distributes the columns equally.

To decide on how to set the column width (pixel/rem/em vs. percent/auto), keep the following tips in mind:

  • For tables with only 2 to 3 columns, use pixel-based units. This ensures that on wide screens the values in the columns are not spread over the whole screen, which improves readability of line items.
  • For tables with many columns, where a horizontal scrollbar is usually needed, use pixel-based units. This avoids unintended side effects when resizing columns.
  • For all other tables, use whatever fits your case better.

Be cautious with mixing columns with pixel-based and percentage-based widths. While this can be helpful in some cases, it could also cause even more unintended side effects when resizing a column. When using percentage-based widths for one or more columns, think of the possibility to not allow end users to resize columns at all.

Alignment of Cell Content

Align column headers according to their cell content:

  • Texts are left-aligned.
  • Numbers (except for IDs), dates, and times are right-aligned.
  • Icons are centered.
  • Micro charts are left-aligned.

In addition, align amounts with currencies to the decimal point. You can do this with the sap.ui.unified.Currency control.

Note that most currencies have two digits after the decimal point, but there are exceptions, for example:

  • The Tunisian dinar has three digits.
  • The Japanese yen has no digits.

In tree tables with mixed currencies, all amounts still have to be aligned to the decimal point.

To enable positive and negative values to be identified more easily, position the minus sign to the right of the number. It is placed in the same position in every row.

For more information, see currency.

Formatting Cell Content

  • Note that there are different locale formats, so show dates, times, and numbers in the correct format for the user’s language/country.
  • If you show both a a text and an ID, consider the requirements for sorting, grouping and filtering:
    • If users need to sort, group, and/or filter by both text and ID, show the text and ID in two separate columns.
    • If users only need to sort, group, and/or filter by either text or ID, show the ID in parentheses after the corresponding text.
  • If the unit of measurement is the same for all rows, show the unit of measurement in the column header. Otherwise, show the unit of measurement within the row.
  • If you want to let users sort, filter, or group by amount and by unit of measure independently, put both in different columns. If you combine them in one column, offer only sorting, filtering, and grouping by amount.

Tree vs. Table

Trees are more complex than tables due to their hierarchical view. Users tend to have more problems finding items in hierarchical views than in flat lists, except where the hierarchical view is natural. By natural we mean that every child node should be part of only one parent, and this relationship between the child and parent is clear and well known.

Do
Example of an acceptable use of tree tables
Do
A clear parent-child relationship

When you use trees, you should choose broad hierarchies over deep hierarchies. Deep hierarchies make finding items more complicated. So try to reduce hierarchical levels where possible, especially if the hierarchy is not natural. Ideally, a tree should have a maximum of four levels, the first two of which should contain the most important items.

Don't
Avoid unnecessary depth in the hierarchy
Do
Favor breadth over depth in the hierarchy

You can use the following methods to reduce hierarchy levels:

  • Avoid single root nodes. A single root node is often used to provide a Select All feature. Since the tree control provides an extra space for a Select All feature, the root node is not usually needed.
  • When you use only two levels, choose a grouped table or grouped ALV over a tree table control. Expand all groups for the default delivery.
  • Container nodes at the top level can usually be replaced by tabs or value pickers.
  • Eliminate unnecessary mid-level containers, for example, by combining redundant ones.
  • Exercise care when using a tree due to its overall complexity. The hierarchical structure of the data does not necessarily mean that a tree control is required.

Design Concepts

The tree table can be used to display large amounts of hierarchical data. Unfortunately, tree tables have a high data density and therefore convey an immediate feeling of complexity. Ideally, tree tables with large amounts of data should only be shown if there is no other option. You should instead try the following:

  • Flatten the data. A list, table, or ALV is still complex, but less so than a tree table.
  • Break down the data into manageable chunks. Allow the user to navigate or drill down between them.
  • Use charts with drilldown functionality until the amount of data is more manageable.

Try to avoid horizontal scrolling in the default delivery.

Navigation

To trigger navigation on line item level, choose one of the following options:

  • Use a link for the attribute that identifies the row. Clicking the link triggers the navigation. This is the preferred option.
  • Add the RowActions column and show the navigation arrow (  ) at the end of the row. No column header text is required. The navigation column is fixed and will not scroll away. Users also cannot personalize this column. The navigation arrow triggers the navigation.
    Do not use the RowActions column for actions other than navigation and deletion.

Special case: Multi-selection in a master-detail scenario
When a multi-selection table is used in a master-detail scenario, it is not clear which item was last opened (for example, which item is currently shown in the second column of a flexible column layout). In this case, you can display a “navigated” indicator to show which item is currently open.

Examples of Incorrect and Correct Usage

When you use trees:

  • Choose breadth over depth.
  • Emphasize important values. Do not let the user run into a wall of text without guidance. You can use bold text for this.
  • Try to minimize the number of columns, especially if there is a large number of rows.
  • Optimize column width for its initial visible content. Do not automatically adjust column width based on content changes.
  • Do not wrap content, truncate it. End users can easily change the column width to see the full text.
Don't
Avoid truncating the initial visible content in the default delivery
Don't
Never wrap texts
Never wrap texts
  • Maintain a fixed layout, except when the user wants to change it.
  • In the default layout, use the tree column for the item name or data that identifies the row. This helps the user to choose between different items.
  • Create a clear and immediately understandable hierarchy. Use clear parent-child relationships. If this is not possible, add a child in different nodes to help the user find the element.
Do
Acceptable: repeat entries to optimize finding items
  • Consider persisting the layout settings. When a user reopens the app, show the tree table with the same column sizes, column order, and view settings as last defined by this user.
  • Use the Select All feature only if it makes sense. Note that selecting a lot of data also takes time and might not be appropriate for all use cases. For example, a delete operation on two million database entries might not be very helpful in many cases.
  • Set the property collapseRecursive to “false” in order to keep the selection on subnodes even after collapsing and expanding the root node.

Empty Tree Tables

Avoid empty tree tables. If necessary, provide instructions on how to fill the tree table with data (sap.ui.table.TreeTable, properties: noDataText, showNoData).

Examples:

  • If a tree table is initially empty, provide at least a basic text:
    No items available.
    Overwrite this whenever a hint can be provided on how to fill the tree table with data.
  • If a tree table is used together with a filter bar (as in the list report), and is initially empty, use the following text:
    No filters set. To start, enter your search and filter settings and run the search.
  • If a tree table is used together with a filter bar and the filter does not return results, use the following text:
    No items found. Check the search and filter settings.

Adapt the texts above if:

  • The standard text is not precise enough for your use case (for example, no search is offered, only the search is offered).
  • You are using the live search (no Go button in the filter bar). In this case, leave out “run the search”.
  • The standard text is misleading (for example, if the data is filled based on a master-detail pattern instead of search and filter settings).

Highlight Items

To show that an item needs attention, a highlight indicator can be shown in front of the item. The highlight indicator can be used to indicate:

  • A semantic state, such as red or orange for an error or warning. In this case, use semantic colors.
  • Additional information, such as blue to highlight newly added items. In this case, use semantic colors.
  • Industry-specific or process-specific states, such as “out of stock” or “excess of inventory”. In this case, use indication colors.

Be aware that the highlight is just an indication. It does not tell users exactly what is wrong. Make sure that you provide this information within the table row, ideally in the same color.

For details on the use of highlight colors, see How To Use Semantic Colors / Industry-Specific Colors.

(sap.ui.table.TreeTable, aggregation: rowSettingsTemplate)

Highlighted items
Highlighted items

Drag and Drop

Drag and drop is “invisible” on the UI: users can’t see where dragging is available and where it isn’t. Also, because there is no generic keyboard interaction, drag and drop isn’t accessible. Moreover, drag and drop is not available on all browsers. For these reasons, offer drag and drop only in addition to existing (and visible) UI elements that fulfill the same purpose. For example, offer (toolbar) buttons for moving or for copying and pasting items.

Use drag and drop only in addition to existing visible UI elements

If you offer drag and drop for rearranging items within a tree table, use the following options:

  • For dropping items as a child, use whole nodes as drop targets (sap.ui.core.dnd.DropPosition.On).
  • For dropping items on the same level, use the space between items as drop targets (sap.ui.core.dnd.DropPosition.Between).
  • If you want to allow users to drop items as a child or sibling, offer both drop targets (sap.ui.core.dnd.DropPosition.OnOrBetween).

This provides better feedback on where the item will be inserted. Show the “move” mouse cursor (sap.ui.core.dnd.DropEffect.Move).

Drop target on an item

Do not combine rearranging items within one level and sorting. If you really need to do so, make sure there is a dedicated sort criterion for the user-defined sort order, and only offer options for rearranging items if this sort order is set.

Moving items from one node to another can be combined with sorting without any issues.

Don't
Do not combine rearranging items on the same level with sorting

Visible Alternatives to Drag and Drop

Depending on the functionality you need, use one or more of the following alternatives:

  • To move items up or down within a node:
    Use the  Move Up and  Move Down buttons on the toolbar. These buttons move the selected items until the first selected item can’t be moved up / the last selected item can’t be moved down any further.
    Depending on your tree, this can make sense for both leaves and nodes, only for leaves, or only for nodes. When moving a node, move the whole node and (if applicable) all its children up or down to the next position within the parent node.
    Always make sure that when the user moves an item in one direction and then moves it back, the order is the same as it was before.
    Do not combine the option to move items up and down with sorting.
  • To move items to another node:
    Use Copy and Paste buttons on the toolbar.
    Alternatively, offer a Move To button. Clicking Move To opens a dialog that shows all the nodes of the tree, but no leaves. Selecting an item in this dialog closes the dialog and moves the corresponding items to the selected node.
  • To change the level of an item:
    In some trees, such as document structures, users can change the level of an item without affecting the level of parent or child items. In this case, use left and right arrow buttons (   ).

Context Menu

Use the context menu only to give users a quick way of accessing functions that are already available elsewhere (for example, as buttons in the toolbar). Don’t just offer actions in the context menu itself, as users might not realize that these actions are available at all.

The context menu can be triggered for the table, row, or cell. However, we do not recommend using context menus for cells: because the content of a cell is a different touch target than the cell itself, opening a cell context menu via touch is quite hard, even in cozy mode.

Do not combine context menus with condensed mode: editable controls fill the entire space inside a cell. Because of this, context menus cannot be opened at all with touch or mouse interaction.

Tables in Object Pages

In the object page, we advise against using analytical, grid, and tree tables. Instead, use a responsive table and offer navigation to a list report with the table types mentioned above.

For more information on the use of tables within the object page, see the Tables section of the Object Page article.

Export to Spreadsheet

On the table toolbar, apps can provide a menu button for exporting table data to a spreadsheet. For the export, use the export to spreadsheet function.

'Export to Spreadsheet' menu button

Resources

Want to dive deeper? Follow the links below to find out more about related controls, the SAPUI5 implementation, and the visual design.

Elements and Controls

Implementation

Generic Tag

The generic tag control displays complementary information that relates to the current page, such as key performance indicators (KPI) and situations.

Usage

Use the generic tag:

Do not use the generic tag:

  • For decorative purposes.
  • For navigation.

Structure

A – Status Indicator / Criticality Indicator – Mandatory

The indicator displays the status/criticality of the tag. Only use it with the available semantic colors.


B – Message Icon – Optional

The message icon can help visualize the status/criticality of the tag. The color of the icon is always the same as the color of the status indicator. Always use the correct message icon for the respective status/criticality.


C – Title – Mandatory

Always use a meaningful title. Keep it simple and try to use no more than 3 words.


D – Value and Unit of Measure – Optional

The value represents the numeric (key) attribute and its unit. The value has a semantic color, and the unit inherits the color from the value. The color of the value must be the same as the color of the status indicator. For more information, see Object Number.

Generic Tag for KPIs

Structure of generic tag

To display KPIs, use the following structure:

  • A – Status indicator / criticality indicator
  • C – Title
  • D – Value and unit of measure
KPI as a generic tag

The generic tag for KPIs also contains an error state. It is shown when the KPI cannot be properly displayed.

KPI error
KPI error

Responsiveness

The generic tag itself is not responsive. To enable responsiveness, use the overflow toolbar.

Generic tag overflow on object page

Behavior and Interaction

The generic tag has a press event. Use this event only to open a popover or analytical card containing relevant information, using the progressive disclosure technique.

Resources

Want to dive deeper? Follow the links below to find out more about related controls, the SAPUI5 implementation, and the visual design.

Elements and Controls

Implementation

Message Box

The message box (sap.m.MessageBox) is a special dialog that allows you to display messages to the user. Compared to the message popover (sap.m.MessagePopover), you can use the message box to display messages that are not related to a field on the UI, such as technical errors.

Formulate messages in plain language (no code), describe the issue precisely, and suggest a constructive solution. Always help your user to recognize, diagnose, and recover from messages. Bear in mind that no message is always preferable to even a good message. When you design your apps, aim to prevent problems from occurring in the first place.

Usage

Use the message box if:

  • You want to display non-field-related messages.
  • You want to interrupt the user while he or she performs an action.
  • You want to display error, warning, success, confirmation, or information messages.
  • You need to interrupt the user for some other reason.
  • You need the user to acknowledge the message.
  • You need the user to make a decision.

Do not use the message box if:

  • You want to display a short success message. (Use a toast instead. For more information, see message toast.)
  • You can show the message directly in a form field.

Responsiveness

The sap.m.MessageBox control has the same responsive behavior as the sap.m.Dialog control. The message box should only be opened in modal mode. Its basic width is 25 em. For more information, see dialog.

Types

The following categories of messages are available:

  • Error
  • Warning
  • Success
  • Information
  • Confirmation

Error Message

Error messages can be triggered after the user has entered incorrect data or a system error has occurred. They should interrupt the user by displaying a dialog. A final action such as Submit cannot be carried out until the user has rectified the error.

Control: sap.m.MessageBox
Icon: sap-icon://message-error
Title: Error
Stretch: False (no full screen on all devices)

Error message with one action
Error message with two actions

Text guidelines for an error message:

  • Do not just describe the problem; tell the user how to resolve it.
  • In the short text, speak the language of the end user. Do not include system or configuration details.
  • If the solution is more involved or technical, add a long text.
  • Do not repeat the short text in the long text. They both appear together on the screen.

Warning Message

Warning messages highlight potential issues, but the user can still continue. This includes unintended data loss scenarios.

Control: sap.m.MessageBox
Icon: sap-icon://message-warning
Title: Warning
Stretch: False (no full screen on all devices)

Use cases for warnings

a) No decision required: Formulate the message as a statement.
Button(s): OK

Warning message with 'OK' button

b) Decision to continue required: Formulate the message as a statement.

Button(s): OK, Cancel

Warning message with 'OK' and 'Cancel' buttons

c) Specific decision required, with one action

Use a relevant action button. The message may also be formulated as a question.
Button(s): Leave Page, Cancel

Warning message with action and 'Cancel' buttons

Success Message

Success messages give feedback to the user that an action has been executed. The user needs to acknowledge the message.

Control: sap.m.MessageBox
Icon: sap-icon://message-success
Title: Success
Stretch: False (no full screen on all devices)
Button(s): OK

Success message
Success message
Information
You should generally use a message toast (sap.m.MessageToast) to display success messages instead of a dialog (sap.m.Dialog).

Information Message

Information messages provide information the user needs to acknowledge, but which does not involve a decision. The message provides information that is useful and relevant, but never critical.

Control: sap.m.MessageBox
Icon: sap-icon://message-information
Title: Information
Stretch: False (no full screen on all devices)

Button(s): OK

Information message
Information message

Confirmation Message

Confirmation messages prompt users to confirm an action that they have triggered. The title of the message box already includes the action that has to be confirmed, such as an intended deletion or an approval.

Control: sap.m.MessageBox
Icon: sap-icon://question-mark
Title:  (such as “Approve”, “Reject”, or “Delete”)
Stretch: False (no full screen on all devices)

Button(s): Approve, Cancel

Confirmation message

Confirmation Message with “Note” Section

Warning
The image belows shows a “Note” section which allows the user to add notes, for example in a “Reject” process. This feature is not provided by the sap.m.MessageBox. Instead, you can use a normal sap.m.Dialog and place those controls inside the confirmation message.

Confirmation messages prompt users to confirm an action that they have triggered. The title of the message box already includes the action that needs to be confirmed, such as an intended deletion or an approval.

Control: sap.m.Dialog
Type: Message
Icon: sap-icon://question-mark
Title:  Such as “Approve” or “Reject”
Stretch: False (no full screen on all devices)

Button(s): ApproveCancel

Confirmation message with note

Confirmation for “Delete”

If the user clicks Delete, display a “Delete” dialog that confirms the delete action.

Control: sap.m.MessageBox
Icon: sap-icon://message-warning
Title: Delete
Stretch: False (no full screen on all devices)

Button(s): Delete, Cancel


Use cases for delete confirmation messages in object page and list reports

a) No context is available. For example, neither the ID nor the description of the business object are available at the time of deletion.
Body text: Delete this <object>?

Confirmation for 'Delete' action

b) The ID of the object is available.
Body text: Delete <object> <object ID>?

Confirmation for 'Delete' action with object ID

c) The object ID and description are both available at the time of deletion.
Body text: Delete <object> <object ID> “<object description>”?

Confirmation for 'Delete' action with object ID and description
Developer Hint
The default text in SAP Fiori elements will be slightly different, usually using the default term “object” to designate the item to be deleted. When using SAP Fiori elements, replace “object” with the correct business object name. For more information, see Introduction to SAP Fiori Elements – Adjustments.

Components

The message box contains the following sections and options:

Title: Title text appears in the message box header.

Content: This area contains the actual content of the message box.

Footer with actions: Although the message box allows more than two buttons, we recommend limiting the number to two. Available button types are primary and negative path actions. If you require other button types, use sap.m.Dialog instead. If no buttons are defined, the default Close button is shown.

Example of a message box structure

Show Details button

The message displayed for the user should provide sufficient information to ensure that the user knows what has happened. A message box without an explicit details section should be sufficient. Therefore, the Show Details link is only shown if detailed information is available that differs from the message text and is important for the user.

If details are available, the application has three options to display the text. Text can be displayed as:

  • Plain
  • Formatted
  • The original code format
Message details - Plain text
Message details - Formatted text
Message details with code excerpt

Resources

Want to dive deeper? Follow the links below to find out more about related controls, the SAPUI5 implementation, and the visual design.

Elements and Controls

Implementation

Date Picker

The date picker lets users select a localized date using touch, mouse, or keyboard input. It consists of two parts: the date input field and the date picker.

Use this control if the user needs to enter a single date or a date range. The control also allows users to navigate directly from one month or year to another.

Usage

Use the date picker if:

  • You need a range and know that your user is a power user who has to input lots of data. If the keyboard is the primary device used for navigating the app, use two input fields. This allows the user to quickly jump from field to field. By selecting a date in one of the fields, the other field should know what is selected and jump to the same selection.

Responsiveness

The date picker provides responsive behavior that allows for simple operation on all devices. It is smaller in compact mode and provides a touch-friendly size in cozy mode.

Clicking the date picker button opens the popover in full screen. To close it, the user can select a date (which triggers the close event), or click Cancel without selecting a date. Clicking the date input field allows the user to type and does not open the date picker popover.

Date picker on a smartphone
Date picker on a desktop device

Components

The date picker has two components: the date input field (1) and the date picker button (2). On all devices users can either use the input field to type a date or use the date picker button to open the date picker calendar.

Date picker with input field and button

Date Input Field

In the input field, the user can enter a date directly or select it using the date picker. The system validates the entry and provides the user with feedback. You can also show placeholder text in the field.

Date Picker

With the date picker, the user can see a day view, month view, year view, or year ranges.

The current day (1) and the selected date (2) are highlighted. The calendar week is also visible in the day view. The calendar closes when a final day is selected. The user can click the arrows to navigate to the previous and the next day (3), month (4), or year view (5), depending on the current view. To select a date the use can use the calendar (6).

The selected date is shown with a blue background. The current day is indicated with a purple border and owns the focus.

The date picker can also show special days, which are highlighted with a colored line at the bottom of the date cell. For more information about the colors and legend, see Legend for Highlighted Days.

Date picker with a selected date and the current date
Clickable areas of the date picker
Date picker with highlighted days

You can change the default focus “today” to another date. This can save users several clicks when they create events. For an event end date, for example, the focus should propose a date in the future (after the start date).

Use case-specific focus date

Month and Year Views

The month and year views can be used separately in a month or year picker. The year ranges are related to the year view and are not used separately. Selecting a year range navigates back to the year view, not the day view.

Month view in the date picker
Year view in the date picker
Year ranges in the date picker

Footer

You can add a footer with OK and Cancel buttons to the date picker popover. However, we advise against this unless it’s very important that the user can pick multiple values (day, month, year) without closing the popover.

The default and recommended behavior is to close the date picker popover upon selection of the day (or month/year for the month and year pickers).

Date picker with footer

Behavior and Interaction

Selecting a Date

The user selects a date by clicking the date. After the user selects a day, the calendar closes and the date appears in the date input field.

Date selection
Date selection

Clicking the arrow shows the next day, month, or year view.

Navigating to the next month

If the current month is clicked, the view changes to the month view and the user can change the month.

Switching to month view

By clicking on a month, the user changes the month and the view changes to the day view.

Selecting another month

The user can similarly change the year. By clicking the current year, the view changes to the year view. After the user selects a year, the view changes back to the day view.

Switching to year view

After the user selects a year, the view changes back to the day view. The date in the date input field stays the same until the user selects a new date.

Selecting another year

Styles

Value States

The date picker supports the following value states:

  1. Regular
  2. Positive
  3. Warning
  4. Error
  5. Information

You can display a value state text for error, warning, and information states to provide hints for the user.

For more information on how to use the different semantic states, see How to Use Semantic Colors.

For more information about different value states, see UI Element States.

Date picker value states

Guidelines

Date Formats

Long Date Format

Use the long date format for master list/object list item/title and object header/title. Here are some examples:

  • English (US): January 16, 2022
  • German (DE): 16. Januar 2022
  • Danish (DK): 16. Jan. 2022

Short Date Format

Use the short date format for master list/object list item/list of object attributes if space is a concern. For example, you might need to save space if there is a label with the date. Here are some examples of the short date format:

  • English (US): 1/16/22
  • German (DE): 16.01.22
  • Japanese (JP): 22/01/16

Relative and Medium Date Format

If appropriate, use a relative format for master list/object list item/list of object status. For example: today, 1 day ago, 2 days ago, and so on up to 6 days ago. After 6 days, use an absolute date with the medium format.

Use the absolute date with medium format in the corresponding object header in the details area. Do not use the relative format here.

Responsive Table

If screen space is at a premium (for example, if there are too many columns), use the short date format in table cells. Otherwise use the medium format.

If you need to display the weekday, use the full format. For example:

  • English (US): Sunday, January 16, 2022
  • German (DE): Sonntag, 16. Januar 2022
  • French (FR): dimanche 16 janvier 2022

Resources

Want to dive deeper? Follow the links below to find out more about related controls, the SAPUI5 implementation, and the visual design.

Elements and Controls

Implementation

Time Picker

The time picker allows the user to select a localized time. It can be used with touch, mouse, or keyboard input.

Usage

Use the time picker if:

  • You want the user to select a time.
  • You want the user to select a time range. In this case, one time picker can be used to set the starting time and a second one to set the end time.
  • You want the user to select a detailed duration, such as 1 minute and 30 seconds.

Do not use the time picker if:

  • You want the user to select a duration such as 15 minutes, 30 minutes, 1 hour, or 2 hours. In this case, use the select control instead.

Responsiveness

The time picker comes with a cozy mode and a compact mode. In the compact mode, the time input field and the button are smaller than in the cozy mode. In the compact mode, there are also arrows that the user can click to set hours, minutes, and so on. For more information, see the article on content density.

On desktop (size L/XL) and tablet (size M) devices, the user can enter a time in the input field of the time picker, or set a time via the time picker dropdown which opens when the user clicks the time picker button.

For mobile (size S) devices, the tap area is the same as for a tablet, and the user can type a time in the time input field. Unlike on a tablet or desktop, the time picker dropdown does not open below the time input field, but rather in a subview.

Cozy and compact mode of the time picker

Components

The time picker consists of a time input field (1) and a time picker button (2). On desktop, tablet, and mobile devices, both elements have their own click area. Clicking the time picker button opens the time picker dropdown.

You can set a predefined time, which shows as the initial value in the time input field and the time picker dropdown. Users can overwrite the initial value manually at any time.

Time picker input
Time picker input

Time Input Field

The time input field allows the user to enter a time directly in the field, or select it using the time picker dropdown. The input is validated and feedback is given to the user.

The time input field can also contain a placeholder (input prompt).

Time Picker Button

When the user clicks the time picker button, the time picker dropdown opens to allow the user to choose a time.

Time Picker Dropdown

In the time picker dropdown, the user can select a time by setting hours, minutes, seconds and AM/PM or a subset of these (with hours and minutes only).

Dropdown with hours and minutes
Dropdown with hours, minutes, seconds, and AM/PM

Behaviour and Interaction

Selecting a Time (Desktop Device)

The user clicks the time picker button, which opens the time picker dropdown. In the time picker dropdown, the user can set the time either with the mouse or by using the keyboard arrows. The Page Up and Page Down keys can also be used to set the current selection to the lowest or highest value, and the Home and End keys can be used to go to the first or last element of the picker.

When the desired time has been selected, the user can confirm this selection by clicking the OK button. If the user wants to close the dropdown without changing the time to the selected time, this can be done by clicking the Cancel button or by clicking outside the dropdown.

Preventing Errors

The user can also select a time by clicking the time picker input field and typing the desired time in the field. You can prevent users from making incorrect entries by not allowing them to type in certain characters (see mask input). If the user enters a time that has the correct format but is invalid (such as 12:60:85), the time picker displays a validation error.

You can switch off the integrated mask input feature, but we strongly advice against doing so. Only deactivate the mask input if you need to make an exception for your use case (for example, if a variable length is required for a specific locale).

Time picker dropdown and input field

Selecting a Time (Tablet or Mobile Device)

On tablets and mobile devices, users can select the time by tapping the time picker button. The timer picker dropdown opens beneath the input field (a subview is opened on mobile devices). The user sets the hour by touching the hour element and then swiping up or down. To set the minutes, seconds, and AM/PM, the user also touches the corresponding element and swipes up or down to set the right value.

To confirm the selected time, the user taps the OK button. Tapping the Cancel button cancels the selection. On tablets, the selection can also be cancelled by tapping outside the time picker dropdown.

Set the time by swiping up and down (mobile)

Style

The Time Picker has five basic value states:

  1. Regular
  2. Information
  3. Success
  4. Warning
  5. Error

The information, warning, and error states can also have a message with additional information below.

Time picker value states

Guidelines

Time Formats

Seconds

Only let the user select time in seconds if this information is really necessary.

Time Zone

If the user has to set a time that is time zone-sensitive, offer a select control next to the time picker control to choose the appropriate time zone.

12-Hour System

In the 12-hour system, the date picker can contain selections for hours, minutes, seconds, and AM/PM.

24-Hour System

In the 24-hour system, the date picker can contain selections for hours, minutes, and seconds. AM/PM is not available in this mode.


For more information, see formatting time.

Properties

AM and PM are locale-dependent. Therefore, the locale can be set using the property “localeId”.

You can set the display format (property: displayFormat) to define the format in which the time input field and the time picker dropdown display the time. For more information about time formats, see the article on formatting dates.

Resources

Want to dive deeper? Follow the links below to find out more about related controls, the SAPUI5 implementation, and the visual design.

Elements and Controls

Implementation

Combo Box

The combo box control allows users to select an item from a predefined list.

The control provides an editable input field for filtering the list, and a dropdown menu with a list of the available options.

If the entries are not validated by the application, users can also enter custom values.

Usage

Use the combo box if:

  • Users need to select a single item from a long list of items (minimum 13, maximum 200 entries).
  • The values of the option list are secondary information and do not need to be displayed right away.

Do not use the combo box if:

  • Users need to select from a list of two options, where one of the options can be implied as on and off or yes and no. Consider using a switch control instead.
  • Users need to pick one item from a small set of options with up to 12 entries. Consider using the select control instead.
  • Users need to pick one item from a large set of options with more than 200 entries. Consider using the input field control with a select dialog or value help dialog instead.
  • You need to display more than one attribute. Consider using the input field with select dialog or value help dialog.
  • Searching on multiple attributes is required. Consider using the input field with select dialog or value help dialog.
  • Your use cases require that all available options should be displayed right away without any user interaction. Consider using radio buttons or a radio button group.
Information
For more information on which selection control to choose, see the selection control overview.

Responsiveness

Size S

Size S
Size S

Size M

Size M
Size M

Size L

Size L
Size L

Also see the section on mobile handling below.

Components

Title

A descriptive heading (1).

Input Field

The input field (2) displays the selected value. Users can type any character to filter the option list.

Dropdown Arrow

The dropdown menu’s arrow (3) collapses and expands the option list.

Option List

The option list (4) contains a list of values (5) that users can choose from.

Size S
Size S
Size M/L
Size M/L

Two-Column Layout

Use the combo box with a two-column layout if you need to display additional information for the selection options, such as currencies, country abbreviations, or system abbreviations.

Users can filter both columns simultaneously showing only matching entries.

Combo box with two-column layout

Grouping

You can group the items in the suggestion list by a specific attribute and separate them visually with a group header.

The group headers are not interactive.

Grouped suggestion list
Grouped suggestion list - Size S

Behavior and Interaction

Select a Value

There are three ways to select an item from the list:

  1. Select the item directly from the dropdown list.
  2. Type the item into the input field.
  3. Use the up and down arrows to navigate the list.

Clicking the input field places the cursor in the field (1). Clicking the arrow opens the option list (2). When the user starts typing, the list is filtered accordingly. The first item that starts with the characters entered is highlighted in the list and autocompleted in the input field (3). Up/down moves the highlight in the list and populates the value in the field (4). Selecting a value closes the list of options (5).

Developer Hint
With the showitems API, you can open the option list without having the dropdown arrow in a “pressed” state. Clicking the arrow again opens the full option list and changes the state to “pressed”. This allows you to show some items on focus and all items on click.

Autocomplete

When the first few letters are typed in the input field, the control performs autocomplete to help users to easily select one item from the option list.

Warning
The typeahead input feature is not available on Android devices.

Choose from Option List

The option list displays all the available items the user can choose from. The selection is always highlighted. Selecting another option from the list moves the highlight to the newly selected option.

Clicking the arrow opens the option list below the field. If there is not enough space, the list is displayed above the input field.

Selecting a value
Selecting a value

Filtering the Option List

When the user starts typing in the input field, the option list is filtered. Only items that match the characters entered are shown in the dropdown list. The default filtering method is “starts with per term”, which matches the beginning of each word in an item’s text.

In addition, application developers can set a custom filtering method “starts with” or “contains” (method: setFilterFunction). The “starts with” approach filters only for items where the beginning of the label matches the query entered. The “Contains” approach searches the full label for a match.

As a visual hint for the user, the matched characters are highlighted in the option list items. The highlighting works on the basis of “starts with per term”, regardless of the filtering method.

If the filtered option list contains items that start with the characters entered by the user, the first matching, unselected item is autocompleted in the input field.

Combo box - Default filtering and autocomplete
Combo box - Default filtering in both columns and autocomplete

Auto-Resize

The width of the option list adapts to its content. The minimum width is the input field plus the dropdown arrow. The maximum width is the part of the screen furthest to the right. If the option list content requires even more width, entries become truncated.

Option list – Minimum width
Option list adapts to long entries

Mobile Handling

The user can enter text into the input field (supported by autocompletion). Clicking the dropdown arrow of the combo box (1) opens in a full-screen dialog (2). The user can now modify the selected entry by clicking the input field of the combo box. The mobile keyboard is then displayed, and the user can begin to enter a new term to filter the option list, also supported by autocompletion (3). The option list closes when the user clicks the OK button at the bottom of the list (4) or selects an item in the list (5).

Information
For information on how to manage leading and trailing white space (blanks) when copying and pasting text into input controls, please see removing leading and trailing white space.

Styles

A combo box has different styles for its different states. Here are some examples:

Unselected
Unselected
Unselected with predefined placeholder
Unselected on hover
Unselected on hover
Arrow on hover
Arrow on hover
Focus
Focus
Expanded
Expanded
Autocomplete
Autocomplete
Error
Error
Warning
Warning
Success
Success
Information
Information
Warning message with long, wrapping text

For more information on how to use the different semantic states of the control, see How to Use Semantic Colors.

Guidelines

Label

The combo box control can be displayed with or without a label. If the field is attached to another field, you do not need to define a second label. For more information, see the article on how to use labels in SAP Fiori.

Placeholder

Do not use the placeholder attribute as an alternative to a label. This is important because the placeholder text is overwritten as soon as the form is filled out. Labels are necessary to indicate the meaning of the form fields when the placeholders are no longer visible. Show a placeholder only if the user needs a hint on data entry. Do not repeat the content of the label. A hint could be a sample value or a brief description of the expected format. Read more about how to use placeholders.


Option List

The option list contains text values only. Keep the text values short because the list is represented using only single lines. Values that are too long might be truncated.

If you need to express that none of the selection options are selected, show a blank input field. Define a default selection whenever possible.

Sorting

We recommend sorting options alphabetically to help users find the right option quickly. For more sorting rules, check out the guidelines for the select control.

Width

You can adjust the width of the option list to some extent.

The combo box control is usually used in forms, where the width is determined by the form element or container in which the combo box control is embedded. Therefore, we do not recommend defining a fixed width, but rather working with proper layout containers that have a defined width, such as the following properties: “form”, “simpleform”, “responsivegridlayout”, and “layoutdata” .

If you need to restrict the width to a defined value, set the width accordingly.

Keep in mind that there is no horizontal scrolling in the option list. Entries in the list that are too long become truncated and users may not be able to read them.

If localized text is not an issue, consider using a smaller width.

Unit of Measurement

You can use the layout options of the form to add the unit of measurement (UoM) after the combo box control. Apps can use the label-field ratio to show the UoM after the field. However, you must make sure that the UoM is properly visualized and doesn’t wrap to the next row.

Developer Hint

For accessibility purposes, you can use “ariaDescribedBy” from the input control.

Properties

Selection

When you select a value, there are two events:

  • Change: Occurs when the text in the input field is changed and the focus leaves the input field or the user presses the Enter key.
  • Selection change: Occurs when the user types something that matches an item in the list; also when the user clicks a list box item, or when navigating via keyboard.

Resources

Want to dive deeper? Follow the links below to find out more about related controls, the SAPUI5 implementation, and the visual design.

Elements and Controls

Implementation

Planning Calendar

The planning calendar allows users to see different appointments at the same time and to create new appointments. It allows the user to display appointments for several objects, such as a team calendar, and compare them to each other.

Usage

Use the planning calendar if:

  • You want to compare objects of the same type with each other over a period of time.
  • You require responsive behavior.
  • You have less than 100 lines in the calendar.

Do not use the planning calendar if:

  • You want to show a calendar for one object and a detailed overview of appointments over a long time interval.
  • You want to show a complex or graphical representation. In this case, please use the Gantt chart.
  • You have more than 100 lines in the calendar. In this case, please use the Gantt chart.

Responsiveness

In size S, the control provides pop-in behavior, which allows the user to see as many appointments as possible and to connect them with the corresponding object. If the toolbar contains too many actions for the space available, the overflow icon appears.

The interval section displaying the hours, days, and months is responsive and shows 12 values in size L, 8 values in size M, and 6 values in size S. You can override this behavior, but you should then check that the responsiveness is still working.

Planning calendar - Size L
Planning calendar - Size M
Planning calendar - Size S

Types

You can define what size of interval the calendar should show, and whether multi selection should be possible. Additionally, the row header and the interval appointments are optional.

The control allows multi-select mode to be shown for the list items. This can be used, for example, to delete multiple objects from the view.

An app development team must decide whether to show the planning calendar with or without multi-select mode, or whether users should be able to switch between the two modes. Hiding the interval appointments of every object is optional.

The planning calendar can also be used without a row header. In this case, the row header disappears and only the appointments are visible. It can be used to show the calendar of one object. Note that the control was built mainly to compare time slots of different objects. For this reason, the time axis is shown horizontally and, depending on the interval, the appointments might shrink to smaller size. In this case, the text is cut off rather than truncated.

Components

This section describes the various components of the planning calendar.

Parts of the planning calendar

The control consists of different parts:

  1. Header
  2. Toolbar
  3. View switch
  4. Navigation
  5. Time strip for hours/days/months
  6. Row header
  7. Row
  8. List item
  9. Interval appointment
  10. Appointment

1. Header

The header contains the toolbar and the navigation.

2. Toolbar

The toolbar consists of the calendar title (optional) and the toolbar actions, including a default view switch. You can add generic and app-specific actions that are relevant for your use case (such as creating an appointment, search, settings, showing the calendar legend, and so on). Always place actions that affect the entire calendar in the toolbar.

For more information, check out the toolbar guideline article.

The generic actions are as follows:

Search
Create Appointment
Add New Contact (icon: add-contact)
Multi-Select Mode (icon: multi-select)
Legend (icon: legend)
Settings (icon: action-settings)
Full Screen (icon: full-screen/exit-full-screen)

3. View switch

The view switch allows the user to switch between different time intervals (calendar views). Depending on the number of available calendar views, the view switch can be a segmented button (four views or less) or a select control (five views or more).

The 1 Month view shows an entire month. On desktop devices, the 1 Month view always displays an interval of 31 days. When the displayed month is shorter (28, 29, 30 days), days from the following month are displayed. They have a different visual state and serve as navigation to the following month.

The 1 Month view has an additional style for half-column appointment distribution, which is mainly used to avoid overlapping. The property appointmentRoundWidth can be set to “HalfColumn” or “None” (default). Currently, the width of the appointment is always rounded to 12 hours.
Note: This property is also applied when the calendar interval type is Days and the view shows more than 20 days.

On size M and Size S, the 1 Month view is adaptive. It consists of a calendar and a list of appointments for the selected day.

If you offer the 1 Week view, we strongly recommend displaying a different number of days in the Days view (more or less than seven). Otherwise, the user might be confused, as navigation for the two views differs.

The default calendar views are Hours, Days, Months, 1 Week, and 1 Month. The app developer can choose which views to include, depending on the use case, and how many values are shown for each view. App developers can change the default number of values shown, but they should then ensure that the app is still responsive. The app developer can also create custom views.

4. Navigation

The navigation area contains back and forward arrows, the Today button, a date interval link, and the time strip. Clicking the Today button takes the user to the period containing the current day. Clicking the date opens a date picker for direct navigation.

5. Time strip for hours/days/months

The time strip reflects the selected view, and shows the hours, days or months that are currently visible. In all views that show days (Days, 1 Week, 1 Month), you can display calendar weeks in an additional line below the time strip (property: showWeekNumbers).

6. Row header

The row header identifies the object for which the appointments are shown. It pops in if there is not enough space. The row header can contain a picture or icon, a title, and a subtitle.

You can also add an action on the row header (event: rowHeaderClick).

7. Row

The row contains all appointments for an object. You can turn the alternating row coloring on or off. By default, the alternating rows option is turned on.

8. List item

The list item contains the row header, row, appointments, and interval appointments. Each row can show different working and non-working days.

If the users have a specific working schedule, the non-working days can be different on each row. This can be applied not only for weekends, but also for non-working days based on specific schedule differences.

9. Interval appointment

Each row can also have interval appointments, which differ from half-sized appointments visually and in that they are always at the top of the row. Interval appointments can be used to show appointments that last for a longer period of time, such as vacations or workshops.

You can opt to hide the space reserved for interval appointments if no such appointments exist for that time period.

10. Appointment

Appointments consist of an icon or picture, a title, and a subtitle. Concurrent appointments are shown one above the other.

There are four types of appointments:

  • Regular: Displayed in two rows. One-row display is also possible if the appointmentsReducedHeight property is set to “true”.
  • Half-size: Always displayed in one row, shows the title.
  • Large: Always displayed in three rows, also shows the description for each appointment (if available).
  • Automatic: The number of rows is determined automatically.
    Appointment Info Rows
    Title only 1 row
    Title + text
    or:
    Title + description
    2 rows
    Title + text + description 3 rows

You can define the colors for different appointment types. Appointments can also be set to tentative.

The control can register a click event on the appointment, but the app development team must define what happens next.

In the Months view, appointments within the same calendar week are combined to save space. The combined appointment shows the number of appointments in the same week. If an appointment takes place between two calendar weeks (for example, from Sunday to Monday), it is not included in the combined appointments for either calendar week.

A list of the appointments in a combined appointment can be shown in a popover. However, this must be implemented by the app team. The control only provides the click event.

If necessary, you can disable combined appointments (property: GroupAppointmentsMode, value: “Expanded”).

Users can copy and paste appointments to a new position in the planning calendar using keyboard combinations (Ctrl/Cmd + drag and drop to the new position).

Planning Calendar Legend

To show the types for days and appointments, the planning calendar uses a specific legend control
(sap.m.PlanningCalendarLegend).

Users open the planning calendar legend using a standard legend button in the toolbar ( ). Like all other actions in the toolbar, the app developer must add the legend button explicitly.

The app team also needs to decide which container to use for the planning calendar legend. We recommend placing the legend in a popover to keep the context. You can also use a dialog, or, if there is sufficient screen real estate, show the legend as dynamic side content.

The planning calendar legend has two non-collapsible sections containing legend elements. By default, these are called Calendar and Appointments. The app developer can configure the section names using the itemsHeader and appointmentItemsHeader properties. If no elements are available for a section, it is not displayed.

The Calendar section contains standard legend items: Today, Working Day, Non-Working Day, and Selected (only in the 1-month view on mobile). The app team must ensure that the Selected element is added to the planning calendar legend when the planning calendar is viewed in 1-month mode in a smartphone size. This is not provided by the control. If any of the standard legend items are not needed, you can switch them off (property: standardItems).

You can also apply colors for special days in the Calendar section. The planning calendar legend does not automatically use the colors defined for special days in the planning calendar – this must be done by the app team.

The Appointments section contains the color values for the available appointment types. The app developer has to define explicitly which color represents which type. The planning calendar legend does not take the color automatically from the planning calendar.

If combined appointments in the calendar are of the same type (in Months view), they take the color of that type. Combined appointments of different types are marked gray. We also recommend adding the gray color for mixed combined appointments to the Appointments section in the legend.

Planning calendar legend
Developer Hint
To prevent waiting time, app developers should load the sap.ui.unified library.

Behavior and Interaction

To create an appointment, the user must trigger an action by clicking the Create button in the toolbar. You can also configure the control to create a new appointment when the user clicks directly on a row.

The user can click the appointment to see further details. The app development team must define what kind of information is then shown. For example, clicking an appointment can trigger a popover with detailed information.

A multi-select toggle can also be provided in the toolbar. This can be used, for example, to select multiple people in order to delete them from the planning calendar.

Various tooltips can be shown, but you should not use them to show additional information because users cannot access this functionality on touch devices.

Depending on the current visible interval, appointments might be smaller and the text cut off. The user can click the appointment to see the details.

View switch

The user can change the calendar view with the select control (dropdown). For example, to get an overview of a whole year, the user selects the Months view. Which view is most useful depends on the average length of appointments and the use case.

Today

The user can trigger this action to go back to the current date/moment.

Back and forward navigation

The arrows allow the user to navigate to the next or previous interval.

Date picker

The user can open a date picker to select the start time for the visible interval. What is shown initially in the picker differs depending on the view.

Snapping Header

The header area of the planning calendar can remain fixed on top of the screen (property: stickyHeader), which allows users to view calendars with a lot of rows without losing the context.

Header snaps to top when scrolling down

Drag and Drop

Drag and drop can be used to move appointments (to enable Drag and Drop use property: enableAppointmentDragAndDrop). Moving an appointment automatically changes its start and end times (for example, if an appointment is scheduled from 1:00-2:00 PM, the user can drag it and change the time from 2:00-3:00 PM) . When dragged, the appointment is shown as a ghost element on the mouse cursor. Drop target areas are indicated to the user with a placeholder.

In the “Hours” view, the appointments can be moved to a specific new time, with the placeholder snapping at every 30 minutes. In the “Days” view, the appointment can be moved to a different day. The placeholder indicates the target day. On drop the appointment is moved to that day but keeps its previous start and end hour. The interaction is the same for the “Months” view. The placeholder indicates the target month and, when dropped, the appointment is moved to that month. The start and end hour and start and end day remain the same.

Appointments can be moved between rows. Note that additional coding may be needed to determine whether all calendar users will be able to perform this action.

Users can create new appointments by clicking, dragging and releasing on an empty space in the content area. The control also allows users to change the duration of an appointment by clicking and dragging one side of the appointment container. These two options are only available for desktop devices.

Combined appointments and interval appointments are not draggable.

Drag and drop is only available on supporting browsers.

Drag and drop
Drag and drop

Guidelines

Switching the Row Header

To enable end users to rearrange the planning calendar by switching the row header, you can implement a flexible row header. This is not done by the control and must be implemented by the app development team.

The list items in the row header can be a value of any attribute of an appointment. The appointment attributes are part of app-specific content, so they should be specified by the app development team. The control does not provide default attributes.

Our guideline is to use the select control in the place of the calendar title. The select control will contain all the attributes that can serve as the row header. When a different attribute is selected, the calendar is rearranged accordingly. You can also add a counter after the list items to indicate how many appointments fall into a specific group.

It is also possible to have both the calendar title and select control, in which case you should have first the title and then the select.

On small screen sizes, use select instead of the calendar title. If you want to keep the calendar title, place select in the overflow menu.

Resources

Want to dive deeper? Follow the links below to find out more about related controls, the SAPUI5 implementation, and the visual design.

Elements and Controls

Implementation

Grid Table

A grid table contains a set of data that is structured in rows and columns. It allows the user to scroll in both directions and can handle large numbers of items and columns.

Usage

Use the grid table if:

  • The cell level and the spatial relationship between cells are more important than the line item. Examples include spreadsheet analyses and waterfall charts. Note that a grid table is not fully responsive. It is only available for desktops and tablets, so you will need to take an adaptive approach by offering an additional UI for smartphones.
  • You have to work on more than 1,000 rows. In this case, the grid table is easier to handle. In contrast to the responsive table, the architecture of the grid table is optimized for handling large numbers of items. Note that a grid table is not fully responsive. It is only available for desktop and tablets, so you will need to take an adaptive approach by offering an additional UI for smartphones.
  • Comparing items is a major use case. In this case, a grid table might be more appropriate than a responsive table. In the grid table, each cell contains only one data point. In contrast, the responsive table is more flexible regarding line items, including the ability to add more data points per cell and also the pop-in function. Both make comparisons more difficult. Note that a grid table is not fully responsive. It is only available for desktops and tablets, so you will need to take an adaptive approach by offering an additional UI for smartphones.
  • You need an analytical table, but you cannot provide an analytical binding on the technical side. In this case, a grid table will do the work. Note that the grid table provides only one level of grouping, no aggregation options, and is also not fully responsive. It is only available for desktops and tablets, so you will need to take an adaptive approach by offering an additional UI for smartphones.

Do not use the grid table if:

  • You need a table. The responsive table is the default table in SAP Fiori. Additional use cases where you might need the responsive table include:
    • The focus is on working on line items, not on cells. The responsive table is optimized for displaying complete items on all devices, such as file browsing and a list of documents you want to act on, like purchase orders and purchase requisitions.
    • Selecting one or several items is the main use case and details are needed to choose the correct item.
    • Line items are independent of each other and no operation across columns is needed.
    • You want to have only one implementation for all devices.
  • The main use case is choosing one item from a very small number of items with no additional details. A select or combo box might be more appropriate.
  • The main use case is choosing one out of several items with only a few details per item. A list might be more appropriate. Pay attention to the layout of the list item to ensure that it has a pleasant appearance.
  • Data needs to be structured in a hierarchical manner. Use a tree table instead. Note that neither the tree table nor the grid table are responsive. You will need to take an adaptive approach by offering an additional UI for smartphones and tablets.
  • You need an overview of a large amount of data. In this case, use charts.
  • You just need it for layout reasons. In this case, use a layout container such as HBox or VBox.
  • You need read-only or editable field-value pairs. Use a form instead. The grid table is not optimized for form-like input navigation.

Responsiveness

A grid table is available for desktops and tablets, but not in smartphone sizes. It supports touch devices, but is not optimized for small screens.

If you use a grid table, note that you have to implement a fallback solution for small screens. This fallback solution does not need to support all use cases.

You could create a fallback by using a responsive table, but a completely different solution, such as showing charts in a read-only case, might be more appropriate.

Grid table shown on a desktop
Grid table shown on a tablet

Layout

The column header allows the user to resize and rearrange columns. It also provides access to a menu with column-specific commands.

The collection of items, or rows, occupies the main part of the grid table.

The selector cells allow the user to select one or more items.

The Select All button selects or deselects all items.

Schematic visualization of the grid table

Components

A grid table does not consist of other elements. However, it is common to use a toolbar above the grid table.

The toolbar can contain entry points for the view settings dialog and the table personalization dialog or for the p13n dialog, as well as view switches in the form of a segmented button, and buttons for Add, Edit, and other actions.

Behavior and Interaction

A grid table is quite restricted in terms of its content.

Table Level

Scroll

A grid table allows horizontal and vertical scrolling (sap.ui.table.Table, property: navigationMode, value: Scrollbar).

You can add any number of line items to the grid table, which uses “lazy loading”.

To prevent adverse side effects when scrolling vertically, all line items must have the same height (sap.ui.table.Table, property: rowHeight).

The grid table is optimized to allow faster scrolling within the first 1000 items.

Scroll bar
Scroll bar

Select

Selection Mode

Selection for a grid table depends on the chosen selection mode. The following options are available:

No selection: Items cannot be selected. (property: selectionMode = None)

A non-selection grid table

Single selection: One item in the grid table can be selected. A row selector column is shown. (property: selectionMode = Single)

A single-selection grid table

Multiple selection: One or more items can be selected. The grid table provides a column with checkboxes on the left-hand side. Clicking a checkbox toggles the state of the corresponding row from deselected to selected and back. The Shift key can be used to select a range.

For multiple selection, you can choose between two variants.

  • Multi-toggle mode (property: selectionMode = MultiToggle)
  • Multi-selection plug-in (sap.ui.table.plugins.MultiSelectionPlugin)

These variants behave differently when the user selects more items than are currently loaded in the front end.

Multi-toggle

In multi-toggle mode, you can offer a Select All checkbox to the left of the column header (property: enableSelectAll). Selecting this checkbox selects or deselects all items that are currently loaded in the front end. All other items are not selected/deselected. If the application data is stored in the back end, scrolling down further can reveal additional unselected items. The same can happen with range selections if not all items in the selected range have been loaded to the front end.

Multi-selection plug-in

If you use this plug-in instead of the multi-toggle selection mode, the behavior for range selection and Select All changes:

  • By default, a dedicated Deselect All button replaces the Select All checkbox. There is no default UI element for selecting all items.
  • You can set a limit for the number of items that can be selected (sap.ui.table.plugins.MultiSelectionPlugin, property: limit). This limit has the following effect:
    • The range that can be selected using the Shift key is limited to the specified number of items (default = 200). The table automatically scrolls back to the last selected item and you can display a corresponding message (sap.ui.table.plugins.MultiSelectionPlugin, property: enableNotification). Users can select more items by selecting additional ranges (the specified limit applies each time).
    • If the selection limit is set to 0, a Select All checkbox is shown. There is also no limit on the number of items that can be selected in a range. All selected items are loaded, which can lead to performance issues for large data sets.
  • If selected items are not already available in the front end, they are loaded automatically by the plug-in and set as selected.
Information
When setting a limit for the number of items that can be selected, keep the following boundaries in mind:

  • The performance of your service: How many items can be loaded at once in a reasonable time? Does this also apply if an end-user shows all available columns?
  • The “minimum limit”: Internally, the grid table loads blocks of items as the user scrolls down. Because this block size (sap.ui.table.Table, property: threshold) is usually also based on the performance of the service, it should be safe to assume that the minimum selection limit is twice this size. In this case, loading the data would take as long as scrolling down and loading exactly one more block. Nevertheless, we recommend using larger limits if your service allows.

A multiselection grid table
Using the multi-selection plug-in with a limit

Selection Behavior

An item can be selected in different ways, depending on the configuration of the grid table (sap.ui.table.Table, property: selectionBehavior):

  • Row: An item is selected by clicking the checkbox or the row. Use this option for multi-selection grid tables if clicking a row or a cell is not used for anything else.
  • RowSelector: An item is selected only by clicking the checkbox in the selector cell. Use this option if clicking the row (or a cell inside the row) is used for something else, such as navigation.
  • RowOnly: An item is selected only by clicking the row, and not using checkboxes in the selector cells. Use this for single-selection grid tables if clicking a row or a cell is not used for another purpose, such as navigation.

Compact, Cozy, and Condensed

Like all SAP Fiori controls, the grid table is shown in compact mode on a desktop and in cozy mode on tablets.

For a desktop, you can also display even more rows on the same screen height by adding the condensed mode in addition to the compact mode. This renders less white space for each item.

Note that the condensed content density has always to be set in addition to compact. Do not use condensed on its own. Do not mix condensed with cozy. Doing so could lead to unpredictable and / or unwanted results, e.g. cozy sized controls in condensed sized containers, missing padings, etc.

Note that neither compact mode nor condensed mode can be interacted with via touch. Even on a desktop with a touch screen, users will have difficulty selecting rows or using controls inside the cells when using their fingers.

Furthermore, condensed mode is not available for Internet Explorer 9. If condensed mode is to be used, please provide a fallback.

For more information on cozy and compact modes, see content density.

Column Header

The column header provides the label for the corresponding column and access to the column header menu.

Columns are resized as follows:

  • Mouse interaction: The user drags the separator line between two columns (sap.ui.table.Column, property: Resizable). Double-clicking the line optimizes the column according to the length of the currently visible data and the label of the column header (sap.ui.table.Column, property: Autoresizable).
  • Touch interaction: The user taps the column header to reveal two buttons – one to show the column header menu, and one for resizing. The user drags the latter to resize the column.

After resizing a column, the adaptation of the column widths depends on how the column width is set:

  • If column widths are set in pixel-based units (px, em, rem), the corresponding column is adapted and the columns that follow are moved accordingly. The width of all other columns is not affected.
    If all the columns together take up less width than the table control, an empty space is added. In case all columns together take up more width than the table control, a scrollbar appears. (sap.ui.table.Column, property: width)
  • If all column widths are set in percentage or “auto”, resizing one column might also lead to the automatic resizing of some or all other columns. The position of the resized column might also be affected. This is done to ensure that the whole table width is used and no white space is added. A scrollbar appears only if all or most of the columns shrink significantly. To avoid the side effect of undersized columns, a minimum width can be set per column. Please be aware that this minimum width is only taken into account if columns are automatically resized. End users are still able to reduce the column width below the provided minimum. (sap.ui.table.Column, properties: width, minWidth)

Columns can be rearranged by dragging the column header to another position (sap.ui.table.Table, property: enableColumnReordering).

Column header
Column header
Opening the column header menu on touch devices
Less columns than space available

Column Header Menu

For each column, a menu can contain the following menu items (sap.ui.table.ColumnMenu, property: visible):

  • Sort Ascending/Descending (sap.ui.table.Column, property: showSortMenuEntries)
  • Free text filter (sap.ui.table.Column, property: showFilterMenuEntries)
  • Group (sap.ui.table.Table, property: enableGrouping)
  • Freeze from the first to the last specified column (sap.ui.table.Table, property: enableColumnFreeze)

For each column, the menu can be replaced by an app-specific menu.

Column header menu
Column header menu

Sort

The column header menu can provide two sort options (sap.ui.table. Column, properties: sortProperty, showSortMenuEntry):

  • Sort Ascending
  • Sort Descending

The user selects one of these options to sort the corresponding column accordingly (sap.ui.table. Column, properties: sorted, sortOrder, sortProperty).

Sort settings in column header menu

Filter

The column header menu can provide a search field for entering free text (sap.ui.table.Column, properties: filterProperty, showFilterMenuEntries).

If the user enters a term in the input field and triggers the search by pressing Enter when the focus is on the filter input field, the grid table is filtered by the corresponding column and value (sap.ui.table.Table, properties: filtered, filterProperty, filterValue, filterOperator, sap.ui.table.Column, property: filterType).

Note that the filter may return zero results, in which case, the table might be empty.

General recommendations for filtering:

  • If filtering is a main use case, choose the filter bar or any other filtering UI over the built-in free text filter.
  • Only use the free text filter if filtering is a secondary use case and if the filter bar is too heavy.
Free text filter in column header menu

Group

The column header menu can provide the option to group by this column (sap.ui.table.Column, property: enableGrouping).

One group collects all items with the same value within the corresponding column.

Group setting in column header menu

If line items are grouped in a column, every group is provided with a collapsible or expandable group header. The header text consists of the name of the value and the number of items in the specific group. Only one grouping level is possible.

Group header
Group header

Once line items have been grouped, the corresponding column is hidden. There is no built-in possibility to ungroup the grid table again. Therefore, provide a view settings dialog or table presonalization dialog to offer an additional way to group by a column and a way to ungroup the complete table.

An exception to this is when the table is grouped from the start and should not be ungrouped at all.

Group headers shown, the corresponding column hidden: no duplicates, but a confusing change
Warning
Note that grouping the grid table is experimental and currently works only on items loaded to the front end. Thus, scrolling down the table leads to data not being grouped as expected.

Only use this feature if you have just a few line items, all of which are loaded to the front end. If this is the case, consider using a responsive table first instead of a grid table.

Freeze Columns

The column header menu can provide the option to freeze columns (sap.ui.table.Table, property: enableColumnFreeze). Selecting Freeze freezes all columns up to the one in which the operation was triggered (sap.ui.table. Table, property: fixedColumnCount).

When Freeze is triggered, the menu item changes to Unfreeze for the corresponding column.

Freeze setting in column header menu

Line Item Level

A line item contains a set of cells and provides options for selecting the item.

To prevent adverse side effects when scrolling vertically, all line items must have the same height (sap.ui.table.Table, property: rowHeight).

Line item
Line item

Drag and Drop

One or several items can be repositioned within a table or moved to other UI elements using drag and drop operations (sap.ui.table.Table, aggregation: dragDropConfig). While being dragged, the items are shown as ghost elements on the mouse cursor.

Drop targets can be on items, between items, or both (sap.ui.core.dnd.DropPosition). On a drop target, the mouse cursor changes to either a “copy”, “link”, “move”, or “none” cursor. “None” indicates that the dragged item cannot be dropped in the current position (sap.ui.core.dnd.DropEffect).

Drag and drop is only available on supporting browsers.

Drag and drop
Drag and drop
Whole item as drop target

Context Menu

You can attach a context menu (sap.m.Menu) to a table. The context menu gives users an alternative way to modify the focused elements by giving them access to context-specific functions.

When opened, the context menu gets the row and column context, except for special columns (such as the selection column) or special rows (like group headers). Context menus can be implemented for a specific table, row, or cell (not recommended for editable cells).

Context menus are opened by right-clicking (desktop), long press (mobile), the context menu key, or SHIFT+F10.

Be aware that using the context menu overrides the browser context menu, which can no longer be opened.

If a control inside a table is the “click target”, and the control also provides a context menu, the control context menu “wins”.

Grid table with a context menu

Cell Level

A cell provides one data point.

It can contain one of the following controls to display this data point:

While it is technically possible to also use other controls, doing so could lead to issues in regards to alignment, condensed mode, screen reader support, and keyboard support.

If you use text, use only single-line text to keep the same row height. Truncate if necessary as this prevents adverse side effects when scrolling vertically (sap.m.Text, property: wrapping, value: false). Do not wrap.

Cell
Cell

Guidelines

Data Density vs. Complexity

The grid table can be used to display large amounts of data. Unfortunately, the grid table has a high data density and therefore conveys an immediate feeling of complexity.

Only show tables with a lot of data as a last resort. Try the following instead:

  • Break down the data into manageable chunks and allow the user to navigate or drill down between them.
  • Use charts with drilldown functionality until the amount of data is more manageable.

Try to avoid horizontal scrolling in the default delivery.

Try to minimize the number of columns, especially if there is a large number of rows.

Table Title

Implement the table title by using a title control in a toolbar.

Use a table title only if the title of the table is not indicated in the surrounding area.

Do not use a table title if it simply repeats text that is already above the table. For example:

  • A pricing conditions table is the only control on a tab labeled Pricing Conditions.
  • A section or subsection on an object page contains only one table.

Use a table title if you need the item count, table toolbar, or variant management. To avoid repeating text, feel free to use generic text as a table title, such as Items.
Exception: If the surrounding area contains the table title, and both the item count and toolbar can be added to the surrounding area, no additional table title is needed.
Example: An object page (sub-)section contains only one table. In this case, add the item count and the table toolbar to the (sub-)section header.

If you use a table title, show either a title for the table, with or without variant management, or an item count in the following format:

Items (2,534).

The item count in the table title includes all the visible items that a user can reach by scrolling or expanding groups. Group headers are not included.

Remove the item count in the table title if there are zero items.

Developer Hint
Assistive technologies (such as screen readers) use the title to create a hierarchical site map for faster navigation. In addition, screen readers use the title as the label for the table.

If you don’t use a title (for example, to avoid repetition), make sure that the table is connected to another meaningful on-screen text that can be used as a label for assistive technologies. You can do this using the method addAriaLabelledBy.

Multiple Selection

  • We strongly recommend using the multi-selection plug-in. This ensures that all items selected using Select All or as part of a range are included – even if some items were not initially loaded in the front end. This is not the case if you use the multi-toggle option.
  • Do not limit the range selection for the multi-selection plug-in unless you have to.
    • If the dataset is small and/or completely available in the front-end, set the limit property to 0 to enable the Select All option and allow users to select any range.
    • If you have a large dataset, set a limit on the number of selected items to avoid performance issues. Also bear in mind that some actions won’t be helpful if the dataset is too big (for example, a delete operation on 2 million database entries).
  • If you set a limit, also display the corresponding message when the user selects more items at once than the limit allows (sap.ui.table.plugins.MultiSelectionPlugin, property: enableNotification).
Information
When setting a limit for the number of items that can be selected, keep the following boundaries in mind:

  • The performance of your service: How many items can be loaded at once in a reasonable time? Does this also apply if an end-user shows all available columns?
  • The “minimum limit”: Internally, the grid table loads blocks of items as the user scrolls down. Because this block size is usually also based on the performance of the service, it should be safe to assume that the minimum selection limit is twice this size. In this case, loading the data would take as long as scrolling down and loading exactly one more block. Nevertheless, we recommend using larger limits if your service allows.

  • In multiple selection mode (multi toggle), do not show checkboxes in the first data column in the default delivery to avoid confusion.
Don't
Do not add checkboxes to the first data column in the default delivery

Loading Data

To indicate that the table is currently loading items, use the busy state. (sap.ui.table.Table, property: busy). Do not show any items or text. As soon as the data is loaded, remove the busy state and show all items.

Grid table in busy state while loading data

Columns – Best Practices

Minimize the number of columns. Avoid the need to scroll horizontally in the default delivery.

The grid table assigns the same width to each column by default. It is recommended that you overwrite this default to provide optimal space for your content (sap.ui.table.Column, property: width).

If you define the column width in pixels or rems, resizing a column affects only the width of this specific column. Reducing the browser window size results in a scrollbar. After resizing a column, a scroll bar appears if the width of the table is not enough to show all columns. If the columns use less space than available, white space appears on the right side of the last column.

If you define the column width as a percentage, resizing one column affects the width of several or all columns. Text becomes truncated when the browser window size is reduced. This is done to make sure that all columns together fill the space of the table. A scrollbar appears only in case the automatic change of the column widths is not enough for showing all columns. To avoid the side effect of undersized columns, a minimum width can be set per column. Please be aware that this minimum width is only taken into account if columns are automatically resized. End users are still able to reduce the column width below the provided minimum.

If you define the column width as “auto”, the behavior is the same as for “percentage”. In contrast to percentage, “auto” distributes the columns equally.

To decide on how to set the column width (pixel / rem / em vs. percent / auto), keep the following in mind:

  • For tables with only 2 to 3 columns, use pixel-based units. This ensures that on wide screens the values in the columns are not spread over the whole screen, which improves the readability of line items.
  • For tables with many columns, where a horizontal scrollbar is usually needed, use pixel-based units. This avoids unintended side effects when resizing columns.
  • For all other tables, use whatever fits your case better.

Be cautious with mixing columns with pixel-based and percentage-based widths. While this can be helpful in some cases, it could also cause even more unexpected side effects when resizing a column. When using percentage-based widths for one or more columns, think of the possibility to not allow end users to resize columns at all.

Optimize the column width for its initial visible content, including the column header texts. If this is not possible (for example, if showing the full texts would result in extremely wide columns), let the texts truncate. End users can change the width of the column to read the full text, as needed.

Maintain a constant column width and avoid adjusting it automatically when the content changes.

Always keep to one line of text. Do not wrap.

Don't
In the default delivery, the initial visible content should not be truncated
Don't
Never wrap texts
Never wrap texts

Column Headers – Best Practices

For each column, provide a label in the column header. In the default delivery, do not truncate the column header texts. Only let the text truncate if showing the full text would make the column too wide. Never wrap the text.

Content Alignment

For alignment of cell content, follow the guidelines below.

Left-align the following: text, IDs, phone numbers, URLs, passwords, and email addresses.

Left-alignment of text

Right-align numbers (except IDs).

This ensures comparability of numbers and amounts.

Right-alignment of numbers

Right-align amounts with currencies to the cell and align them in terms of their respective decimal points.

This ensures that amounts with different currencies are shown correctly, whether these currencies have 0, 2, or 3 decimals.

For aligning to the decimal point, use the sap.ui.uinified.Currency control.

Alignment to decimal point

Right-align dates and times.

This ensures comparability for most formats and locales.

Right-alignment of dates

Left-align status information.

Left-align status information

Center-align icons.

Left-align micro charts.

XS micro charts in condensed mode

Content Formatting

Locale Settings

Be locale-aware: show dates, times, numbers, and so on in the format corresponding to the user’s locale settings.

Key Identifier

Use a bold label or an emphasized link as the key identifier of an item. In the default delivery, show the key identifier in the first column.

Emphasized link
Emphasized link

For strings with IDs, use one of the following options:

  • Show the ID in a separate column. Use this format if users need to sort, group, or filter by both the string and the ID.
  • Show the ID in brackets after the corresponding string. In this case, sorting, filtering and grouping is available for either the string or the ID. Use this format only if users don’t need to sort, filter, and group by both values.
Text and ID in two columns – Allows sorting, filtering, and grouping on both
If displayed as a link, use only the text as the link, not the ID
Text and ID in one column – Sorting, filtering, and grouping only on the text
Text and ID in one column - If displaying a link, show the whole string as the link (text and ID)

Truncation

Avoid truncation of typical content in the default delivery (sap.ui.table.Column, property: width). However, since the columns are resizable, do not worry too much if truncation occurs as columns can still be enlarged if necessary.

To prevent adverse side effects when scrolling vertically, all line items must also have the same height. If you need to decide between truncation and different row heights, choose truncation. Do not wrap.

Optimize column width for typical content, not all content

Number of Links

Are there too many links? Use subtle links to avoid a wall of links. Standard links are also emphasized more if they are surrounded by subtle links.

Emphasized links, links, subtle links, and text

Missing Value

If there is no value for a cell, leave it blank. Do not display text as N/A.

Leave empty fields blank

Numbering Items

In terms of numbering items:

  • If the item number is more like an ID with regard to its description, use ID formatting as described above.
  • In all other cases, use a separate column for the item number.
Add a separate column for the item number

Status

For status information, use semantic colors on the foreground elements.

For status information on text, use an object status.

Semantic colors on text

Micro Charts

Use only the following micro charts: Bulletcomparisonstacked bar. When using micro charts, use them in size XS.

Micro charts in a grid table

Empty Tables

Avoid empty grid tables. If necessary, provide instructions on how to fill the grid table with data (sap.ui.table.Table, properties: noDataText, showNoData).

Examples:

  • If a table is initially empty, provide at least a basic text:
    No items available.
    Overwrite this whenever a hint can be provided on how to fill the table with data.
  • If a table is used together with a filter bar (as in the list report), and is initially empty, use the following text:
    To start, set the relevant filters.
  • If a table is used together with a filter bar and the filter does not return results, use the following text:
    No data found. Try adjusting the filter settings.

Adapt the texts above if:

  • The standard text is not precise enough for your use case (for example, a search is also offered, or only the search is offered).
  • The standard text is misleading (for example, if the data is filled based on a master-detail pattern instead of filter settings).
Provide meaningful instructions

Invalid State

To show an invalid state of the grid table within the list report floorplan, show an overlay on the grid table and the corresponding toolbar (sap.ui.table.Table, property: showOverlay). The overlay prevents user interactions.

Use this within the list report floorplan if filter settings have been changed but the grid table is has not yet been updated.

Grid table with invalid data

Item States

To show that an item has been modified, for example, within the global edit flow, add the string Modified in an additional column with the label Editing Status.

In the default delivery, add a column directly behind the key identifier.

A modified item
A modified item

To show that a modified item contains an error, for example, within the global edit flow, add the string Contains errors in the Editing Status column and highlight the row accordingly. This string replaces the Modified string.

A modified item with an error

To show that an item is locked, add a transparent-style button with the corresponding icon and the text Locked by [name] in the Editing Status column.

A locked item
A locked item

To show that an item is in draft state, add a transparent-style button with the text Draft in the Editing Status column.

Item in draft state
Item in draft state

Show only one state at a time.

Numbers and Units

Show the unit of measurement in one of the following ways:

Number and Unit in Same Cell

The number and the unit are in the same cell. Do this if sorting, filtering, or grouping by the unit of measurement are not needed.

Use a currency control to display the concatenated string.

Number and unit of measurement in one cell

Number and Unit in Separate Columns

The number and unit are in separate columns. Do this if sorting, filtering, or grouping by the unit of measurement are a common use case.

Note that this column can be hidden or moved independently of the column containing the corresponding number. Therefore, be sure to have clear labels for both columns to communicate the dependency.

Number and unit of measurement in two columns

Show the unit of measurment on the column header, if the unit of measurement is the same for all rows. If not, show the unit of measurement within the row.

Drag and Drop

If you offer drag and drop for rearranging items within the table, use drop targets that are between items (sap.ui.core.dnd.DropPosition.Between). This provides better feedback on where the item will be inserted. Show the “move” mouse cursor (sap.ui.core.dnd.DropEffect.Move).

Drop targets in between items

Do not combine rearranging items and sorting. If you really need to do so, make sure that there is a dedicated sort criterion for the user-defined sort order, and only offer options for rearranging items if this sort order is set.

Don't
Do not combine rearranging items with sorting

Drag and drop is “invisible” on the UI: users can’t see where dragging is available and where it isn’t. In addition, it is not accessible, since there is no generic keyboard interaction. Drag and drop is also not available on all browsers. For these reasons, provide it only in addition to existing (and visible) UI elements that fulfill the same purpose. For example, offer (toolbar) buttons for moving or for copying and pasting items.

Use drag and drop only in addition to existing visible UI elements

When combining rearranging items with grouping, be aware that moving items to another group also means that a value of the dropped item changes: because grouping is based on values in a column, the dropped item needs to take on the value of the target group for the corresponding column. If this is not wanted, do not allow users to rearrange items in grouped tables.

Example:
A table is grouped by availability. An item is moved from the group “Not Available” to the group “In Stock”. In this case, the moved item needs to change its availability to “In Stock” to match the target group. If changing the value doesn’t make sense make sense, only allow users to rearrange the items within the same group, or don’t allow rearranging at all.

Don't
Do not combine rearranging items with grouping, unless you know exactly what you're doing.

Context Menu

Use the context menu only as a quick way of accessing functions that are already available elsewhere (for example, as buttons in the toolbar). Don’t just offer actions in the context menu itself, as users might not realize that these actions are available at all.

The context menu can be triggered for the table, row, or cell. However, we do not recommend using context menus for cells: because the content of a cell is a different touch target than the cell itself, opening a cell context menu via touch is quite hard, even in cozy mode.

Do not combine context menus with condensed mode: editable controls fill the entire space inside a cell. Because of this, context menus cannot be opened at all with touch or mouse interaction.

Actions

Multiple Items

To trigger actions on multiple items, use a mutliselection grid table (sap.ui.table.Table, property: selectionMode, value: MultiToggle). Offer the corresponding actions in the table toolbar.

Do not offer action triggering on multiple items if the table is generally expected to have fewer than 10 items. In this case, try to use the responsive table instead of the grid table.

Single Item

To trigger actions on a single item (sap.ui.table. Table, property: selectionMode, value: Single):

  • Show the actions on the table toolbar.
  • In rare cases, show the actions within the line item. One example would be an Add to Cart button in a shopping application. Since these actions are repeated in every line and thus use a lot of screen real estate, do this only for a maximum of one or two actions. Provide a separate column per action. Use a button, unless the action trigger belongs to a link. Hide the action in rows for which it is not applicable.

To trigger navigation on line item level, choose one of the following options:

  • Use a link for the attribute that identifies the row. Clicking the link triggers the navigation.
  • Add the RowActions column and show the navigation indicator (  ) at the end of the row. The navigation arrow triggers the navigation.

Special case: Multi-selection in a master-detail scenario
When a multi-selection table is used in a master-detail scenario, it is not clear which item was last opened (for example, which item is currently shown in the second column of a flexible column layout). In this case, you can display a “navigated” indicator to show which item is currently open.

Use the RowActions column only for one or both of the following actions:

  • Navigate to details page ( )
  • Delete ( )

The RowActions column does not provide a column header text. It is fixed and will not scroll away. Users also cannot personalize this column.

Navigate to details page

Single Cell

To trigger actions on a single cell, create the corresponding click event. Do not use the cell click event if the cell contains interactive controls, such as links.

Add Items

For adding items, place an Add or Create text button on the table toolbar.

  • Use Create if the button adds a brand new item that doesn’t yet exist on the database.
  • Use Add if the item already exists and is merely added or assigned to the current object.

Show new items as the first item of the table, with a visual highlight at the beginning of the row.

For more details, see the guidelines for managing objects (including subarticles).

Enabling/Disabling Actions

To indicate if an action can be applied to the current selection:

  • Enable the action if it always works, regardless of whether or not items are selected.
  • Enable the action if it can be applied to all selected items.
  • Enable the action if it can be applied to some of the selected items. If the action is triggered, show a message that informs the user how many items will be affected. Let the user choose whether to apply the action anyway or cancel the action.
  • Only disable the action if it can be applied to none of the selected items.

For more details, see UI Element – States.

If the action was applied, and if the items are still available, keep them selected.

Message for an action that applies to a part of a selection

Editable Content

For editable content, only use the following controls, and only one control per cell:

Only these controls are optimized for all viewing modes of the grid table.

If you need edit mode, change your text controls, such as label, text, link, object status, icons, and currencies, to editable controls as soon as you switch to edit mode, but not before. You can do this by exchanging the controls, for example, from sap.m.Text to sap.m.Input.

For mass editing items:

  • Provide multiselection.
  • Provide an Edit button.
  • If several items are selected, clicking the Edit button opens a dialog in which the user edits the corresponding fields for all selected items.

For more information, see Mass Editing.

Interactive controls – In line

View Settings

There are several ways to show Sort, Filter, and/or Group settings:

  • Column header menu: In all cases, show the corresponding settings in the column header menu.
  • View settings dialog: Simple and more flexible with regard to filter settings. No advantage for sorting. Allows the user to ungroup grouped columns.tables with a medium amount of items.
  • Table personalization dialog: Provides complex options for sorting items by several levels and allows the user to ungroup grouped columns. It also provides a query-builder-like approach for filter settings. The complexity of the options is also its downside. Use the table personalization dialog for tables with a large number of items.
  • If filtering is a main use case, use the filter bar. In this case, avoid offering additional filter settings on the table. If you do, the filter settings on the grid table work only on the result set provided by the filter bar.

Always be careful when synchronizing the settings in the dialog with the settings from the column header menu.

Trigger the dialogs in one of the following ways:

  • View settings dialog: Provide several buttons, one for each of these view settings. Each button opens the view settings dialog on the corresponding page.
  • Table personalization dialog: Provide a settings button, which opens the table personalization dialog containing all pages.

Use only the view settings you really need. For example, do not offer grouping if it does not support your use case.

Column header menu with view settings
Table toolbar with triggers for view settings dialog
Table toolbar with trigger for table personalization dialog

Be persistent. When reopening the app, show the analytical table in the same view settings (sort/ filter/ group/ aggregation settings) as last defined by this user.

Sort

To display the current sort state, an icon is shown in the column header of the most recently sorted column. This icon indicates the sort direction (sap.ui.table.Column, properties: sorted, sortOrder, sortProperty).

For the default sort settings, sort by the column that identifies the row, which is usually the first column in default delivery.

Column, sorted ascending
Column, sorted descending

The descending sort order must always be the exact reverse of the ascending sort order. For each column, provide a meaningful sort order. For example:

  • Sort text alphabetically
  • Sort numbers by their value
  • Sort status information by the severity of the status:
    • Ascending: Sort status information from positive to negative, with neutral last.
    • Descending: Sort status information from negative to positive, with neutral first.
Object status sorted ascending, with neutral status last
Object status sorted descending, with neutral status first
    • Ascending with different values per severity level: Sort status information from positive to negative, with neutral last. Sort different values within a severity level (semantic color) alphabetically.
    • Descending with different values per severity level: Sort status information from negative to positive, with neutral first. Sort different values within a severity level (semantic color) alphabetically.
Object status sorted ascending and alphabetically, from positive to negative with neutral last
Object status sorted descending and alphabetically, from negative to positive with neutral first

Filter

To display the current filter state, an icon is shown in the column header of the filtered column (sap.ui.table.Column, properties: filtered, filterProperty, filterValue, filterOperator, defaultFilterOperator, filterType).

Column, filtered
Column, filtered

Group

To display the current group state, group headers are shown. Show the following text in the group header:

[Grouping value] – [Item count for the group]

Group headers
Group headers

In general, offer reasonable grouping by default if appropriate. Enable the user to ungroup via the view settings dialog or via the table personalization dialog.

Personalization

Only offer personalization if you need more columns than those that fit on a tablet screen, which is usually five, to fulfill 80% of your main use cases.

Persist the column layout. When a user reopens the app, show the grid table with the same column layout settings as last defined by this user.

Add, Remove, and Rearrange Columns

To add, remove, or rearrange columns, use one of the following:

  • The table personalization dialog: It offers some simple settings for column layout. Use this if you have only a few columns to choose from and/or you use the view settings dialog.
  • The p13n dialog: Besides various complex view settings, it also provides settings for column layout. Use this if you have a large number of columns to choose from and/or you use this dialog anyway for view settings.

In both cases, trigger the dialog via the settings button in the table toolbar.

You can also use drag and drop to rearrange columns (sap.ui.table.Table, property: enableColumnReordering). If you allow rearranging via drag and drop as well as via a dialog, keep both places in sync.

Resize Columns

Resizing columns works differently on touch and non-touch devices.

  • Non-touch devices: Drag and drop the column separator on the right side of the column. Double-clicking the column separator optimizes the width of the column to the data currently loaded into the front end, which is usually about 100 rows.
  • Touch devices: Clicking the column header reveals two buttons: one for opening the column header menu, another one for resizing the column. Drag and drop this second button to resize the column.

Freeze Columns

To freeze columns, offer the setting in the column header menu (sap.ui.table.Table, property: enableColumnFreeze). Selecing Freeze on a column freezes all columns from the first one to the one where Freeze is selected. On this column, the menu entry changes from Freeze to Unfreeze.

Frozen column
Frozen column

Highlight Items

To show that an item needs attention, a highlight indicator can be shown in front of the item. The highlight indicator can be used to indicate:

  • A semantic state, such as red or orange for an error or warning. In this case, use semantic colors.
  • Additional information, such as blue to highlight newly added items. In this case, use semantic colors.
  • Industry-specific or process-specific states, such as “out of stock” or “excess of inventory”. In this case, use indication colors.

Be aware that the highlight is just an indication. It does not tell users exactly what is wrong. Make sure that you provide this information within the table row, ideally in the same color.

For details on the use of highlight colors, see How To Use Semantic Colors / Industry-Specific Colors.

(sap.ui.table.Table, aggregation: rowSettingsTemplate)

Highlighted items
Highlighted items

Tables in Object Pages

In the object page, we advise against using the analytical, grid, and tree tables. Instead, use a responsive table and offer navigation to a list report with the table types mentioned above.

For more information on the use of tables within the object page, see the Tables section of the Object Page article.

Export to Spreadsheet

On the table toolbar, apps can provide a menu button for exporting table data to a spreadsheet. For the export, use the export to spreadsheet function.

'Export to Spreadsheet' menu button

Paste

The browser paste function can be used to paste data from the clipboard to the table (CTRL+V or browser context menu).

  • If the focus is on row level, the app has to take the data from the clipboard and add it to the corresponding controls within the table.
  • If the focus is on an editable control within the table, the control gets the data automatically.

Pasting via the context menu does not work if a custom context menu is used.

Properties

sap.ui.table.Table

The following additional properties are available for the grid table:

  • The property: width defines the width of the grid table.
  • The property: rowHeight defines the height of each row in the grid table. Since the height required is calculated automatically by the grid table, this property is only needed rarely.
  • The property: columnHeaderHeight defines the height of the column headers. Since the height required is calculated automatically by the grid table, this property is only needed rarely.
  • The property: columnHeaderVisible can be used to hide the column headers. Always show the column headers.
  • The property: showColumnVisibilityMenu provides an additional entry in the column header menu that allows columns to be shown or hidden. In SAP Fiori, columns are shown and hidden via the table personalization dialog or via the table personalization dialog. Do not use this property.
  • The property: visibleRowCount defines the height of the grid table. Show as many rows as fit on the screen.
  • The property: visibleRowCountMode defines whether the height of the grid table is fixed or automatically calculated based on the space provided by the underlying container. For automatic calculation, make sure that all rows have the same height.
  • The property: minAutoRowCount defines the minimum number of rows that must be shown if the property: visibleRowCountMode is set to “auto”. Show at least three to five rows.
  • The property: firstVisibleRow defines the first row shown in the visible area of the grid table. The grid table is scrolled accordingly.
  • The property: allowColumnReordering is deprecated. Do not use it. Use the property: enableColumnReordering instead.
  • The property: editable does not have a visible effect. Do not use it.
  • The property: enableGrouping turns the experimental grouping on or off. Handle with care.
  • The property: enableCustomFilter changes the filter entry in the column header menu from an edit box to Filter…. Selecting this entry throws an event to which apps can react, for example, by opening a dialog. In general, you should choose the built-in filter over your own implementation. Specifically, keep filtering via the column header menu simple, while offering more advanced options via the table personalization dialog.
  • The property: enableBusyIndicator has not yet been fully implemented. Do not use it.
  • The property: title adds a line of text on top of the grid table. Do not use this. To add a title to the table, use a toolbar.
  • The property: footer adds a short text at the bottom of the table.
  • The property: Busy sets the grid table to busy state. While in busy state, the whole table cannot be used and items cannot be read due to an overlay.
  • The property: Tooltip does not have an effect. Do not use it.
  • The property: alternateRowColors displays the rows with alternating background colors (“banded rows”). Do not use it.

sap.ui.table.Column

The following additional properties are available for the column:

  • The property: visible defines whether a column is shown or hidden.
  • The property: name defines the name shown in the column header menu for showing and hiding columns. In SAP Fiori, columns are shown and hidden via the table personalization dialog or via the table personalization dialog. Do not use this property.
  • The property: headerSpan defines whether one column header is used for one or several columns. To prevent adverse side effects, always use one column header for only one single column. Do not use this property.
  • The property: Tooltip does not have an effect. Do not use it.

Resources

Want to dive deeper? Follow the links below to find out more about related controls, the SAPUI5 implementation, and the visual design.

Elements and Controls

Implementation

Object Display Components

There are four types of object display components: object status, object identifier, object number, and object marker. Each one is connected to an object and displays a certain type of information (status, identifier, number, marker).

  • Object status: a short text that represents the semantic status of an object
  • Object identifier: a short text that represents the key identifier of an object
  • Object number: a short text that represents the numeric (key) attribute of an object and its unit
  • Object marker: indicates the technical status of an object
From top to bottom: Examples for the object status, object identifier, object number, and object marker

Usage

Use the object display components if:

  • You need to display the semantic status of an object: negative, critical, positive, or neutral. Use the object status for this.
  • You want to display the key number of an object. In this case, use the object number and keep the default emphasized setting.
  • You need to display one or more numeric attributes of an object (for example, for objects you want to compare). Use the object number for this.
  • You want to indicate the key identifier of the object. Use the object identifier for this.
  • You want to display the technical state of an object (draft, unsaved changes, locked, favorite, flagged). Use the object marker for this, unless you want to display the status of the object in the business life cycle. In the latter case, consider using the object status instead.
  • You need to show that the current object instance is locked by another user. Use the object marker for this.

Do not use the object display components if:

  • You want to display system messages.
  • They are for decoration purposes only.

Responsiveness

  • The object status wraps if it is longer than the available screen width.
  • The object identifier text wraps if the size of the screen becomes too small to display the entire text on one line.
  • The object number does not wrap or truncate. For large numbers, you need to consider using the appropriate formatting.
  • The object marker does not wrap or truncate. It comes with different display options: IconAndText, IconOnly and Text. On size S, the display option IconAndText only displays the icon due to lack of space. The other options are displayed as normal.

For more information about the responsive behavior of text in general, see Wrapping and Truncating Text.

From top to bottom: Wrapping examples for the object status, object identifier, formatted object number, and two versions of the object marker

Components

Object Status

The object status is a short text that represents the semantic status of an object.

It consists of the following:

  • A semantically colored text indicating its status (property: text). We recommend using this semantically colored text-only option on its own. Check out the How to Use Semantic Colors / Industry-Specific Colors article for color options.
  • An optional icon (property: icon). If you need to have an icon, use one of the following:
     = positive/success
    = critical/warning
      = negative/error
    Note that there is no generic icon for “neutral” across industries. If you have a neutral object status, use the text-only version, or a blank icon. Only in exceptional cases, use an icon that means neutral in the app’s specific business context.
Text-only object status and icon with text object status
  • An optional inverted visualization. Use the inverted object status if the information is crucial for the user’s actions and needs to stand out visually (for example, in table list items).
  • An optional link (property: active). If the object status is used as a link, a hover effect is shown on non-touch devices. Use this feature if the user needs additional information about the status (for example, in a popover). Note that if you use the object status as a combination of icon and text, there is no hover effect for the icon.
Inverted object status (left) and object status in hover state (right)
  • An optional larger font (CSS class: sapMObjectStatusLarge). Use this feature if the object status is important in the business context and needs to stand out visually in the page header (for example, key value facets in an object page).
Larger object status in the header facet for an object page
Guidelines

  • Ensure that the context for the object status is properly described. The semantic meaning must also be understandable for color-blind people. Use the object status in combination with a label, icon, unit, or attribute to make the value state clear.
  • In rare cases, an object can have two statuses at the same time. In this case, use the inverted text-only version for the most important status, and the normal text-only version (with an optional icon) for the less important status.
  • If you use the object status in a table, follow the corresponding sorting guidelines.
  • To prevent the text being read as a link, don’t use the blue “information state” for the object status.

Object Identifier

The object identifier is a short text that represents the key identifier of an object.

It has the following characteristics:

  • A title text (property: title)
  • An optional link (property: titleActive). In this case, the event can open the quick view of the object or a popover for example.
  • An optional additional descriptive text (property: text)
Guidelines

  • The object identifier should be easily readable (preferably the display text and not the ID).
  • If the object’s ID is necessary to distinguish between items that use the same title, it should appear as descriptive text below the title (property: text).

Normal object identifier, object identifier with link, and object identifier with descriptive text

Object Number

The object number is a short text that represents the numeric (key) attribute of an object and its unit.

It consists of the following:

  • A colored text (property: number) based on the semantic color palette. Check out the How to Use Semantic Colors / Industry-Specific Colors article for more details.
  • An emphasized text which you can set to non-emphasized when you use it in the content area (property: emphasized).
  • An optional unit (property: unit).
Emphasized and non-emphasized object numbers
Object number used as a semantic attribute (weight)
  • An optional larger font (CSS class: sapMObjectNumberLarge). Use this feature if the object number is important in the business context and needs to stand out visually in the page header (for example, key value facets in an object page). Once the large font is applied, the object number can no longer be emphasized.
Guidelines

  • Ensure that the context for the object number is properly described. The semantic meaning must also be understandable for color-blind people. Use the object number in combination with a label, icon, unit, or attribute to make the value state clear.
  • The object number can also be used to visualize other semantic numeric attributes. In this case, they are not emphasized unless they are the key attribute, such as a sum.
  • Emphasize the object number if it is used as a line item status in a table.

Emphasized and non-emphasized object numbers in the header facet for an object page

Object Marker

The object marker indicates the technical status of an object and can be interactive. It is enabled for the dynamic page layout, the snapping header, the object page header, the upload collection control, and the object list item. You can represent the technical status as an icon, with an icon and text, or as text only, depending on the screen size.

Currently, the following technical statuses can be visualized by the object marker:

  • Editing Status: Draft, Unsaved Changes, Locked. The editing status is part of the draft handling concept.
  • Favorite
  • Flag

Flag and Favorite are usually displayed as icons on all screen sizes. For more information, see Flag and Favorite.

An object can have multiple technical statuses at the same time. However, because the editing statuses are mutually exclusive, users will see a maximum of 3 technical statuses for an object: Flag, Favorite, and one Editing Status.

Developer Hint
The app developer is responsible for the technical statuses. Every technical status has a default visualization that can be changed by the app developer depending on the usage context. For details regarding draft handling, see How to Display the Editing Status in the Draft Handling article.
Icons for draft, unsaved changes, locked, favorite, and flag (from left to right)
Editing status examples

Resources

Want to dive deeper? Follow the links below to find out more about related controls, the SAPUI5 implementation, and the visual design.

Elements and Controls

Implementation

Button

Buttons allow users to trigger an action. There are 4 button types:

  • Simple button for one action
  • Toggle button to switch between different states
  • Segmented button with a group of options
  • Menu button with a group of actions
Common button types
Common button types

Usage

Use the button types as follows:

  • Use simple buttons for specific actions, such as:
    • Create, Edit, Save
    • Approve, Reject
    • Accept, Decline
    • OK, Cancel
  • Use toggle buttons in a toolbar to activate or deactivate an object or element. You can also use toggle buttons to switch between different states.
  • If you want the user to select one option from a small group, offer a segmented button in the toolbar. For example:
    • Year, Month, Day
    • Small, Medium, Large
  • Use the menu button if you need a menu that provides more than one option.

Do not use buttons if:

  • You want to link to a different page or object. Use the link instead.
  • You want to let users upload content. Use the upload collection control instead.

Responsiveness

The button usually grows to fit the size of the text. If you set a fixed size for the button, the text truncates.

If the button is used in a responsive container or toolbar, it follows the responsive behavior defined for that element. For example, the button can move to another line.

Buttons with different lengths

Menu Button

The maximum width of the menu button is 12 rem (192 px). If the button text exceeds the maximum or fixed width, it truncates.

On smartphones (size S), the menu opens in a full screen dialog, and the button label becomes the title of the dialog. The footer contains a Cancel button. Items with submenus become navigable. Navigation is similar to that used in a popover, with a Back button.

On tablet and desktop devices (sizes M and L), the menu button triggers a cascading dropdown menu.

Open menu button
Open menu button
Menu button popover on size S

Types

Button

Buttons can trigger primary, secondary, semantic, and negative path actions. These different action types are explained in more detail in the action placement guideline.

Header and Footer Toolbars

Use the following button styling for the different action types in the header and footer toolbar:

  • Primary action: Use the emphasized button style.
  • Secondary action: Use the ghost button style. 
  • Semantic action: Use the semantic buttons for positive and negative actions. Use the “accept” style for positive actions, and “reject” for negative actions. Semantic actions must always be text buttons.
  • Negative path action: Use the transparent button style.

Content Toolbars

Use the following button styling for the different action types in content toolbars (for example, in tables, forms, or charts):

  • Primary action: Use the emphasized button style. Usually, the primary action is positioned in the header or footer toolbar. Note that there can only be one primary action per page. If a page already has a primary action, but you also need to highlight the most important action in a content toolbar, use the ghost styling for this one button in the content toolbar.
  • Secondary action: Use the transparent button style.

The different button styles are designed to give appropriate feedback to users. Don’t use them for decoration purposes.

Button with different styles

Toggle Button

A toggle button switches between two actions. One of the actions is always active, one is inactive. Use the toggle button for secondary actions.

Apply the following button styles for the different toolbars:

  • Header and footer toolbars: Use the ghost button style.
  • Content toolbars: Use the transparent button style.
Toggle buttons
Toggle buttons

Segmented Button

A segmented button shows a group of options. Only one of the options can be active, the others remain or become inactive. Pressing an option activates it. By default, the control for segmented buttons calculates the button width and applies it to all buttons within the group. You can change this by setting the width for individual buttons.

The segmented button is comparable to a radio button group control.

Segmented buttons
Segmented buttons

Menu Button

There are two different types of menu buttons. Both can contain items with submenus.

Regular Menu Button

When the user activates the button, the menu opens. This is the default type.

Split Menu Button

The split menu button is separated into two areas: the text label and the icon. The separator between them signals that the two areas result in different actions. The user has two choices: activating the text label on the button triggers the action. Activating the arrow opens the menu. The split button consolidates a variety of commands, especially when one of the commands is used more often.

In split mode, the text label depends on the default action. If the default action is displayed as an icon only, all the menu items must contain icons.

Split Menu Button Behaviors

The split menu button can have two different behaviors:

  1. The button always triggers the default action set by the app developer. If no default action has been defined, the first item in the menu list becomes the default.
  2. The button triggers the last action chosen by the user. Initially, it also triggers the default action. However, when the user selects a different action, this user action becomes the default, and the button text label changes accordingly. The button has a fixed size and the text truncates if the menu item exceeds the available width (as with the combo box).

Toolbars

Apply the following menu button styles for the different toolbars:

  • Header and footer toolbars: Use the ghost style.
  • Content toolbars: Use the transparent button style.

Do not use any other styling types.

Menu buttons
Menu buttons

Button Content

Text or Icon

A button can contain an icon OR a text.

Always use a text button for primary, secondary, semantic, and negative path actions.

Use icon buttons only if the icon metaphor is easily recognizable. Ideally, it should have same meaning worldwide.  For more information about icons in general, check out the article on iconography.

Badge

Buttons with text (left) and icon (right)

The standard button can contain an optional badge. The badge acts as a visual eye-catcher and attracts the user’s attention. It shows a number and is typically applied in browse and collect use cases. For example, it can display the number of items in a shopping cart.

Use the badge in combination with one of these button styles:

  • Emphasized (as a primary action)
  • Ghost (as a secondary action)
  • Transparent (as a secondary action)

The number of the badge must always be a whole number (1, 2, 3, …) and cannot be smaller than 1. If 0 or minus items are in the basket, the badge is not displayed. If the number exceeds 4 characters, such as 9999, it is truncated to 999+.

The position of the badge (attached to or on a button) can vary depending on the content density.

Buttons with a badge in cozy mode (left) and compact mode (right)

Behavior and Interaction

To trigger the action, the user clicks the button, toggle button, or segmented button using a keyboard, touchscreen or screen reader. The button provides visual feedback for “hover”, “press-down”, and “focused” states.

  • A toggle button remains in the pressed state until it is pressed again.
  • In a segmented button, the chosen option stays active until the user presses one of the other options.
  • menu button displays a dropdown menu on activation.
  • In a split button, selecting the button text triggers that action directly. Activating the arrow opens a dropdown menu. If the user selects a menu item, the action is triggered and the menu closes.

If an action cannot be triggered, or is temporarily unavailable, use the disabled state for the corresponding button.

If you want to switch a text, icon or tooltip after a button click, bear in mind to use the invisible message control to also convey the information to screen reader listeners.

All three button types support the cozy and compact form factors. For more information, check out the article on content density.

Regular state
Regular state
Hover state
Hover state
Press-down state
Press-down state
Disabled state
Disabled state
Focused state
Focused state
Opening a menu button with subitems

Guidelines

Button Text

  • Choose a button text that is short and meaningful. Check out the UI text guidelines for more information.
  • Use a verb in the imperative for all actions (for example: SaveCancel, Edit).
    Note: The grammatical form for actions can differ for other languages. For example, German action labels use the infinitive (Sichern, Abbrechen, Bearbeiten).
  • Keep in mind that the text can be up to 300% longer in other languages.
  • If you need to show the number of items that will be affected by the action of the button, you can add the number in parentheses. For example, Edit (3).
  • Do not change the text or icon of a toggle button when it is pressed. Screen readers announce the “pressed” state for the action. If you use a different text for the pressed state, the screen reader announcement doesn’t make sense.

Icon Buttons

  • Make sure the default accessibility text for the icon is correct for your use case. If the text is not ideal, define an app-specific accessibility text.
  • Offer a tooltip to show the label for icon buttons.
  • Don’t use the icon control for buttons. Use the icon property for the button instead.

Button Shortcut

  • You can use the button shortcut control to show the keyboard shortcut for an action. The keyboard shortcut appears on hover or on keyboard focus, and its positioning (top or bottom) is context-dependent. When a tooltip is needed, it is combined with the shortcut information.
Button with a shortcut hint

Examples

Header toolbar with primary action (emphasized styling) and secondary actions (ghost styling)
Table toolbar with search field, text buttons (ghost and transparent styling), icon buttons (transparent styling), and segmented button
Footer toolbar with standard actions: 'Save' (emphasized) and 'Cancel' (transparent)

Related Links

Elements and Controls

Implementation


  • No links

Grid Table

A grid table contains a set of data that is structured in rows and columns. It allows the user to scroll in both directions and can handle large numbers of items and columns.

Usage

Use the grid table if:

  • The cell level and the spatial relationship between cells are more important than the line item. Examples include spreadsheet analyses and waterfall charts. Note that a grid table is not fully responsive. It is only available for desktops and tablets, so you will need to take an adaptive approach by offering an additional UI for smartphones.
  • You have to work on more than 1,000 rows. In this case, the grid table is easier to handle. In contrast to the responsive table, the architecture of the grid table is optimized for handling large numbers of items. Note that a grid table is not fully responsive. It is only available for desktop and tablets, so you will need to take an adaptive approach by offering an additional UI for smartphones.
  • Comparing items is a major use case. In this case, a grid table might be more appropriate than a responsive table. In the grid table, each cell contains only one data point. In contrast, the responsive table is more flexible regarding line items, including the ability to add more data points per cell and also the pop-in function. Both make comparisons more difficult. Note that a grid table is not fully responsive. It is only available for desktops and tablets, so you will need to take an adaptive approach by offering an additional UI for smartphones.
  • You need an analytical table, but you cannot provide an analytical binding on the technical side. In this case, a grid table will do the work. Note that the grid table provides only one level of grouping, no aggregation options, and is also not fully responsive. It is only available for desktops and tablets, so you will need to take an adaptive approach by offering an additional UI for smartphones.

Do not use the grid table if:

  • You need a table. The responsive table is the default table in SAP Fiori. Additional use cases where you might need the responsive table include:
    • The focus is on working on line items, not on cells. The responsive table is optimized for displaying complete items on all devices, such as file browsing and a list of documents you want to act on, like purchase orders and purchase requisitions.
    • Selecting one or several items is the main use case and details are needed to choose the correct item.
    • Line items are independent of each other and no operation across columns is needed.
    • You want to have only one implementation for all devices.
  • The main use case is choosing one item from a very small number of items with no additional details. A select or combo box might be more appropriate.
  • The main use case is choosing one out of several items with only a few details per item. A list might be more appropriate. Pay attention to the layout of the list item to ensure that it has a pleasant appearance.
  • Data needs to be structured in a hierarchical manner. Use a tree table instead. Note that neither the tree table nor the grid table are responsive. You will need to take an adaptive approach by offering an additional UI for smartphones and tablets.
  • You need an overview of a large amount of data. In this case, use charts.
  • You just need it for layout reasons. In this case, use a layout container such as HBox or VBox.
  • You need read-only or editable field-value pairs. Use a form instead. The grid table is not optimized for form-like input navigation.

Responsiveness

A grid table is available for desktops and tablets, but not in smartphone sizes. It supports touch devices, but is not optimized for small screens.

If you use a grid table, note that you have to implement a fallback solution for small screens. This fallback solution does not need to support all use cases.

You could create a fallback by using a responsive table, but a completely different solution, such as showing charts in a read-only case, might be more appropriate.

Grid table shown on a desktop
Grid table shown on a tablet

Layout

The column header allows the user to resize and rearrange columns. It also provides access to a menu with column-specific commands.

The collection of items, or rows, occupies the main part of the grid table.

The selector cells allow the user to select one or more items.

The Select All button selects or deselects all items.

Schematic visualization of the grid table

Components

A grid table does not consist of other elements. However, it is common to use a toolbar above the grid table.

The toolbar can contain entry points for the view settings dialog and the table personalization dialog or for the p13n dialog, as well as view switches in the form of a segmented button, and buttons for Add, Edit, and other actions.

Behavior and Interaction

A grid table is quite restricted in terms of its content.

Table Level

Scroll

A grid table allows horizontal and vertical scrolling (sap.ui.table.Table, property: navigationMode, value: Scrollbar).

You can add any number of line items to the grid table, which uses “lazy loading”.

To prevent adverse side effects when scrolling vertically, all line items must have the same height (sap.ui.table.Table, property: rowHeight).

The grid table is optimized to allow faster scrolling within the first 1000 items.

Scroll bar
Scroll bar

Select

Selection Mode

Selection for a grid table depends on the chosen selection mode. The following options are available:

No selection: Items cannot be selected. (property: selectionMode = None)

A non-selection grid table

Single selection: One item in the grid table can be selected. A row selector column is shown. (property: selectionMode = Single)

A single-selection grid table

Multiple selection: One or more items can be selected. The grid table provides a column with checkboxes on the left-hand side. Clicking a checkbox toggles the state of the corresponding row from deselected to selected and back. The Shift key can be used to select a range.

For multiple selection, you can choose between two variants.

  • Multi-toggle mode (property: selectionMode = MultiToggle)
  • Multi-selection plug-in (sap.ui.table.plugins.MultiSelectionPlugin)

These variants behave differently when the user selects more items than are currently loaded in the front end.

Multi-toggle

In multi-toggle mode, you can offer a Select All checkbox to the left of the column header (property: enableSelectAll). Selecting this checkbox selects or deselects all items that are currently loaded in the front end. All other items are not selected/deselected. If the application data is stored in the back end, scrolling down further can reveal additional unselected items. The same can happen with range selections if not all items in the selected range have been loaded to the front end.

Multi-selection plug-in

If you use this plug-in instead of the multi-toggle selection mode, the behavior for range selection and Select All changes:

  • By default, a dedicated Deselect All button replaces the Select All checkbox. There is no default UI element for selecting all items.
  • You can set a limit for the number of items that can be selected (sap.ui.table.plugins.MultiSelectionPlugin, property: limit). This limit has the following effect:
    • The range that can be selected using the Shift key is limited to the specified number of items (default = 200). The table automatically scrolls back to the last selected item and you can display a corresponding message (sap.ui.table.plugins.MultiSelectionPlugin, property: enableNotification). Users can select more items by selecting additional ranges (the specified limit applies each time).
    • If the selection limit is set to 0, a Select All checkbox is shown. There is also no limit on the number of items that can be selected in a range. All selected items are loaded, which can lead to performance issues for large data sets.
  • If selected items are not already available in the front end, they are loaded automatically by the plug-in and set as selected.
Information
When setting a limit for the number of items that can be selected, keep the following boundaries in mind:

  • The performance of your service: How many items can be loaded at once in a reasonable time? Does this also apply if an end-user shows all available columns?
  • The “minimum limit”: Internally, the grid table loads blocks of items as the user scrolls down. Because this block size (sap.ui.table.Table, property: threshold) is usually also based on the performance of the service, it should be safe to assume that the minimum selection limit is twice this size. In this case, loading the data would take as long as scrolling down and loading exactly one more block. Nevertheless, we recommend using larger limits if your service allows.

A multiselection grid table
Using the multi-selection plug-in with a limit

Selection Behavior

An item can be selected in different ways, depending on the configuration of the grid table (sap.ui.table.Table, property: selectionBehavior):

  • Row: An item is selected by clicking the checkbox or the row. Use this option for multi-selection grid tables if clicking a row or a cell is not used for anything else.
  • RowSelector: An item is selected only by clicking the checkbox in the selector cell. Use this option if clicking the row (or a cell inside the row) is used for something else, such as navigation.
  • RowOnly: An item is selected only by clicking the row, and not using checkboxes in the selector cells. Use this for single-selection grid tables if clicking a row or a cell is not used for another purpose, such as navigation.

Compact, Cozy, and Condensed

Like all SAP Fiori controls, the grid table is shown in compact mode on a desktop and in cozy mode on tablets.

For a desktop, you can also display even more rows on the same screen height by adding the condensed mode in addition to the compact mode. This renders less white space for each item.

Note that the condensed content density has always to be set in addition to compact. Do not use condensed on its own. Do not mix condensed with cozy. Doing so could lead to unpredictable and / or unwanted results, e.g. cozy sized controls in condensed sized containers, missing padings, etc.

Note that neither compact mode nor condensed mode can be interacted with via touch. Even on a desktop with a touch screen, users will have difficulty selecting rows or using controls inside the cells when using their fingers.

Furthermore, condensed mode is not available for Internet Explorer 9. If condensed mode is to be used, please provide a fallback.

For more information on cozy and compact modes, see content density.

Column Header

The column header provides the label for the corresponding column and access to the column header menu.

Columns are resized as follows:

  • Mouse interaction: The user drags the separator line between two columns (sap.ui.table.Column, property: Resizable). Double-clicking the line optimizes the column according to the length of the currently visible data and the label of the column header (sap.ui.table.Column, property: Autoresizable).
  • Touch interaction: The user taps the column header to reveal two buttons – one to show the column header menu, and one for resizing. The user drags the latter to resize the column.

After resizing a column, the adaptation of the column widths depends on how the column width is set:

  • If column widths are set in pixel-based units (px, em, rem), the corresponding column is adapted and the columns that follow are moved accordingly. The width of all other columns is not affected.
    If all the columns together take up less width than the table control, an empty space is added. In case all columns together take up more width than the table control, a scrollbar appears. (sap.ui.table.Column, property: width)
  • If all column widths are set in percentage or “auto”, resizing one column might also lead to the automatic resizing of some or all other columns. The position of the resized column might also be affected. This is done to ensure that the whole table width is used and no white space is added. A scrollbar appears only if all or most of the columns shrink significantly. To avoid the side effect of undersized columns, a minimum width can be set per column. Please be aware that this minimum width is only taken into account if columns are automatically resized. End users are still able to reduce the column width below the provided minimum. (sap.ui.table.Column, properties: width, minWidth)

Columns can be rearranged by dragging the column header to another position (sap.ui.table.Table, property: enableColumnReordering).

Column header
Column header
Opening the column header menu on touch devices
Fewer columns than space available

Column Header Menu

For each column, a menu can contain the following menu items (sap.ui.table.ColumnMenu, property: visible):

  • Sort Ascending/Descending (sap.ui.table.Column, property: showSortMenuEntries)
  • Free text filter (sap.ui.table.Column, property: showFilterMenuEntries)
  • Group (sap.ui.table.Table, property: enableGrouping)
  • Freeze from the first to the last specified column (sap.ui.table.Table, property: enableColumnFreeze)

For each column, the menu can be replaced by an app-specific menu.

Column header menu
Column header menu

Sort

The column header menu can provide two sort options (sap.ui.table. Column, properties: sortProperty, showSortMenuEntry):

  • Sort Ascending
  • Sort Descending

The user selects one of these options to sort the corresponding column accordingly (sap.ui.table. Column, properties: sorted, sortOrder, sortProperty).

Sort settings in column header menu

Filter

The column header menu can provide a search field for entering free text (sap.ui.table.Column, properties: filterProperty, showFilterMenuEntries).

If the user enters a term in the input field and triggers the search by pressing Enter when the focus is on the filter input field, the grid table is filtered by the corresponding column and value (sap.ui.table.Table, properties: filtered, filterProperty, filterValue, filterOperator, sap.ui.table.Column, property: filterType).

Note that the filter may return zero results, in which case, the table might be empty.

General recommendations for filtering:

  • If filtering is a main use case, choose the filter bar or any other filtering UI over the built-in free text filter.
  • Only use the free text filter if filtering is a secondary use case and if the filter bar is too heavy.
Free text filter in column header menu

Group

The column header menu can provide the option to group by this column (sap.ui.table.Column, property: enableGrouping).

One group collects all items with the same value within the corresponding column.

Group setting in column header menu

If line items are grouped in a column, every group is provided with a collapsible or expandable group header. The header text consists of the name of the value and the number of items in the specific group. Only one grouping level is possible.

Group header
Group header

Once line items have been grouped, the corresponding column is hidden. There is no built-in possibility to ungroup the grid table again. Therefore, provide a view settings dialog or table presonalization dialog to offer an additional way to group by a column and a way to ungroup the complete table.

An exception to this is when the table is grouped from the start and should not be ungrouped at all.

Group headers shown, the corresponding column hidden: no duplicates, but a confusing change
Warning
Note that grouping the grid table is experimental and currently works only on items loaded to the front end. Thus, scrolling down the table leads to data not being grouped as expected.

Only use this feature if you have just a few line items, all of which are loaded to the front end. If this is the case, consider using a responsive table first instead of a grid table.

Freeze Columns

The column header menu can provide the option to freeze columns (sap.ui.table.Table, property: enableColumnFreeze). Selecting Freeze freezes all columns up to the one in which the operation was triggered (sap.ui.table. Table, property: fixedColumnCount).

When Freeze is triggered, the menu item changes to Unfreeze for the corresponding column.

Freeze setting in column header menu

Line Item Level

A line item contains a set of cells and provides options for selecting the item.

To prevent adverse side effects when scrolling vertically, all line items must have the same height (sap.ui.table.Table, property: rowHeight).

Line item
Line item

Drag and Drop

One or several items can be repositioned within a table or moved to other UI elements using drag and drop operations (sap.ui.table.Table, aggregation: dragDropConfig). While being dragged, the items are shown as ghost elements on the mouse cursor.

Drop targets can be on items, between items, or both (sap.ui.core.dnd.DropPosition). On a drop target, the mouse cursor changes to either a “copy”, “link”, “move”, or “none” cursor. “None” indicates that the dragged item cannot be dropped in the current position (sap.ui.core.dnd.DropEffect).

Drag and drop is only available on supporting browsers.

Drag and drop
Drag and drop
Whole item as drop target

Context Menu

You can attach a context menu (sap.m.Menu) to a table. The context menu gives users an alternative way to modify the focused elements by giving them access to context-specific functions.

When opened, the context menu gets the row and column context, except for special columns (such as the selection column) or special rows (like group headers). Context menus can be implemented for a specific table, row, or cell (not recommended for editable cells).

Context menus are opened by right-clicking (desktop), long press (mobile), the context menu key, or SHIFT+F10.

Be aware that using the context menu overrides the browser context menu, which can no longer be opened.

If a control inside a table is the “click target”, and the control also provides a context menu, the control context menu “wins”.

Grid table with a context menu

Cell Level

A cell provides one data point.

It can contain one of the following controls to display this data point:

While it is technically possible to also use other controls, doing so could lead to issues in regards to alignment, condensed mode, screen reader support, and keyboard support.

If you use text, use only single-line text to keep the same row height. Truncate if necessary as this prevents adverse side effects when scrolling vertically (sap.m.Text, property: wrapping, value: false). Do not wrap.

Cell
Cell

Guidelines

Data Density vs. Complexity

The grid table can be used to display large amounts of data. Unfortunately, the grid table has a high data density and therefore conveys an immediate feeling of complexity.

Only show tables with a lot of data as a last resort. Try the following instead:

  • Break down the data into manageable chunks and allow the user to navigate or drill down between them.
  • Use charts with drilldown functionality until the amount of data is more manageable.

Try to avoid horizontal scrolling in the default delivery.

Try to minimize the number of columns, especially if there is a large number of rows.

Table Title

Implement the table title by using a title control in a toolbar.

Use a table title only if the title of the table is not indicated in the surrounding area.

Do not use a table title if it simply repeats text that is already above the table. For example:

  • A pricing conditions table is the only control on a tab labeled Pricing Conditions.
  • A section or subsection on an object page contains only one table.

Use a table title if you need the item count, table toolbar, or variant management. To avoid repeating text, feel free to use generic text as a table title, such as Items.
Exception: If the surrounding area contains the table title, and both the item count and toolbar can be added to the surrounding area, no additional table title is needed.
Example: An object page (sub-)section contains only one table. In this case, add the item count and the table toolbar to the (sub-)section header.

If you use a table title, show either a title for the table, with or without variant management, or an item count in the following format:

Items (2,534).

The item count in the table title includes all the visible items that a user can reach by scrolling or expanding groups. Group headers are not included.

Remove the item count in the table title if there are zero items.

Developer Hint
Assistive technologies (such as screen readers) use the title to create a hierarchical site map for faster navigation. In addition, screen readers use the title as the label for the table.

If you don’t use a title (for example, to avoid repetition), make sure that the table is connected to another meaningful on-screen text that can be used as a label for assistive technologies. You can do this using the method addAriaLabelledBy.

Multiple Selection

  • We strongly recommend using the multi-selection plug-in. This ensures that all items selected using Select All or as part of a range are included – even if some items were not initially loaded in the front end. This is not the case if you use the multi-toggle option.
  • Do not limit the range selection for the multi-selection plug-in unless you have to.
    • If the dataset is small and/or completely available in the front-end, set the limit property to 0 to enable the Select All option and allow users to select any range.
    • If you have a large dataset, set a limit on the number of selected items to avoid performance issues. Also bear in mind that some actions won’t be helpful if the dataset is too big (for example, a delete operation on 2 million database entries).
  • If you set a limit, also display the corresponding message when the user selects more items at once than the limit allows (sap.ui.table.plugins.MultiSelectionPlugin, property: enableNotification).
Information
When setting a limit for the number of items that can be selected, keep the following boundaries in mind:

  • The performance of your service: How many items can be loaded at once in a reasonable time? Does this also apply if an end-user shows all available columns?
  • The “minimum limit”: Internally, the grid table loads blocks of items as the user scrolls down. Because this block size is usually also based on the performance of the service, it should be safe to assume that the minimum selection limit is twice this size. In this case, loading the data would take as long as scrolling down and loading exactly one more block. Nevertheless, we recommend using larger limits if your service allows.

  • In multiple selection mode (multi toggle), do not show checkboxes in the first data column in the default delivery to avoid confusion.
Don't
Do not add checkboxes to the first data column in the default delivery

Loading Data

To indicate that the table is currently loading items, use the busy state. (sap.ui.table.Table, property: busy). Do not show any items or text. As soon as the data is loaded, remove the busy state and show all items.

Grid table in busy state while loading data

Columns – Best Practices

Minimize the number of columns. Avoid the need to scroll horizontally in the default delivery.

The grid table assigns the same width to each column by default. It is recommended that you overwrite this default to provide optimal space for your content (sap.ui.table.Column, property: width).

If you define the column width in pixels or rems, resizing a column affects only the width of this specific column. Reducing the browser window size results in a scrollbar. After resizing a column, a scroll bar appears if the width of the table is not enough to show all columns. If the columns use less space than available, white space appears on the right side of the last column.

If you define the column width as a percentage, resizing one column affects the width of several or all columns. Text becomes truncated when the browser window size is reduced. This is done to make sure that all columns together fill the space of the table. A scrollbar appears only in case the automatic change of the column widths is not enough for showing all columns. To avoid the side effect of undersized columns, a minimum width can be set per column. Please be aware that this minimum width is only taken into account if columns are automatically resized. End users are still able to reduce the column width below the provided minimum.

If you define the column width as “auto”, the behavior is the same as for “percentage”. In contrast to percentage, “auto” distributes the columns equally.

To decide on how to set the column width (pixel / rem / em vs. percent / auto), keep the following in mind:

  • For tables with only 2 to 3 columns, use pixel-based units. This ensures that on wide screens the values in the columns are not spread over the whole screen, which improves the readability of line items.
  • For tables with many columns, where a horizontal scrollbar is usually needed, use pixel-based units. This avoids unintended side effects when resizing columns.
  • For all other tables, use whatever fits your case better.

Be cautious with mixing columns with pixel-based and percentage-based widths. While this can be helpful in some cases, it could also cause even more unexpected side effects when resizing a column. When using percentage-based widths for one or more columns, think of the possibility to not allow end users to resize columns at all.

Optimize the column width for its initial visible content, including the column header texts. If this is not possible (for example, if showing the full texts would result in extremely wide columns), let the texts truncate. End users can change the width of the column to read the full text, as needed.

Maintain a constant column width and avoid adjusting it automatically when the content changes.

Always keep to one line of text. Do not wrap.

Don't
In the default delivery, the initial visible content should not be truncated
Don't
Never wrap texts
Never wrap texts

Column Headers – Best Practices

For each column, provide a label in the column header. In the default delivery, do not truncate the column header texts. Only let the text truncate if showing the full text would make the column too wide. Never wrap the text.

Content Alignment

For alignment of cell content, follow the guidelines below.

Left-align the following: text, IDs, phone numbers, URLs, passwords, and email addresses.

Left-alignment of text

Right-align numbers (except IDs).

This ensures comparability of numbers and amounts.

Right-alignment of numbers

Right-align amounts with currencies to the cell and align them in terms of their respective decimal points.

This ensures that amounts with different currencies are shown correctly, whether these currencies have 0, 2, or 3 decimals.

For aligning to the decimal point, use the sap.ui.uinified.Currency control.

Alignment to decimal point

Right-align dates and times.

This ensures comparability for most formats and locales.

Right-alignment of dates

Left-align status information.

Left-align status information

Center-align icons.

Left-align micro charts.

XS micro charts in condensed mode

Content Formatting

Locale Settings

Be locale-aware: show dates, times, numbers, and so on in the format corresponding to the user’s locale settings.

Key Identifier

Use a bold label or an emphasized link as the key identifier of an item. In the default delivery, show the key identifier in the first column.

Emphasized link
Emphasized link

For strings with IDs, use one of the following options:

  • Show the ID in a separate column. Use this format if users need to sort, group, or filter by both the string and the ID.
  • Show the ID in brackets after the corresponding string. In this case, sorting, filtering and grouping is available for either the string or the ID. Use this format only if users don’t need to sort, filter, and group by both values.
Text and ID in two columns – Allows sorting, filtering, and grouping on both
If displayed as a link, use only the text as the link, not the ID
Text and ID in one column – Sorting, filtering, and grouping only on the text
Text and ID in one column - If displaying a link, show the whole string as the link (text and ID)

Truncation

Avoid truncation of typical content in the default delivery (sap.ui.table.Column, property: width). However, since the columns are resizable, do not worry too much if truncation occurs as columns can still be enlarged if necessary.

To prevent adverse side effects when scrolling vertically, all line items must also have the same height. If you need to decide between truncation and different row heights, choose truncation. Do not wrap.

Optimize column width for typical content, not all content

Number of Links

Are there too many links? Use subtle links to avoid a wall of links. Standard links are also emphasized more if they are surrounded by subtle links.

Emphasized links, links, subtle links, and text

Missing Value

If there is no value for a cell, leave it blank. Do not display text as N/A.

Leave empty fields blank

Numbering Items

In terms of numbering items:

  • If the item number is more like an ID with regard to its description, use ID formatting as described above.
  • In all other cases, use a separate column for the item number.
Add a separate column for the item number

Status

For status information, use semantic colors on the foreground elements.

For status information on text, use an object status.

Semantic colors on text

Micro Charts

Use only the following micro charts: Bulletcomparisonstacked bar. When using micro charts, use them in size XS.

Micro charts in a grid table

Empty Tables

Avoid empty grid tables. If necessary, provide instructions on how to fill the grid table with data (sap.ui.table.Table, properties: noDataText, showNoData).

Examples:

  • If a table is initially empty, provide at least a basic text:
    No items available.
    Overwrite this whenever a hint can be provided on how to fill the table with data.
  • If a table is used together with a filter bar (as in the list report), and is initially empty, use the following text:
    To start, set the relevant filters.
  • If a table is used together with a filter bar and the filter does not return results, use the following text:
    No data found. Try adjusting the filter settings.

Adapt the texts above if:

  • The standard text is not precise enough for your use case (for example, a search is also offered, or only the search is offered).
  • The standard text is misleading (for example, if the data is filled based on a master-detail pattern instead of filter settings).
Provide meaningful instructions

Invalid State

To show an invalid state of the grid table within the list report floorplan, show an overlay on the grid table and the corresponding toolbar (sap.ui.table.Table, property: showOverlay). The overlay prevents user interactions.

Use this within the list report floorplan if filter settings have been changed but the grid table is has not yet been updated.

Grid table with invalid data

Item States

To show that an item has been modified, for example, within the global edit flow, add the string Modified in an additional column with the label Editing Status.

In the default delivery, add a column directly behind the key identifier.

A modified item
A modified item

To show that a modified item contains an error, for example, within the global edit flow, add the string Contains errors in the Editing Status column and highlight the row accordingly. This string replaces the Modified string.

A modified item with an error

To show that an item is locked, add a transparent-style button with the corresponding icon and the text Locked by [name] in the Editing Status column.

A locked item
A locked item

To show that an item is in draft state, add a transparent-style button with the text Draft in the Editing Status column.

Item in draft state
Item in draft state

Show only one state at a time.

Numbers and Units

Show the unit of measurement in one of the following ways:

Number and Unit in Same Cell

The number and the unit are in the same cell. Do this if sorting, filtering, or grouping by the unit of measurement are not needed.

Use a currency control to display the concatenated string.

Number and unit of measurement in one cell

Number and Unit in Separate Columns

The number and unit are in separate columns. Do this if sorting, filtering, or grouping by the unit of measurement are a common use case.

Note that this column can be hidden or moved independently of the column containing the corresponding number. Therefore, be sure to have clear labels for both columns to communicate the dependency.

Number and unit of measurement in two columns

Show the unit of measurment on the column header, if the unit of measurement is the same for all rows. If not, show the unit of measurement within the row.

Drag and Drop

If you offer drag and drop for rearranging items within the table, use drop targets that are between items (sap.ui.core.dnd.DropPosition.Between). This provides better feedback on where the item will be inserted. Show the “move” mouse cursor (sap.ui.core.dnd.DropEffect.Move).

Drop targets in between items

Do not combine rearranging items and sorting. If you really need to do so, make sure that there is a dedicated sort criterion for the user-defined sort order, and only offer options for rearranging items if this sort order is set.

Don't
Do not combine rearranging items with sorting

Drag and drop is “invisible” on the UI: users can’t see where dragging is available and where it isn’t. In addition, it is not accessible, since there is no generic keyboard interaction. Drag and drop is also not available on all browsers. For these reasons, provide it only in addition to existing (and visible) UI elements that fulfill the same purpose. For example, offer (toolbar) buttons for moving or for copying and pasting items.

Use drag and drop only in addition to existing visible UI elements

When combining rearranging items with grouping, be aware that moving items to another group also means that a value of the dropped item changes: because grouping is based on values in a column, the dropped item needs to take on the value of the target group for the corresponding column. If this is not wanted, do not allow users to rearrange items in grouped tables.

Example:
A table is grouped by availability. An item is moved from the group “Not Available” to the group “In Stock”. In this case, the moved item needs to change its availability to “In Stock” to match the target group. If changing the value doesn’t make sense make sense, only allow users to rearrange the items within the same group, or don’t allow rearranging at all.

Don't
Do not combine rearranging items with grouping, unless you know exactly what you're doing.

Context Menu

Use the context menu only as a quick way of accessing functions that are already available elsewhere (for example, as buttons in the toolbar). Don’t just offer actions in the context menu itself, as users might not realize that these actions are available at all.

The context menu can be triggered for the table, row, or cell. However, we do not recommend using context menus for cells: because the content of a cell is a different touch target than the cell itself, opening a cell context menu via touch is quite hard, even in cozy mode.

Do not combine context menus with condensed mode: editable controls fill the entire space inside a cell. Because of this, context menus cannot be opened at all with touch or mouse interaction.

Actions

Multiple Items

To trigger actions on multiple items, use a mutliselection grid table (sap.ui.table.Table, property: selectionMode, value: MultiToggle). Offer the corresponding actions in the table toolbar.

Do not offer action triggering on multiple items if the table is generally expected to have fewer than 10 items. In this case, try to use the responsive table instead of the grid table.

Single Item

To trigger actions on a single item (sap.ui.table. Table, property: selectionMode, value: Single):

  • Show the actions on the table toolbar.
  • In rare cases, show the actions within the line item. One example would be an Add to Cart button in a shopping application. Since these actions are repeated in every line and thus use a lot of screen real estate, do this only for a maximum of one or two actions. Provide a separate column per action. Use a button, unless the action trigger belongs to a link. Hide the action in rows for which it is not applicable.

To trigger navigation on line item level, choose one of the following options:

  • Use a link for the attribute that identifies the row. Clicking the link triggers the navigation.
  • Add the RowActions column and show the navigation indicator (  ) at the end of the row. The navigation arrow triggers the navigation.

Special case: Multi-selection in a master-detail scenario
When a multi-selection table is used in a master-detail scenario, it is not clear which item was last opened (for example, which item is currently shown in the second column of a flexible column layout). In this case, you can display a “navigated” indicator to show which item is currently open.

Use the RowActions column only for one or both of the following actions:

  • Navigate to details page ( )
  • Delete ( )

The RowActions column does not provide a column header text. It is fixed and will not scroll away. Users also cannot personalize this column.

Navigate to details page

Single Cell

To trigger actions on a single cell, create the corresponding click event. Do not use the cell click event if the cell contains interactive controls, such as links.

Add Items

For adding items, place an Add or Create text button on the table toolbar.

  • Use Create if the button adds a brand new item that doesn’t yet exist on the database.
  • Use Add if the item already exists and is merely added or assigned to the current object.

Show new items as the first item of the table, with a visual highlight at the beginning of the row.

For more details, see the guidelines for managing objects (including subarticles).

Enabling/Disabling Actions

To indicate if an action can be applied to the current selection:

  • Enable the action if it always works, regardless of whether or not items are selected.
  • Enable the action if it can be applied to all selected items.
  • Enable the action if it can be applied to some of the selected items. If the action is triggered, show a message that informs the user how many items will be affected. Let the user choose whether to apply the action anyway or cancel the action.
  • Only disable the action if it can be applied to none of the selected items.

For more details, see UI Element – States.

If the action was applied, and if the items are still available, keep them selected.

Message for an action that applies to a part of a selection

Editable Content

For editable content, only use the following controls, and only one control per cell:

Only these controls are optimized for all viewing modes of the grid table.

If you need edit mode, change your text controls, such as label, text, link, object status, icons, and currencies, to editable controls as soon as you switch to edit mode, but not before. You can do this by exchanging the controls, for example, from sap.m.Text to sap.m.Input.

For mass editing items:

  • Provide multiselection.
  • Provide an Edit button.
  • If several items are selected, clicking the Edit button opens a dialog in which the user edits the corresponding fields for all selected items.

For more information, see Mass Editing.

Interactive controls – In line

View Settings

There are several ways to show Sort, Filter, and/or Group settings:

  • Column header menu: In all cases, show the corresponding settings in the column header menu.
  • View settings dialog: Simple and more flexible with regard to filter settings. No advantage for sorting. Allows the user to ungroup grouped columns.tables with a medium amount of items.
  • Table personalization dialog: Provides complex options for sorting items by several levels and allows the user to ungroup grouped columns. It also provides a query-builder-like approach for filter settings. The complexity of the options is also its downside. Use the table personalization dialog for tables with a large number of items.
  • If filtering is a main use case, use the filter bar. In this case, avoid offering additional filter settings on the table. If you do, the filter settings on the grid table work only on the result set provided by the filter bar.

Always be careful when synchronizing the settings in the dialog with the settings from the column header menu.

Trigger the dialogs in one of the following ways:

  • View settings dialog: Provide several buttons, one for each of these view settings. Each button opens the view settings dialog on the corresponding page.
  • Table personalization dialog: Provide a settings button, which opens the table personalization dialog containing all pages.

Use only the view settings you really need. For example, do not offer grouping if it does not support your use case.

Column header menu with view settings
Table toolbar with triggers for view settings dialog
Table toolbar with trigger for table personalization dialog

Be persistent. When reopening the app, show the analytical table in the same view settings (sort/ filter/ group/ aggregation settings) as last defined by this user.

Sort

To display the current sort state, an icon is shown in the column header of the most recently sorted column. This icon indicates the sort direction (sap.ui.table.Column, properties: sorted, sortOrder, sortProperty).

For the default sort settings, sort by the column that identifies the row, which is usually the first column in default delivery.

Column, sorted ascending
Column, sorted descending

The descending sort order must always be the exact reverse of the ascending sort order. For each column, provide a meaningful sort order. For example:

  • Sort text alphabetically
  • Sort numbers by their value
  • Sort status information by the severity of the status:
    • Ascending: Sort status information from positive to negative, with neutral last.
    • Descending: Sort status information from negative to positive, with neutral first.
Object status sorted ascending, with neutral status last
Object status sorted descending, with neutral status first
    • Ascending with different values per severity level: Sort status information from positive to negative, with neutral last. Sort different values within a severity level (semantic color) alphabetically.
    • Descending with different values per severity level: Sort status information from negative to positive, with neutral first. Sort different values within a severity level (semantic color) alphabetically.
Object status sorted ascending and alphabetically, from positive to negative with neutral last
Object status sorted descending and alphabetically, from negative to positive with neutral first

Filter

To display the current filter state, an icon is shown in the column header of the filtered column (sap.ui.table.Column, properties: filtered, filterProperty, filterValue, filterOperator, defaultFilterOperator, filterType).

Column, filtered
Column, filtered

Group

To display the current group state, group headers are shown. Show the following text in the group header:

[Grouping value] – [Item count for the group]

Group headers
Group headers

In general, offer reasonable grouping by default if appropriate. Enable the user to ungroup via the view settings dialog or via the table personalization dialog.

Personalization

Only offer personalization if you need more columns than those that fit on a tablet screen, which is usually five, to fulfill 80% of your main use cases.

Persist the column layout. When a user reopens the app, show the grid table with the same column layout settings as last defined by this user.

Add, Remove, and Rearrange Columns

To add, remove, or rearrange columns, use one of the following:

  • The table personalization dialog: It offers some simple settings for column layout. Use this if you have only a few columns to choose from and/or you use the view settings dialog.
  • The p13n dialog: Besides various complex view settings, it also provides settings for column layout. Use this if you have a large number of columns to choose from and/or you use this dialog anyway for view settings.

In both cases, trigger the dialog via the settings button in the table toolbar.

You can also use drag and drop to rearrange columns (sap.ui.table.Table, property: enableColumnReordering). If you allow rearranging via drag and drop as well as via a dialog, keep both places in sync.

Resize Columns

Resizing columns works differently on touch and non-touch devices.

  • Non-touch devices: Drag and drop the column separator on the right side of the column. Double-clicking the column separator optimizes the width of the column to the data currently loaded into the front end, which is usually about 100 rows.
  • Touch devices: Clicking the column header reveals two buttons: one for opening the column header menu, another one for resizing the column. Drag and drop this second button to resize the column.

Freeze Columns

To freeze columns, offer the setting in the column header menu (sap.ui.table.Table, property: enableColumnFreeze). Selecing Freeze on a column freezes all columns from the first one to the one where Freeze is selected. On this column, the menu entry changes from Freeze to Unfreeze.

Frozen column
Frozen column

Highlight Items

To show that an item needs attention, a highlight indicator can be shown in front of the item. The highlight indicator can be used to indicate:

  • A semantic state, such as red or orange for an error or warning. In this case, use semantic colors.
  • Additional information, such as blue to highlight newly added items. In this case, use semantic colors.
  • Industry-specific or process-specific states, such as “out of stock” or “excess of inventory”. In this case, use indication colors.

Be aware that the highlight is just an indication. It does not tell users exactly what is wrong. Make sure that you provide this information within the table row, ideally in the same color.

For details on the use of highlight colors, see How To Use Semantic Colors / Industry-Specific Colors.

(sap.ui.table.Table, aggregation: rowSettingsTemplate)

Highlighted items
Highlighted items

Tables in Object Pages

In the object page, we advise against using the analytical, grid, and tree tables. Instead, use a responsive table and offer navigation to a list report with the table types mentioned above.

For more information on the use of tables within the object page, see the Tables section of the Object Page article.

Export to Spreadsheet

On the table toolbar, apps can provide a menu button for exporting table data to a spreadsheet. For the export, use the export to spreadsheet function.

'Export to Spreadsheet' menu button

Paste

The browser paste function can be used to paste data from the clipboard to the table (CTRL+V or browser context menu).

  • If the focus is on row level, the app has to take the data from the clipboard and add it to the corresponding controls within the table.
  • If the focus is on an editable control within the table, the control gets the data automatically.

Pasting via the context menu does not work if a custom context menu is used.

Properties

sap.ui.table.Table

The following additional properties are available for the grid table:

  • The property: width defines the width of the grid table.
  • The property: rowHeight defines the height of each row in the grid table. Since the height required is calculated automatically by the grid table, this property is only needed rarely.
  • The property: columnHeaderHeight defines the height of the column headers. Since the height required is calculated automatically by the grid table, this property is only needed rarely.
  • The property: columnHeaderVisible can be used to hide the column headers. Always show the column headers.
  • The property: showColumnVisibilityMenu provides an additional entry in the column header menu that allows columns to be shown or hidden. In SAP Fiori, columns are shown and hidden via the table personalization dialog or via the table personalization dialog. Do not use this property.
  • The property: visibleRowCount defines the height of the grid table. Show as many rows as fit on the screen.
  • The property: visibleRowCountMode defines whether the height of the grid table is fixed or automatically calculated based on the space provided by the underlying container. For automatic calculation, make sure that all rows have the same height.
  • The property: minAutoRowCount defines the minimum number of rows that must be shown if the property: visibleRowCountMode is set to “auto”. Show at least three to five rows.
  • The property: firstVisibleRow defines the first row shown in the visible area of the grid table. The grid table is scrolled accordingly.
  • The property: allowColumnReordering is deprecated. Do not use it. Use the property: enableColumnReordering instead.
  • The property: editable does not have a visible effect. Do not use it.
  • The property: enableGrouping turns the experimental grouping on or off. Handle with care.
  • The property: enableCustomFilter changes the filter entry in the column header menu from an edit box to Filter…. Selecting this entry throws an event to which apps can react, for example, by opening a dialog. In general, you should choose the built-in filter over your own implementation. Specifically, keep filtering via the column header menu simple, while offering more advanced options via the table personalization dialog.
  • The property: enableBusyIndicator has not yet been fully implemented. Do not use it.
  • The property: title adds a line of text on top of the grid table. Do not use this. To add a title to the table, use a toolbar.
  • The property: footer adds a short text at the bottom of the table.
  • The property: Busy sets the grid table to busy state. While in busy state, the whole table cannot be used and items cannot be read due to an overlay.
  • The property: Tooltip does not have an effect. Do not use it.
  • The property: alternateRowColors displays the rows with alternating background colors (“banded rows”). Do not use it.

sap.ui.table.Column

The following additional properties are available for the column:

  • The property: visible defines whether a column is shown or hidden.
  • The property: name defines the name shown in the column header menu for showing and hiding columns. In SAP Fiori, columns are shown and hidden via the table personalization dialog or via the table personalization dialog. Do not use this property.
  • The property: headerSpan defines whether one column header is used for one or several columns. To prevent adverse side effects, always use one column header for only one single column. Do not use this property.
  • The property: Tooltip does not have an effect. Do not use it.

Resources

Want to dive deeper? Follow the links below to find out more about related controls, the SAPUI5 implementation, and the visual design.

Elements and Controls

Implementation

Analytical Table (ALV)

An analytical table contains a set of data that is structured in rows and columns. It provides several powerful possibilities for working with the data, including advanced grouping and aggregations.

In contrast to other tables, the analytical data binding used by the analytical table allows an aggregated number to be shown automatically in a cell. This means that a number in such a summarized cell is a total sum of several lines in the database.

Usage

Use the analytical table (ALV) if:

  • The cell level and the spatial relationship between cells are more important than the line item. Examples include spreadsheet analyses and waterfall charts. Note that an analytical table is not fully responsive. It is only available for desktops and tablets, so you will need to take an adaptive approach by offering an additional UI for smartphones.
  • You have to work on more than 1,000 rows. In this case, the analytical table is easier to handle. In contrast to the responsive table, the architecture of the analytical table is optimized for handling large numbers of items. Note that an analytical table is not fully responsive. It is only available for desktops and tablets, so you will need to take an adaptive approach by offering an additional UI for smartphones.
  • Comparing items is a major use case. In this case, an analytical table might be more appropriate than a responsive table. In the analytical table, each cell contains only one data point. In contrast, the responsive table is more flexible regarding line items, including the ability to add more data points per cell and also the pop-in function. Both make comparisons more difficult. Note that an analytical table is not fully responsive. It is only available for desktops and tablets, so you will need to take an adaptive approach by offering an additional UI for smartphones.

Do not use the analytical table (ALV) if:

  • You need a table. The responsive table is the default table in SAP Fiori. Additional use cases where you might need the responsive table include:
    • You need to provide a total sum for one column. You can also add totals to the responsive table.
    • The focus is on working on line items, not on cells. The responsive table is optimized for displaying complete items on all devices (such as purchase orders and purchase requisitions).
    • Selecting one or more items is a main use case and details are needed to choose the correct item.
    • Line items are independent of each other and no operation across columns is needed.
    • You want to have only one implementation for all devices.
  • The main use case is choosing one item from a very small number of items with no additional details. A select or combo box might be more appropriate.
  • The main use case is choosing one out of several items with only a few details per item. A list might be more appropriate. Pay attention to the layout of the list item to ensure that it has a pleasant appearance. Examples include the master list and the attachment list.
  • You cannot provide an analytical binding on the technical side. In this case, a grid table will do the work. Note that the grid table provides only one level of grouping, no aggregation options, and is also not responsive.
  • Data needs to be structured in a hierarchical manner. In this case, a tree table might be more appropriate. Although the analytical table can have several grouping levels, it is not as flexible when nodes at several levels contain children. Note that neither the tree table nor the analytical table are responsive. You will need to take an adaptive approach by offering an additional UI for smartphones and tablets.
  • You need an overview of a large amount of data. In this case, use charts.
  • You just need it for layout reasons. In this case, use a layout container like HBox or VBox.
  • You need read-only or editable field-value pairs. Use a form instead. The analytical table is not optimized for form-like input navigation.

Responsiveness

The analytical table is available for desktops and tablets, but not in smartphone sizes. It supports touch devices, but is not optimized for small screens.

If you use an analytical table for desktop use cases, note that you must implement a fallback solution for mobile and touch devices. This fallback solution does not need to support all use cases.

You could create a fallback by using a responsive table. However, a completely different solution, such as showing charts in a read-only case, might be more suitable.

Analytical table (ALV) shown on a desktop
Analytical table (ALV) shown on a tablet

Components

An analytical table does not consist of other elements. However, it is common to use a toolbar above the analytical table.

The toolbar can contain entry points for the view settings dialog and the table personalization dialog or for the p13n dialog, as well as for view switches in the form of a segmented button, and buttons for Add, Edit, and other actions.

Behavior and Interaction

An analytical table is quite restricted in terms of its content, although it provides powerful features for working with the content.

Table Level

Scroll

An analytical table allows horizontal and vertical scrolling (sap.ui.table.AnalyticalTable, property: navigationMode, value: Scrollbar).

You can add any number of line items to the analytical table, which is known as “lazy loading”.

To prevent adverse side effects when scrolling vertically, all line items must have the same height (sap.ui.table.AnalyticalTable, property: rowHeight).

The analytical table is optimized to allow faster scrolling within the first 1000 items.

Scroll bar
Scroll bar

Select

Selection for an analytical table depends on the chosen selection mode. The following options are available:

No selection: Items cannot be selected. (property: selectionMode = None)

Analytical table without item selection

Single selection: One item in the analytical table can be selected. A row selector column is shown. (property: selectionMode = Single)

Analytical table with single selection
  • Multiple selection: One or more items can be selected. The analytical table provides a column with checkboxes on the left-hand side. Clicking a checkbox toggles the state of the corresponding row from deselected to selected and back. The Shift key can be used to select a range. For multiple selection, you can choose between two variants.
    • Multi-toggle mode (property: selectionMode = MultiToggle)
    • Multi-selection plug-in (sap.ui.table.plugins.MultiSelectionPlugin)

    These variants behave differently when the user selects more items than are currently loaded in the front end.

    Multi-toggle

    In multi-toggle mode, you can offer a Select All checkbox to the left of the column header (property: enableSelectAll). Selecting this checkbox selects or deselects all items that are currently loaded in the front end. All other items are not selected/deselected. If the application data is stored in the back end, scrolling down further can reveal additional unselected items. The same can happen with range selections if not all items in the selected range have been loaded to the front end.

    Multi-selection plug-in

    If you use this plug-in instead of the multi-toggle selection mode, the behavior for range selection and Select All changes:

    • By default, a dedicated Deselect All button replaces the Select All checkbox. There is no default UI element for selecting all items.
    • You can set a limit for the number of items that can be selected (sap.ui.table.plugins.MultiSelectionPlugin, property: limit). This limit has the following effect:
      • The range that can be selected using the Shift key is limited to the specified number of items (default = 200). The table automatically scrolls back to the last selected item and a message can appear (sap.ui.table.plugins.MultiSelectionPlugin, property: enableNotification). Users can select more items by selecting additional ranges (the specified limit applies each time).
      • If the selection limit is set to 0, a Select All checkbox is shown. There is also no limit on the number of items that can be selected in a range. All selected items are loaded, which can lead to performance issues for large data sets.
    • If selected items are not already available in the front end, they are loaded automatically by the plug-in and set as selected.
Information
When setting a limit for the number of items that can be selected, keep the following boundaries in mind:

  • The performance of your service: How many items can be loaded at once in a reasonable time? Does this also apply if an end-user shows all available columns?
  • The “minimum limit”: Internally, the analytcial table loads blocks of items as the user scrolls down. Because this block size (sap.ui.table.AnalyticalTable, property: threshold) is usually also based on the performance of the service, it should be safe to assume that the minimum selection limit is twice this size. In this case, loading the data would take as long as scrolling down and loading exactly one more block. Nevertheless, we recommend using larger limits if your service allows.

Analytical table with multiple selection
Using the multi-selection plug-in with a limit

Selection Behavior

An item can be selected in different ways, depending on the configuration of the analytical table (sap.ui.table.Table, property: selectionBehavior):

  • Row: An item is selected by clicking the checkbox or the row. Use this option for multi-selection tables if clicking a row or a cell is not used for anything else.
  • RowSelector: An item is selected only by clicking the checkbox in the selector cell. Use this option if clicking the row (or a cell inside the row) is used for something else, such as navigation.
  • RowOnly: An item is selected only by clicking the row, and not using checkboxes in the selector cells. Use this for single-selection tables if clicking a row or a cell is not used for another purpose, such as navigation.

Compact, Cozy, and Condensed

Like all SAP Fiori controls, the analytical table is shown in compact mode on a desktop and in cozy mode on tablets.

For desktop devices, you can fit even more rows onto the screen by using the condensed mode together with the compact mode. This renders less white space for each item.

Note that the condensed content density must always be set in addition to the compact mode. Do not use the condensed mode on its own. Do not mix condensed with cozy. Doing so could lead to unpredictable or unwanted results, such as cozy-sized controls in condensed-sized containers, missing padding, and so on.

Note that neither compact mode nor condensed mode support touch interaction. Even on a desktop with a touch screen, users will have difficulty selecting rows or using controls inside the cells with their fingers.

For more information on cozy and compact modes, see content density.


Analytical table in compact mode
Analytical table in condensed mode - more items on the same screen real estate

Column Header

The column header provides the label for the corresponding column and access to the column header menu.

Columns are resized as follows:

  • Mouse interaction: The user drags the separator line between two columns (sap.ui.table.AnalyticalColumn, property: Resizable). Double-clicking the line optimizes the column according to the length of the data currently visible and the label of the column header (sap.ui.table.AnalyticalColumn, property: Autoresizable).
  • Touch interaction: The user clicks the column header to reveal two buttons: one to show the column header menu and one for resizing. The user drags the latter to resize the column.

When the user resizes a column, the adaptation of the column width depends on how the column widths are set:

  • If column widths are set in pixel-based units (px, em, rem), the resized column is adapted and subsequent columns are moved accordingly. The width of all other columns is not affected.
    If all the columns together do not use up the full width of the table control, empty space is added. If all the columns together exceed the width of the table control, a scrollbar appears.
  • If all column widths are set as percentages or “auto”, resizing one column automatically resizes one or more other columns. Resizing can also affect the position of the resized column. This option utilizes the full width of the table and ensures that no white space is added. A scrollbar appears only if all or most of the columns become to narrow. To avoid the side effect of undersized columns, you can set a minimum width per column. However, this minimum width is only taken into account if columns are resized automatically. End users can still reduce the column width to below the defined minimum (sap.ui.table.Column, properties: width, minWidth).

Users can rearrange columns by dragging the column header to another position (sap.ui.table.AnalyticalTable, property: enableColumnReordering).

Column header
Column header
Opening the column header menu on touch devices
Columns do not use up the available space

Column Header Menu

For each column, a menu can contain the following menu items (sap.ui.table.AnalyticalColumnMenu, property: Visible):

  • Sort Ascending/Descending (sap.ui.table.AnalyticalColumn, property: showSortMenuEntries)
  • Free text filter (sap.ui.table.AnalyticalColumn, property: showFilterMenuEntries)
  • Group
  • Totals
  • Freeze from the first to the last specified column (sap.ui.table.AnalyticalTable, property: enableColumnFreeze)

For each column, the menu can be replaced by an app-specific menu.

Column header menu
Column header menu

Sort

The column header menu can provide two sort options (sap.ui.table.AnalyticalColumn, properties: sortProperty, showSortMenuEntry):

  • Sort Ascending
  • Sort Descending

The user selects one of these options to sort the corresponding column accordingly (sap.ui.table.AnalyticalColumn, properties: sorted, sortOrder, sortProperty).

Sort settings in column header menu

Filter

The column header menu can provide a search field for entering free text (sap.ui.table.AnalyticalColumn, properties: filterProperty, showFilterMenuEntries).

If the user enters a term in the input field and triggers the search by pressing ENTER when the focus is on the filter input field, the analytical table is filtered by the corresponding column and value (sap.ui.table.AnalyticalTable, properties: filtered, filterProperty, filterValue, filterOperator, sap.ui.table.AnalyticalColumn, property: filterType).

Note that the filter may return zero results, in which case, the table might be empty.

General recommendations for filtering:

  • If filtering is a main use case, choose the filter bar or any other filtering UI over the built-in free text filter.
  • Only use the free text filter if filtering is a secondary use case and if the filter bar is too heavy.
Free text filter in column header menu

Group

The column header menu can provide the option to group by this column (sap.ui.table.AnalyticalColumn, property: sortProperty).

One group collects all items with the same value within the corresponding column.

Group setting in column header menu

If line items are grouped in a column, every group is provided with a collapsible or expandable group header (sap.ui.table.AnalyticalColumn, property: grouped). The header text consists of the column name and the value for the corresponding group (sap.ui.table.AnalyticalColumn, property: groupHeaderFormatter). Several grouping levels are possible.

The corresponding column can be hidden to avoid duplicates (sap.ui.table.AnalyticalColumn, property: showIfGrouped). Exercise caution when using this option since hiding the column changes the table layout and may lead to confusion.

Group headers and the corresponding columns are shown – The relevant data is duplicated
Group headers shown, the corresponding column hidden – No duplicates

Aggregation

The column header menu can provide the option to show or hide aggregation totals for this column.

Aggregation in column header menu

Intermediate aggregations are shown at group level for the corresponding columns if the group contains more than one line item (sap.ui.table.AnalyticalColumn, property: summed).

Group total
Group total

The overall aggregation is shown at the bottom of the analytical table.

Overal aggregation
Overal aggregation

Freeze Columns

The column header menu can provide the option to freeze columns (sap.ui.table.AnalyticalTable, property: enableColumnFreeze). Selecting Freeze freezes all columns up to the one in which the operation was triggered (sap.ui.table.AnalyticalTable, property: fixedColumnCount).

When Freeze is triggered, the menu item changes to Unfreeze for the corresponding column.

Freeze setting in column header menu

Line Item Level

A line item contains a set of cells and provides options for selecting the item.

To prevent adverse side effects when scrolling vertically, all line items must have the same height.

(sap.ui.table.AnalyticalTable, property: rowHeight)

Line item
Line item

Drag and Drop

One or several items can be moved to other UI elements using drag and drop operations (sap.ui.table.AnalyticalTable, aggregation: dragDropConfig). While being dragged, the items are shown as ghost elements on the mouse cursor.

Drop targets can be on items, between items, or both (sap.ui.core.dnd.DropPosition). On a drop target, the mouse cursor changes to either a “copy”, “link”, “move”, or “none” cursor. “None” indicates that the dragged item cannot be dropped in the current position (sap.ui.core.dnd.DropEffect).

Drag and drop is only available on supporting browsers.

Drag and drop
Drag and drop
Whole item as drop target

Cell Level

A cell provides one data point.

It can contain one of the following controls to display this data point:

While it is technically possible to also use other controls, doing so could lead to issues with alignment, condensed mode, screen reader support, and keyboard support.

If you use text, use only single-line text to keep the same row height. Truncate if necessary as this prevents adverse side effects when scrolling vertically (sap.m.Text, property: wrapping, value: false). Do not wrap.

Cell
Cell

Context Menu

You can attach a context menu (sap.m.Menu) to a table. The context menu gives users an alternative way to modify the focused elements by giving them access to context-specific functions.

When opened, the context menu gets the row and column context, except for special columns (such as the selection column) or special rows (like group headers). Context menus can be implemented for a specific table, row, or cell (not recommended for editable cells).

By default, the analytical table provides a context menu on the group headers (for example, Expand, Collapse, …). Otherwise, no default context menus are provided.

Context menus are opened by right-clicking (desktop), long press (mobile), the context menu key, or SHIFT+F10.

Be aware that using the context menu overrides the browser context menu, which can no longer be opened.

If a control inside a table is the “click target”, and the control also provides a context menu, the control context menu “wins”.

Analytical table with context menu

Guidelines

Data Density vs. Complexity

The analytical table can be used to display and work with large amounts of data. Unfortunately, the analytical table has a high data density and therefore conveys an immediate feeling of complexity.

Only show tables with a lot of data as a last resort. To make the data easier to read, you should instead try the following:

  • Break down the data into manageable chunks and allow the user to navigate or drill down between them.
  • Use charts with drilldown functionality until the amount of data is more manageable.

Try to avoid horizontal scrolling in the default delivery.

Try to minimize the number of columns, especially if there is a large number of rows.

Table Title

Implement the table title by using a title control in a toolbar.

Use a table title only if the title of the table is not indicated in the surrounding area.

Do not use a table title if it simply repeats text that is already above the table. For example:

  • A pricing conditions table is the only control on a tab labeled Pricing Conditions.
  • A section or subsection on an object page contains only one table.

Use a table title if you need the item count, table toolbar, or variant management. To avoid repeating text, feel free to use generic text as a table title, such as Items.
Exception: If the surrounding area contains the table title, and both the item count and toolbar can be added to the surrounding area, no additional table title is needed.
Example: An object page (sub-)section contains only one table. In this case, add the item count and the table toolbar to the (sub-)section header.

If you use a table title, show either a title for the table, with or without variant management, or an item count in the following format:

Items (2,534).

The item count in the table title includes all the visible items that a user can reach by scrolling or expanding groups. Group headers are not included.

Remove the item count in the table title if there are zero items.

Developer Hint
Assistive technologies (such as screen readers) use the title to create a hierarchical site map for faster navigation. In addition, screen readers use the title as the label for the table.

If you don’t use a title (for example, to avoid repetition), make sure that the table is connected to another meaningful on-screen text that can be used as a label for assistive technologies. You can do this using the method addAriaLabelledBy.

Multiple Selection

  • We strongly recommend using the multi-selection plug-in. This ensures that all items selected using Select All or as part of a range are included – even if some items were not initially loaded in the front end. This is not the case if you use the multi-toggle option.
  • Do not limit the range selection for the multi-selection plug-in unless you have to.
    • If the dataset is small and/or completely available in the front-end, set the limit property to 0 to enable the Select All option and allow users to select any range.
    • If you have a large dataset, set a limit on the number of selected items to avoid performance issues. Also bear in mind that some actions won’t be helpful if the dataset is too big (for example, a delete operation on 2 million database entries).
  • When setting a limit, also display the corresponding message when the user selects more items at once than the limit allows (sap.ui.table.plugins.MultiSelectionPlugin, property: enableNotification).

In multiple selection mode (multi toggle), do not show checkboxes in the first data column in the default delivery to avoid confusion.

Don't
Do not add checkboxes to the first column

Loading Data

To indicate that the table is currently loading items, use the busy state (sap.ui.table.AnalyticalTable, property: busy). Do not show any items or text. As soon as the data is loaded, remove the busy state and show all items.

Columns – Best Practices

Minimize the number of columns. Avoid the need to scroll horizontally in the default delivery.

By default, the analytical table assigns the same width to each column. We recommend overwriting this default to provide optimal space for your content (sap.ui.table.AnalyticalColumn, property: width).

If you define the column width in pixels or rems, resizing a column affects only the width of this specific column. Reducing the size of the browser window results in a scrollbar. If the user resizes a column, and the total width of all columns exceeds the table width, a scrollbar appears. If the columns do not take up the full table width, white space appears to the right of the last column.

If you define the column width as a percentage, resizing one column affects the width of several or all columns. Reducing the size of the browser window truncates the texts. This ensures that the columns fill up all the available space. A scrollbar appears only if width of all the columns still exceeds the table width after the automatic width adjustments. To avoid the side effect of undersized columns, you can set a minimum width per column. However, this this minimum width is only taken into account if columns are automatically resized. End users can still reduce the column width to below the defined minimum (sap.ui.table.Column, properties: width, minWidth).

If you set the column width to “auto”, the behavior is the same as for “percentage”. However, unlike “percentage”, “auto” distributes the columns equally.

To decide on how to set the column width (pixel/rem/em vs. percent/auto), keep the following in mind:

  • For tables with only 2 to 3 columns, use pixel-based units. This ensures that the values in the columns are not spread over the whole screen on wide screens, which improves the readability of the line items.
  • For tables with many columns, where a horizontal scrollbar is usually needed, use pixel based units. This avoids unintended side effects when resizing columns.
  • For all other tables, use whatever fits your case better.

Be cautious when mixing columns with pixel-based and percentage-based widths. While this can be helpful in some cases, it can also cause even more side effects when resizing a column. If you are using percentage-based widths for one or more columns, consider not allowing end users to resize columns at all.

Optimize the column width for its initial visible content, including the column header texts. If this is not possible (for example, if showing the full texts would result in extremely wide columns), let the texts truncate. End users can change the width of the column to read the full text, as needed.

Maintain a constant column width and avoid adjusting it automatically when the content changes.

Always keep to one line of text. Do not wrap.

Don't
In the default delivery, the initial visible content should not be truncated
Don't
Never wrap texts
Never wrap texts

Column Headers – Best Practices

For each column, provide a label in the column header. In the default delivery, do not truncate the column header texts. Only let the text truncate if showing the full text would make the column too wide. Never wrap the text.

Content Alignment

For alignment of cell content, follow the guidelines below.

Left-align: text, IDs, phone numbers, URLs, passwords, and email addresses.

Left-alignment of text

Right-align: numbers, except IDs, to ensure comparability of numbers and amounts.

Right-alignment of numbers

Right-align amounts with currencies to the cell and align them in terms of their respective decimal points.

This ensures that amounts with different currencies are shown correctly, whether these currencies have 0, 2, or 3 decimals.

For aligning to the decimal point, use the sap.ui.uinified.Currency control.

Alignment to decimal point

Right-align dates and times.

This ensures comparability for most formats and locales.

Right-alignment of dates

Left-align status information.

Left-align status information

Center-align icons.

Left-align micro charts.

XS micro charts in condensed mode

Content Formatting

Key Identifier

Use a bold label or an emphasized link as the key identifier of an item. In the default delivery, show the key identifier in the first column.

Emphasized link
Emphasized link

For strings with IDs, use one of the following:

  • Show the ID in a separate column. Use this format if users need to sort, group, or filter by both the string and the ID.
  • Show the ID in brackets after the corresponding string. In this case, sorting, filtering and grouping is available for either the string or the ID. Use this format only if users don’t need to sort, filter, and group by both values.
Text and ID in two columns – Allows sorting, filtering, and grouping for both
If displayed as a link, use only the string as the link, not the ID
Text and ID in one column – Sorting, filtering, and grouping only by the text
If displayed as a link, use the whole text as the link

Truncation

Avoid truncation of typical content in the default delivery (sap.ui.table.AnalyticalColumn, property: width). However, since the columns are resizable, do not worry too much if truncation occurs as columns can still be enlarged if necessary.

To prevent adverse side effects when scrolling vertically, all line items must also have the same height. If you need to decide between truncation and different row heights, choose truncation. Do not wrap.

Optimize column width for typical content, not all content

Number of Links

Are there too many links? Use subtle links to avoid a wall of links. Standard links are also emphasized more if they are surrounded by subtle links.

For example, a financial table consists of several columns with summarized cells. A summarized cell shows the total sum of several database entries. Each sum should be a link to a report that shows details about which database entries produce the total sum. The line item identifier should also be a link that provides more detail about the line item itself. Use a standard or emphasized link for the item identifier, and subtle links for the summarized cells.

Emphasized links, links, subtle links, and text

Missing Value

If there is no value for a cell, leave it blank. Do not display text as N/A.

Leave empty fields blank

Numbering Items

In terms of numbering items:

  • If the item number is more like an ID with regard to its description, use ID formatting as described above.
  • In all other cases, use a separate column for the item number.
Add a separate column for the item number

Status

For status information, use semantic colors on the foreground elements.

For status information on text, use an object status.

Semantic colors on text

Micro Charts

Use only the following micro charts: Bullet, comparison, stacked bar. When using micro charts, use them in size XS.

Micro charts in an analytical table

Empty Tables

Avoid empty analytical tables. If necessary, provide instructions on how to fill the analytical table with data (sap.ui.table.AnalyticalTable, properties: noDataText, showNoData).

Examples:

  • If a table is initially empty, provide at least a basic text:
    No items available.
    Overwrite this whenever a hint can be provided on how to fill the table with data.
  • If a table is used together with a filter bar (as in the list report), and is initially empty, use the following text:
    To start, set the relevant filters.
  • If a table is used together with a filter bar and the filter does not return results, use the following text:
    No data found. Try adjusting the filter settings.

Adapt the texts above if:

  • The standard text is not precise enough for your use case (for example, a search is also offered, or only the search is offered).
  • The standard text is misleading (for example, if the data is filled based on a master-detail pattern instead of filter settings).
Provide meaningful instructions

Invalid State

To show an invalid state of the analytical table within the list report floorplan, show an overlay on the analytical table and the corresponding toolbar (sap.ui.table.AnalyticalTable, property: showOverlay). The overlay prevents user interactions.

Use this within the list report floorplan if filter settings have been changed but the analytical table has not yet been updated.

Analytical table with invalid data

Item States

To show that an item has been modified, for example, within the global edit flow, add the string (Modified) in an additional column with the label Editing Status.

In the default delivery, add a column directly behind the key identifier.

A modified item
A modified item

To show that a modified item contains an error, for example, within the global edit flow, add the string Contains errors in the Editing Status column and highlight the row accordingly. This string replaces the Modified string.

A modified item with an error

To show that an item is locked, add a transparent-style button with the corresponding icon and the text Locked by [name] in the Editing Status column.

A locked item
A locked item

To show that an item is in draft state, add a transparent-style button with the text Draft in the Editing Status column.

Item in draft state
Item in draft state

Show only one state at a time.

Numbers and Units

Show the unit of measurement in one of the following ways:

The number and unit are in the same cell. Do this if sorting, filtering, or grouping by the unit of measurement are not needed.

Use a currency control to display the concatenated string.

Number and unit of measurement in one cell

The number and unit are in separate columns. Do this if sorting, filtering, or grouping by the unit of measurement are a common use case.

Note that this column can be hidden or moved independently of the column containing the corresponding number. Therefore, be sure to have clear labels for both columns to communicate the dependency.

Number and unit of measurement in two columns

If the unit of measurement is the same for all rows, show the unit of measurement in the column header. Otherwise, show the unit of measurement within the row.

Drag and Drop

Drag and drop is “invisible” on the UI: users can’t see where dragging is available and where it isn’t. In addition, drag and drop is not accessible, since there is no generic keyboard interaction. Drag and drop is also not available on all browsers. For these reasons, provide it only in addition to existing (and visible) UI elements that fulfill the same purpose, such as (toolbar) buttons.

Use drag and drop only in addition to existing visible UI elements

Do not use drag and drop for rearranging items in the analytical table. The analytical table is mainly used for grouping items and for calculating the totals per group and column. Moving items to another group also means that a value of the dropped item changes: because grouping is based on values in a column, the dropped item needs to take on the value of the target group for the corresponding column.

Example:
A table is grouped by availability. An item is moved from the group “Not Available” to the group “In Stock”. In this case, the moved item needs to change its availability to “In Stock” to match the target group. Because changing the value in this way doesn’t make sense, rearranging items is not permitted in analytical tables.

Don't
Do not use drag and drop for rearranging items in the analytical table

Context Menu

Use the context menu only to give users a quick way of accessing functions that are already available elsewhere (for example, as buttons in the toolbar). Don’t just offer actions in the context menu itself, as users might not realize that these actions are available at all.

The context menu can be triggered for the table, row, or cell. However, we do not recommend using context menus for cells: because the content of a cell is a different touch target than the cell itself, opening a cell context menu via touch is quite hard, even in cozy mode.

Do not combine context menus with condensed mode: editable controls fill the entire space inside a cell. Because of this, context menus cannot be opened at all with touch or mouse interaction.

Actions

Multiple Items

To trigger actions on multiple items, use a multiselection analytical table (sap.ui.table.AnalyticalTable, property: selectionMode, value: MultiToggle). Offer the corresponding actions in the table toolbar.

Do not offer action triggering on multiple items if the table is generally expected to have fewer than 10 items. In this case, try to use the responsive table instead of the analytical table.

Single Item

To trigger actions on a single item (sap.ui.table.AnalyticalTable, property: selectionMode, value: Single):

  • Show the actions on the table toolbar.
  • In rare cases, show the actions within the line item. One example would be an Add to Cart button in a shopping application. Since these actions are repeated in every line and thus use a lot of screen real estate, do this only for a maximum of one or two actions. Provide a separate column per action. Use a button, unless the action trigger belongs to a link. Hide the action in rows for which it is not applicable.

Single Cell

To trigger actions on a single cell, create the corresponding click event. Do not use the cell click event if the cell contains interactive controls, such as links.

To trigger navigation on line item level choose one of the following options:

  • Use a link for the attribute that identifies the row. Clicking the link triggers the navigation.
  • Add the RowActions column and show the navigation indicator (  ) at the end of the row. The navigation arrow triggers the navigation.

Special case: Multi-selection in a master-detail scenario
When a multi-selection table is used in a master-detail scenario, it is not clear which item was last opened (for example, which item is currently shown in the second column of a flexible column layout). In this case, you can display a “navigated” indicator to show which item is currently open.

Use the RowActions column only for one or both of the following actions:

  • Navigate to details page ( )
  • Delete ( )

The RowActions column does not provide a column header text. It is fixed and will not scroll away. Users also cannot personalize this column.

Navigate to details page

Single Cell

For triggering actions on a single cell, create the corresponding click event. Do not use the cell click event if the cell contains interactive controls, such as links.

Add Items

For adding items, place an Add or Create text button on the table toolbar.

  • Use Create if the button adds a brand new item that doesn’t yet exist on the database.
  • Use Add if the item already exists and is merely added or assigned to the current object.

Show new items as the first item of the table, with a visual highlight at the beginning of the row.

For more details, see the guidelines for managing objects (including subarticles).

Enabling/Disabling Actions

To indicate if an action can be applied to the current selection:

  • Enable the action if it always works, regardless of whether or not items are selected.
  • Enable the action if it can be applied to all selected items.
  • Enable the action if it can be applied to some of the selected items. If the action is triggered, show a message that informs the user how many items will be affected. Let users choose whether to apply the action anyway or cancel the action.
  • Only disable the action if it can be applied to none of the selected items.

For more details, see UI Element States.

If the action was applied and the items are still available, keep them selected.

Message for action which applies to a part of a selection

Editable Content

For editable content, only use the following controls, and only one control per cell:

Only these controls are optimized for all viewing modes of the analytical table.

If you need edit mode, change your text controls, such as label, text, link, object status, icons, and currencies, to editable controls as soon as you switch to edit mode, but not before. You can do this by exchanging the controls, for example, from sap.m.Text to sap.m.Input.

For mass editing items:

  • Provide multiselection.
  • Provide an Edit button.
  • If several items are selected, clicking the Edit button opens a dialog in which the user edits the corresponding fields for all selected items.

This is similar to mass editing in the split-screen layout floorplan.

Warning
Do not offer editing for summarized cells. A summarized cell shows the total sum of several database entries. Changing the total sum does not make sense since it is unclear how this sum is divided between the different database entries.
Interactive controls – Inline

View Settings

There are several ways to show Sort, Filter, and/or Group settings:

  • Column header menu: In all cases, show the corresponding settings in the column header menu.
  • View settings dialog: Simple and more flexible with regard to filter settings. No advantage for sorting. Allows the user to ungroup grouped columns.tables with a medium amount of items.
  • Table personalization dialog: Provides complex options for sorting items by several levels and allows the user to ungroup grouped columns. It also provides a query-builder-like approach for filter settings. The complexity of the options is also its downside. Use the table personalization dialog for tables with a large number of items.
  • If filtering is a main use case, use the filter bar. In this case, avoid offering additional filter settings on the table. If you do, the filter settings on the table work only on the result set provided by the filter bar.

Always be careful when synchronizing the settings in the dialog with the settings from the column header menu.

Trigger the dialogs in one of the following ways:

  • View settings dialog: Provide several buttons, one for each of these view settings. Each button opens the view settings dialog on the corresponding page.
  • Table personalization dialog: Provide a settings button, which opens the table personalization dialog containing all pages.

Use only the view settings you really need. For example, do not offer grouping if it does not support your use case.


Column header menu with view settings
Table toolbar with triggers for view settings dialog
Table toolbar with trigger for table personalization dialog

Persist the view settings. When a user reopens the app, show the analytical table with the same sort, filter, group, and aggregation settings as last defined by this user.

Sort

To display the current sort state, an icon is shown in the column header of the last sorted column. This icon indicates the sort direction (sap.ui.table.AnalyticalColumn, properties: sorted, sortOrder, sortProperty).

For the default sort setting, sort by the column that identifies the row, which is usually the first column in default delivery. Use a meaningful sort order, such as alphabetical order for text, numeric order for numbers, or chronological order for dates.

Column, sorted ascending
Column, sorted descending

The descending sort order must always be the exact reverse of the ascending sort order.

For each column, provide a meaningful sort order. For example:

  • Sort text alphabetically
  • Sort numbers by their value
  • Sort status information by the severity of the status:
    • Ascending: Sort status information from positive to negative, with neutral last.
    • Descending: Sort status information from negative to positive, with neutral first.
Object status sorted ascending, with neutral status last
Object status sorted descending, with neutral status first
    • Ascending with different values per severity level: Sort status information from positive to negative, with neutral last. Sort different values within a severity level (semantic color) alphabetically.
    • Descending with different values per severity level: Sort status information from negative to positive, with neutral first. Sort different values within a severity level (semantic color) alphabetically.
Object status sorted ascending and alphabetically, from positive to negative with neutral last
Object status sorted descending and alphabetically, from negative to positive with neutral first

Filter

To display the current filter state, an icon is shown in the column header of the filtered column (sap.ui.table.AnalyticalColumn, properties: filtered, filterProperty, filterValue, filterOperator, defaultFilterOperator, filterType).

Column, filtered
Column, filtered

Group

To display the current group state, group headers are shown. Show the following text in the group header (sap.ui.table.AnalyticalColumn, properties: grouped, showIfGrouped, groupHeaderFormatter):

[Label of the grouped column]: [Grouping value]

If there is no grouping value, show the following text:
[Label of the grouped column]: (Not Available)

This is the case if you have a group of items that don’t have a value for the grouped column.


Set the property collapseRecursive to “false” to keep subgroups expanded even after collapsing and expanding the parent group.

Group headers, several levels

On non-touch devices, right-clicking a group header opens the group header menu. On touch devices, the same menu is opened by using the menu icon on the right side of a group header.

The group header menu provides several options:

  • Show/Hide: Shows or hides the column in the table layout, although it is grouped.
  • Ungroup: When the user ungroups a column, the corresponding group headers disappear. If the column was hidden, it is shown again as a separate column.
  • Ungroup All: The columns are shown again.
  • Move Up: Rearranges the grouping levels hierarchy by moving the selected group above the group that is one level higher up in the hierarchy.
  • Move Down: Rearranges the grouping levels hierarchy by moving the selected group below the group that is one level lower down in the hierarchy.
  • Collapse Level: Collapses all groups on the corresponding grouping level.
  • Collapse All: All groups are collapsed.
Group header menu
Group header menu
Group header on touch devices

In general:

  • Offer grouping on objects and attributes.
  • Do not offer grouping on measures.
  • If appropriate, offer reasonable grouping by default, but do not exaggerate. As a rule of thumb, use up to three group levels.
  • Provide more space for the first column. Grouping needs an indent per group level. Extra space in the first column prevents truncated text.

Aggregate

To display the current aggregation state, the total sum of the corresponding column is shown at the bottom of the table.

If items are grouped, an intermediate sum is shown:

  • At the bottom of each group if the group is expanded.
  • In the group header if the group is collapsed.

(sap.ui.table.AnalyticalColumn, property: summed)

When aggregating amounts with different units of measurement, show an asterisk (*) in the aggregation rows.

When sorting an aggregated column, only the leaf nodes of a group are included by default. If each measure column currently displays a single unit of measurement, the order of the groups can also be affected.

For example:
Let’s assume that table items are grouped by Country/Region and aggregated by Total Net Amount. If you sort the Total Net Amount column in descending order, the largest total net amount is shown first.

Warning
Only enable sorting by totals if each column has a single unit of measurement. This prevents inconsistencies in the sorting behavior, which depends on user settings, such as filter settings or the columns currently displayed.
Developer Hint
To allow sorting by totals, the following conditions must be met:

  1. For each measure column, multiple units must not occur in the displayed data, regardless of whether or not totals are shown.
  2. The autoExpandMode of the AnalyticalBinding must be set to Sequential. Note that the default is Bundled.

In general:

  • Offer aggregation on measures, but not on objects or attributes.
  • Avoid aggregations on the first three columns for the default delivery. As soon as grouping is used together with aggregations, collapsing a group shows the aggregation on the group header. This conflicts with the group name.
  • Where appropriate, offer reasonable aggregation by default.
Aggregation and groups

Personalization

Only offer personalization if you need more columns than a tablet screen can display at any one time, which is usually five.

Persist the column layout. When a user reopens the app, show the analytical table with the same column layout settings as last defined by this user.

Add, Remove, and Rearrange Columns

To add, remove, or rearrange columns, use one of the following:

  • The table personalization dialog: It offers some simple settings for column layout. Use this if you have only a few columns to choose from and/or you use the view settings dialog.
  • The p13n dialog: Besides various complex view settings, it also provides settings for column layout. Use this if you have a large number of columns to choose from and/or you use this dialog anyway for view settings.

In both cases, trigger the dialog via the settings button in the table toolbar.

You can also use drag and drop to rearrange columns (sap.ui.table.Table, property: enableColumnReordering). If you allow rearranging via drag and drop as well as via a dialog, keep both places in sync.

Resize Columns

Resizing columns works differently on touch and non-touch devices.

  • Non-touch devices: Drag and drop the column separator on the right side of the column. Double-clicking the column separator optimizes the width of the column for the data currently loaded into the front end, which is usually about 100 rows.
  • Touch devices: Clicking the column header reveals two buttons: one for opening the column header menu, another one for resizing the column. Drag and drop this second button to resize the column.

Freeze Columns

For freezing columns, offer the setting in the column header menu (sap.ui.table.AnalyticalTable, property: enableColumnFreeze).

Selecting Freeze on a column freezes all columns from the first one to the one where Freeze is selected. On this column, the menu entry changes from Freeze to Unfreeze.

Frozen column
Frozen column

Highlight Items

To show that an item needs attention, you can display a highlight indicator in front of the item. The highlight indicator can be used to indicate:

  • A semantic state, such as red or orange for an error or warning. In this case, use semantic colors.
  • Additional information, such as blue to highlight newly added items. In this case, use semantic colors.
  • Industry-specific or process-specific states, such as “out of stock” or “excess of inventory”. In this case, use indication colors.

Be aware that the highlight is just an indication. It does not tell users exactly what is wrong. Make sure that you provide this information within the table row, ideally in the same color.

For details on the use of highlight colors, see How To Use Semantic Colors / Industry-Specific Colors.

(sap.ui.table.AnalyticalTable, aggregation: rowSettingsTemplate)

Highlighted items
Highlighted items

Tables in Object Pages

In the object page, we advise against using analytical, grid, and tree tables. Instead, use a responsive table and offer navigation to a list report with the table types mentioned above.

For more information on the use of tables within the object page, see the Tables section of the Object Page article.

Export to Spreadsheet

On the table toolbar, apps can provide a menu button for exporting table data to a spreadsheet. For the export, use the export to spreadsheet function.

'Export to Spreadsheet' menu button

Properties

sap.ui.table.AnalyticalTable

The following additional properties are available for the analytical table:

  • The property: width defines the width of the analytical table.
  • The property: rowHeight defines the height of each row in the analytical table. Since the height required is calculated automatically by the analytical table, this property is only needed rarely.
  • The property: columnHeaderHeight defines the height of the column headers. Since the height required is calculated automatically by the analytical table, this property is only needed rarely.
  • The property: columnHeaderVisible can be used to hide the column headers. Always show the column headers.
  • The property: showColumnVisibilityMenu provides an additional entry in the column header menu that allows columns to be shown or hidden. In SAP Fiori, columns are shown and hidden via the table personalization dialog or via the table personalization dialog. Do not use this property.
  • The property: columnVisibilityMenuSorter is used for sorting the columns inside the column header menu if showing and hiding columns is provided in the menu. In SAP Fiori, columns are shown and hidden via the table personalization dialog or via the table personalization dialog. Do not use this property.
  • The property: visibleRowCount defines the height of the analytical table. Show as many rows as fit on the screen.
  • The property: visibleRowCountMode defines whether the height of the analytical table is fixed or automatically calculated based on the space provided by the underlying container. For automatic calculation, make sure that all rows have the same height.
  • The property: minimumAutoRowCount defines the minimum number of rows that must be shown if the property: visibleRowCountMode is set to “auto”. Show at least three to five rows.
  • The property: firstVisibleRow defines the first row shown in the visible area of the analytical table. The analytical table is scrolled accordingly.
  • The property: allowColumnReordering is deprecated. Use the property: enableColumnReordering instead.
  • The property: editable does not have a visible effect. Please do not use it.
  • The property: threshold is used for optimizing lazy loading of items. In most cases, the default value is appropriate.
  • The property: enableGrouping is experimental and does not have a meaningful effect on the analytical table. Do not use it.
  • The property: sumOnTop shows additional aggregation values on the group header, even if the group is expanded. Do not use it.
  • The property: enableCustomFilter changes the filter entry in the column header menu from an edit box to Filter…. Selecting this entry throws an event that apps can react to, for example, by opening a dialog. In general, you should choose the built-in filter over your own implementation. Specifically, keep filtering via the column header menu simple, while offering more advanced options via the table personalization dialog.
  • The property: enableBusyIndicator has not yet been fully implemented. Do not use it.
  • The property: title adds a line of text on top of the analytical table. Do not use it. To add a title to the table, use a toolbar.
  • The property: footer adds a short text at the bottom of the table.
  • The property: Busy sets the analytical table to busy state. While in busy state, the whole table cannot be used and items cannot be read due to an overlay.
  • The property: Tooltip does not have an effect. Do not use it.
  • The property: alternateRowColors displays the rows with alternating background colors (“banded rows”). Do not use it.

sap.ui.table.AnalyticalColumn

The following additional properties are available for the analytical column:

  • The property: leadingProperty is used for data binding.
  • The property: inResult is used for data binding.
  • The property: visible defines whether a column is shown or hidden.
  • The property: name defines the name shown in the column header menu for showing and hiding columns. In SAP Fiori, columns are shown and hidden via the table personalization dialog or via the table personalization dialog. Please do not use this property.
  • The property: headerSpan defines whether one column header is used for one or several columns. To prevent adverse side effects, always use one column header for only one single column. Please do not use this property.
  • The property: Tooltip does not have an effect. Please do not use it.

Resources

Want to dive deeper? Follow the links below to find out more about related controls, the SAPUI5 implementation, and the visual design.

Elements and Controls

Implementation

Timeline

The timeline control shows entries (such as objects, events, or posts) in chronological order.

A common use case is to provide information about changes to an object, or events related to an object. These entries can be added manually or generated by the system (for example, value XY changed from A to B). The latest entry is always on top.

Another use case is a feed that is driven by user updates and comments. This feed can also be entirely devoid of machine-generated content.

Information
Do not confuse the timeline control with the similar-looking group feed component. While the group feed component was created explicitly for integration with SAP Jam, the timeline is more flexible, fully responsive, and not restricted to a specific source. However, the timeline control doesn’t offer any integration with social collaboration platforms out of the box.

Usage

The timeline does not have a fixed location on the UI. Where you place it depends on your use case.

For example:

  • If the timeline is closely related to the content and needs to be seen in parallel, you can use the dynamic side content floorplan. Alternatively, you can create a separate page with the timeline as the central element and show it next to the main content using the flexible column layout.
  • If the timeline contains only secondary information, or only needs to be accessed occasionally, you can embed it in a tab.
  • If you are using the object page floorplan, you can use the horizontal layout to integrate the timeline (see Orientation in the Styles section below).

These are just some of the ways you can position the timeline on a page.

If you also require social collaboration features, you have two options: For integration with SAP Jam, you can use the group feed component, which offers similar features to the timeline. For integration with other social collaboration solutions, you can use the timeline control, but the integration does not come out of the box and needs to be provided by the app team.

Use the timeline if:

  • You want to display read-only content, such as an object history.
  • Your customers do not use SAP Jam.
  • You expect a long list of posts triggered by the system, the users, or both.
  • You want users to be able to create their own posts.
  • You want to offer custom actions for individual items.

Do not use the timeline if:

  • You expect only a few entries. In this case, use a simple feed.
  • You want to provide a way to upload files. Use the upload collection control instead. You can still use the timeline to show automated updates about the user’s uploads.
  • You need SAP Jam integration. In this case, use the group feed component.

Responsiveness

The timeline control is fully responsive and works well with multiple screen sizes.

For better usability, both the single-sided and the double-sided layouts have a maximum width. This prevents the control from being excessively stretched.

For size S (smartphone), we highly recommend using the single-sided layout combined with narrow containers, such as the dynamic side panel. Also use the single-sided layout if the column in the flexible layout is too narrow for the double-sided layout. As soon as you have enough screen real estate, switch to the double-sided version to fully utilize the available space.

The single-sided version has a maximum width of 30 rem, while the double-sided layout has 57.5 rem.

Timeline – Size S
Timeline – Size S
Timeline – Size M
Timeline – Size M
Timeline – Size L
Timeline – Size L

Layout

The timeline control consists of:

  • A header (optional, but highly recommended)
  • A chronological axis
  • Posts/entries

The following optional features can be added:

  • Filter
  • Group
  • Add entries

Header

The title describes the content displayed along the timeline axis. 

Axis

Along the axis, the entries are arranged chronologically. The distance does not correspond to the time between each occurrence.

You can use a vertical or horizontal axis. The timeline can be scrolled along its axis.

By default, the latest entries appear on top. Replies are sorted the other way round.

Post (Entry/Feed Update)

Posts can be entered manually or generated by the system (for example, “Object ABC was changed by Mr. X”). The entry should include information about who changed what, and when (depending on the use case). Typically, posts in the timeline consist of four sections:

  1. A node
    Using icons on a node is optional. Use icons for either all or none of the posts.
  1. A header section, which can contain:
  1. An (expandable) content section, which can contain:
  • Text(s) and/or link(s)
  • Structured or unstructured information
  • Images
  1. An optional action section containing actions that can be performed on an item, such as Edit or Delete. Actions are provided by the application.

Note: If a section is not used, it should not take up any space within the bubble.

Timeline – Layout
Timeline – Layout

Here are just a few examples of different visualizations. Because the timeline control is very flexible, there are also numerous other possibilities.

Timeline – Layout examples

Posts can originate from three sources:

  • Manual post: A person actively posts to the timeline (or to another place that supplies updates to the timeline).

Example:
Julie Armstrong: Can someone please have a look at these numbers?

  • Post triggered by user action: The post is triggered by something a person does (such as creating an object, adding a note, or uploading an attachment).

Examples:

Julie Armstrong created sales order 4815162342.
(Followed by an optional preview of the header data)

John Miller uploaded the document Sales-Revenue_Q4.xls
(Followed by an optional preview of the document, if available)

Donna Moore added a note:
(Followed by an optional preview of the note)

Julie Armstrong added the picture our_team.jpg
(Followed by an optional preview of the image)

  • Post triggered by a technical source: Posts can also originate from a purely technical source (for example, if a threshold has been exceeded, or a deadline has been reached).

Examples:

Boiler BB-258/80 has exceeded its maximum temperature.

Server DS209 is running out of space.

Order #052690 is overdue.

Information
Notes vs. Posts: 

Notes are not the same as timeline posts. They must be kept separate and visualized differently. Like attachments, users create notes in the context of a business object, typically within a Notes tab.

In the context of a business object, notes have the same character as attachments.

The difference is even more apparent if you compare posts to complex notes created with a rich text editor. These notes are fundamentally different from timeline posts.

To show notes on the timeline, trigger a feed post with a teaser text. For example, “Julie Armstrong added a new note: Lorem ipsum…”.

Types

The timeline offers many levels of expansion, ranging from a simple read-only history to a highly interactive mode. This flexibility allows the timeline to cater for a wide range of use cases.

For example, you could use a read-only version to show system-generated posts that don’t require any user interaction. Nevertheless, this timeline could still be used to show actions the user has taken within the app (like creating notes and attachments, or making calls). These actions appear in the timeline as application-generated posts.

Example of a basic read-only use case
Example of a highly interactive history feed

Behavior and Interaction

Search

Because a timeline can contain a vast number of entries, always offer a search. A search helps users to find what they are looking for without having to scroll through all the posts and updates.

Initially, the search field is closed and only visualized with a search icon. Clicking the icon opens the search field with the focus in the field so the user can start typing.

Expand and Collapse

Some updates might be too lengthy to show in full. For these cases, applications can decide to show only a preview and let users expand the post if they want to read it. You can set a limit for the number of lines to be shown (recommended), or for the number of characters.

This example shows a post that previews 3 lines before truncating and showing a More button in the next line. Clicking this button expands the post to its full length and changes the button text to Less. Clicking this button again collapses the post to its previous height.

Interaction – Expand/collapse

Filter (Optional)

For timelines with several entries or entry types, it makes sense to enable filtering. You can let users filter the timeline by entry type and by other useful attributes (such as bookmarked). Users can even filter by time range to find posts between two specific dates, months, quarters, or years.

The filter is triggered with the filter icon  icon in the toolbar.

Timeline interaction – Filter

Depending on the complexity of the timeline, you can offer different kinds of filter dialog:

  • Single selection
Timeline interaction – Filter with single selection
  • Multi-selection
Timeline interaction – Filter with multi-selection
  • Multi-faceted filter
    To implement this combination of feed source and filter, use the view settings dialog.
Timeline interaction – Filter with view settings dialog

If a filter is set, inform the user in the infobar.

Timeline interaction – Set filter
Developer Hint
As of SAPUI5 version 1.48, sorting and filtering is no longer restricted to the front end. The timeline offers full filter and sorting support for model binding.

Scrolling

The timeline offers endless scrolling. As soon as the user reaches the end of the pre-loaded list, more posts are fetched from the back end.

Developer Hint
To enable infinite scrolling, set the properties GetLazyLoading and EnableScroll to “true”.

In exceptional cases, it might be more useful to let users trigger the fetching process manually. Once the number of entries displayed in the timeline exceeds the number of entries set, a Show More button appears at the bottom of the list for loading additional posts.

Each app team can determine the number of entries displayed before the Show More button appears, based on the specific use case and app performance.

Use the Show More button instead of infinite scrolling if you expect users to look at only the most recent posts and do not expect them to scroll through longer lists of posts.

Grouping

The timeline allows applications to group posts by certain criteria (for example, by year). Groups can be expanded and collapsed for a better overview.

Grouping is supported by all timeline types and layouts: vertical and horizontal as well as left-, right- and double-sided.

The following example shows two collapsed groups (2018 and 2017) and an expanded group (2016).

Timeline interaction – Grouping

Custom Actions

You can introduce custom actions for timeline posts. Keep in mind that the available space is limited and translated words can take up much more space than their English counterparts. Only offer actions that are essential to your users and reduce the number of actions to a minimum. If more actions or more complex interaction is required, let your users navigate to a separate page for the item they need to work on (such as an object page).

In the first example, the custom actions Edit (1) and Delete (2) have been added to the post.

Behavior – Custom actions 'Edit' and 'Delete'

In the second example, the custom action Download (3) enables the user to quickly download an attachment directly from the post.

Behavior – Custom action 'Download'

Refresh

Instead of showing new posts as soon as they arrive (which would interrupt users while they are reading), the timeline offers a very subtle way of notifying users about new posts.

You can place a message strip directly below the toolbar to show how many new posts are waiting to be retrieved from the back end.

Behavior – Refresh
Behavior – Refresh

If a filter is active, the message strip shows alongside the filter infobar.

Behavior – Refresh and filter

Social Actions

The timeline does not offer integrated social collaboration features out of the box. For integration with SAP Jam, see the group feed component.

If you want to build your own social platform or integrate an existing service other than SAP Jam, the timeline is flexible enough to handle most social collaboration features. The following section gives some guidance on how to design the interaction.

Adding a Post

You can allow users to add their own posts by offering a Post a Comment button in the toolbar on top of the timeline.

Use the Post a Comment button to trigger a popover containing a text area. Set the focus inside the text area to enable the user to start typing right away.

Post sends the user’s text, which then appears in the timeline. To prevent empty posts, keep the button inactive until the user has typed something.

Interaction – Adding a post

Replying to a Post

Alongside the Post function, Reply is probably the most basic and essential social feature. Unlike feed controls (sap.m.FeedInput and sap.m.FeedListItem), the timeline enables communication at item level. Feed controls always add entries to the top of the list; there are no inline replies within the feed. By contrast, the timeline lets users reply directly to a specific entry. The number of replies is shown next to the Reply action, for example, Reply (5).

When the user clicks the Reply link, the app needs to trigger a popover that shows all previous replies, as well as a text area for posting a reply.

Interaction – Reply
Interaction – Reply

Styles

Orientation

There are various layout options. When you choose the layout, consider the type of content and the screen real estate available for displaying the control.
(See guidelines section for more details.)

Vertical

Use the vertical timeline for narrow containers or on smartphones (in portrait mode).

Styles – Vertical (single-sided), right
Styles – Vertical (single-sided), left
Styles – Vertical (double-sided)

Horizontal

You can use the horizontal timeline on wide screens, the object pageor even on smartphones in landscape mode.

You can display both the vertical and horizontal timelines with or without icons.

Styles – Horizontal (single-sided), bottom
Styles – Horizontal (single-sided), top
Styles – Horizontal (double-sided)

Icons vs. Bullets

When you design your application, you can choose between two visualizations for listing posts on the timeline: icons or bullet points.

You can use icons if all entry types that will appear in the timeline can be represented by an icon.

If you cannot find icons for all post types, use bullet points instead.

Styles – Vertical with icons
Styles – Vertical without icons

Colors

You can use colors to highlight entries in the timeline and to convey semantic information (for example, to indicate the status or urgency of an entry).
Styles – Timeline with icons and semantic colors

Guidelines

  • Only use the speech bubble icon   for posts entered manually by users.
    CSS name: icon-post
    HTML Unicode: & # xe 0 a b ; (remove the spaces)
  • Do not use colors for decoration. Only use colors to convey semantic information (for example, warnings or errors).
  • When using the vertical timeline, use single-sided (right) or double-sided layout, unless the use case calls for the left-sided version.
  • When using the horizontal layout, use the single-sided (bottom) or double-sided version, unless the use case is better supported by the top-sided version.
  • When you choose the layout, consider the type of content and the screen real estate available for displaying the control. For example:
    • In a vertically-oriented dynamic side content container, also use vertical orientation for the timeline. Likewise, if the container is oriented horizontally (either by design or due to responsive behavior), the timeline should also be horizontal.
    • If sections on an object page offer more horizontal than vertical space, use a horizontal timeline. This can be either single-sided (bottom) or double-sided.

Resources

Want to dive deeper? Follow the links below to find out more about related controls, the SAPUI5 implementation, and the visual design.

Elements and Controls

Implementation

Tree Table

A tree table contains a hierarchical set of data structured in rows and columns and grouped into nodes. The analytical table (also know as ALV) can provide additional details in several non-hierarchical columns per line item. 

Usage

Trees are used to display and work with large amounts of hierarchical data. They have a high data density and therefore convey an immediate feeling of complexity. Ideally, you should only show trees with a lot of hierarchical data as a last resort. Try the following instead:

  • Break down the data into manageable chunks and allow the user to navigate or drill down between them.
  • Use charts with drilldown functionality until the amount of data is more manageable.

Responsiveness

A tree table is available for desktops and tablets, but not in smartphone sizes. It supports touch devices, but is not optimized for small screens.

If you use a tree table, note that you have to implement a fallback solution for small screens. This fallback solution does not need to support all use cases.

Possible fallback solutions are as follows:

  • Use navigation to different pages instead of a tree structure. This works well for structures that are no more than four levels deep.
  • Remove levels until only one or two remain. Replace a single-level tree by a table, and a two-level tree by a grouped table or a split-screen layout.
  • Use filtering instead of a tree structure.

You can try to create a fallback based on these ideas, but a completely different solution, such as showing charts in a read-only case, might be more appropriate.

Tree table shown on a desktop
Tree table shown on a tablet

Types

Like all SAP Fiori controls, the tree table is shown in compact mode on a desktop and in cozy mode on tablets.

For a desktop, you can also display even more rows on the same screen height by adding the condensed mode in addition to the compact mode. This renders less white space for each item.

Note that the condensed content density has always to be set in addition to compact. Do not use condensed on its own. Do not mix condensed with cozy. Doing so could lead to unpredictable and / or unwanted results, e.g. cozy sized controls in condensed sized containers, missing padings, etc.

Note that neither compact mode nor condensed mode can be interacted with via touch. Even on a desktop with a touch screen, users will have difficulty selecting rows or using controls inside the cells when using their fingers.

Furthermore, condensed mode is not available for Internet Explorer 9. If condensed mode is to be used, please provide a fallback.

For more information on cozy and compact modes, see content density.

Compact Mode

Tree table – Compact mode

Condensed Mode

Tree table – Condensed mode

Components

Column Header

The column header provides the label for the corresponding column and access to the column header menu.

Resizing columns works in the following ways:

  • Mouse interaction: Dragging the separator line between two columns (sap.ui.table. Column, property: Resizable). Double-clicking optimizes the column according to the length of the currently visible data and the label of the column header (sap.ui.table.Column, property: Autoresizable).
  • Touch interaction: The user taps the column header to reveal two buttons: one for showing the column header menu and one for resizing. Drag the latter to resize the column.

After resizing a column, the adaptation of the column widths depends on how the column width is set:

  • If column widths are set in pixel-based units (px, em, rem), the corresponding column is adapted and following columns are moved accordingly. The width of all other columns is not affected.
    If all the columns together take up less width than the table control, an empty space is added. If all the columns together take up more width than the table control, a scrollbar appears.
  • If all column widths are set in percentage or “auto”, resizing one column might also lead to the automatic resizing of some or all other columns. The position of the resized column might also be affected. This is done to ensure that the whole table width is used and no white space is added. A scrollbar appears only, if all or most of the columns get very small. To avoid the unintended side effect of undersized columns, a minimum width can be set per column. Please be aware that this minimum width is only taken into account if columns are automatically resized. End users are still able to reduce the column width below the provided minimum. (sap.ui.table.Column, properties: width, minWidth)

Columns can be rearranged by dragging the column header to another position (sap.ui.table.TreeTable, property: enableColumnReordering).

Tree table – Column header
Opening the column header menu on touch devices
Fewer columns than space available

Line Item

A line item contains a set of cells and provides options for selecting the item.

To prevent adverse side effects when scrolling vertically, all line items must have the same height (sap.ui.table.TreeTable, property: rowHeight).

Tree table – Line item

In rare cases, show the actions within the line item. One example would be an Add to Cart button in a shopping application. Since these actions are repeated in every line and thus use a lot of screen real estate, do this only for a maximum of one or two actions. Provide a separate column per action. Use a button, unless the action trigger belongs to a link. Hide the action in rows for which it is not applicable.

Tree Column

The first colum (tree column) provides the hierarchical structure.

Tree table – Tree column

Expand/Collapse Button

The expand/collapse button is offered on container nodes to allow the child items of the corresponding container to be shown or hidden.

Tree table – Collapse
Tree table – Expand
Tree table – Expand

Container Node

A container node is a line item that contains child elements.

Tree table – Container node

Leaf Node

A leaf node is a line item that does not contain child elements.

Tree table – Leaf node

Cell

Each cell provides one data point. It can contain one of the following controls to display the data point:

While it is technically possible to also use other controls, doing so could lead to issues in regards to alignment, condensed mode, screen reader support, and keyboard support.

If you use text, use only single-line text to keep the same row height. Truncate if necessary as this prevents adverse side effects when scrolling vertically (sap.m.Text, property: wrapping, value: false).

Tree table – Cell
Tree table – Cell

Tree Cell

A tree cell is a cell inside the tree column. Besides its data point, it provides a collapse/expand button on container nodes, and it indents the different hierarchy levels.

Tree table – Tree cell

Column Header Menu

For the tree column, the column header menu can contain the menu item Freeze and a Filter field, in which the user enters free text.
For all other columns, only the free text filter is available.

Tree table – Tree column header menu

Selection Cells

For multiselection tree tables, the first column contains checkboxes for selecting line items. Besides multiselection, the tree table offers a single-selection mode and also a read-only mode, in which line items are not selectable.

Tree table – Selection cells

Select All

For multiselection tree tables, the column header can contain a checkbox above the selection cells for selecting or deselecting all line items.

Tree table – Select all

Scrollbar

The tree table allows horizontal and vertical scrolling. You can add any number of line items to the tree table, which uses “lazy loading”.

To prevent adverse side effects when scrolling vertically, all line items must have the same height (sap.ui.table.TreeTable, property: rowHeight).

The tree table is optimized to allow faster scrolling within the first 1000 items.

Tree table – Vertical scroll bar

Behavior and Interaction

Selection

The tree provides the following possibilities:

No selection: Items cannot be selected. (property: selectionMode = None)

Tree table – No selection

Single selection: One item in the tree table can be selected. A row selector column is shown. (property: selectionMode = Single)

Tree table – Single selection

Multiple selection: One or more items can be selected. The tree table provides a column with checkboxes on the left-hand side. Clicking a checkbox toggles the state of the corresponding row from deselected to selected and back. The Shift key can be used to select a range.

For multiple selection, you can choose between two variants.

  • Multi-toggle mode (property: selectionMode = MultiToggle)
  • Multi-selection plug-in (sap.ui.table.plugins.MultiSelectionPlugin)

These variants behave differently when the user selects more items than are currently loaded in the front end.

Multi-toggle

In multi-toggle mode, you can offer a Select All checkbox to the left of the column header (property: enableSelectAll). Selecting this checkbox selects or deselects all items that are currently loaded in the front end. All other items are not selected/deselected. If the application data is stored in the back end, scrolling down further can reveal additional unselected items. The same can happen with range selections if not all items in the selected range have been loaded to the front end.

Multi-selection plug-in

If you use this plug-in instead of the multi-toggle selection mode, the behavior for range selection and Select All changes:

  • By default, a dedicated Deselect All button replaces the Select All checkbox. There is no default UI element for selecting all items.
  • You can set a limit for the number of items that can be selected (sap.ui.table.plugins.MultiSelectionPlugin, property: limit). This limit has the following effect:
    • The range that can be selected using the Shift key is limited to the specified number of items (default = 200). The table automatically scrolls back to the last selected item and a message can appear (sap.ui.table.plugins.MultiSelectionPlugin, property: enableNotification). Users can select more items by selecting additional ranges (the specified limit applies each time).
    • If the selection limit is set to 0, a Select All checkbox is shown. There is also no limit on the number of items that can be selected in a range. All selected items are loaded, which can lead to performance issues for large data sets.
  • If selected items are not already available in the front end, they are loaded automatically by the plug-in and set as selected.
Information
When setting a limit for the number of items that can be selected, keep the following boundaries in mind:

  • The performance of your service: How many items can be loaded at once in a reasonable time? Does this also apply if an end-user shows all available columns?
  • The “minimum limit”: Internally, the grid table loads blocks of items as the user scrolls down. Because this block size (sap.ui.table.TreeTable, property: threshold) is usually also based on the performance of the service, it should be safe to assume that the minimum selection limit is twice this size. In this case, loading the data would take as long as scrolling down and loading exactly one more block. Nevertheless, we recommend using larger limits if your service allows.

Tree table – Multiple selection
Multi-selection plug-in with a limit

Selection Behavior

An item can be selected in different ways, depending on the configuration of the tree table (sap.ui.table.Table, property: selectionBehavior):

  • Row: An item is selected by clicking the checkbox or the row. Use this option for multi-selection tree tables if clicking a row or a cell is not used for anything else.
  • RowSelector: An item is selected only by clicking the checkbox in the selector cell. Use this option if clicking the row (or a cell inside the row) is used for something else, such as navigation.
  • RowOnly: An item is selected only by clicking the row, and not using checkboxes in the selector cells. Use this for single-selection tree tables if clicking a row or a cell is not used for another purpose, such as navigation.

Set the property collapseRecursive to “false” in order to keep the selection on subnodes even after collapsing and expanding the root node.

Drag and Drop

One or several items can be repositioned within a table or moved to other UI elements using drag and drop operations (sap.ui.table.TreeTable, aggregation: dragDropConfig). While being dragged, the items are shown as ghost elements on the mouse cursor.

Drop targets can be on items, between items, or both (sap.ui.core.dnd.DropPosition). On a drop target, the mouse cursor changes to either a “copy”, “link”, “move”, or “none” cursor. “None” indicates that the dragged item cannot be dropped in the current position  (sap.ui.core.dnd.DropEffect).

Drag and drop is only available on supporting browsers.

Drag and drop
Drag and drop

Column Header Menu

Sort

The column header menu can provide two sort options (sap.ui.table.Column, properties: sortProperty, showSortMenuEntry):

  • Sort Ascending
  • Sort Descending

The user selects one of these options to sort the corresponding column accordingly (sap.ui.table.Column, properties: sorted, sortOrder, sortProperty).

Sort settings in column header menu

Filter

The column header menu can provide a search field for entering free text. If the user enters a term in the input field and triggers the search by pressing Enter, the tree is filtered by the tree column and the corresponding value. If no items match the filter values, the filtered tree table may be empty.

Tree table – Filter
Tree table – Filter

Freeze Columns

The Freeze/Unfreeze option is provided in the column header menu of all columns. Using Freeze on one column freezes all columns from the first one to the selected one.

Tree table – Freeze
Tree table – Freeze

Column Handling

Show/Hide Columns

Columns can be shown and hidden. If the tree column is hidden, the following column is the tree column.

Rearrange Columns

The user rearranges columns by dragging and dropping the corresponding column header. The tree column is always the first column and cannot be dragged.

Resize Columns

Columns are resized as follows:

  • Mouse interaction: The user drags the separator line between two columns (sap.ui.table. Column, property: Resizable). Double-clicking the line optimizes the column according to the length of the currently visible data and the label of the column header (sap.ui.table.Column, property: Autoresizable). Note that auto-resizing works only if the cells in this column contain one of the following controls: text, label, link, or input.
  • Touch interaction: The user clicks or taps the column header to reveal two buttons: One to show the column header menu, and one for resizing. The user drags the latter to resize the column.

Context Menu

You can attach a context menu (sap.m.Menu) to a table. The context menu gives users an alternative way to modify the focused elements by giving them access to context-specific functions.

When opened, the context menu gets the row and column context, except for special columns (such as the selection column) or special rows (like group headers). Context menus can be implemented for a specific table, row, or cell (not recommended for editable cells).

Context menus are opened by right-clicking (desktop), long press (mobile), the context menu key, or SHIFT+F10.

Be aware that using the context menu overrides the browser context menu, which can no longer be opened.

If a control inside a table is the “click target”, and the control also provides a context menu, the control context menu “wins”.

Tree table with context menu

Cell Content

The tree is traditional in that each cell can contain only one data point in one single line.

Apart from plain read-only text, cells can contain the following:

While it is technically possible to also use other controls, doing so could lead to issues in regards to alignment, condensed mode, screen reader support, and keyboard support.

If you use text, use only single-line text to keep the same row height. Truncate if necessary as this prevents adverse side effects when scrolling vertically (sap.m.Text, property: wrapping, value: false).

Guidelines

Filtering

What exactly needs to stay or be removed is highly dependent on the kind of structure and data your tree table displays. For many trees, the following approach works well if you want to apply filters only to the leaves of a tree:

  • Remove all leaves that don’t fit the filter criteria
  • Remove empty nodes

Where nodes need to be filtered, keep the following in mind:

  • A node may or may not fit the filter criteria.
  • A node can contain items (nodes and/or leaves) that fit the filter criteria.

Because of this, the results might contain more nodes than those that are relevant for the filter criteria.

Developer Hint
The tree table itself has no influence on the filter result. It sends a filter request and displays whatever comes back. Make sure that the result set is meaningful.

Sorting

First of all: Is sorting meaningful in your tree? If so, decide on a meaningful default sort order.

If sorting is meaningful, is it meaningful on all levels? Or does the tree structure need to be stable? In the latter case, sort only leaves, but not nodes.

To display the current sort state, an icon is shown in the column header of the most recently sorted column. This icon indicates the sort direction (sap.ui.table.Column, properties: sorted, sortOrder, sortProperty).

The descending sort order must always be the exact reverse of the ascending sort order. For each column, provide a meaningful sort order. For example:

  • Sort text alphabetically
  • Sort numbers by their value
  • Sort status information by the severity of the status:
    • Ascending: Sort status information from positive to negative, with neutral last.
    • Descending: Sort status information from negative to positive, with neutral first.
    • Ascending with different values per severity level: Sort status information from positive to negative, with neutral last. Sort different values within a severity level (semantic color) alphabetically.
    • Descending with different values per severity level: Sort status information from negative to positive, with neutral first. Sort different values within a severity level (semantic color) alphabetically.

Loading Data

To indicate that the table is currently loading items, use the busy state (sap.ui.table.TreeTable, property: busy). Do not show any items or text. As soon as the data has been loaded, remove the busy state and show all items.

Initital Display

Think of the initial expand / collapse state of a tree: If your structure contains many items on the root level, it might make sense to collapse the whole tree in the beginning.

In contrast, if the main items to work with are displayed on a deeper level (e.g. the parent nodes are just some kind of categorization), the tree should be expanded up to the first level where the needed items appear.

Selection

  • We strongly recommend using the multi-selection plug-in. This ensures that all items selected using Select All or as part of a range are included – even if some items were not initially loaded in the front end. This is not the case if you use the multi-toggle option.
  • Do not limit the range selection for the multi-selection plug-in unless you have to.
    • If the dataset is small and/or completely available in the front-end, set the limit property to 0 to enable the Select All option and allow users to select any range.
    • If you have a large dataset, set a limit on the number of selected items to avoid performance issues. Also bear in mind that some actions won’t be helpful if the dataset is too big (for example, a delete operation on 2 million database entries).
  • When setting a limit, also display the corresponding message when the user selects more items at once than the limit allows (sap.ui.table.plugins.MultiSelectionPlugin, property: enableNotification).
  • In multiple selection mode, do not show checkboxes in the first data column in the default delivery to avoid confusion.

Empty Table

Try to avoid empty tables. If necessary, provide instructions on how to fill the tree table with data.

Remove the item count in the table title if there are zero items.

Add Items

For adding items, place an Add or Create text button on the table toolbar.

  • Use Create if the button adds a brand new item that doesn’t yet exist on the database.
  • Use Add if the item already exists and is merely added or assigned to the current object.

Show new items as the first item of the tree table or node:

  • If nothing is selected, add the new item to the root.
  • If a single node is selected, add the new item to the selected node.
  • If a single leaf is selected, add the new item as child of this leaf. The original selected item becomes a node.

If your tree doesn’t support adding items to the root, selected node, or selected leaf, disable Create or Add for the corresponding levels.

Disable Create or Add if more than one item is selected.

For more details, see the guidelines for managing objects (including subarticles).

Enabling/Disabling Actions

To indicate if an action can be applied to the current selection:

  • Enable the action if it always works, regardless of whether or not items are selected.
  • Enable the action if it can be applied to all selected items.
  • Enable the action if it can be applied to some of the selected items. If the action is triggered, show a message that informs the user how many items will be affected. Let the user choose whether to apply the action anyway or cancel the action.
  • Only disable the action if it can be applied to none of the selected items.

For more details, see UI Element – States.

If the action was applied and the items are still available, keep them selected.

Message for an action that applies to a part of a selection

Columns

Minimize the number of columns. Avoid the need to scroll horizontally in the default delivery. In the first column, show the hierarchical data, which should identify the line item. Choose the name over the ID, but if both are needed, show the name first, then the ID.

The tree table assigns the same width to each column by default. It is recommended that you overwrite this default to provide optimal space for your content (sap.ui.table.Column, property: width).

If you define the column width in pixels or rems, resizing a column affects only the width of this specific column. Reducing the browser window size results in a scrollbar. After resizing a column, a scrollbar appears if the width of the table is not enough to show all columns. If the columns use less space than is available, white space appears on the right side of the last column.

If you define the column width as a percentage, resizing one column affects the width of several or all columns. Text becomes truncated when the browser window size is reduced. This is done to make sure that all columns together fill the space of the table. A scrollbar appears only in case the automatic change of the column widths is not enough to display all columns. To avoid the side effect of undersized columns, a minimum width can be set per column. Please be aware that this minimum width is only taken into account if columns are automatically resized. End users are still able to reduce the column width below the provided minimum. (sap.ui.table.Column, properties: width, minWidth)

If you define the column width as “auto”, the behavior is the same as for “percentage”. In contrast to percentage, “auto” distributes the columns equally.

To decide on how to set the column width (pixel/rem/em vs. percent/auto), keep the following tips in mind:

  • For tables with only 2 to 3 columns, use pixel-based units. This ensures that on wide screens the values in the columns are not spread over the whole screen, which improves readability of line items.
  • For tables with many columns, where a horizontal scrollbar is usually needed, use pixel-based units. This avoids unintended side effects when resizing columns.
  • For all other tables, use whatever fits your case better.

Be cautious with mixing columns with pixel-based and percentage-based widths. While this can be helpful in some cases, it could also cause even more unintended side effects when resizing a column. When using percentage-based widths for one or more columns, think of the possibility to not allow end users to resize columns at all.

Alignment of Cell Content

Align column headers according to their cell content:

  • Texts are left-aligned.
  • Numbers (except for IDs), dates, and times are right-aligned.
  • Icons are centered.
  • Micro charts are left-aligned.

In addition, align amounts with currencies to the decimal point. You can do this with the sap.ui.unified.Currency control.

Note that most currencies have two digits after the decimal point, but there are exceptions, for example:

  • The Tunisian dinar has three digits.
  • The Japanese yen has no digits.

In tree tables with mixed currencies, all amounts still have to be aligned to the decimal point.

To enable positive and negative values to be identified more easily, position the minus sign to the right of the number. It is placed in the same position in every row.

For more information, see currency.

Formatting Cell Content

  • Note that there are different locale formats, so show dates, times, and numbers in the correct format for the user’s language/country.
  • If you show both a a text and an ID, consider the requirements for sorting, grouping and filtering:
    • If users need to sort, group, and/or filter by both text and ID, show the text and ID in two separate columns.
    • If users only need to sort, group, and/or filter by either text or ID, show the ID in parentheses after the corresponding text.
  • If the unit of measurement is the same for all rows, show the unit of measurement in the column header. Otherwise, show the unit of measurement within the row.
  • If you want to let users sort, filter, or group by amount and by unit of measure independently, put both in different columns. If you combine them in one column, offer only sorting, filtering, and grouping by amount.

Tree vs. Table

Trees are more complex than tables due to their hierarchical view. Users tend to have more problems finding items in hierarchical views than in flat lists, except where the hierarchical view is natural. By natural we mean that every child node should be part of only one parent, and this relationship between the child and parent is clear and well known.

Do
Example of an acceptable use of tree tables
Do
A clear parent-child relationship

When you use trees, you should choose broad hierarchies over deep hierarchies. Deep hierarchies make finding items more complicated. So try to reduce hierarchical levels where possible, especially if the hierarchy is not natural. Ideally, a tree should have a maximum of four levels, the first two of which should contain the most important items.

Don't
Avoid unnecessary depth in the hierarchy
Do
Favor breadth over depth in the hierarchy

You can use the following methods to reduce hierarchy levels:

  • Avoid single root nodes. A single root node is often used to provide a Select All feature. Since the tree control provides an extra space for a Select All feature, the root node is not usually needed.
  • When you use only two levels, choose a grouped table or grouped ALV over a tree table control. Expand all groups for the default delivery.
  • Container nodes at the top level can usually be replaced by tabs or value pickers.
  • Eliminate unnecessary mid-level containers, for example, by combining redundant ones.
  • Exercise care when using a tree due to its overall complexity. The hierarchical structure of the data does not necessarily mean that a tree control is required.

Design Concepts

The tree table can be used to display large amounts of hierarchical data. Unfortunately, tree tables have a high data density and therefore convey an immediate feeling of complexity. Ideally, tree tables with large amounts of data should only be shown if there is no other option. You should instead try the following:

  • Flatten the data. A list, table, or ALV is still complex, but less so than a tree table.
  • Break down the data into manageable chunks. Allow the user to navigate or drill down between them.
  • Use charts with drilldown functionality until the amount of data is more manageable.

Try to avoid horizontal scrolling in the default delivery.

Navigation

To trigger navigation on line item level, choose one of the following options:

  • Use a link for the attribute that identifies the row. Clicking the link triggers the navigation. This is the preferred option.
  • Add the RowActions column and show the navigation arrow (  ) at the end of the row. No column header text is required. The navigation column is fixed and will not scroll away. Users also cannot personalize this column. The navigation arrow triggers the navigation.
    Do not use the RowActions column for actions other than navigation and deletion.

Special case: Multi-selection in a master-detail scenario
When a multi-selection table is used in a master-detail scenario, it is not clear which item was last opened (for example, which item is currently shown in the second column of a flexible column layout). In this case, you can display a “navigated” indicator to show which item is currently open.

Examples of Incorrect and Correct Usage

When you use trees:

  • Choose breadth over depth.
  • Emphasize important values. Do not let the user run into a wall of text without guidance. You can use bold text for this.
  • Try to minimize the number of columns, especially if there is a large number of rows.
  • Optimize column width for its initial visible content. Do not automatically adjust column width based on content changes.
  • Do not wrap content, truncate it. End users can easily change the column width to see the full text.
Don't
Avoid truncating the initial visible content in the default delivery
Don't
Never wrap texts
Never wrap texts
  • Maintain a fixed layout, except when the user wants to change it.
  • In the default layout, use the tree column for the item name or data that identifies the row. This helps the user to choose between different items.
  • Create a clear and immediately understandable hierarchy. Use clear parent-child relationships. If this is not possible, add a child in different nodes to help the user find the element.
Do
Acceptable: repeat entries to optimize finding items
  • Consider persisting the layout settings. When a user reopens the app, show the tree table with the same column sizes, column order, and view settings as last defined by this user.
  • Use the Select All feature only if it makes sense. Note that selecting a lot of data also takes time and might not be appropriate for all use cases. For example, a delete operation on two million database entries might not be very helpful in many cases.
  • Set the property collapseRecursive to “false” in order to keep the selection on subnodes even after collapsing and expanding the root node.

Empty Tree Tables

Avoid empty tree tables. If necessary, provide instructions on how to fill the tree table with data (sap.ui.table.TreeTable, properties: noDataText, showNoData).

Examples:

  • If a tree table is initially empty, provide at least a basic text:
    No items available.
    Overwrite this whenever a hint can be provided on how to fill the tree table with data.
  • If a tree table is used together with a filter bar (as in the list report), and is initially empty, use the following text:
    No filters set. To start, enter your search and filter settings and run the search.
  • If a tree table is used together with a filter bar and the filter does not return results, use the following text:
    No items found. Check the search and filter settings.

Adapt the texts above if:

  • The standard text is not precise enough for your use case (for example, no search is offered, only the search is offered).
  • You are using the live search (no Go button in the filter bar). In this case, leave out “run the search”.
  • The standard text is misleading (for example, if the data is filled based on a master-detail pattern instead of search and filter settings).

Highlight Items

To show that an item needs attention, a highlight indicator can be shown in front of the item. The highlight indicator can be used to indicate:

  • A semantic state, such as red or orange for an error or warning. In this case, use semantic colors.
  • Additional information, such as blue to highlight newly added items. In this case, use semantic colors.
  • Industry-specific or process-specific states, such as “out of stock” or “excess of inventory”. In this case, use indication colors.

Be aware that the highlight is just an indication. It does not tell users exactly what is wrong. Make sure that you provide this information within the table row, ideally in the same color.

For details on the use of highlight colors, see How To Use Semantic Colors / Industry-Specific Colors.

(sap.ui.table.TreeTable, aggregation: rowSettingsTemplate)

Highlighted items
Highlighted items

Drag and Drop

Drag and drop is “invisible” on the UI: users can’t see where dragging is available and where it isn’t. Also, because there is no generic keyboard interaction, drag and drop isn’t accessible. Moreover, drag and drop is not available on all browsers. For these reasons, offer drag and drop only in addition to existing (and visible) UI elements that fulfill the same purpose. For example, offer (toolbar) buttons for moving or for copying and pasting items.

Use drag and drop only in addition to existing visible UI elements

If you offer drag and drop for rearranging items within a tree table, use the following options:

  • For dropping items as a child, use whole nodes as drop targets (sap.ui.core.dnd.DropPosition.On).
  • For dropping items on the same level, use the space between items as drop targets (sap.ui.core.dnd.DropPosition.Between).
  • If you want to allow users to drop items as a child or sibling, offer both drop targets (sap.ui.core.dnd.DropPosition.OnOrBetween).

This provides better feedback on where the item will be inserted. Show the “move” mouse cursor (sap.ui.core.dnd.DropEffect.Move).

Drop target on an item

Do not combine rearranging items within one level and sorting. If you really need to do so, make sure there is a dedicated sort criterion for the user-defined sort order, and only offer options for rearranging items if this sort order is set.

Moving items from one node to another can be combined with sorting without any issues.

Don't
Do not combine rearranging items on the same level with sorting

Visible Alternatives to Drag and Drop

Depending on the functionality you need, use one or more of the following alternatives:

  • To move items up or down within a node:
    Use the  Move Up and  Move Down buttons on the toolbar. These buttons move the selected items until the first selected item can’t be moved up / the last selected item can’t be moved down any further.
    Depending on your tree, this can make sense for both leaves and nodes, only for leaves, or only for nodes. When moving a node, move the whole node and (if applicable) all its children up or down to the next position within the parent node.
    Always make sure that when the user moves an item in one direction and then moves it back, the order is the same as it was before.
    Do not combine the option to move items up and down with sorting.
  • To move items to another node:
    Use Copy and Paste buttons on the toolbar.
    Alternatively, offer a Move To button. Clicking Move To opens a dialog that shows all the nodes of the tree, but no leaves. Selecting an item in this dialog closes the dialog and moves the corresponding items to the selected node.
  • To change the level of an item:
    In some trees, such as document structures, users can change the level of an item without affecting the level of parent or child items. In this case, use left and right arrow buttons (   ).

Context Menu

Use the context menu only to give users a quick way of accessing functions that are already available elsewhere (for example, as buttons in the toolbar). Don’t just offer actions in the context menu itself, as users might not realize that these actions are available at all.

The context menu can be triggered for the table, row, or cell. However, we do not recommend using context menus for cells: because the content of a cell is a different touch target than the cell itself, opening a cell context menu via touch is quite hard, even in cozy mode.

Do not combine context menus with condensed mode: editable controls fill the entire space inside a cell. Because of this, context menus cannot be opened at all with touch or mouse interaction.

Tables in Object Pages

In the object page, we advise against using analytical, grid, and tree tables. Instead, use a responsive table and offer navigation to a list report with the table types mentioned above.

For more information on the use of tables within the object page, see the Tables section of the Object Page article.

Export to Spreadsheet

On the table toolbar, apps can provide a menu button for exporting table data to a spreadsheet. For the export, use the export to spreadsheet function.

'Export to Spreadsheet' menu button

Resources

Want to dive deeper? Follow the links below to find out more about related controls, the SAPUI5 implementation, and the visual design.

Elements and Controls

Implementation

Toolbar Overview

The toolbar enables the user to change the UI or trigger an action. For example, the toolbar allows the user to change views, manipulate data or objects, navigate to another page, perform generic actions, and so on.

This article gives an overview of what kind of different toolbars exist and when to use which one.

Actions and Layout

Actions can be used as follows:

  • They can be independent of the current selection and not related to a specific item or object.
  • They can be specific to the current object (user selects one item).
  • They can apply to a set of items (user selects two or more items).
  • They can control the settings for parts of the UI content. For example, an action can affect all items in a table.

The toolbar is mostly used for buttons (with an icon or text). The buttons are always right-aligned.

Sort your buttons according to their importance for the user, with the most frequently-used action first and the most seldom-used action last. All buttons go into the overflow from right to left, thus ensuring that the most important buttons are the last to be moved into the overflow menu. For more information, see Action Placement.

Responsiveness

To enable responsiveness, use the OverflowToolbar control. Based on the sap.m.Toolbar control, the OverflowToolbar control is a container that provides overflow when its content does not fit in the visible area. Controls that can overflow include the segmented button, select, toggle button, checkbox, input, search field, combo box, and date/time input.

Only allow important actions to shrink and stay outside the overflow. The app team itself must decide which actions it considers to be sufficiently important.

The height of the toolbar changes on desktops (compact mode), tablets, and smartphones (cozy mode). For more information, see the article on content density.

Responsive toolbar – Size L
Responsive toolbar – Size S

Behavior and Interaction

App teams should implement overflow behavior to ensure that all actions can be accessed at any time. Buttons are sorted by usage, with the most frequently used action first (on the left) and the most seldom-used action last (on the right). This ensures that the most important buttons are the last to be moved into the overflow menu. Our general guideline is to use only icon buttons or text buttons. Do not combine an icon and text into one button. Buttons are always right-aligned.

Overflow (Generic)

The overflow should be activated either when there is not enough space for all actions, or if some actions are less important than others. In this case, the app team might decide to have certain actions only appear in the overflow. Furthermore, the app team can also decide that some (important) actions should never be moved into the overflow.

When you implement the overflow toolbar, the overflow behavior is generated automatically. The  “” (overflow) button is a toggle button and can be used to switch the overflow menu on and off.

The user clicks the overflow button to open a popover. In this action sheet, all icon buttons are labeled with text. Overflow is supported for the following controls:

All buttons go into the overflow from right to the left. This ensures that the most important buttons are the last to be moved into the overflow menu.

The sap.m.ToolbarSeparator can also go into the overflow. The separator then changes from a vertical line into a horizontal line. If the control happens to be the first or the last item of the overflow area, the separator isn’t displayed.

Prioritization

You can also prioritize the actions in the toolbar by applying one of five statuses:

  • Always overflow: The action always goes into the overflow.
  • Disappear: An action that is not so relevant for the user can disappear if the space is limited (for example, a title).
  • Low: Assign the priority “Low” to an action if the user seldom needs it; this action will overflow first.
  • High: Actions set to “High” remain visible in the toolbar until all lower-priority actions have moved to the overflow. Lower-priority actions are those with the priorities “Disappear” or “Low”, and all unprioritized actions.
  • Never overflow: These actions are always visible in the toolbar.

The priority of each item is high by default. If two items have equal priority, the item on the right side overflows first.

Grouping

Items can overflow together even if they are in different positions. This can be achieved using the group property in the overflow toolbar layout data. When the value of the property is 0, the element does not belong to any group. When two or more elements are given the same property value, they belong to the same group and will go into the overflow together. Elements that belong to a group are not allowed to have “always overflow” or “never overflow” as priorities, since these priorities force the items to remain either in the toolbar or in the overflow area. When group elements have different priorities, the priority of the group is defined by the maximum priority of its elements.

Table toolbar on desktop without overflow
Table toolbar on smartphone with overflow
Table toolbar on smartphone with open overflow

Styles

Header and Footer Toolbars

Use the following button styles for the different action types in the header and footer toolbars:

  • Primary action: Use the emphasized button style.
  • Secondary action: Use the ghost button style. Note that the ghost button has a transparent background.
  • Semantic action: Use the semantic buttons for positive and negative actions. Use the “accept” style for positive actions, and the “reject” one for negative actions. Semantic actions must always be text buttons.
  • Negative path action: Use the transparent button style.

Do not use any other style types.

Content Toolbars

Use the following button styles for the different action types in content toolbars (for example, in tables, forms, or charts):

  • Primary action: Use the emphasized button style. Usually, the primary action is positioned in the header or footer toolbar. Note that there can only be one primary action per page. If a page already has a primary action, but you also need to highlight the most important action in a content toolbar, use the ghost style for this one button in the content toolbar.
  • Secondary action: Use the transparent button style.

The different button styles are designed to give appropriate feedback to users. Do not use them for decoration purposes.

Button with different styles

Styles and Toolbars

Apply the following menu button styles for the different toolbars:

  • Header and footer toolbars: Use the ghost style.
  • Content toolbars: Use the transparent button style.

Do not use any other style types.

Emphasized and Semantic Buttons

  • Use a maximum of 1 emphasized button per toolbar.
  • Never mix emphasized and semantic buttons.
  • Ideally, there should be only one emphasized action per page. There can be valid exceptions, but we generally recommend using only one emphasized button.
  • For more information, see Buttons.

Enumeration

The toolbar style is an enumeration with two properties: Standard (default) and Clear.

  • Standard style results in linear design (with border) and is intended for standalone usage of the toolbar.
  • Clear style appears as a plain color without borders. This style visually groups the toolbar with a nearby control or controls.

The toolbar style property is combined with the toolbar design property to create various visual styles.

Types

A variety of toolbars exist for different use cases (see examples below). The following types are used:

  • Header toolbar: Contains global actions that are important for the whole page
  • Footer toolbar: Contains only closing and finalizing actions
  • Table toolbar: Toolbar that is positioned above a table and contains table-specific actions
  • Chart toolbar: Toolbar that is positioned above a chart and contains chart-specific actions
  • Infobar: Toolbar that indicates what filters have been set, and how many items have been selected
  • Tree toolbar: Toolbar that appears above a tree or tree table, and is used for actions that impact the entire tree.

Header toolbar with primary action (emphasized style) and secondary actions (ghost style)

Footer toolbar with standard actions: 'Save' (emphasized) and 'Cancel' (transparent)

Table toolbar with search field, text buttons (ghost and transparent style), icon buttons (transparent style), and segmented button

Chart toolbar
Chart toolbar

Inactive infobar (not clickable)
Active infobar (clickable)

Tree toolbar
Tree toolbar

Guidelines

Order of Buttons

To provide a consistent user experience for each app, we highly recommend using the following alignment for generic actions:

  • All buttons are right-aligned.
  • Text buttons should be grouped together, as should icon buttons.
  • Place semantic buttons side by side (for example, Accept and Reject).
  • App-specific text-only buttons and generic text-only buttons can be combined and arranged in a sequence defined by the app team. Remember to place the most frequently-used actions furthest to the left of the group of buttons. This ensures that these actions are the last to be moved into the overflow menu or are visible at all times.

General Guidelines

  • Do not overload the toolbar with actions.
  • Place actions as close to the corresponding content as possible.
  • Place commands in the same location throughout the app. Each page should contain only the commands that are relevant to that page. If commands are shared between pages, they should be placed as close to the same location as possible on each page so that users can predict where the commands can be found when navigating.
  • Separate navigation and commands. Place commands as close to their corresponding items as possible.
  • Do not place Settings, Logout, or other account management commands in the footer toolbar. All these actions are shown in the Me Area.
  • Do not use icon buttons for app-specific actions (neither icon-only buttons, nor icon+text buttons).
  • Use only icon buttons or text buttons. Do not combine an icon and text into one button. Buttons are always right-aligned.
  • If you want to group buttons, use a menu button.
  • Actions that impact the entire page are placed in the header area.
  • Only closing or finalizing actions are placed in the footer toolbar (for example, Submit or Post).

UI Text Guidelines

Use tooltips such as Sort, Filter, and Group to label the icons in the footer toolbar. In the case of Sort, Group, and Filter, use the following text for the no selection made option:

  • (Not sorted)

Note: In most cases, (Not sorted) is not necessary. Simply show the default sort settings instead:

  • (Not filtered)
  • (Not grouped)

Resources

Want to dive deeper? Follow the links below to find out more about related controls, the SAPUI5 implementation, and the visual design.

Elements and Controls

Implementation

Table Toolbar

The table toolbar always appears above the table. The control is used for key actions that impact the entire table.

Usage

Use the table toolbar if:

  • There are multiple objects on your page and you need to edit only a single table.
  • You want to show actions as close to their corresponding controls as possible.
  • You need a title for your table.

Do not use the table toolbar if:

  • You are using single selection and have only one or two actions. In this case, place the actions on each line.

Responsiveness

To enable responsiveness, use the overflow toolbar control. For more information, see Toolbar Overview – Responsiveness.

Components

The table toolbar can contain several components, including a title and several types of button. Actions are grouped by the following action types:

  • Finalizing actions, such as Save or Cancel. Finalizing actions are app-specific and are used only if the table is editable.
  • Business actions, such as Edit or Create. Business actions can be app-specific or general object management actions.
  • Actions for managing the content, such as Sort or Filter. These settings are also known as “view settings”.
  • Generic actions, such as Export to Spreadsheet.

Between the groups, add a separator line.

The following content can be part of the table toolbar. Use only the content your users really need. For the remaining content, keep the order shown below:

  • Title
  • Variant management or content switch (for example, as used to switch between multiple views in a list report)
  • Search
  • Finalizing actions:
    • Save
    • Cancel
  • Business actions: Use this action type for app-specific actions. This group contains:
    • App-specific business actions
    • Actions for object management
      • Create (for new items) or Add (for existing items)
      • Edit
      • Delete (if the object itself is deleted) or Remove (if the reference to an item is removed)
    • Paste

The order of actions in this group is not “fixed”. Place the most important action first, followed by the second most important action, an so on. Try to keep Create/Add, Edit, and Delete/Remove together, but only if this is meaningful in your app.
Exception: Keep Paste as the last action in this category.

All possible components in the correct order

Behavior and Interaction

App-Specific Business Actions

If needed, you can define your own actions for the app. In this case, use text-only buttons with a short, unambiguous text for the action the button performs. A button text is usually a single-word verb (for example, Share). Note that text strings can be longer in other languages.

Table toolbar with app-specific buttons

Title

A title provides a short, meaningful summary of the content, mostly in a single word. To display a title, use the title control.

In addition, the title can be followed by an item counter (the number of items in parentheses).

Use a title if you need the table toolbar, and if the title of the table is not indicated in the surrounding area. To avoid repeating text, you can use a generic text for the table title, such as Items. Note that the title is truncated if there is not enough space.

Title with item counter in the table toolbar

Variant Management

In tables, a variant stores all the settings that define the table view, such as the column layout, column visibility, sorting, filter settings, and grouping. The variant management control enables users to load, save, and change variants. In most cases, variant management replaces the title.

Variant management in the table toolbar

Title and Variant Management

If you need both a title and variant management, place the variant management control directly after the title. Use a separator between the title and variant management.

Since using both controls often leads to truncation problems, this pattern is not recommended.

Title with variant management

Content Switch

To switch between different predefined views, use a select control or a segmented button. The content switch replaces the title and the variant management control. In the rare case that the content switch is shown together with a title, the content switch follows the title.

A predefined view contains settings for sorting, filtering, grouping, column layout, and column visibility. Nevertheless, in most cases, the content switch is just used for different filter settings like All, Mine, and Others. In this case, make sure that the content switch doesn’t interfere with other filter settings. For example, remove the corresponding filter from the filter bar. If possible, include an item counter per view.

Another common pattern for content switches are views like By X, and By Y, which are usually defined using group settings.

Use the segmented button and the select control as follows:

  • For a limited set of views (2-3), use the segmented button for desktop and tablet devices. Replace it with a select control if there is not enough screen space.
  • If the number of views can change or is larger than 3, use the select control.

For more information, see multiple views for list reports.

Segmented button with a counter
Segmented text button to switch content
Select control to switch content

Search

For tables with a large number of items, consider adding a search field. Use a search field only if there is no other way to search within the table (for example, if there is no additional filter bar).

Place the search field on the right side of the toolbar. Since the search field cannot be moved into the overflow menu, always provide a minimum width.

Ideally, search for results in all columns. As a minimum, search in all currently visible columns.

For more information, see Search.

Search in the table toolbar

Edit

There are several options for editing a table:

Edit a Single Item

To allow the user to edit a single item, show an icon-only Edit button at the end of the item (depending on the table control, use sap.m.ListItemBase, property: type, value: sap.m.ListType.Detail or sap.m.ListType.DetailAndActive; or row actions). The user can click the button to trigger the edit event. Use this event to make the item editable.

Editing a single item

Mass Editing

See: Mass Editing

Edit the Whole Table

To let the user edit a whole table, use a text-only Edit button. When the user triggers the edit action, switch the table to edit mode. In edit mode, do not show the Edit button and add the finalizing actions Save and Cancel instead. Remove any actions that are meaningless in edit mode. Keep the view settings available.

See also: Manage Objects.

 Table in display mode with 'Edit' as the most important action
Table in display mode with 'Edit' as the most important action
Table in edit mode
Table in edit mode

Create / Add

Use a text button for Create or Add actions. If the Create or Add action is a main function, never move it into the overflow.

See also: Manage Objects.

Table toolbar with 'Create' button
Table toolbar with 'Add' button

Delete / Remove

Use a text button for Delete or Remove actions. In most cases, Delete is used together with Create, while Remove is used together with Add.

If the Delete or Remove action is a main function, never move it into the overflow.

See also: Manage Objects

Table toolbar with 'Delete' button
Table toolbar with 'Remove' button

Show Details / Hide Details

Based on the responsive behavior of a table, data can be shown in the pop-in area. With the Show Details / Hide Details function, users can switch between a full data set or a reduced data set.

This function is part of the view settings group and is displayed at the first position of this group.

For more information, see Smart Table.

'Show Details' function to show all data in pop-in area
'Hide Details' function to reduce data in pop-in area

Sort, Filter, Group

When the user chooses one of these actions, open the view settings dialog or the P13n Dialog with only the corresponding settings.

  • If sorting, filtering, and/or grouping is a common use case in your app, offer one, two, or all three of the corresponding features. Do not provide these features if the table is expected to have only a small number of entries (up to 20 in most cases).
  • If filtering is a main use case, do not offer filtering on the table toolbar; use the filter bar instead.

Always use only the view settings you really need. For example, do not offer grouping if it does not support your use case.

Ensure a consistent user experience. When a user reopens the app and if variant management is not used, show the table with the same view settings that were last defined by this user.

For more information, see Table Personalization.

Triggers for the different view settings (sort, filter, and group)

Column Settings

Use the table personalization dialog or the P13n Dialog for adding, removing, and rearranging columns.

Offer column settings if you need more columns than those that fit on a tablet screen (which is usually five) to fulfill 80% of your main use cases. Before you do this, try to reduce the number of columns, for example, by using several lines per column or by using the pop-in feature.

Ensure a consistent user experience. When a user reopens the app and if variant management is not used, show the table with the same column settings that were last defined by this user.

For more information, see Table Personalization.

Table toolbar with 'Column Settings' button

Export to Spreadsheet

The Export to Spreadsheet action allows the user to export table rows and is represented by an icon-only menu button.

Table toolbar with the 'Export to Spreadsheet' menu button

Print

The action for printing table items is represented by an icon-only button.

Table toolbar with 'Print' button

Maximize / Minimize

To allow the user to show the table in full screen mode (property: ShowFullScreenButton), show the   Maximize button.  The user can exit the full screen by clicking the   Minimize button.

Table toolbar with 'Maximize/Minimize' button

View Switch

View switches are right-aligned in the toolbar and allow the user to switch between different chart types and different controls for displaying items (for example list, responsive table, grid list). Provide the view switch if a chart relies on subtle color differences or gradients of color. In these cases, users with visual impairments can switch to the table view.

Switches are optional and do not have to be provided if there is no need to switch between different charts or tables.

Define the number of chart types and switches with care. Offer only chart types that are meaningful for visualizing the respective data and that best assist the user. Ideally, offer no more than three types of visualization.

The sequence of chart type switches is not fixed. Sort them in order of importance.

The chart type currently in use is highlighted. To show this, use a segmented button with icons.

For more information about the icons and the chart types they represent, see Chart Toolbar.

Styles

On the table toolbar, use the following button styles:

  • If the single primary action for the whole page is on the table toolbar, use the emphasized button style.
  • if the single primary action for the whole page is not on the table toolbar, you can still highlight the most important button of the table toolbar by using the ghost button style.
  • For secondary actions and negative path actions, use the transparent button style.
  • For split buttons and menu buttons, use the transparent button style.
  • Do not use semantic button styles on the table toolbar.

For more information, see Button and Action Placement.

Guidelines

To indicate if an action can be applied to the current selection:

  • Enable the action if it always works, regardless of whether or not items are selected.
  • Enable the action if it can be applied to all selected items.
  • Enable the action if it can be applied to some of the selected items. If the action is triggered, show a message that informs the user how many items will be affected. Let the user choose whether to apply the action anyway or cancel the action.
  • Only disable the action if it can be applied to none of the selected items.

For more details, see UI Element States.

Message for an action that applies to a part of a selection

If the items are still available after the action was applied, keep them selected.

For further guidelines, see Toolbar Overview – Guidelines.

Resources

Want to dive deeper? Follow the links below to find out more about related controls, the SAPUI5 implementation, and the visual design.

Elements and Controls

Implementation

Search

A search is a means of accessing information quickly. If an amount of data is too large for users to find something just by scanning through it, you should consider providing a search function.

Search field
Search field

Usage

Use a search field (sap.m.SearchField) if you want to enable users to enter text to search for information. The search field is also the control of choice for filtering down a given amount of information.

Responsiveness

When suggestions are turned on, the suggestion list displays differently depending on the device type.

Size S (Smart Phones)

Clicking the search field opens a new full screen dialog in which items can be selected from a list of suggestions.

Size S
Size S

Size M (Tablets)

Suggestions are shown below the search field.

Size M
Size M

Size L (Desktops)

Suggestions are shown below the search field.

Size L
Size L

Types

SAP Fiori comes with two different search types.

  1. The manual search is triggered explicitly after the user enters text in the search field and clicks the Search button or presses the Enter key.
  2. The live search (also known as “incremental search” or “search-as-you-type”) is triggered by each character that the user enters or deletes. There is a default delay of 400 ms before sending the search data to the back end. This ensures better performance and optimizes user experience. 

Queries that are entered are used to search the back-end data for term matches (not case-sensitive). While a live search uses a “contains” approach, a manual search uses a “starts with” approach. “Contains” means that the result needs to match the query only partly to be a valid result. “Starts with” means that full terms of the result need to start with the entered query to be visualized.

Layout

The search input field (or search box) consists of two parts:

  1. The text input, which is left-aligned. Initially, the field shows a placeholder (Search). As soon as the user enters a character, this prompt text disappears. It appears again if the user deletes the entry.
  2. If a manual search is to be implemented, a search button with a magnifier icon is placed on the right side of this input control. The user clicks this button to trigger the search. In live searches, the magnifier icon is also placed here, but it functions more like an additional indicator to signify that this is a search input field. It also functions as an explicit search button if the user wants to search again for a query that has already been entered.

All item attributes defined by the app development team are searched. When the results are displayed, the items found do not necessarily have to show the attribute through which the item was found. The results are displayed in the same list that contained the original item set. Initial grouping and the order of the list are not affected by the search.

When the split screen is used, the search field appears at the top of the master list. In full screen mode, the search field is placed at the top of the page.

Behavior and Interaction

Entering a Search Term

Search terms can be entered easily into the input field. The search box then displays all full-text search terms. There is no line break and no truncation if the query is longer than the input field. Results might also be displayed that do not match the query in their title or subtitle. This might be because details can also be searched for. The user can see the matching terms in the specific details section.

Deleting a Search Term

The user can click the “X” icon  ) button to remove the text from the field. In the case of the live search, this also resets the search. In a manual search, deleting the search term and then triggering the search resets the search results.

Refreshing

If the Refresh button is available, the user can update the list without triggering a new search. This is usually needed when backend data changes quickly and often.

If the currently selected item is no longer available after the list has been refreshed, the next item in the line is selected. If no next item is available, the first item in the line should be selected next.

Search field with 'Refresh' button

On touch devices, the Refresh icon is not visible in the search field. In this case, Pull Down to Refresh is used instead. The Pull Down to Refresh arrow icon is animated and spins to signal that the user should release it.

Information
For information on how to manage leading and trailing white space (blanks) when copying and pasting text into input controls, please see removing leading and trailing white space.

Properties

The following methods are important.

For the live search:

  • attachLiveChange(oData?fnFunctionoListener?) Attach event handler fnFunction to the liveChange event of this sap.m.SearchField.
  • detachLiveChange(fnFunctionoListener) Detach event handler fnFunction from the liveChange event of this sap.m.SearchField.
  • fireLiveChange(mArguments?) Fire liveChange event to attached listeners.

For the manual search:

  • attachSearch(oData?fnFunctionoListener?) Attach event handler fnFunction to the search event of this sap.m.SearchField.
  • detachSearch(fnFunctionoListener) Detach event handler fnFunction from the search event of this sap.m.SearchField.
  • fireSearch(mArguments?) Fire search event to attached listeners.

If a Refresh button is needed:

To show the Search button:

To ensure the focus is set to input:

If the search is triggered automatically when the value of the field is changed (unlike the liveChange event, the change event is not fired for each key press):

  • attachChange(oData?fnFunctionoListener?) Attach event handler fnFunction to the change event of this sap.m.SearchField.
  • detachChange(fnFunctionoListener) Detach event handler fnFunction from the change event of this sap.m.SearchField.
  • fireChange(mArguments?) Fire change event to attached listeners.

Guidelines

  • Implement the live search whenever possible.
  • Use a manual search only if the amount of data is too large and if your app would otherwise run into performance issues.
  • Show an appropriate prompt text:Search if queries are sent to all connected services, or Search In: if the search is limited to a certain source or providing service.

Resources

Want to dive deeper? Follow the links below to find out more about related controls, the SAPUI5 implementation, and the visual design.

Elements and Controls

Implementation

Feed and Notes

Feeds and notes are commonplace in many SAP Fiori applications. The sap.m.FeedInput control allows users to input and post plain text, while the sap.m.FeedListItem control handles and displays this text. Both can be used individually, but they also complement each other well to create a simple feed or notes control.

Usage

Feed Input

Use the feed input if:

  • A user needs to input small amounts of text without formatting.
  • You expect multiple instances, such as notes or feed entries.

Do not use the feed input if:

  • The user needs to format the text (rich text editor).
  • You need only a single text box instance. In this case, use the text area (for multiple lines) or the text control (for a single line).

Combination of Both Controls (as Feed or Notes Control)

Use both controls if:

  • You need a feed to show textual posts.
  • Your users need to input notes.

Do not use both controls if:

  • You expect extensive social interaction in the feed.
  • Users need to reply at item level instead of creating a new post.
  • You want to display SAP Jam feeds.

In these cases, use the social timeline instead (requires SAP Jam).

Responsiveness

Due to their responsive behavior, both controls can be used in small and large view ports or screens.

For better usability, we highly recommend that you do not stretch the controls across the full width on large screens – 2/3 or even 1/2 works just fine. This can easily be achieved using the grid layout .

Feed – Size S
Feed – Size S
Feed – Size M
Feed – Size M
Feed – Size L
Feed – Size L

When the width of the available space falls below 25 rem (for example, in portrait mode on smartphones), the two controls respond as follows:

  • If a user image previously appeared in the feed input, it will be omitted in narrow screens to give the text field more space.
  • If there is no user image, there will be no visual change.
Feed input – Responsiveness

In the feed list item, the user’s name, image, and the time stamp move on top of the text. If there is no image, the name and time stamp are left-aligned together with the text.

Feed list item – Responsiveness – With image
Feed list item – Responsiveness – Without image

Layout

Feed Input

The feed input consists of:

  • A text input field with a placeholder (input prompt)
    Example: Add a comment
  • A Send button
  • An optional user image

You can also choose not to show user images at all. In this case, the size of the input area increases automatically.

Feed input – Layout – With user image
Feed input – Layout – With generic user image
Feed input – Layout – Without user image

Feed List Item

The feed list item consists of the user’s name and an optional picture of the user who wrote the note or update. The name can contain a link that triggers a quick overview of the user’s profile data. The actual text written by the user follows the name. Below it is a separate byline that can contain a time stamp and an attribute in the form of free text. This allows you to put in your own attribute, such as Approval, Internal, or External. Both the time stamp and the attribute are optional.

If the name is a link, the picture should also be linked with the same attributes.

Feed list item – With user image and linked name

If the user does not have a picture assigned, a placeholder is shown instead:

Feed list item – With generic user image and linked name

The name (and picture) can also be read-only, that is, without a link:

Feed list item – With user image but without links

If the app does not support user images, they can be omitted:

Feed list item – Without user image but with linked name

Here, too, the name can be read-only:

Feed list item – Without user image and read-only name

It’s also possible to display rich text (formatted text) in the feed list item. This feature should be handled with care as it allows for countless custom layouts.

Please see that you use it responsibly and provide your users with a consistent experience. Only deviate from the default layout and font if absolutely required by the use case.

Example use case: Render URLs as links.

Feed list item – Layout – Rich text
Information
The items in the feed list must be homogeneous. This means that they must contain the same layout and visualization. For example, it is not possible to have a feed containing both linked and plain names, or both user images and default images.

Special Case: Multiple Types of Notes

Apps sometimes need to discern between different types of notes. There is an easy way to allow users to choose which type they want to see or add to the list.

You can place a toolbar containing a select control at the top of the feed input control. From there, users can select the type of notes, such as Internal Notes or External Notes. The list of notes must contain only the type selected. If the user adds a note via the feed input, the type must be set automatically according to the selection.

Interaction – Note Types

Components

The feed input and feed list item do not contain subcontrols. However, you can easily combine them to create a simple feed or notes control.

Although the feed input counts as a single control, the input area inherits its behavior from the sap.m.TextArea control.

Behavior and Interaction

Send Message

Initially, the feeder contains a placeholder (input prompt), and the Send button is disabled, with reduced opacity.

Clicking into the input field puts the focus on the field and allows to start typing.

When the user starts to type, the placeholder disappears and the Send button becomes active and more prominent.

If the available width is below 25 rem (for example, in portrait mode on a smartphone), the picture is removed.

To send the text, the user must explicitly click the Send button. Pressing Enter on the keyboard (on-screen or physical) results in a line break.

Feed input – Behavior

Show More Text

When the text exceeds a certain number of characters (you can overwrite the default value), the rest of the text is truncated and a MORE link appears after the truncated section.

The MORE link indicates the possibility of expanding the section of the feed list item itself. Hovering over the link underlines it.

Show Less Text

When the user expands the text, the name of this link changes to LESS,  but still behaves the same way as before.

Both texts for the “MORE” / “LESS” links can be modified to suit a particular use case.  There is a possibility to use uppercase, lowercase or a mix of them.

MORE link (1)
MORE link (1)
MORE link (2)
MORE link (2)

Feed and Notes in Tables

In tables, users sometimes need to see if an object has a comment (or feed or note) without further navigation, and even be able to add/edit right from the table.

Add an additional column, named according to the type of user input, such as Comment, Note, or Feed.

Place a link inside each cell with the appropriate action (row: Comment, link: Comment/ row: Feed, link: Post).
If there can be more than one item, add a counter after the text as well (see example on the right).

This solution works with every table control.

Feed and notes in tables (1)

Optional:
Depending on the use case, it might help users if they can see the latest note. The responsive table allows the feed list item (sap.m.FeedListItem) to be used inside a cell.

Reduce the property “maxCharacters” to an amount that your table can handle.
Note that once the maximum number of characters has been reached, a MORE link allows users to expand the text. Technically, this is no problem for the responsive table, but you need to ensure that the layout of your page allows this kind of expansion.

Place a link below the feed list item to allow users to add something (as described above).

Feed and notes in tables (2)

When the user clicks a link, such as Comment or Note, display a dialog showing all comments (notes, feed entries, and so on) along with possible actions, such as Add or Edit, depending on your use case.

There are several ways to show notes (comments, feed entries, and so on) in a dialog:

  • You can use the feed list item (and feed input) as described in this article.
  • If only one single note is allowed, you can use the text area.
  • For a large feed, you can use the timeline control (SAP Jam is required for social features).

Actions On Feed List Items

Applications can define actions that users can perform on individual feed posts. The two most typical actions are Edit and Delete. Other actions can be introduced as required by the use case. To keep the feed as lightweight as possible, don’t overwhelm users with too many actions or complicated actions (max. 5 per post).

Interaction - Actions

Styles

By default, feed entries are separated by divider lines. We recommend that these separators remain enabled, since they help distinguish between individual posts. However, if your list is expected to hold only a handful of entries, you can disable the separators by setting the showSeparators property at list level (not at list item level) to none.

Guidelines

Because the feed list item is built on the basis of the standard list item, it inherits multiple properties that may not make sense in a feed use case.

Use only properties that are described in this article. Especially making the entire feed list item clickable can lead to functional issues and usability problems.

Don’t stretch the feed input or the feed list items across large screens (size L and beyond). This will have a negative effect on usability and readability. Instead, only use 1/3 or even 1/2 of the screen. Implement this with the grid layout .

If you display formatted text (rich text) in the feed list item, use formatting that is beneficial to users, not decorative formatting. Use formatting responsibly, and provide your users with a consistent experience. Deviate from the default layout and font only if absolutely required by the use case (example: render URLs as links).

Resources

Want to dive deeper? Follow the links below to find out more about related controls, the SAPUI5 implementation, and the visual design.

Elements and Controls

  • No links.

Implementation

Icon Tab Bar

The icon tab bar comprises a series of tabs that each link to a different content area or view. You can use it for navigation within an object, or as a filter.

There are two key use cases:

  • You want to let users navigate between different object facets in the object details area.
  • You want to let users filter lists, and give them the option of calling up the entire list, or only items with a specific attribute.

In both cases, the user switches between tab pages by clicking the respective tab.

Usage

Use the icon tab bar if:

  • Your business objects need to show multiple facets at the same time.
  • You want to allow the user to browse through these facets.
  • You need a prominent or very visual filter on top of a list.
  • You have clear-cut process steps that need to be visualized.

Do not use the icon tab bar if:

  • You plan to use only one single tab.

Responsiveness

The icon tab bar stretches horizontally, and soon runs out of space on small screens. It responds to limited space by offering a scrolling mechanism.

Responsiveness – Text tabs
Responsiveness – Icon tabs

In addition to the responsive overflow behavior, the icon tab bar can be forced into compact mode or even react dynamically to the application’s global density setting. See the Tab Density section for details.

When the screen space does not allow to show all tabs on the main tab bar, an overflow appears on the far right, containing all remaining tabs that do not fit on the screen.

Responsiveness – Overflow

Layout

The horizontal layout of the icon tab bar never changes. The tabs always appear side by side. However, there are several types of tab bar to choose from. These are described in detail below.

Types

You can use the icon tab bar control to build the following types of tab bars:

  • Text only
  • Icon tabs
  • Tabs as filters
  • Tabs as process steps

Text Only

The text-only variant is one of the most common types. It allows longer labels, and can also display counters next to the text to indicate the number of items on the tab page.

Unlike all other tab variants, the labels do not get truncated. The full text is always shown. As a result, you need to ensure that your labels do not become too long. They should still be easy to read on smaller screens.

If you use text-only tabs, make sure that the UpperCase property is disabled and that you enter the labels in title case (for example: Approval Flow).

Types – Text-only without counters
Types – Text-only with inline counters

Counters and Text Tabs

If counters are used, set the property HeaderMode to “Inline” so the counters appear in brackets after the labels.

Do not use the old layout that shows the counters on top of the labels (Headermode = “Standard”).

Do
Counters – Inline layout ('HeaderMode' set to 'Inline')
Don't
Counters – Old layout ('HeaderMode' set to 'Standard')

Icon Tabs

Icon tabs are also common tab types. These round tabs can be populated with any icon from the SAP icon font.

Labels are optional. If you decide to use labels, use them for all tabs. You can use counters as needed.

Types – Icons with counters

Please note that starting with SAPUI5 version 1.40, you should only use the horizontal type of label (icon and label side by side).

If your labels get truncated, consider using shorter labels or text tabs (without icons), since text tabs cannot get truncated.

Types – Icons with counters and labels
Types – Icon-only
Types – Icon-only

Tabs as Filters

If you build the tab bar as a filter, it can comprise two parts:

  • An “all” tab on the left (optional)
    This tab shows the total number of items, and describes the type of item (for example, 189 Products).
  • Tabs for specific filters
    Use the tab text to indicate the filter attribute.
    We strongly recommend showing a counter on every tab.
Types – Filter
Types – Filter

Tabs as Process Steps

You can also use the tab bar to depict a process. In this case, each tab stands for one step.

To connect the steps, use the triple-chevron icon ( ) from the SAP icon font (technical name: process).

Types – Process
Types – Process
Developer Hint
When using icons with labels, add a comment in the properties file to make editors and translators aware that space is limited.
Example: Label for icon tab on detail screen. Max 14-16 characters (depending on character width).

Test whether your labels and their translations are displayed in full, and do not get truncated.

Warning
The overflow behavior changed in SAPUI5 version 1.80. Tabs from the overflow are shown on the main tab bar as long as they are selected. This may disrupt the order of your process and give the impression of a false step order. We are working on a fix for this issue.

Hierarchies

The tab bar supports hierarchies, allowing multiple tabs underneath one main tab. This way, you can group several tabs together, with the main tab acting as a headline.

Subtabs

The example on the right shows the main tab Notes with two subtabs, Internal and External, with no specific hierarchy except for their order.

Types – Subtabs
Types – Subtabs

Nested Tabs

Nesting allows deeper hierarchies with indentations to indicate the level of each tab.

By default, the property maxNestingLevel is “0” (zero). To enable nesting, adjust this value to the highest level of nesting that your app allows.

Types – Nested tabs
Types – Nested tabs

Behavior and Interaction

Clicking a Tab

To navigate through the views, the user clicks the tabs.

Optional behavior: If the user clicks a tab that is already open, the container collapses. It opens again when the user clicks any tab.

Use the expandable property to specify whether users can collapse the tab container (default = “true”):

  • Let users collapse the container if there is additional content below the container, and the information inside the container is not always needed.
  • If there is no content below the tab container, set the expandable property to “false”.

The expandable property controls the initial state of the container. Do not change the default state (“true”).

Changing the Order of Tabs

You can allow users to rearrange the tab order in a desktop environment (property: enableTabReordering). If this feature is enabled, users can drag and drop tabs to reorder them, either directly on the tab bar or inside the overflow menu.

It is also possible to drag and drop tabs from the tab bar to the overflow menu and vice versa.

If nesting is enabled (property maxNestingLevel > 0), users can choose the level at which they want to drop a tab.

Dragging a tab activates a visual indicator for positioning the tab. For example, dragging tab 8 on top of tab 5 makes tab 8 the child of the now highlighted tab 5 (see image 1).

If the user drags a tab between two other tabs, the indicator shows the level at which level the tab will be nested (see image 2).

Interaction - Tab nesting using drag and drop (1 of 2)
Interaction - Tab nesting using drag and drop (2 of 2)
Information
Do not use this feature for tabs as process steps to ensure that consecutive steps do not get mixed up.

Styles

Tab Density

The default responsive design of the icon tab bar applies to both compact and cozy modes. However, in addition to this responsive behavior, the control can be forced into a compact mode, or even react dynamically to the application’s global density setting. This feature can be used to:

  • Save vertical space on the page (applies to both text and icon tabs)
  • Save horizontal space (icon tabs only; this is especially helpful when there are many tabs)
  • Generally use less space on mobile devices
  • Reduce noise when there are already more important visual elements on the screen (primarily icon tabs)

The property for the override is called tabDensityMode, which can be set to “Cozy”, “Compact”, or “Inherit”. “Cozy” is the default setting that renders the control in its regular dimensions. “Compact” reduces the control’s height and icon sizes (if applicable), even if there would be enough space for the cozy design. “Inherit” instructs the control to follow the global density mode defined for the application. For backward compatibility, the default setting is “Cozy”.

The following image shows some types of tabs with their default style (cozy, left) and the reduced density mode (compact, right).

Style – Tab density
Style – Tab density

Colors

The two different styles (round tabs and text only) are discussed in the Types section. In both cases, you can use semantic colors to give users additional orientation.

Only use semantic colors if it is important for users to know that they need to take action (for example, to indicate errors or critical situations requiring action). Otherwise, use the neutral default colors. For more information, see How to Use Semantic Colors.

Developer Hint
To apply semantic colors to the icons and the text-only tabs, you can use the property sap.ui.core.IconColor.

Example

In the example below, one step in the process is indicating an error. Since the other tabs have neutral colors, it is clear that they do not contain errors. Coloring them green to show that they are OK is unnecessary, and would reduce the severity of the red tab.

Styles – Colors
Styles – Colors

Guidelines

Apply the styles as follows:

  • Icons only: Use this option if you have only 4-5 tabs that can be very clearly identified by their icon. If a short description is needed, use icons and labels.
  • Text only: Use this option if you have more than 4-5 tabs, or if there are no clear icons to represent the content. The text-only style also allows for longer labels. Set the property HeaderMode to “Inline”.
Do
Counters – Inline layout ('HeaderMode' set to 'Inline')
Don't
Counters – Old layout ('HeaderMode' set to 'Standard')

If you use icon tabs, ensure the following:

  • The icons clearly identify the content on the tab pages.
  • Each tab has a unique icon. Do not use the same icon more than once.
  • The icons are easily distinguishable.
  • Any icons between tabs (for example, as separators or connectors) are visually very different from the icons on the tabs.
  • Either all or none of the icons have labels.

Implement the focus as follows:

  • By default, show the first tab as open. This is the initial setting provided by the control.
    Note: Technically, you can also override the initial selection. However, this is not recommended.
  • Later on, you can show the tab last selected by the user.

Additional guidelines:

  • Do not display a loading indicator above the tab while the number for the item count is loading.
  • Handle empty tabs as follows:
    • Hide tabs that do not contain any information, and do not allow the user to create content..
    • Show empty tabs that allow users to create content, such as notes or attachments.
  • Only use the tab bars to navigate between tabs. Do not use any other navigation links. For example, do not let users click an item in tab A that takes them to tab B. This type of cross-navigation inside a container is confusing, and cannot be handled by the back navigation.

Resources

Want to dive deeper? Follow the links below to find out more about related controls, the SAPUI5 implementation, and the visual design.

Elements and Controls

Implementation

HTML

The HTML control allows you to display rich text or add freestyle HTML to your apps. This helps to cover use cases that would otherwise not be possible with standard SAP Fiori controls.

Warning
If you opt to use freestyle HTML, you must make sure that standard capabilities such as theming, accessibility, and responsiveness are supported.

For more information, see Top Tips below.

When to Use

Information
Be aware that implementing custom content costs time and effort for development.

Use the HTML control to display:

  • (External) HTML content, such as work instructions or articles with images or videos.
  • User-created HTML content.
  • Content created with the rich text editor (as a live view during creation, or in read-only mode).
    (While formatted text only supports a limited set of tags, using HTML will give you the full set of HTML tags.)

Do not use the HTML control to display:

  • In-app help or explanations on how to use your app. Use the Web Assistant instead.
  • A simple and short text. Use the text control instead.
  • A semantically-colored text or a status. Use the object status instead.
  • An object name with a brief descriptive text. Use the object identifier instead.
  • A number or total. Use the object number instead.
  • A currency. Use the currency control instead.
  • A label. Use the label control instead.
  • A single headline. Use the title control instead.

Components

Where possible, reuse existing controls inside your freestyle content. Do not reinvent standard controls, such as buttons or popovers. Instead, use the the available controls that are described in the SAP Fiori Design Guidelines.

Behavior and Interaction

When creating freestyle content, always apply the SAP Fiori design principles. Design your interactions on the basis of these principles and build upon existing, established patterns.

If part of your content looks similar to an existing control, it should behave similarly. Do not change established interactions or patterns just because freestyle HTML allows you to, or because it looks more fancy. Users appreciate consistency.

Responsiveness

Using freestyle HTML comes with responsibilities. Making sure your content is responsive and adaptive is one of them.

If you have a large amount of content, consider an adaptive approach: Don’t try to cram all the content you show on a desktop into a mobile version of your app. Instead, think about how your customers would use this app while away from their PC. For more information, see Multi-Device Support.

Example

The following image showcases how freestyle HTML can be used to create step-by-step work instructions by combining formatted rich text and videos. If you follow the SAP Fiori design guidelines, the freestyle section integrates seamlessly into the SAP Fiori application (shown here as a schematic object page layout).

Freestyle HTML application example

Top Tips

Using freestyle HTML means that you are responsible for taking care of certain aspects that are otherwise covered automatically by standard SAP Fiori controls:

  • SAP Fiori design principles
  • Theming: Ensure correct theming if the HTML is part of the UI. This is not necessary if the HTML content is entirely user-created.
  • Accessibility: For example: contrast ratios, screen reader support, HCB
  • Multi-device support: Support all screen sizes for both touch- and mouse-enabled devices, including adaptive and responsive behavior.
  • Multi-browser support: Make sure your custom content is displayed correctly on all prevalent browsers.
  • Performance: Optimize performance and ensure that your custom content does not slow down the app or the user’s workflow.
  • Translatability: Make sure that your content is translated correctly.
  • Security: See the warning below.
Warning
By default, the HTML content (property: content) is not sanitized and is therefore open to XSS attacks. App teams must either sanitize the content themselves, or activate automatic sanitizing with the sanitizeContent property. For more information, see the API reference.

Related Links

Elements and Controls

Implementation

  • HTML (SAPUI5 samples)
  • HTML (SAPUI5 API reference)

Message Popover

The message popover control can display multiple messages of different types in one list. For example, it might show several messages related to entries in a form, or messages triggered by a finalizing action, such as Save.

The message popover is used in conjunction with a technical message manager, which populates the message list. If an error occurs at a validation point, the corresponding message is added to message popover automatically, without interrupting the user.

Users can browse messages by type and navigate to the message details. In some cases, they can also jump directly from the message to the affected field on the UI.

Message popover
Message popover

When to Use

Use the message popover if:

  • You want to display multiple messages to the user.
  • You do not want to interrupt users while they are performing an action.

Do not use the message popover if:

  • You need to interrupt the user. In this case, use a message box.
    (Typically, interrupting the user is only necessary for technical problems, such as network errors and connection issues.)

Components

(1) Filter bar
(2) Message short text
(3) Message subtitle
(4) Section/subsection on the UI
(5) Message button
(6) Navigation to message details
(7) Counter for aggregated messages

Components of the message popover

Filter Bar

Initially, the filter bar shows all the different message types in the list (1).

Segmented buttons at the top of the message popover allow the user to filter the messages by type (error, warning, success, and information).

List

Short Description

The short message text (2) provides a simple and helpful short message. It’s the same message as the one attached to the UI control where the issue occurred.

Subtitle

You can use the subtitle (3) to give your message an identifier. If the message relates to a specific field, show the label of the field where the error occurred. Based on the subtitle, the user should be able to identify the corresponding UI control on the UI (for example, the input field in a form).

Section/Subsection

Messages in the list are grouped by the section and subsection on the UI (4). This helps the user to find the part of the UI that triggered the message.

Navigation to Message Details

If message details are provided, the message popover automatically provides a chevron on the right-hand side for navigating to the message details page (6).

Aggregated Messages

If your app team wants to aggregate messages, they can use the counter property of each list item (7). Note that the message popover only provides the counter property. The aggregation itself must be implemented by the app team.

Message Button

If there are messages to display, the message button indicates the most critical message status in the list (5).

For example, if the list contains error messages, the message button inherits the error icon and semantic color. If the most critical message in the list is a warning, the message button shows the warning icon and corresponding semantic color, and so on.

In addition, the error button contains a count indicating the number of errors.

Message button types - Error with counter, warning, success, information

If there are no messages to display, there is no message button. In this case, the footer toolbar contains only the “normal” actions for the task.

Message Details

The message details page shows:

  • The message short text (1).
  • A more detailed message text to explain the issue and propose a solution (2).
  • An optional link to more information, such as app documentation (3).
Detail page of the message popover

Behavior and Interaction

When Does the Message Popover Open?

Form Field Validation

If one or more errors occur when the user fills out a form, the message button appears, indicating the message type of the most critical message. The message popover does not open automatically. For more information on the different validation points, see Form Field Validation.

Form field validation behavior

Finalizing Actions

If the user activates a finalizing action (such as Create, Save, or Submit), the message popover opens automatically to inform the user about the errors on the UI that need to be resolved first.

Message popover triggered by a finalizing 'Save' action

Navigation to the Second Page

If the message provides a long text from the back-end system, the user can navigate to a second page within the message popover. There, the user will typically find more information and help.

Navigation to the detail page of the message popover

Navigation to the Relevant Field

The navigation link takes users directly to the field on the UI that triggered the message. This can be a field in the visible area, a field somewhere else on the same page, or a field on another tab or screen.

Guidelines
Always add a navigation link, where possible.

For more information about the navigation, see Navigating to the Corresponding Field on the UI in the Message Handling article.

Developer Hint
Set the navigation link with the activeTitlePress event. This allows users to click the message text in both the first and second page of the message popover.
Navigation from the message text to a field on the UI

Responsiveness

Size S (Smartphone)

On smartphones, the message popover is automatically shown in full screen mode.

Full screen message popover on a smartphone

Top Tips

  • Whenever possible, provide a navigation link from the message to the relevant field on the UI.
  • Use the message subtitle to indicate the field label.
  • In forms, also highlight the individual fields, and change their value state according to the type of message. For more information, see Form Field Validation.

Related Topics

Elements and Controls

Implementation

Message Strip

The message strip is a control that is used as an information bar. It contains information about an object or a status and can be embedded within the detail area of an object or page.

Usage

Use the message strip if:

  • You want to provide information within the detail area of an object.
  • You want to inform your user about a status of an object.
  • You want to warn your user about an issue.

Do not use the message strip if:

  • You want to display information within the object page header, within a control, in the master list, or above the page header.

Responsiveness

The message strip is fully responsive. Icons within the message strip are displayed to the left (custom icons) or right (Close action) of the message.  Text and links behave differently and wrap.

If you place the control within the detail area, it will always use 100% of the width and react to the responsiveness of the container.

Message strip on a smartphone (size S)
Message strip on a desktop (size L)

Types

The following semantic types are available.

  • Information
  • Warning
  • Error
  • Success
Different semantic types and colors

Behavior and Interaction

Static behavior

The message strip acts as an information bar. If you want to display a status related to an object, keep the interaction static and do not show the Close button.

Static behavior used to display a status

Interactive behavior

Clicking the   Close button on the right-hand side hides the message strip.

Interactive behavior with 'Close' function

Accessibility

When an application adds a message strip dynamically, also notify screen reader users.

Use the following structure for the screen reader notification text:

“New information bar of type <Error / Warning / Success / Information>: <text of message>”

To avoid an endless screen reader announcement, send a short message summary with only the most relevant information.

Properties

sap.m.MessageStrip is limited to the following properties:

  • Property:showIcon – Allows you to display an icon before the text
  • Property:customIcon – Allows you to display an icon from the icon library
  • Property:type – Changes the semantic color and the icon in front of the message strip
  • Property:text – Adds text to the control
  • Property:link – Adds a link
  • Property:showCloseButton – Adds a Close button

Resources

Elements and Controls

Implementation

Message Toast

A message toast (sap.m.MessageToast) is a small, non-disruptive popup for success messages that disappears automatically after a few seconds.

Usage

Use the message toast if:

  • You want to display a short success message.
  • You do not want to interrupt users while they are performing an action.
  • You want to confirm a successful action.

Do not use the message toast if:

  • You want to display an error or warning message.
  • You want to interrupt users while they are performing an action.
  • You want to make sure that users read the message before they leave the page.
  • You want users to be able to copy the message content to the clipboard (such as a product or transaction number). In this case, use a success message dialog instead.

Responsiveness

The message toast has the same behavior on all devices. However, you can adjust the width of the control, for example, for use on a desktop device.

Layout

Position

The message toast is always centered horizontally at the bottom of the screen.

Message toast on a desktop

Width

The basic width of the toast is 15 rem. Although the app can adjust the width, we recommend setting it to no more than 35 rem.

For longer success messages, adjust the width of the toast to make the message easy to read (for example, on a desktop device).

Behavior and Interaction

Choreography

When an action is successful, the message toast fades in and out automatically. The timing and duration of the message toast is defined by the app.

Navigation

In some scenarios, the action that triggers the message toast also triggers navigation to a different page (for example, after a save or submit action).

In this case, always navigate first, and then show the message toast on the target page.

Only show the message toast on the same page if no navigation is involved.

Exception: success message dialog

If you need to interrupt users before they leave the current page, do not use the message toast, but a message box (sap.m.MessageBox, property: type – success), which includes a success message. For more information, see message box.

Information
Only put a success message in a message box if your use case requires explicit user interaction, such as copying an order number to process it. We strongly recommend using a message toast where possible.

Animation

Set the duration of the animation according to the length of the message text: the longer the text, the longer the duration should be. The message does not react to the user’s focus.

Guidelines

Message Toast Texts

To make the toast message easy to scan, keep the text as short as possible. Remember that the user will not have time to take in very much detail.

Do not use the word “successfully” in the message text. This is implicit in a success message.

Patterns

For standard actions (such as create, save, delete, or send), we recommend using the following patterns, depending on your use case.

Use Case Use Case Variant Pattern (EN) Example (EN)
Single item Object name is not needed.

Hint: If the name or ID is not crucial feedback in your context, leave it out.

[object] [action taken] Sales order created
Object name is needed.

Hint: If you mention the object name, you can often leave out the object type (usually obvious in the context).

[name] [action taken] SAP added to customer group
Multiple items [item count] [objects] [action taken] 2 sales orders were deleted.
Multiple actions Single items, object names are not needed 1 [object] [1st action taken], 1 [object] [2nd action taken] 1 product added, 1 product removed
Single items, object names are needed.

Hint: Only include object names if the user really needs the specific feedback.

[object] [name] [1st action taken], [object] [name] [2nd action taken] Product A was added, product B was removed.
Multiple items [item count] [objects] [1st action taken], [item count] [objects] [2nd action taken] 2 products added, 3 products removed

Notes:

  • The exact phrasing will depend on your target audience and the conventions in your app family. If an action is repeated regularly by a heavy users, be as brief as possible (for example, Order deleted). If your app is typically for occasional users, a full sentence might be more appropriate (for example, Your request has been sent to the support team.).
  • Bear in mind that long object names can increase the length of the message toast. Remember to allow for this when defining the toast duration. If long or multiple object names make the toast too cumbersome to read, leave them out. If you really need to list them in a success message, use the success message box instead.
Do
Toast without ID
Toast without ID
Don't
Do not use
Do not use "successfully"
Do
Toast with item count
Don't
Do not list names of multiple items

SAP Fiori Elements

If you are using SAP Fiori elements, remember to replace the “object” placeholder with your business object.

For more information, see SAP Fiori Elements – Mandatory Adjustments.

Do
Replace
Replace "object" with your specific business object
Don't
Do not leave the
Do not leave the "object" placeholder

Properties

You can change the values of the following properties. Only change the values if the standard values don’t work for your use case.

Position: We recommend that you always use the initial value (horizontally centered, at the bottom of the page).

Duration: The standard value is 3,000 ms. You can set a duration of more than 3,000 ms, but do not use less than 3,000 ms.

Width: The standard width is 15 em. You can extend the width, but do not use more than 35 em.

Offset: Do not change this value.

Auto-close: True/false

Example of a message toast

Resources

Want to dive deeper? Follow the links below to find out more about related controls, the SAPUI5 implementation, and the visual design.

Elements and Controls

Implementation

Message View

Intro

You can use the message view to display messages that are not related to form or table fields. These messages are triggered in response to a user action.

Although the message view can be embedded within various controls, we recommend that you use it only within a dialog.

Message view
Message view

Usage

Use the message view if:

  • You want to display multiple messages triggered by an action within a disruptive dialog.

Do not use the message view if:

  • You want to display messages for form field validation. Instead, use the message popover.
  • You want to display a single message that interrupts the user. Instead, use the message box.

Responsiveness

Size S (Smartphone)

The responsiveness of the message view is determined by the dialog container in which it is embedded.

Layout

Filtering

Multiple Message types – Filtering by Message Severity

If different types of message are available, users can filter messages by type (error, warning, success, and information) using the segmented buttons at the top of the message view.

Messages of different types can be filtered using the segmented buttons.

One Message Type Only – Filtering Hidden

The filter bar is hidden if there is only one type of message (for example, only errors).

The filter bar is hidden if all messages are of the same type.

List

Short Description (1)

The short description comprises a simple and helpful text.

Subtitle (2)

The subtitle comprises a description that helps users to identify the object they are looking for.

Navigation to Second Page (3)

If there is a long text, the message popover automatically provides an arrow on the right for navigating to the message details.

Aggregating Messages (4)

You can aggregate messages by filling out the counter property of each list item.

Developer Hint
The message popover control only provides the counter property. The aggregation must be implemented by the app team.
Message view list items

Detail Page of the Message View

Users can filter messages by type (error, warning, success and information) using the segmented buttons on top of the message view.

The detail view has the following parts:

1. Back-end short text

2. Back-end long text

3. Optional link

Message view detail page

Behavior and Interaction

Navigation to the Second Page of the Message View

If the backend contains a long text, the user can click the arrow/chevron on the right-hand side to view the full text in the second page of the message view.

Navigation to second page of the message view

Life Cycle

We recommend that messages no longer be displayed after the user closes the dialog (sap.m.MessageBox/sap.m.Dialog).

Resources

Want to dive deeper? Follow the links below to find out more about related controls, the SAPUI5 implementation, and the visual design.

Elements and Controls

Implementation

Message Box

The message box (sap.m.MessageBox) is a special dialog that allows you to display messages to the user. Compared to the message popover (sap.m.MessagePopover), you can use the message box to display messages that are not related to a field on the UI, such as technical errors.

Formulate messages in plain language (no code), describe the issue precisely, and suggest a constructive solution. Always help your user to recognize, diagnose, and recover from messages. Bear in mind that no message is always preferable to even a good message. When you design your apps, aim to prevent problems from occurring in the first place.

Usage

Use the message box if:

  • You want to display non-field-related messages.
  • You want to interrupt the user while he or she performs an action.
  • You want to display error, warning, success, confirmation, or information messages.
  • You need to interrupt the user for some other reason.
  • You need the user to acknowledge the message.
  • You need the user to make a decision.

Do not use the message box if:

  • You want to display a short success message. (Use a toast instead. For more information, see message toast.)
  • You can show the message directly in a form field.

Responsiveness

The sap.m.MessageBox control has the same responsive behavior as the sap.m.Dialog control. The message box should only be opened in modal mode. Its basic width is 25 em. For more information, see dialog.

Types

The following categories of messages are available:

  • Error
  • Warning
  • Success
  • Information
  • Confirmation

Error Message

Error messages can be triggered after the user has entered incorrect data or a system error has occurred. They should interrupt the user by displaying a dialog. A final action such as Submit cannot be carried out until the user has rectified the error.

Control: sap.m.MessageBox
Icon: sap-icon://message-error
Title: Error
Stretch: False (no full screen on all devices)

Error message with one action
Error message with two actions

Text guidelines for an error message:

  • Do not just describe the problem; tell the user how to resolve it.
  • In the short text, speak the language of the end user. Do not include system or configuration details.
  • If the solution is more involved or technical, add a long text.
  • Do not repeat the short text in the long text. They both appear together on the screen.

Warning Message

Warning messages highlight potential issues, but the user can still continue. This includes unintended data loss scenarios.

Control: sap.m.MessageBox
Icon: sap-icon://message-warning
Title: Warning
Stretch: False (no full screen on all devices)

Use cases for warnings

a) No decision required: Formulate the message as a statement.
Button(s): OK

Warning message with 'OK' button

b) Decision to continue required: Formulate the message as a statement.

Button(s): OK, Cancel

Warning message with 'OK' and 'Cancel' buttons

c) Specific decision required, with one action

Use a relevant action button. The message may also be formulated as a question.
Button(s): Leave Page, Cancel

Warning message with action and 'Cancel' buttons

Success Message

Success messages give feedback to the user that an action has been executed. The user needs to acknowledge the message.

Control: sap.m.MessageBox
Icon: sap-icon://message-success
Title: Success
Stretch: False (no full screen on all devices)
Button(s): OK

Success message
Success message
Information
You should generally use a message toast (sap.m.MessageToast) to display success messages instead of a dialog (sap.m.Dialog).

Information Message

Information messages provide information the user needs to acknowledge, but which does not involve a decision. The message provides information that is useful and relevant, but never critical.

Control: sap.m.MessageBox
Icon: sap-icon://message-information
Title: Information
Stretch: False (no full screen on all devices)

Button(s): OK

Information message
Information message

Confirmation Message

Confirmation messages prompt users to confirm an action that they have triggered. The title of the message box already includes the action that has to be confirmed, such as an intended deletion or an approval.

Control: sap.m.MessageBox
Icon: sap-icon://question-mark
Title:  (such as “Approve”, “Reject”, or “Delete”)
Stretch: False (no full screen on all devices)

Button(s): Approve, Cancel

Confirmation message

Confirmation Message with “Note” Section

Warning
The image belows shows a “Note” section which allows the user to add notes, for example in a “Reject” process. This feature is not provided by the sap.m.MessageBox. Instead, you can use a normal sap.m.Dialog and place those controls inside the confirmation message.

Confirmation messages prompt users to confirm an action that they have triggered. The title of the message box already includes the action that needs to be confirmed, such as an intended deletion or an approval.

Control: sap.m.Dialog
Type: Message
Icon: sap-icon://question-mark
Title:  Such as “Approve” or “Reject”
Stretch: False (no full screen on all devices)

Button(s): ApproveCancel

Confirmation message with note

Confirmation for “Delete”

If the user clicks Delete, display a “Delete” dialog that confirms the delete action.

Control: sap.m.MessageBox
Icon: sap-icon://message-warning
Title: Delete
Stretch: False (no full screen on all devices)

Button(s): Delete, Cancel


Use cases for delete confirmation messages in object page and list reports

a) No context is available. For example, neither the ID nor the description of the business object are available at the time of deletion.
Body text: Delete this <object>?

Confirmation for 'Delete' action

b) The ID of the object is available.
Body text: Delete <object> <object ID>?

Confirmation for 'Delete' action with object ID

c) The object ID and description are both available at the time of deletion.
Body text: Delete <object> <object ID> “<object description>”?

Confirmation for 'Delete' action with object ID and description
Developer Hint
The default text in SAP Fiori elements will be slightly different, usually using the default term “object” to designate the item to be deleted. When using SAP Fiori elements, replace “object” with the correct business object name. For more information, see Introduction to SAP Fiori Elements – Adjustments.

Components

Show Details button

The message displayed for the user should provide sufficient information to ensure that the user knows what has happened. A message box without an explicit details section should be sufficient. Therefore, the Show Details link is only shown if detailed information is available that differs from the message text and is important for the user.

If details are available, the application has three options to display the text. Text can be displayed as:

  • Plain
  • Formatted
  • The original code format
Message details - Plain text
Message details - Formatted text
Message details with code excerpt

Resources

Want to dive deeper? Follow the links below to find out more about related controls, the SAPUI5 implementation, and the visual design.

Elements and Controls

Implementation

Avatar

The avatar is a control for displaying images. These can be user profiles, user initials, placeholder images, icons, or business-related images, such as product pictures.

Usage

Use the avatar to display:

  • An image, initials, or placeholder for a user
  • Standardized images for business-related content (such as products, parts, product and company logos, ad campaign images, …)
  • Icons
  • Images with a transparent background
  • Placeholder images

Do not use the avatar if:

  • You want to include an image for any other use case. Instead, use the image control.
  • You want to display pictures in a carousel. Instead, use the carousel control.
  • You want to show an interactive icon. Instead, use the button with an icon inside.
Examples of a user image, user initials, and standard user placeholder icon
Potential product image and product image placeholder
Icon
Icon

Responsiveness

The avatar control is adaptive and has five predefined sizes. These are the same for both compact and cozy form factors:


Size rem Use for images in…
XS 2 rem Table list items
Card list items
S 3 rem Card headers
Card list items
M 4 rem App headers for small screen sizes
L 5 rem App headers for normal screen sizes
XL 7 rem App headers for large screen sizes

If your use case requires it, you can also set a custom size.

Predefined sizes: XS, S, M, L, XL

Image Fit

You can use the imageFitType property to specify how images fit to the avatar. There are two options: Cover (default) and Contain.

Cover

The size of the image is scaled up to completely cover the control area. As a result, parts of the image may be outside the shape.

Use the Cover fit type if the focal point is in the center of the image.

Contain

The image is scaled down to fit into the control area. The entire image is displayed, but might not fully fill the shape. In this case, the control displays a default background color. The image itself is always centered inside the shape.

Use the Contain fit type for product pictures that need to be displayed in full.

Product image with the fit type 'cover' (left) and 'contain' (right)

Types

Avatar – User Image, Initials, or Placeholder

An avatar is a visual representation of a user in the digital space. Usually, an avatar displays the user in one of the following ways:

  • A user photo
  • The user’s initials
  • A placeholder icon instead of the user’s personal data (photo or initials)

Always display avatars in a circle. This ensures that all users are represented equally on the user interface.

Initials

User image, user initials, and standard user placeholder icon

The initials stand for the first name(s) and last name(s) of a person – for example, JD for Jane Doe, or MvV for Marjolein van Veen. Which name comes first depends on the language-specific settings.

Initials can have up to three alphabetical characters (A-Z, a-z). If more than 3 initials are required for longer names (such as Anna María Agustí Suárez), the gender-neutral placeholder icon is displayed instead. The placeholder is also used if the three letters don’t fit into the circle (for example, WWW).

Some languages don’t build on an alphabet, or don’t use initials at all. In such cases, the gender-neutral person icon is displayed instead.

User initials with 1, 2, and 3 characters

Business Images

Business images display a product, company, object, logo, or other business-related content.

Always use a square for business images.

Examples of product images

Placeholder for Avatar and Business Images

Placeholder images are used for both avatar and business images when no other image is available.

  • The default placeholder for an avatar is a gender-neutral person icon inside a circle.
  • The default placeholder for a business image is a neutral product icon inside a square.
Default person and product placeholders

You can specify your own the default placeholder icon for business images.

Always replace the default product icon if there is a more suitable icon for your use case and industry.

Product placeholder images with custom icons

Placeholder Background

By default, the placeholder background color is set to blue (accent color 6). However, to add more visual variety to the UI, you can change the background color using one of the following options:

  • Accent colors – You can specify one of 10 different accent colors as the placeholder background color.
  • Random color – The control automatically picks a random color from the accent color palette.

All accent colors can be themed.

User initials in all ten accent colors

Placeholder for Decorative Images in the Content Area

Use the background color ‘placeholder’ for decorative images in the content area, such as images in articles or longer descriptions. In these use cases, the primary focus is on the text and the image content is secondary.

Decorative image in the content area
Placeholder image for secondary content

Images with Transparent Background

You can display images with a transparent background. This can be useful for displaying descriptive illustrations and decorative pictures, for example.

Image with transparent background

Icons

You can use the avatar to display non-interactive display icons. Use the background color ‘placeholder’ to display the icon.

If you want to put an action on the icon, use the button with an icon inside instead.

Exemplary icons
Exemplary icons

Badge

If an avatar is clickable, you can show an optional badge and icon.

  • Use a badge to indicate that the avatar is interactive.
  • Use an icon to indicate the action triggered by clicking the avatar.

This feature gives users visual affordance of the available action, and is particularly useful for images. To ensure that the image and the badge icon are properly displayed, don’t use the badge for any avatar sizes smaller than S.

When you use a badge and icon, always provide a corresponding tooltip for your avatar to indicate the action.

Use the following standard icons and tooltip texts:


Icon Tooltip Action
  Edit Image Edit the image. This can include multiple options, such as replacing an image, cropping, visual effects, or uploading a new image.
  Take a Picture Take a photo.
  Zoom In Zoom into the image.
Avatars with badges
Avatars with badges
Avatars with badges and edit (left), camera (middle), and zoom in (right)

Guidelines

  • If you use a custom avatar size with initials or icons:
    • Make sure that the font size is consistent with the size of the control itself.
    • If your custom size is between two predefined sizes, use the font size for the smaller predefined size.
      Example: If your avatar is 5.5 rem (between sizes L and XL), use the font size for size L (2 rem).
  • Accessibility: Provide an alternative text for each avatar image for cases when the image is not available or can’t be displayed.
  • If the avatar is interactive, provide a tooltip to indicate the action (for example, Edit Image or Take a Picture).
  • Optimize high-resolution images to avoid unnecessarily large files. Large image files can severely impede page performance.
Do
Custom placeholder size with appropriate custom font size
Don't
Custom placeholder size, but icon is too small

Styles

You can add a very subtle border to the avatar (property: ShowBorder).

Images with optional borders

Resources

Want to dive deeper? Follow the links below to find out more about related controls, the SAPUI5 implementation, and the visual design.

Elements and Controls

Implementation

Responsive Table

The responsive table is the default table in SAP Fiori. It contains a set of line items and is fully responsive. Depending on the scenario, users can also navigate from the line items to further details.

A line item contains several data points sorted into columns. A data point refers to a unit of information, such as a number, a text, a unit of measurement, and so on, which can be used to form the content of a tableform or other control. One data point is usually displayed by a control, such as a text, object status, or input field. A control can display more than one data point, for example, by concatenating text.

In contrast to traditional tables, a “cell” of the responsive table is not limited to displaying only one control, and therefore a single cell can present far more than one data point.

Responsive table
Responsive table

Usage

Use the responsive table if:

  • You need a table. The responsive table is the default table in SAP Fiori.
  • You need to use various controls inside a line item, such as micro charts. By contrast, the analytical table supports only a very limited set of controls.
  • The focus is on line items, not on cells. The responsive table is optimized for viewing complete items on all devices.
  • Selecting one or more items is a main use case and details are needed to choose the correct item.
  • Line items are independent of each other and no operation across columns is needed.
  • You want to have only one implementation for all devices. As the name suggests, the responsive table is responsive.

Do not use the responsive table if:

  • The main use case is to select one item from a very small number of items, without viewing additional details. In this case, a select or combo box might be more appropriate.
  • The main use case is to select one item from several items, with the possibility of viewing only a few details per item. In this case, a list might be more appropriate. Pay attention to the layout of the list item to ensure that it has a pleasant appearance.
  • The cell level and the spatial relationship between cells is more important than the line item. In this case, use the analytical table or grid table. Examples include spreadsheet analyses and waterfall charts. Note that neither the analytical table nor the grid table are fully responsive. Both are only available for desktops and tablets, so you will need to take an adaptive approach by offering an additional UI for smartphones.
  • You expect the table to contain more than around 1,000 rows. Try using the analytical table or grid table instead; they are easier to handle, perform better, and are optimized for handling large numbers of items.
    Note that neither the analytical table nor the grid table are fully responsive. Both are only available for desktops and tablets, so you will need to take an adaptive approach by offering an additional UI for smartphones.
  • Comparing items is a major use case. In this case, the analytical table or grid table might be more appropriate because each cell contains only one data point. By contrast, the responsive table offers greater flexibility within line items, including the ability to add more data points per cell and the pop-in function. Both make comparisons more difficult. Note that neither the analytical table nor the grid table are fully responsive. Both are only available for desktops and tablets, so you will need to take an adaptive approach by offering an additional UI for smartphones.
  • Data needs to be structured in a hierarchical manner. In this case, a tree table might be more appropriate. Although the analytical table can have several grouping levels, it is not as flexible when nodes at several levels contain child nodes. Note that neither the analytical table nor the grid table are fully responsive. Both are only available for desktops and tablets, so you will need to take an adaptive approach by offering an additional UI for smartphones.
  • You need an overview of a large amount of data. In this case, use a chart.
  • You just need it for layout reasons. In this case, use a layout container such as a horizontal layout or a vertical layout instead.
  • You need read-only or editable field-value pairs. In this case, use a form instead. The responsive table is not optimized for form-like input navigation.
Don't
Don't use a responsive table as a form

See the table overview to decide which SAP Fiori table is most suitable for your needs.

Responsiveness

The responsive table is optimized for viewing one line item at a time with no scrolling or only vertical scrolling, irrespective of the display width.

On smartphones, only the most important data remains in the one-column or two-column table, while all other data is moved to the space between two item rows, known as the “pop-in area”.

In this area, data for the corresponding cell is provided as a label/value pair. The label is defined by the column header, and the value is taken from the corresponding cell. Labels can be displayed next to the value or above the value.

Within the pop-in area, the label/value pairs can be displayed in the following ways (sap.m.Table, property: PopinLayout):

  • Block: Label/value pairs are listed one below the other.
  • GridSmall: Label/value pairs are displayed next to each other in equally spaced grid cells. An additional column is shown for each 13 rem of available width (208 px with default browser settings). If the number of grid cells exceeds the available width, the grid cells wrap. On S size, this layout transforms automatically to a block layout.
  • GridLarge: The display logic is the same as for GridSmall,, but grid columns come with a larger minimum width (26 rem instead of 13 rem).

In all layouts, you can show the labels next to or above (recommended) the corresponding data.

The responsive table uses all the available space, and does not provide any padding. If there is space around the table, it comes from the spacing defined for the surrounding layout container.

Information
The GridSmall and GridLarge layouts are not available in all browsers. If the chosen layout is not available, it is automatically changed to Block layout.
Responsive table displayed on a smartphone (size S)
Responsive table displayed on a tablet (size M)
Responsive table displayed in compact mode on a desktop computer (size L)

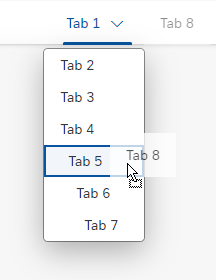
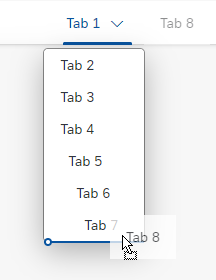
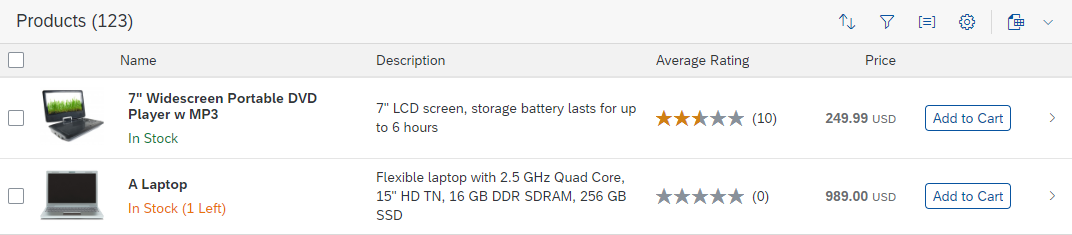
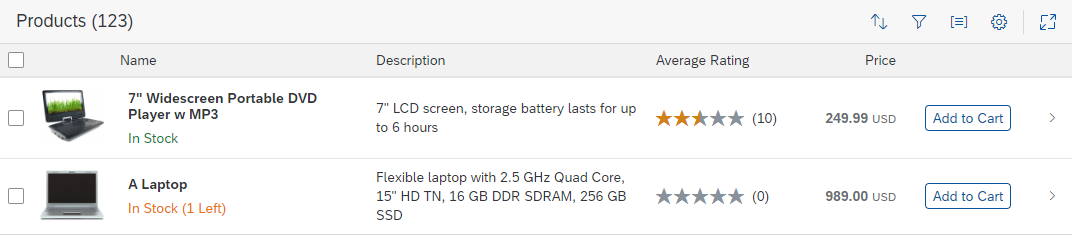
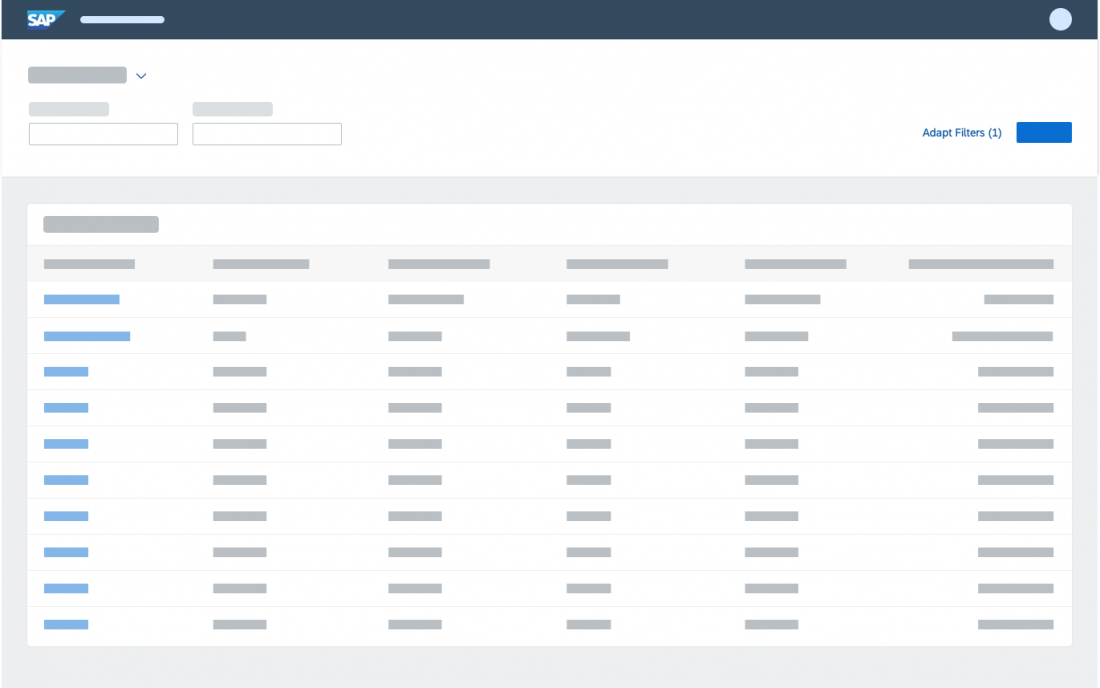
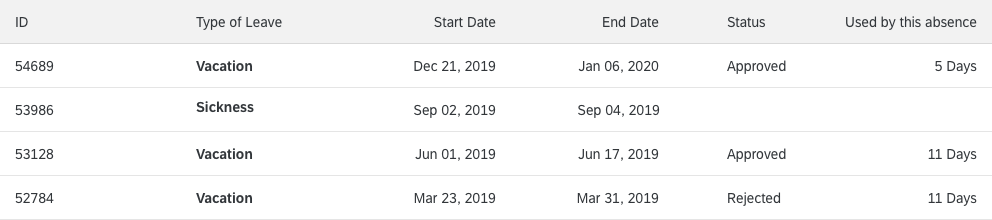
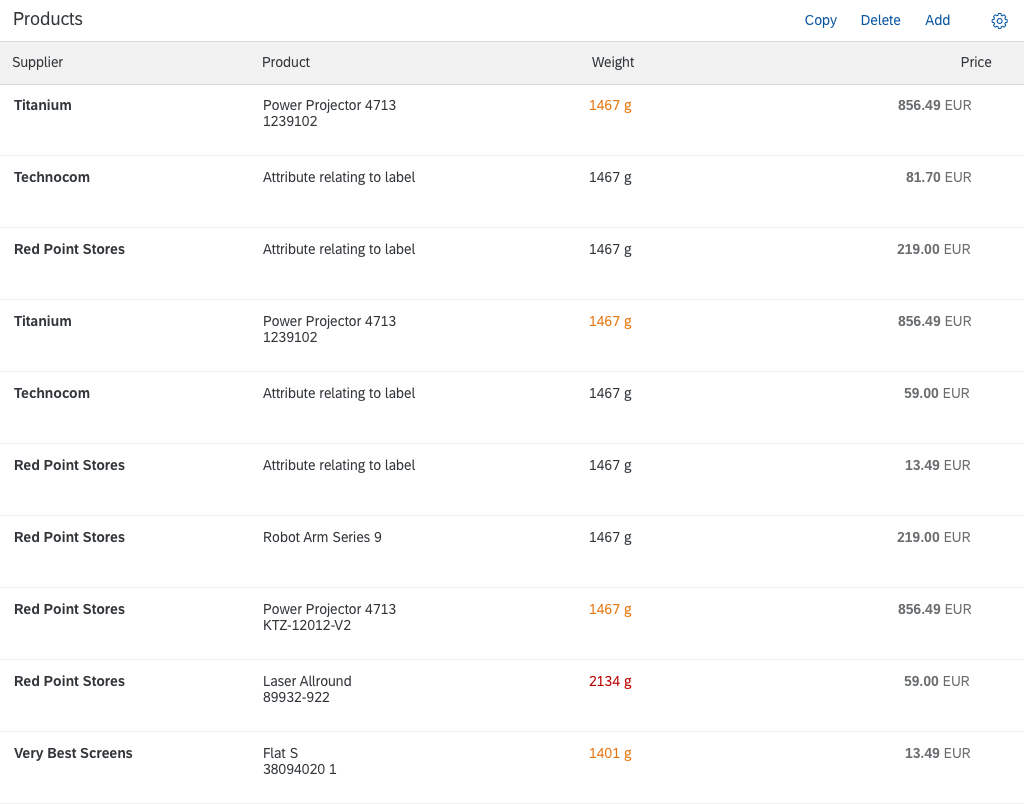
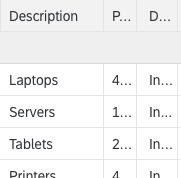
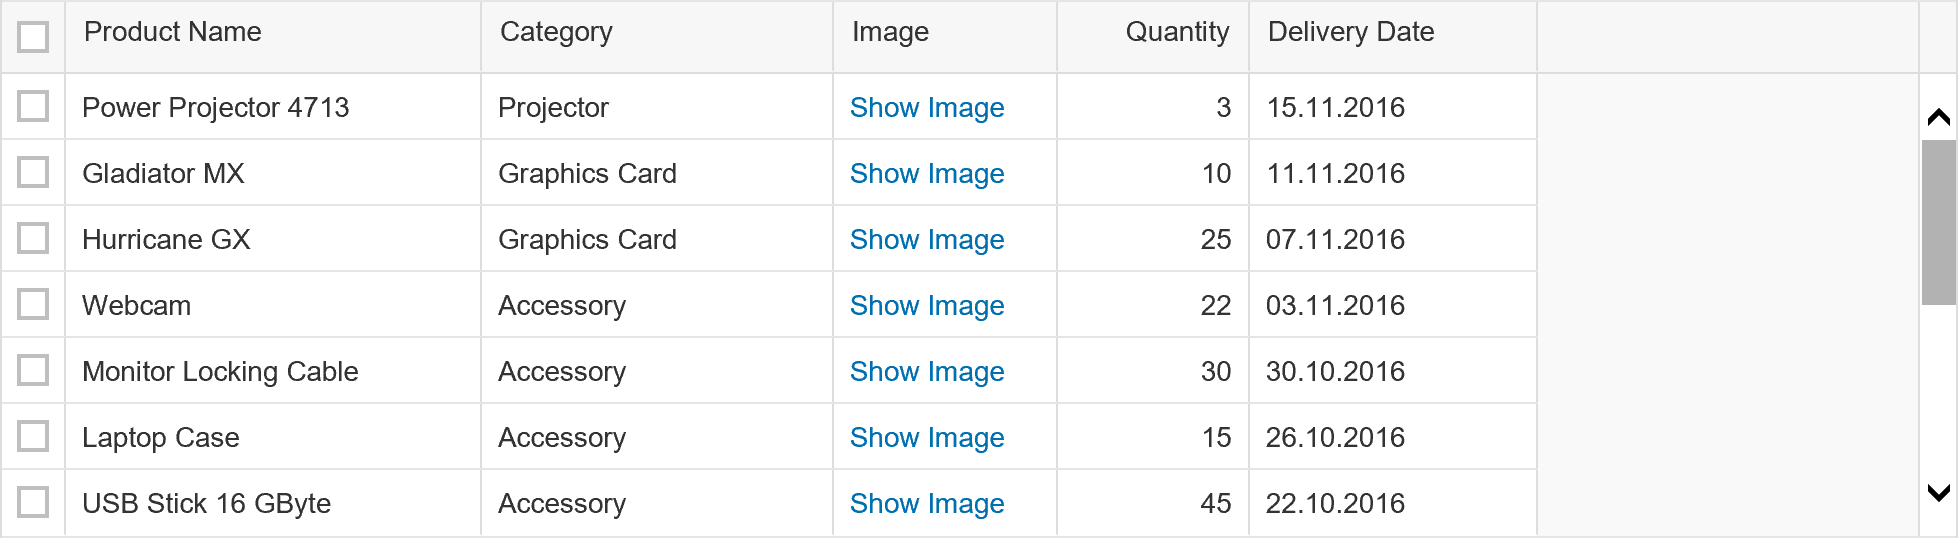
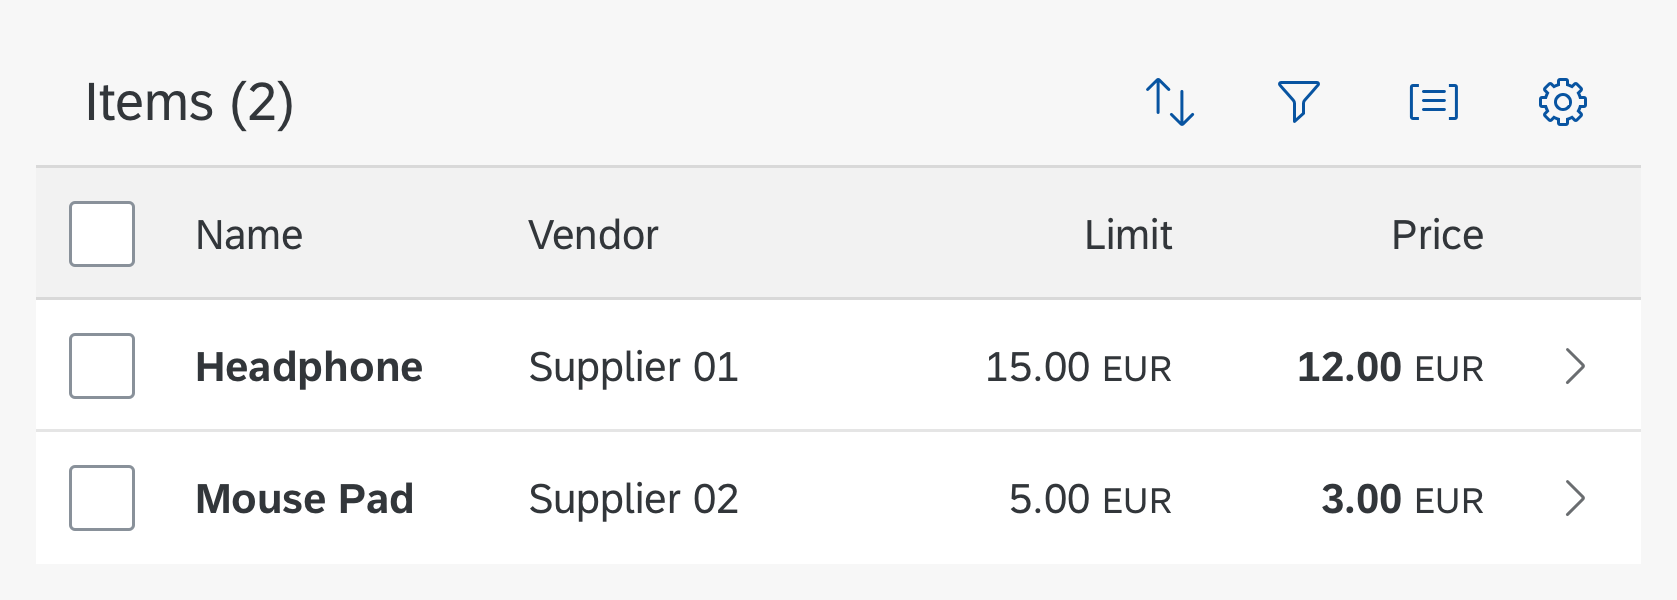
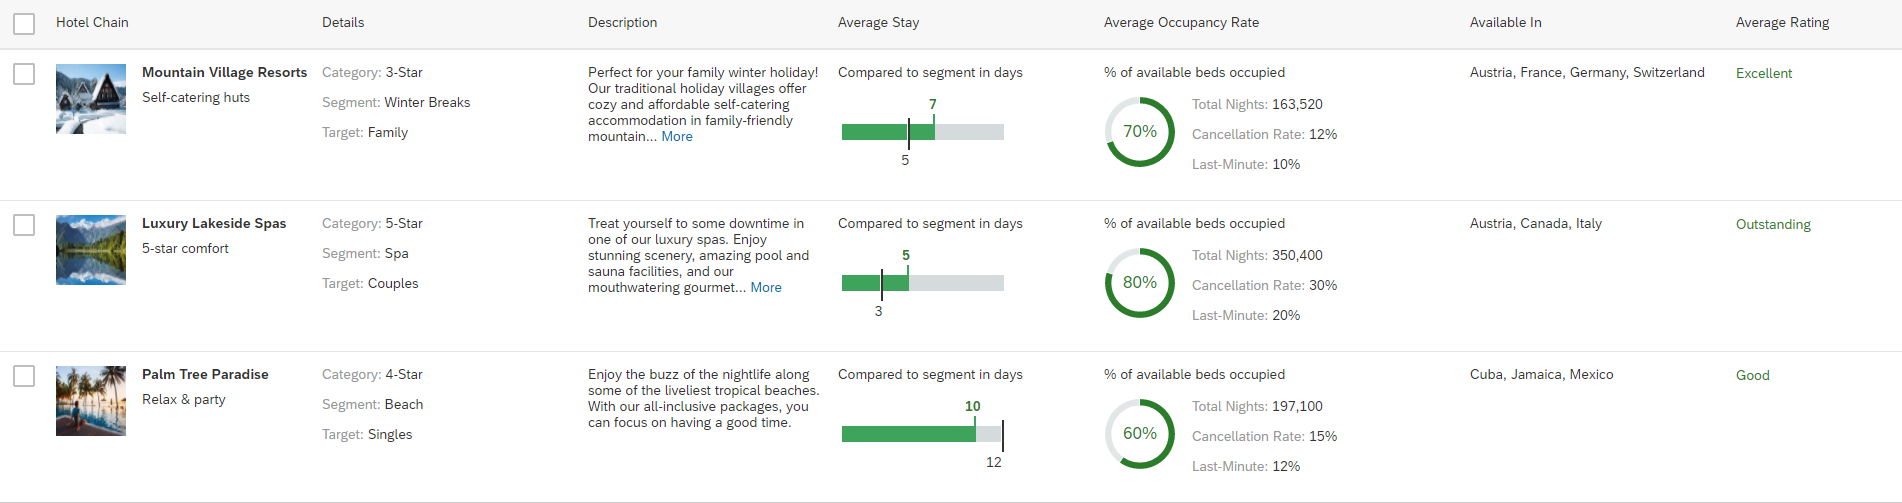
The responsive behavior is optional. If it is not used, the responsive table just minimizes all visible columns until they are no longer readable.

There are two ways to configure responsiveness: auto pop-in mode and manual pop-in mode (sap.m.Table, property: autoPopinMode).

The auto pop-in mode ensures responsiveness automatically and is sufficient in most cases. You can still influence the behavior per column, but only to a limited extent.

The manual mode is more flexible, but needs are more configuration. This configuration becomes more cumbersome when table columns can be shown/hidden or re-ordered. On the other hand, only the manual mode allows you to:

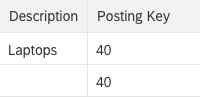
  • Let more than one column stay in the tabular layout
  • Move more than one column into the pop-in area at once

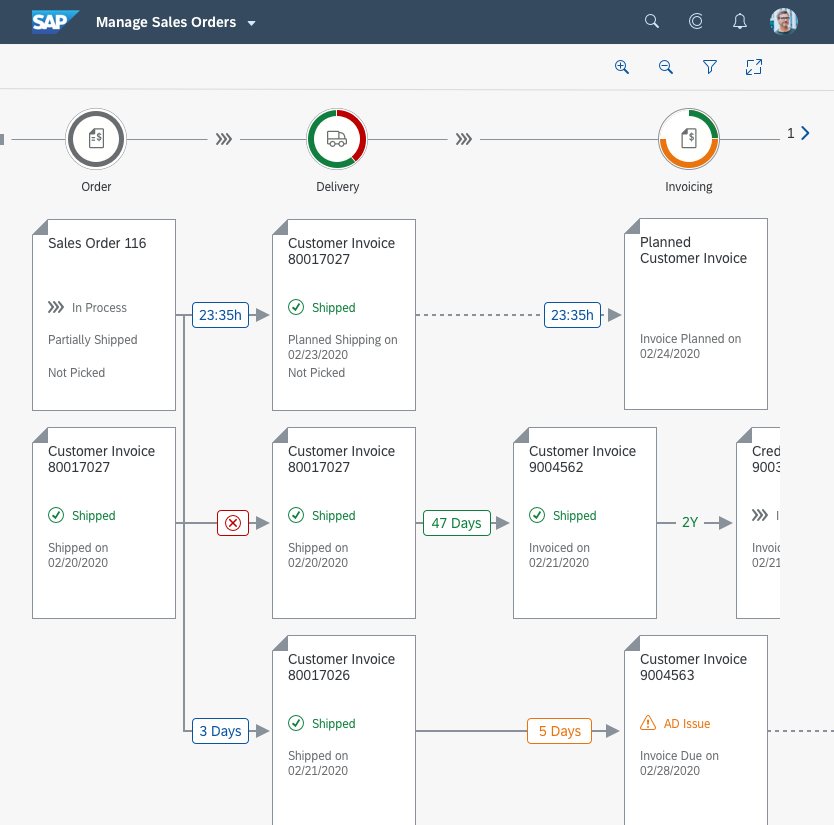
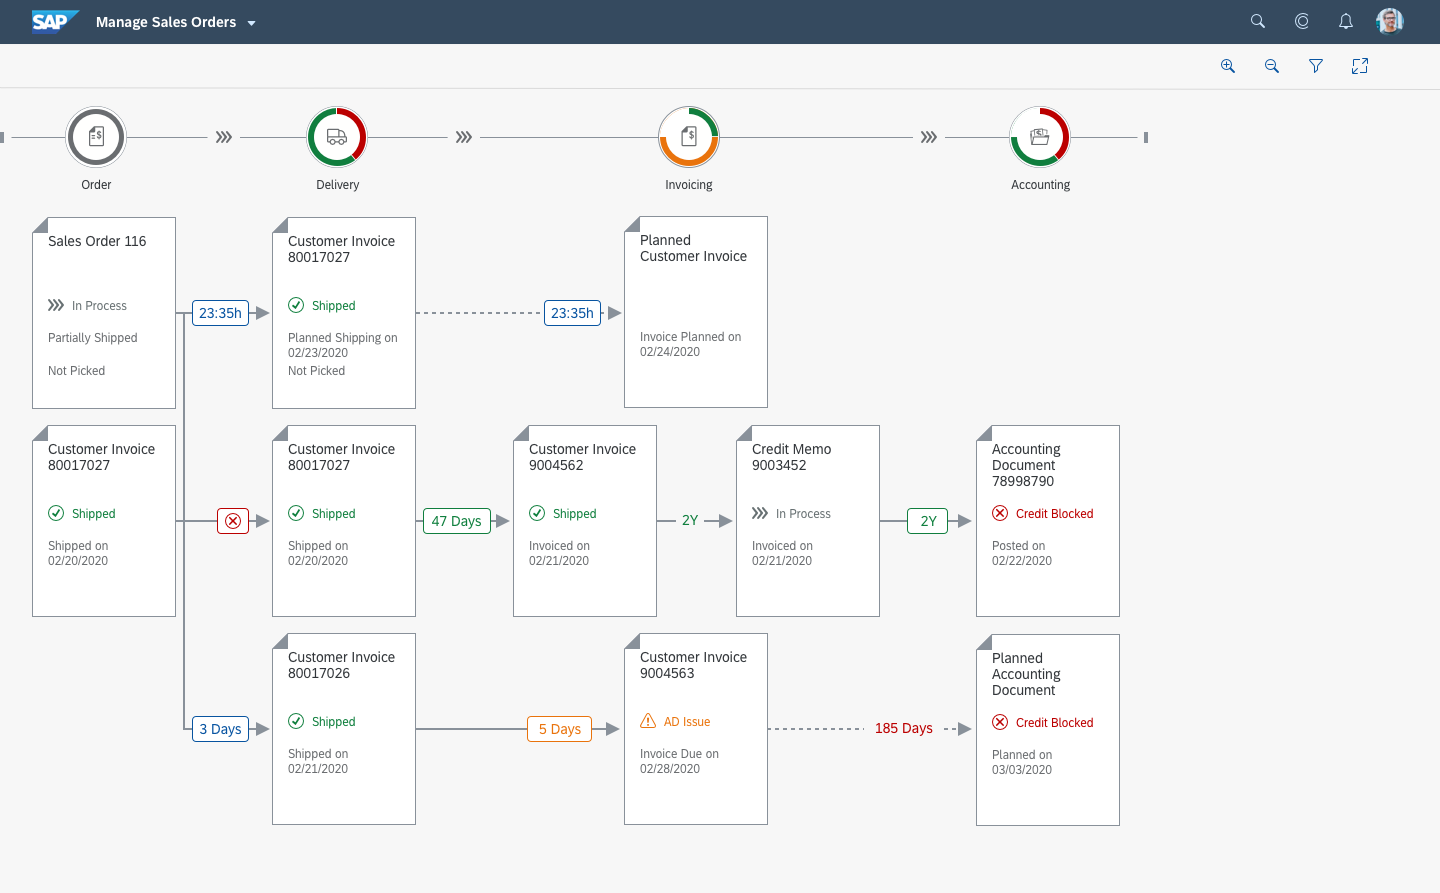
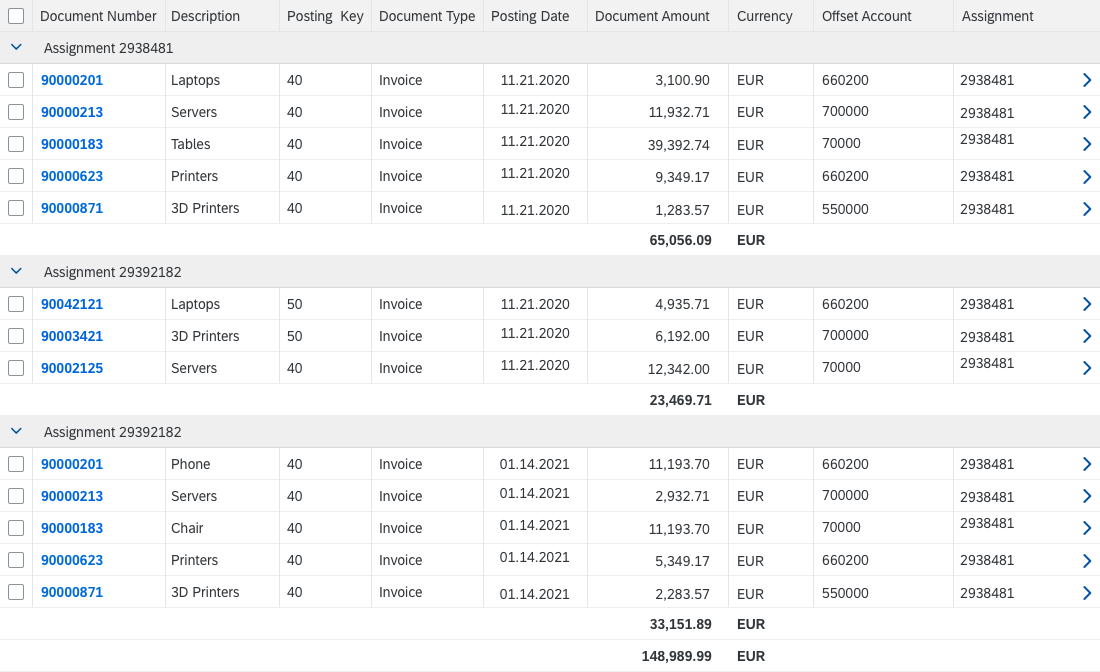
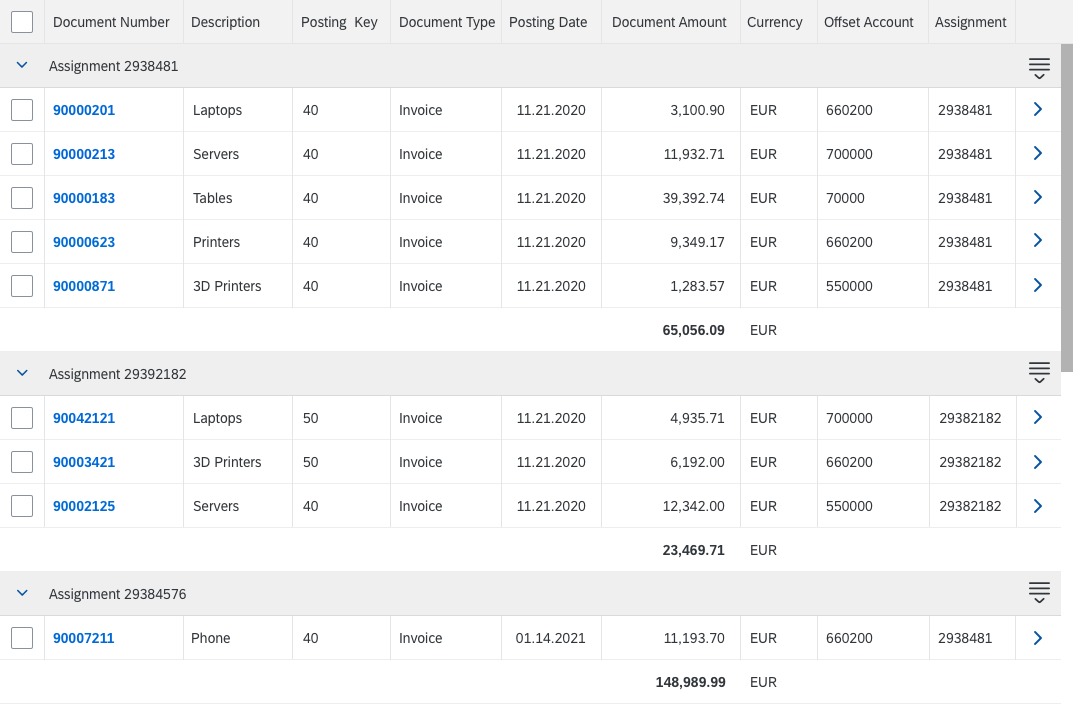
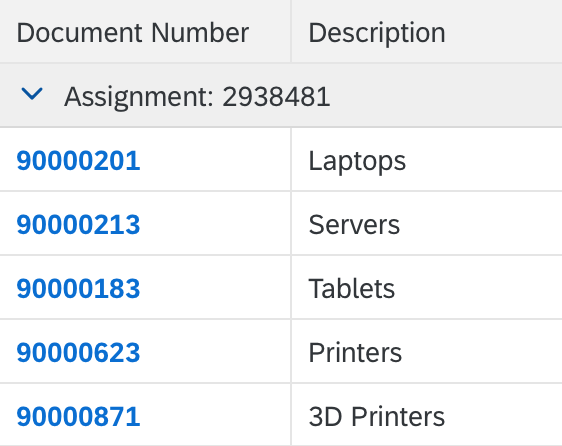
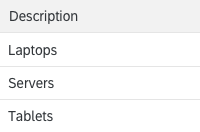
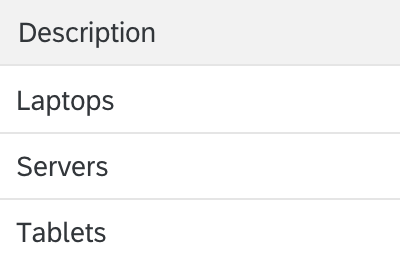
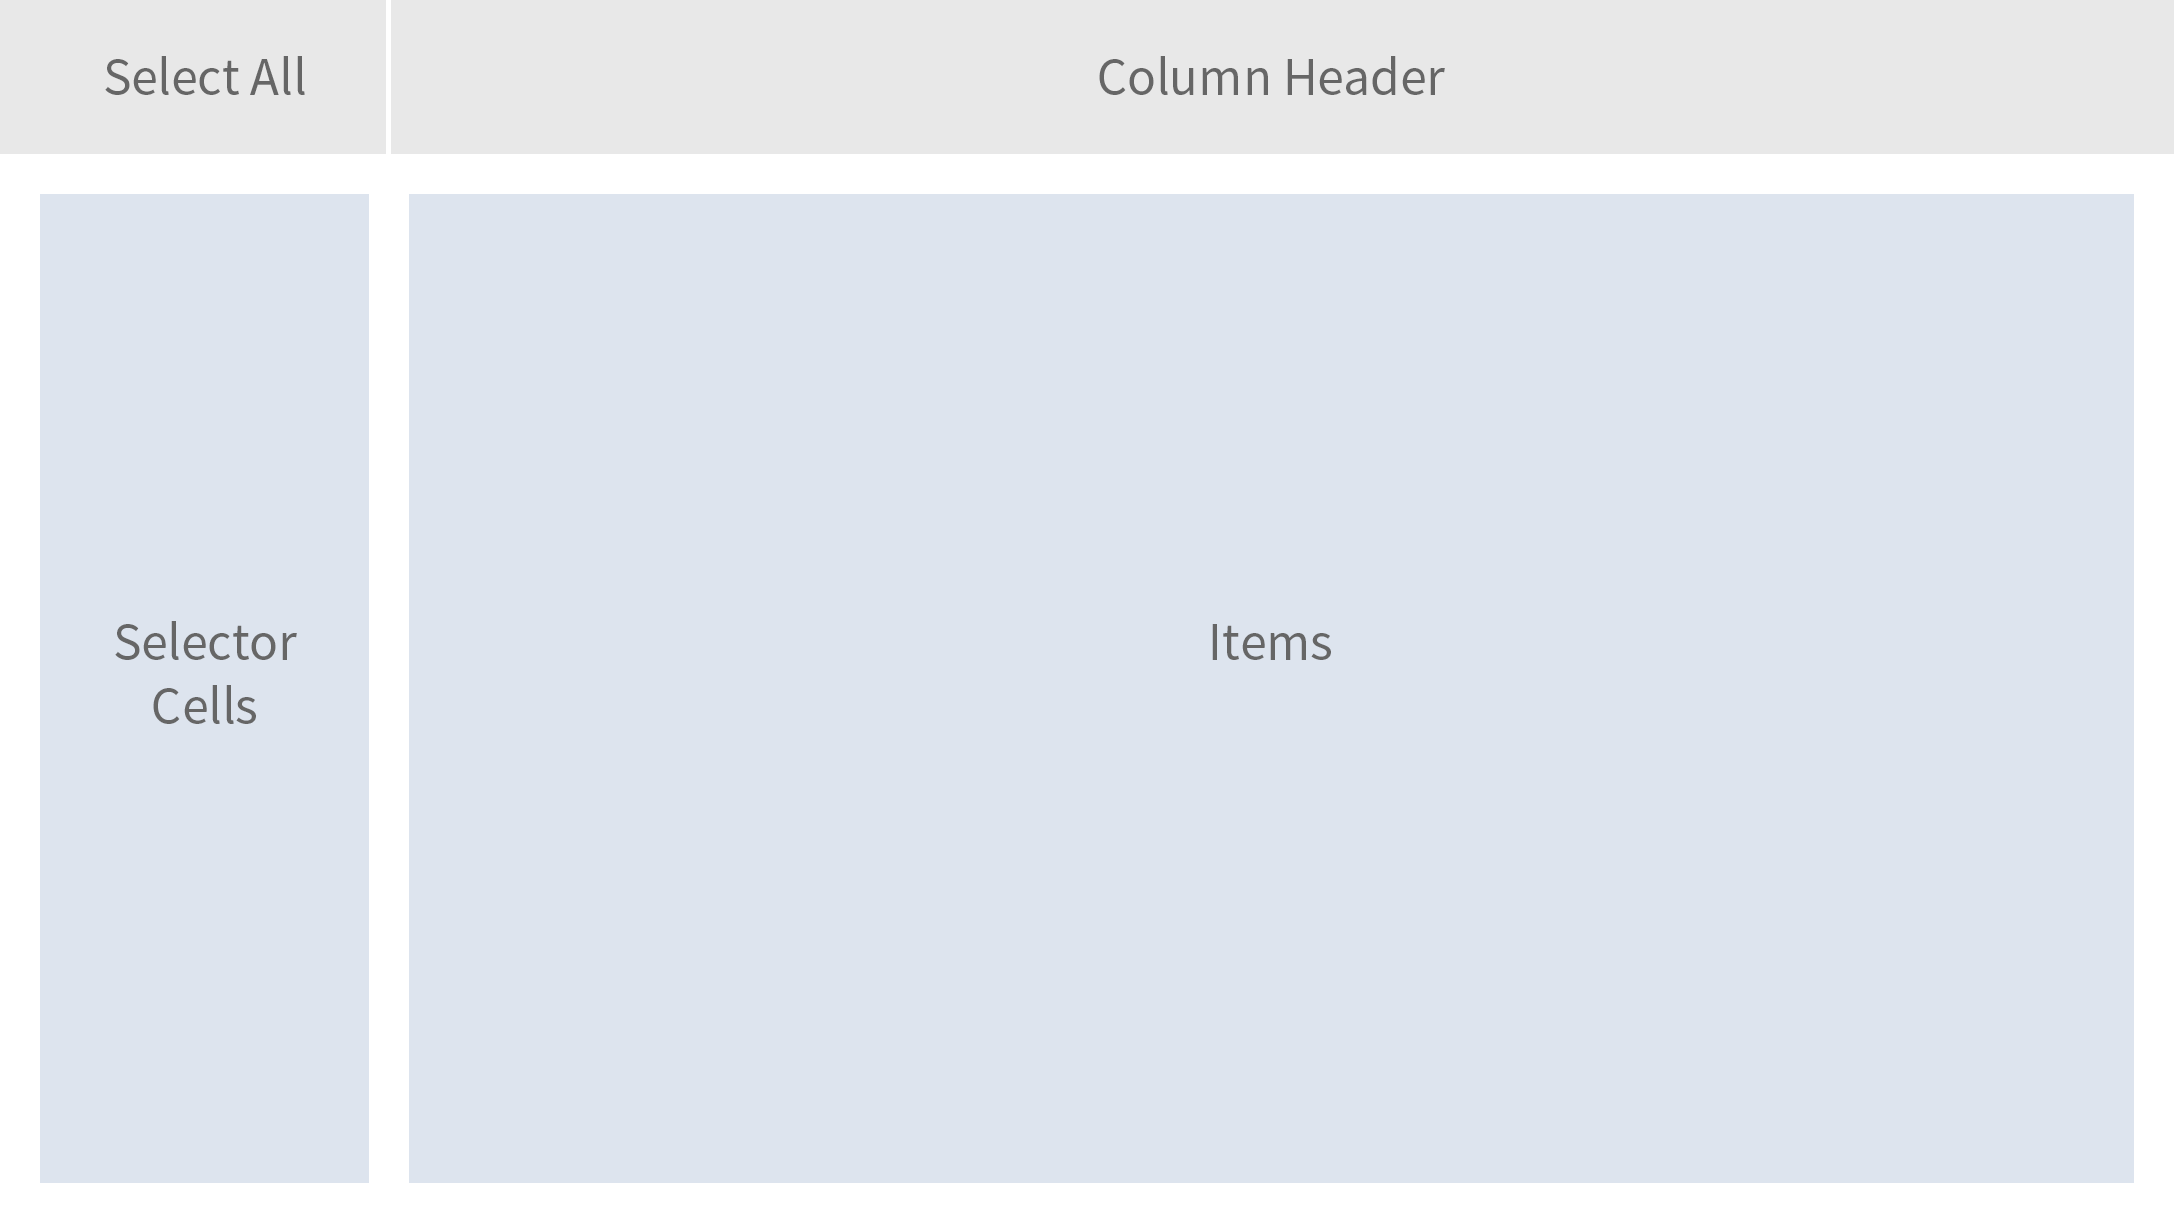
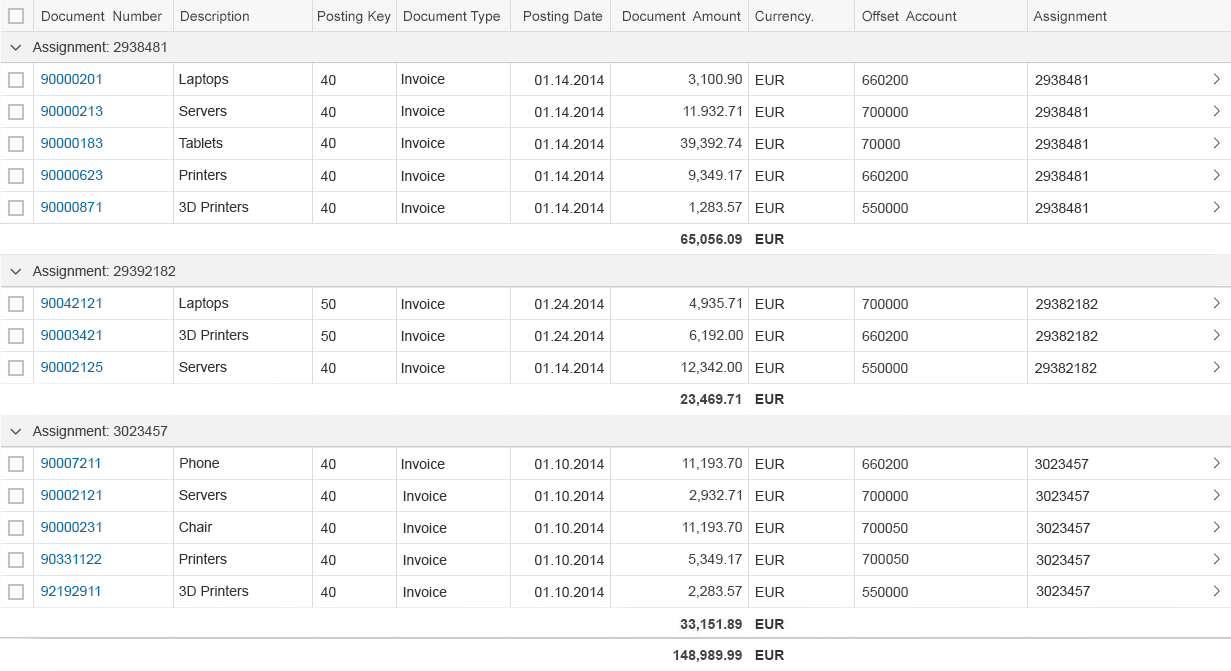
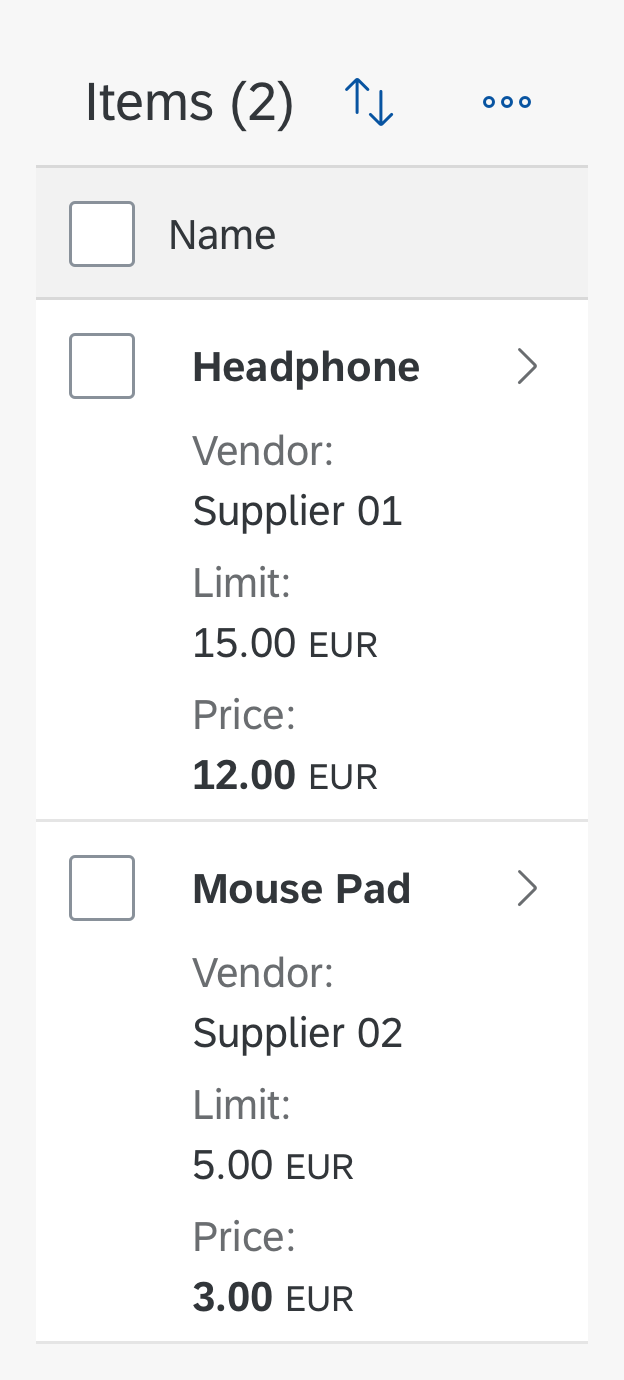
In both modes, the responsive table ensures that at least one column always remains in the table layout.
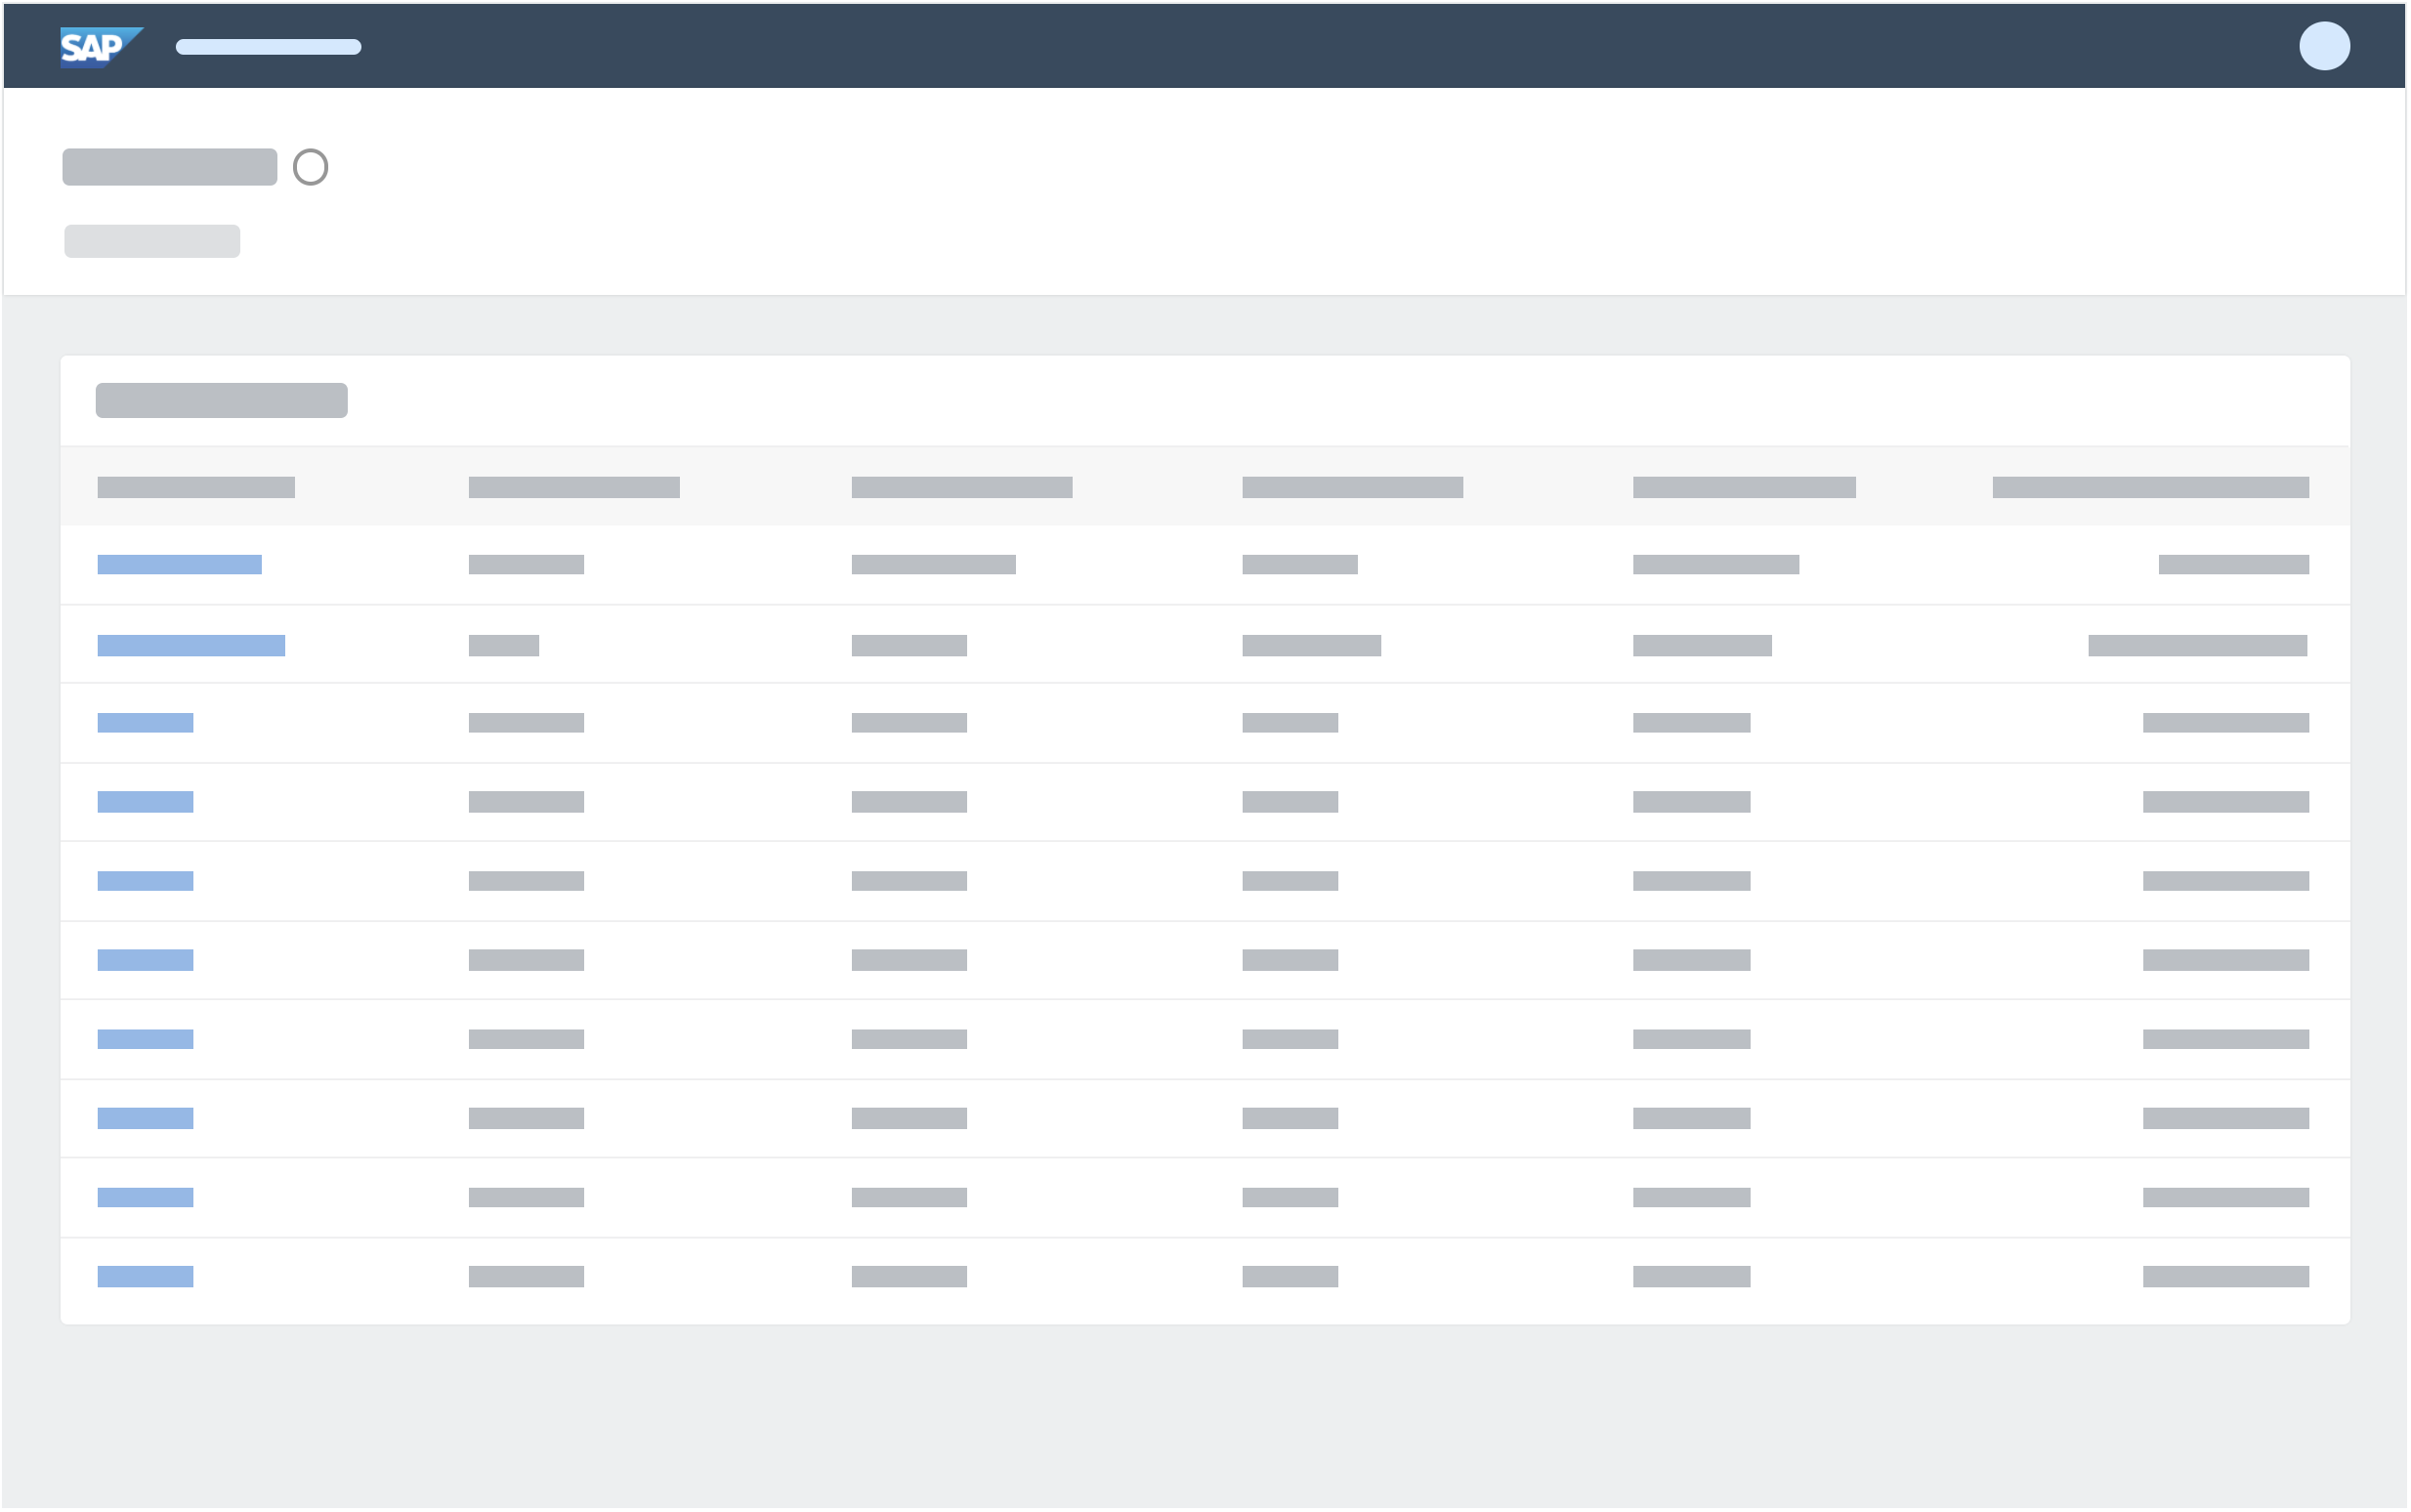
Auto Pop-In Mode

The auto pop-in mode handles responsiveness automatically. You can optimize this to a certain extent by adapting the behavior per column.

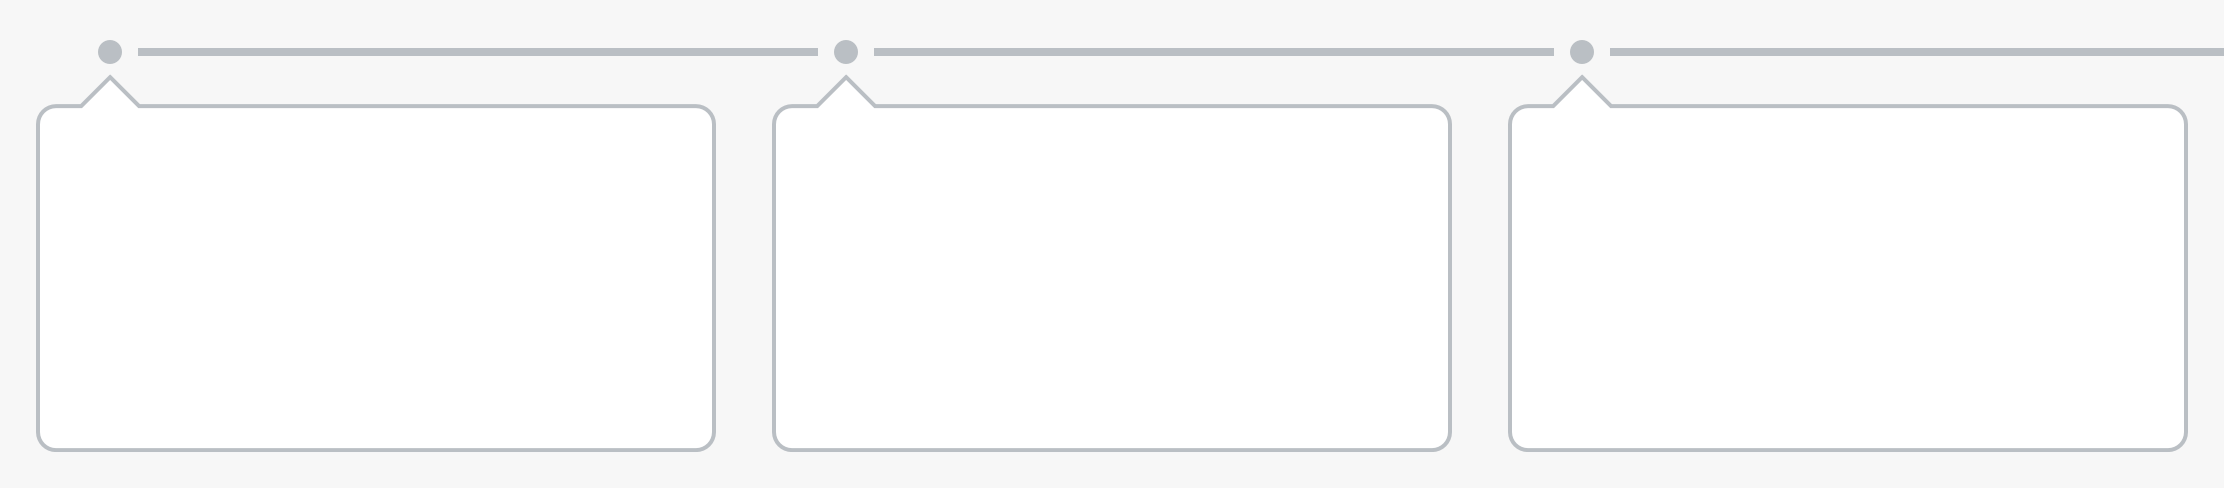
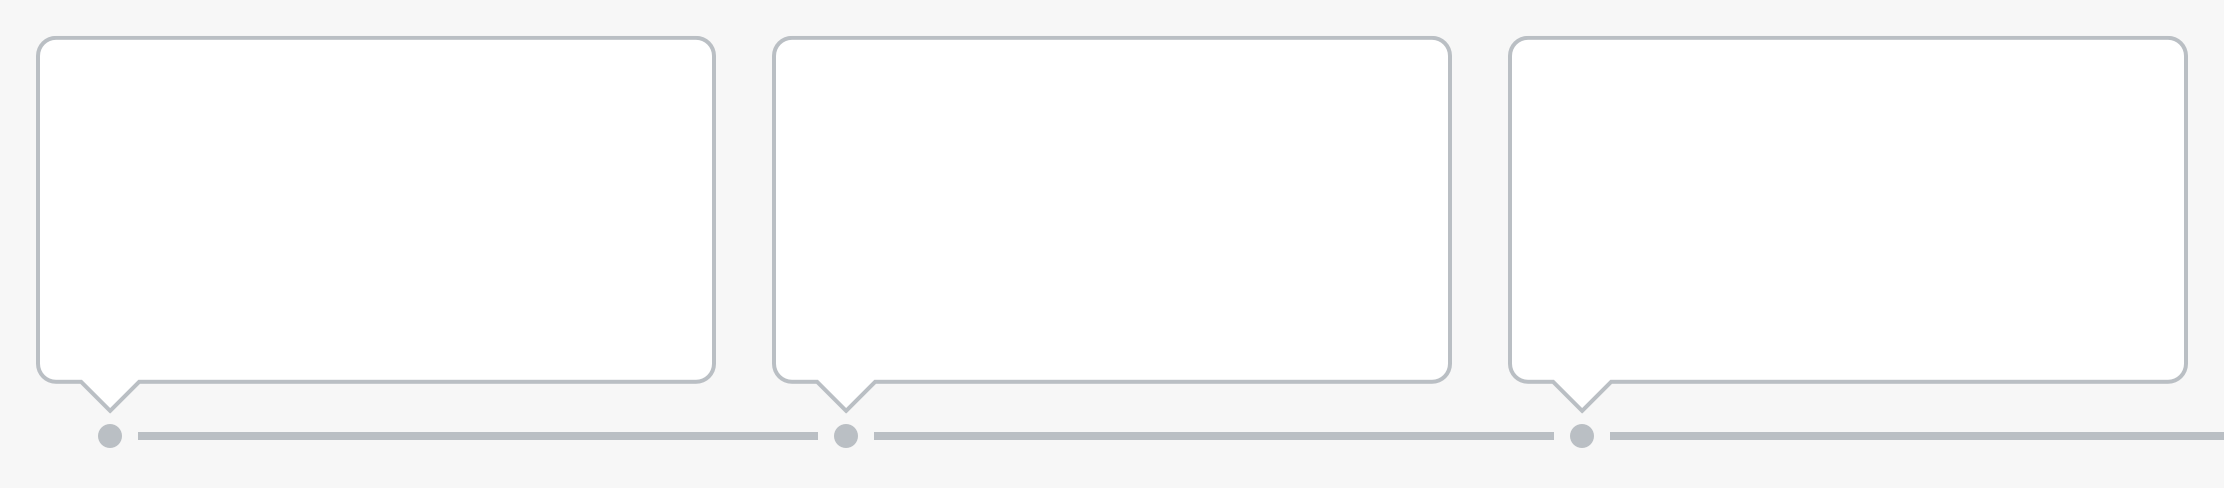
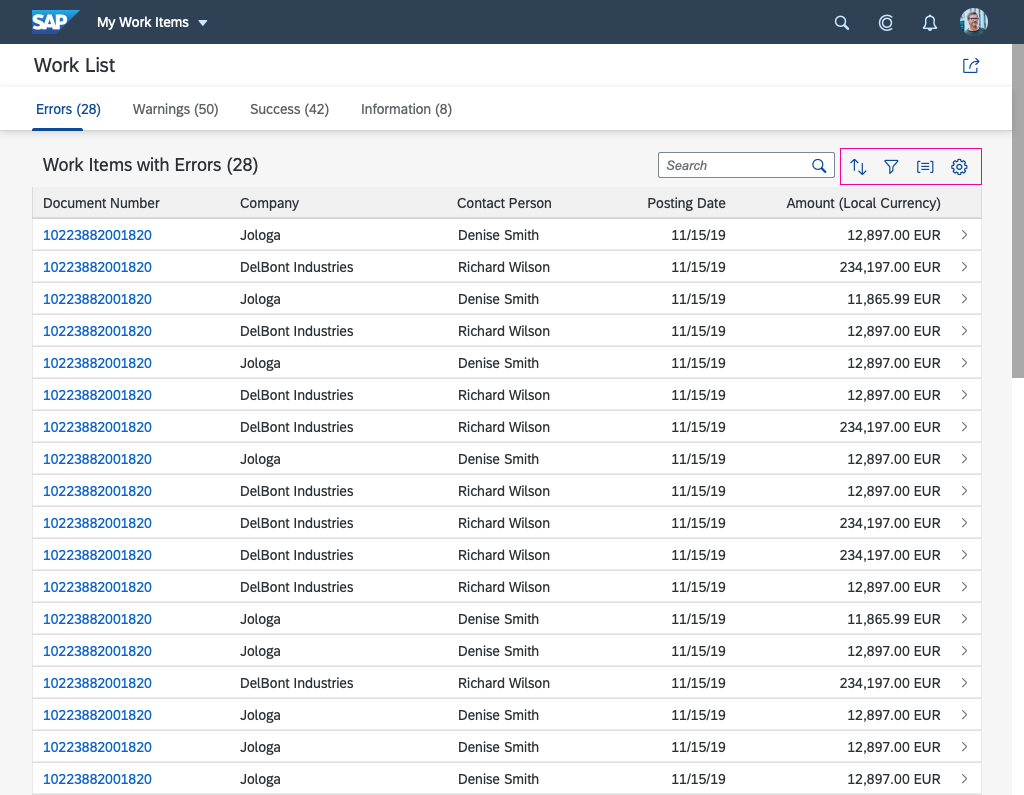
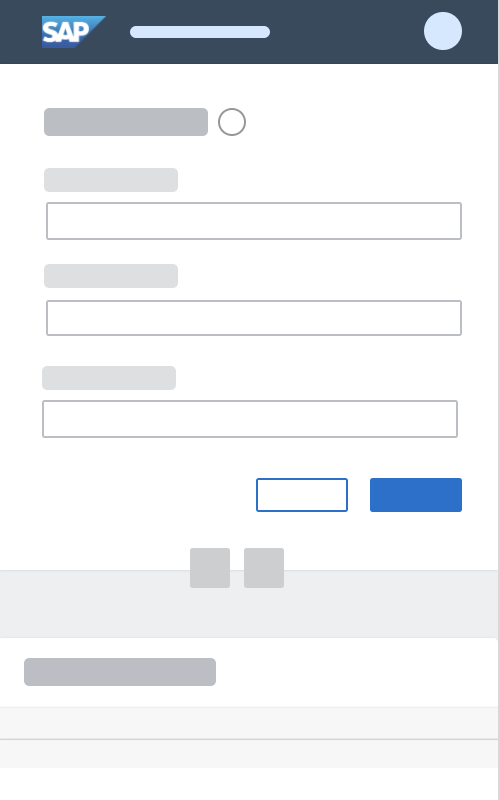
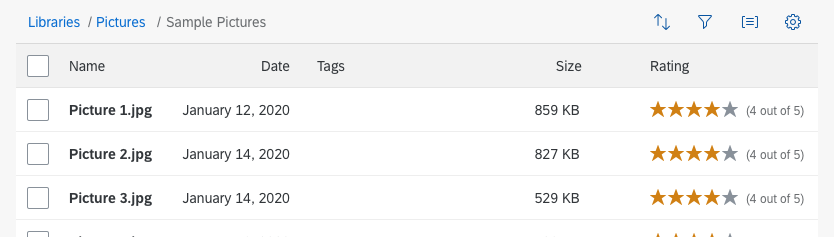
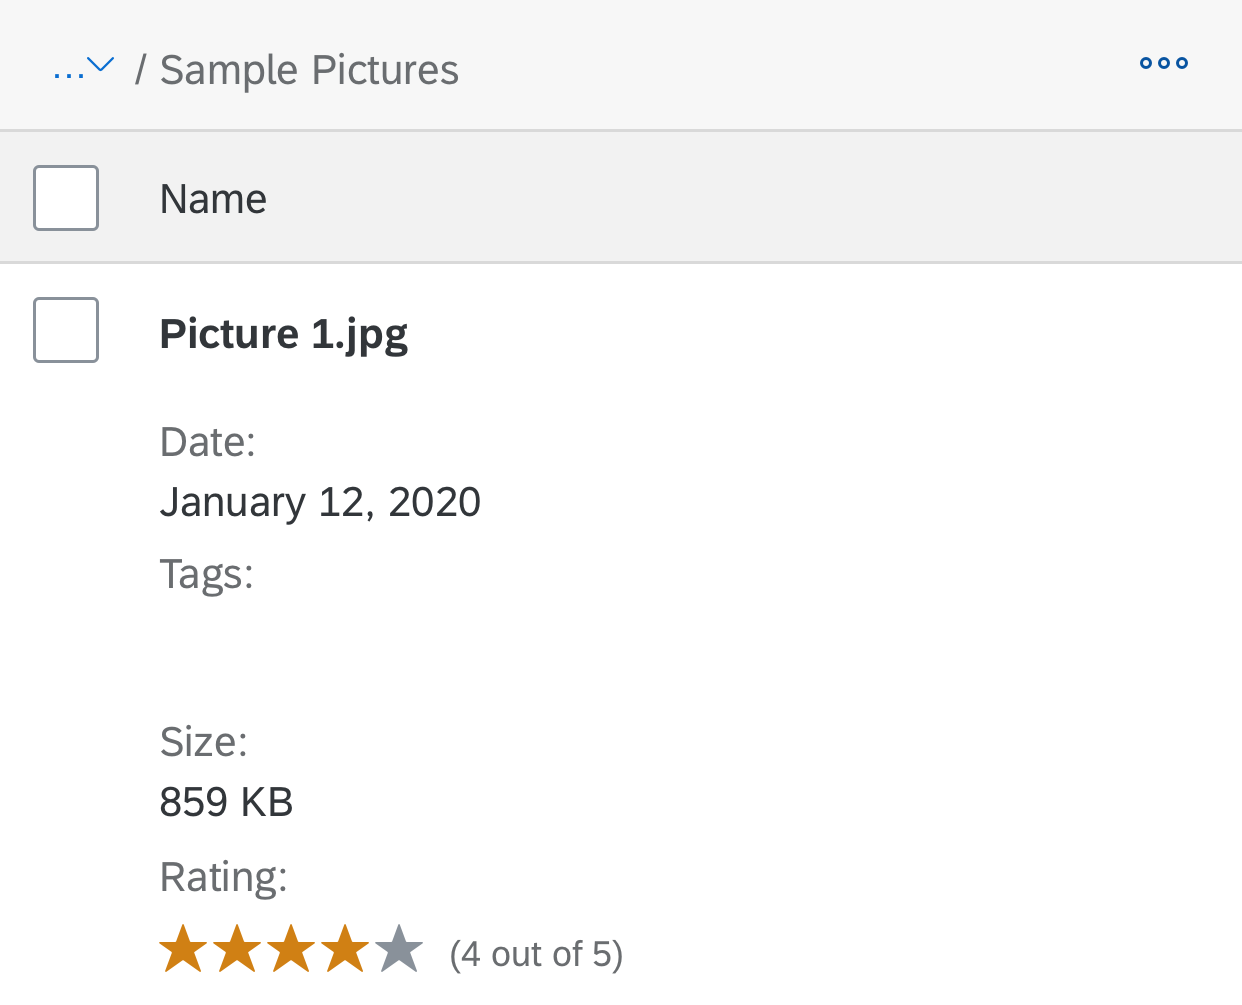
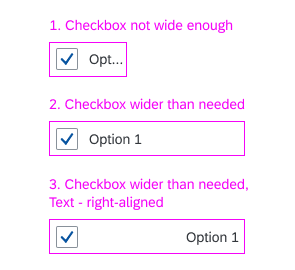
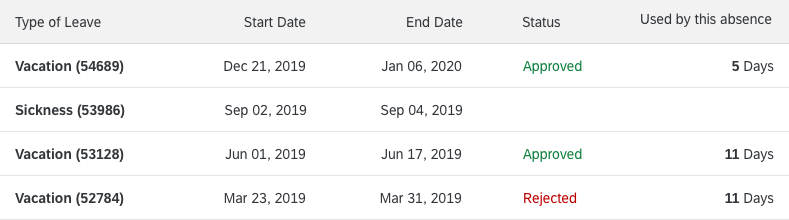
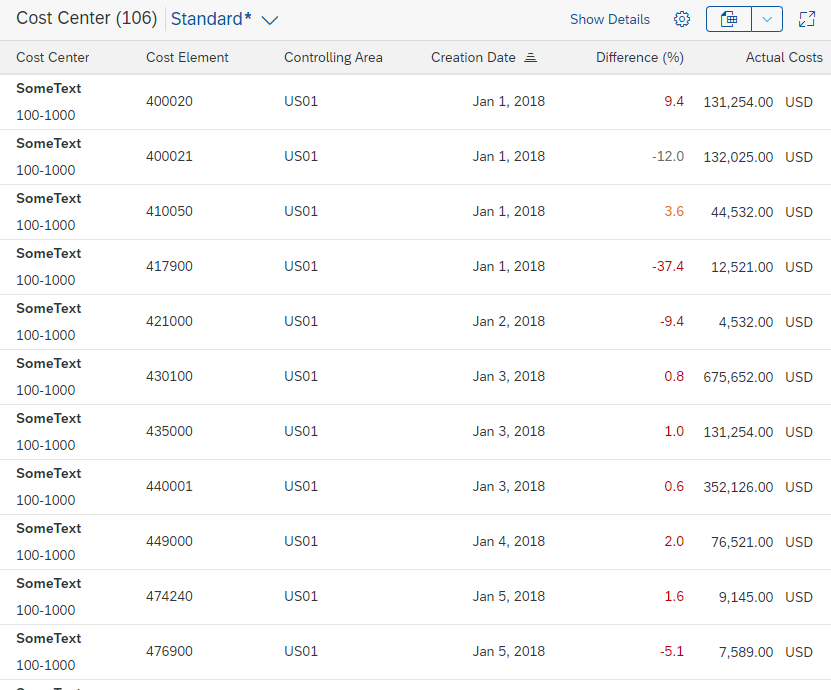
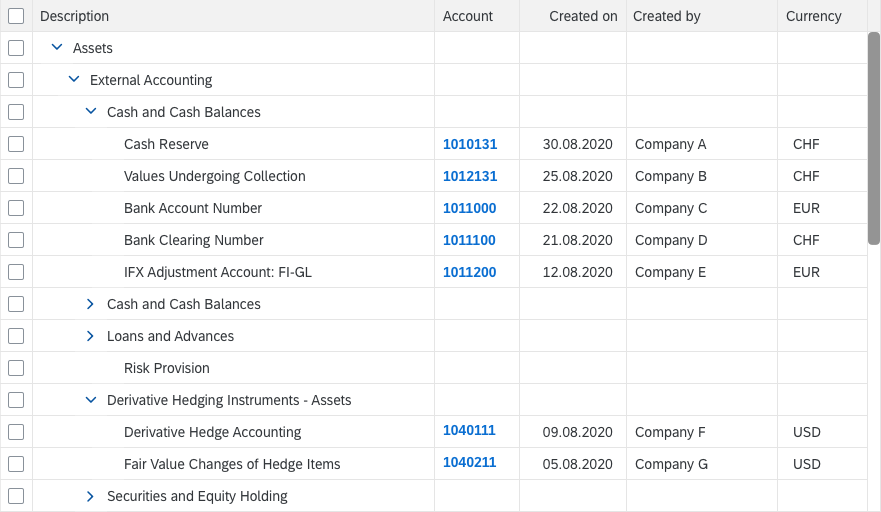
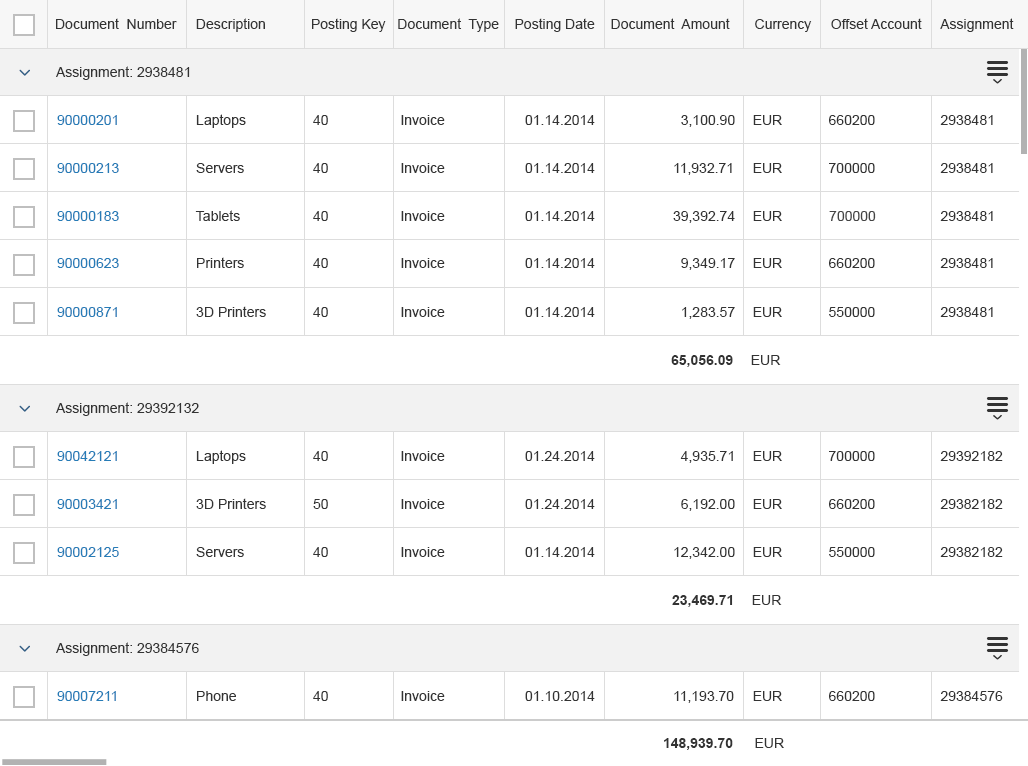
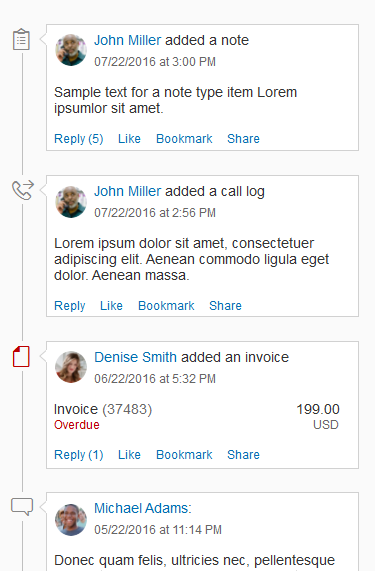
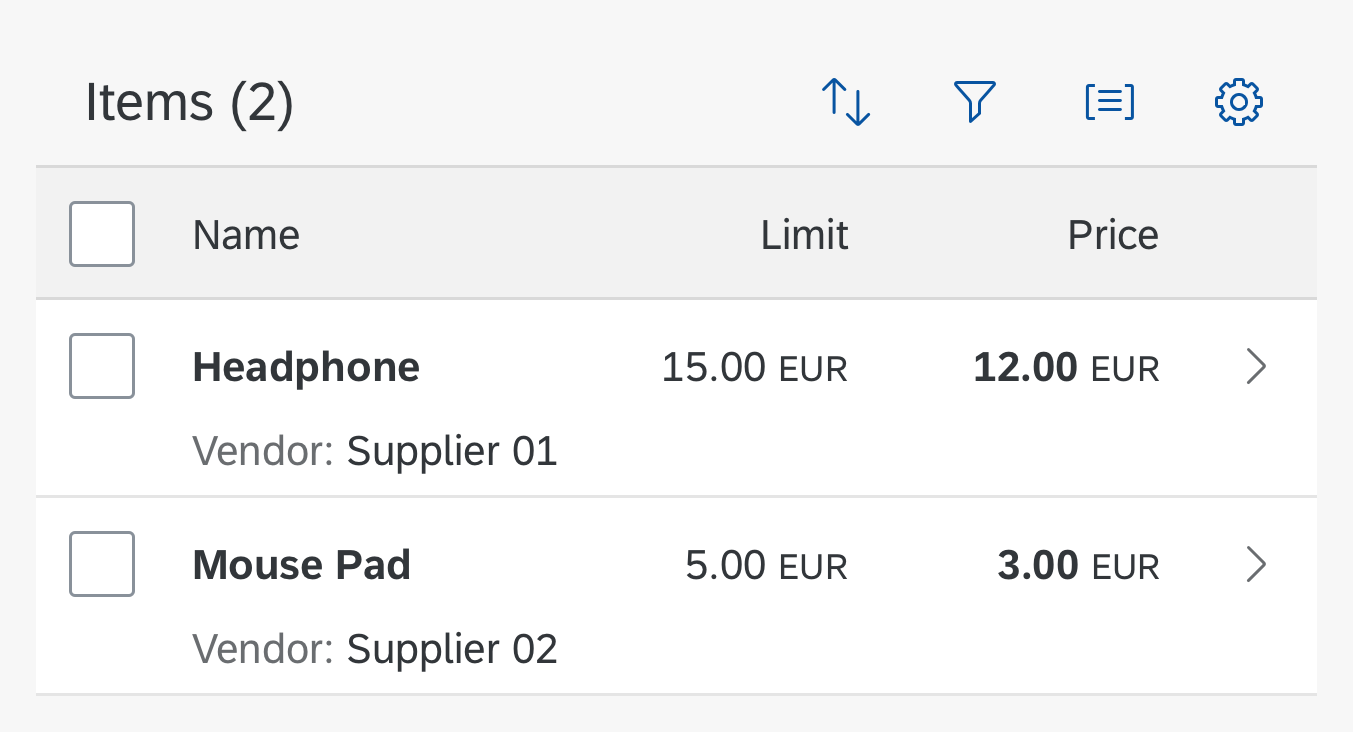
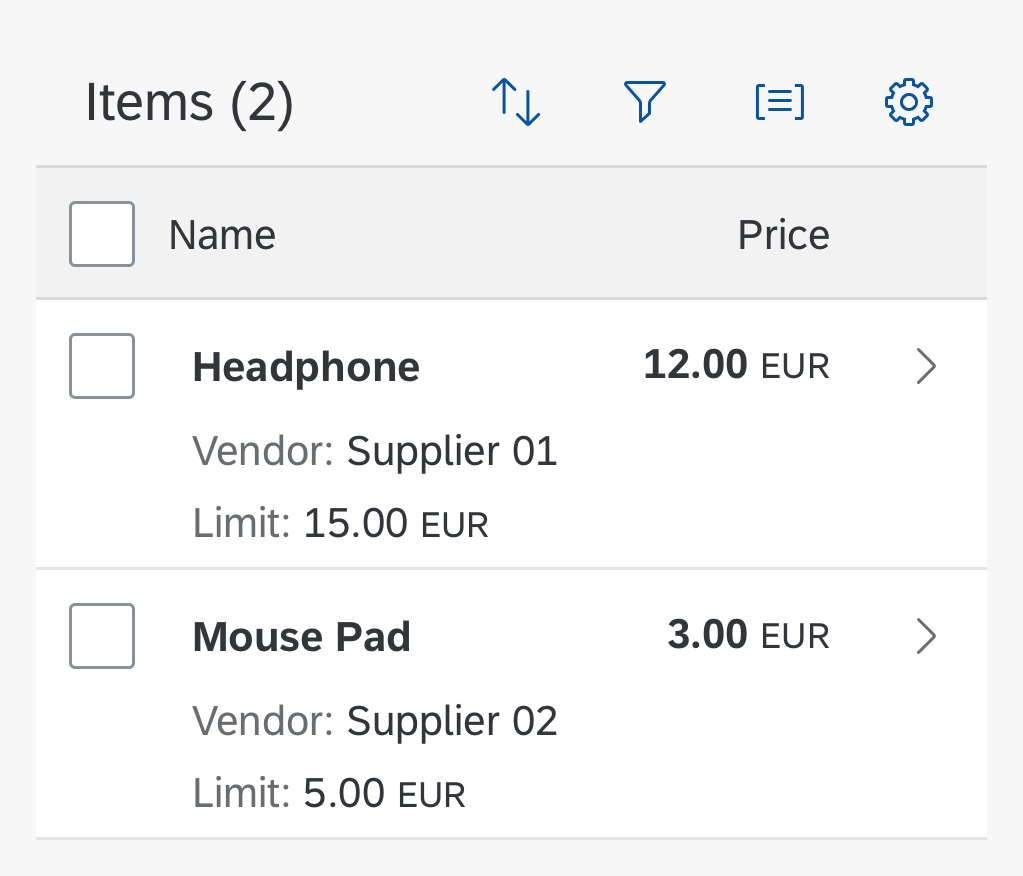
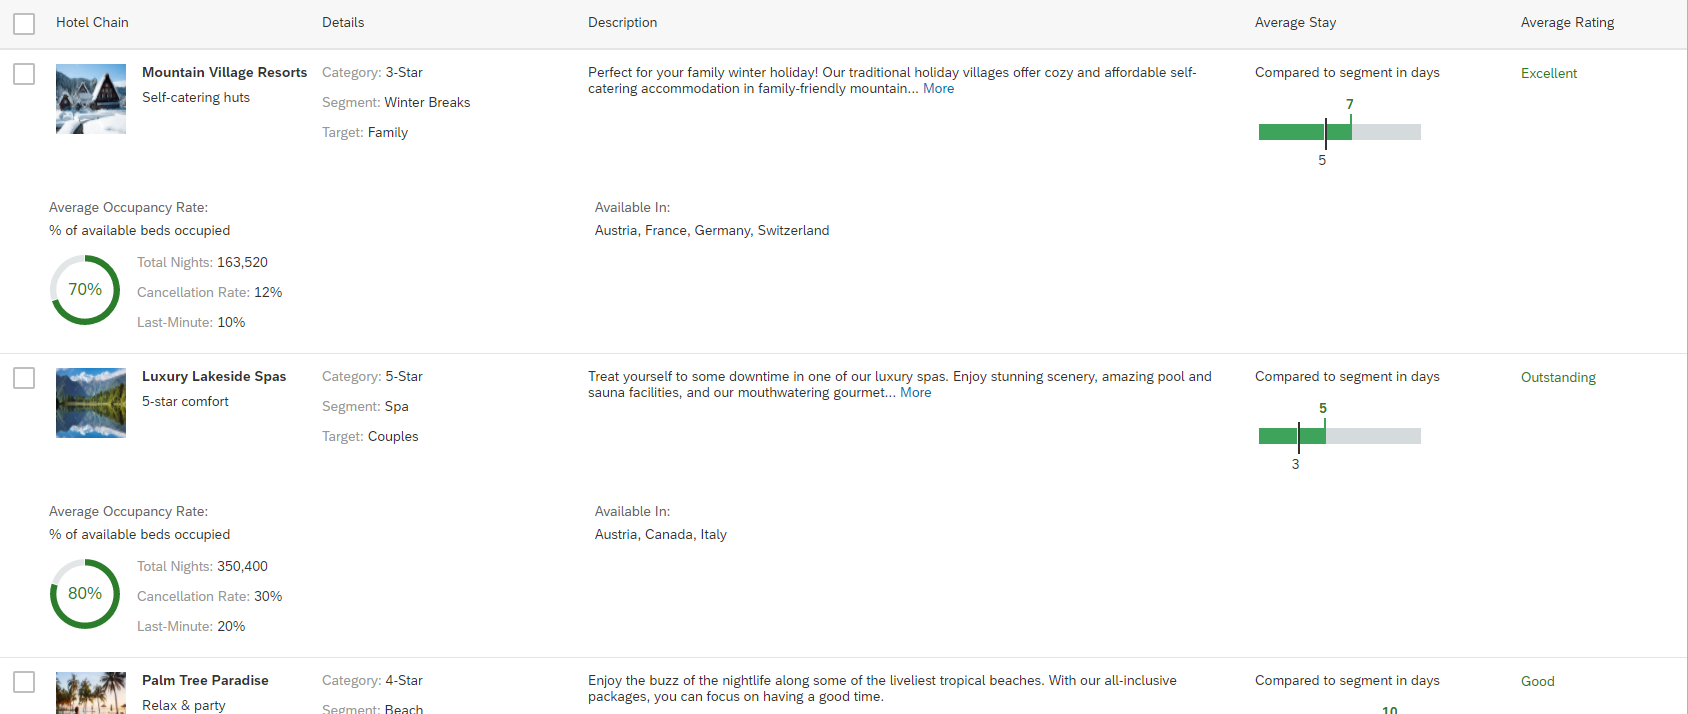
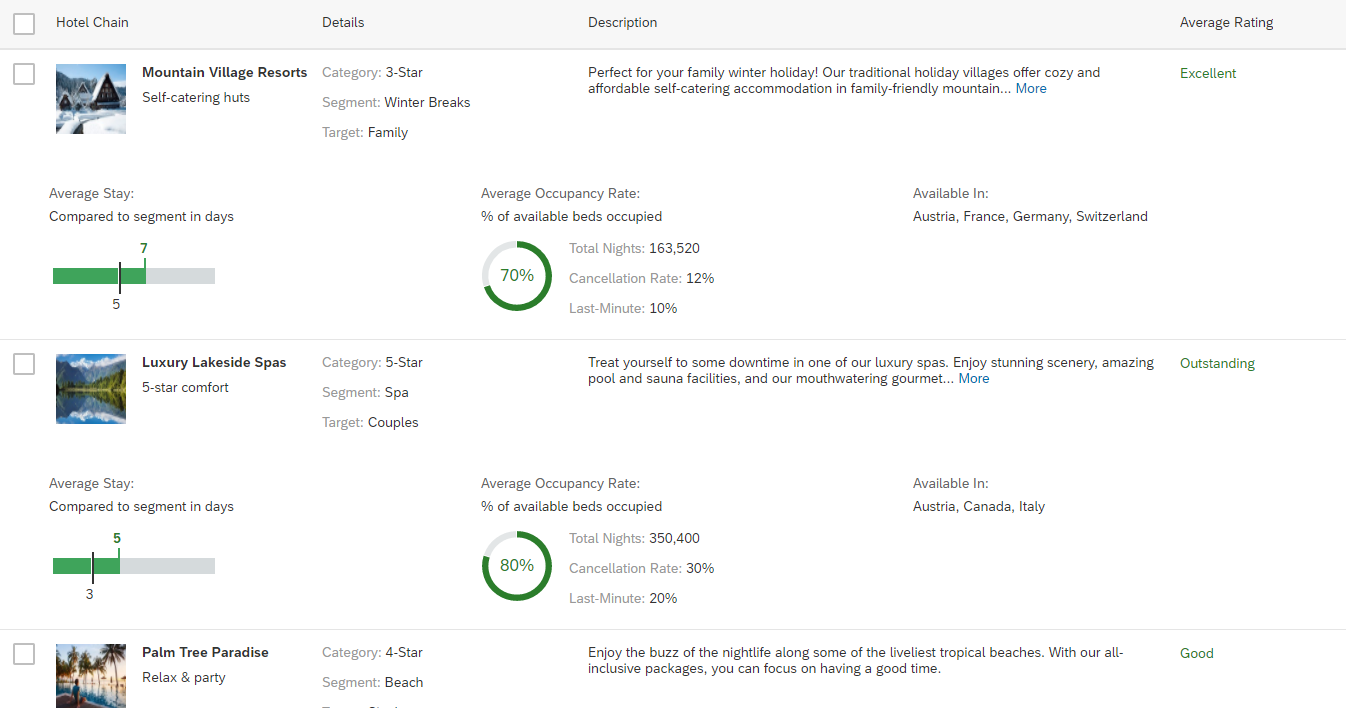
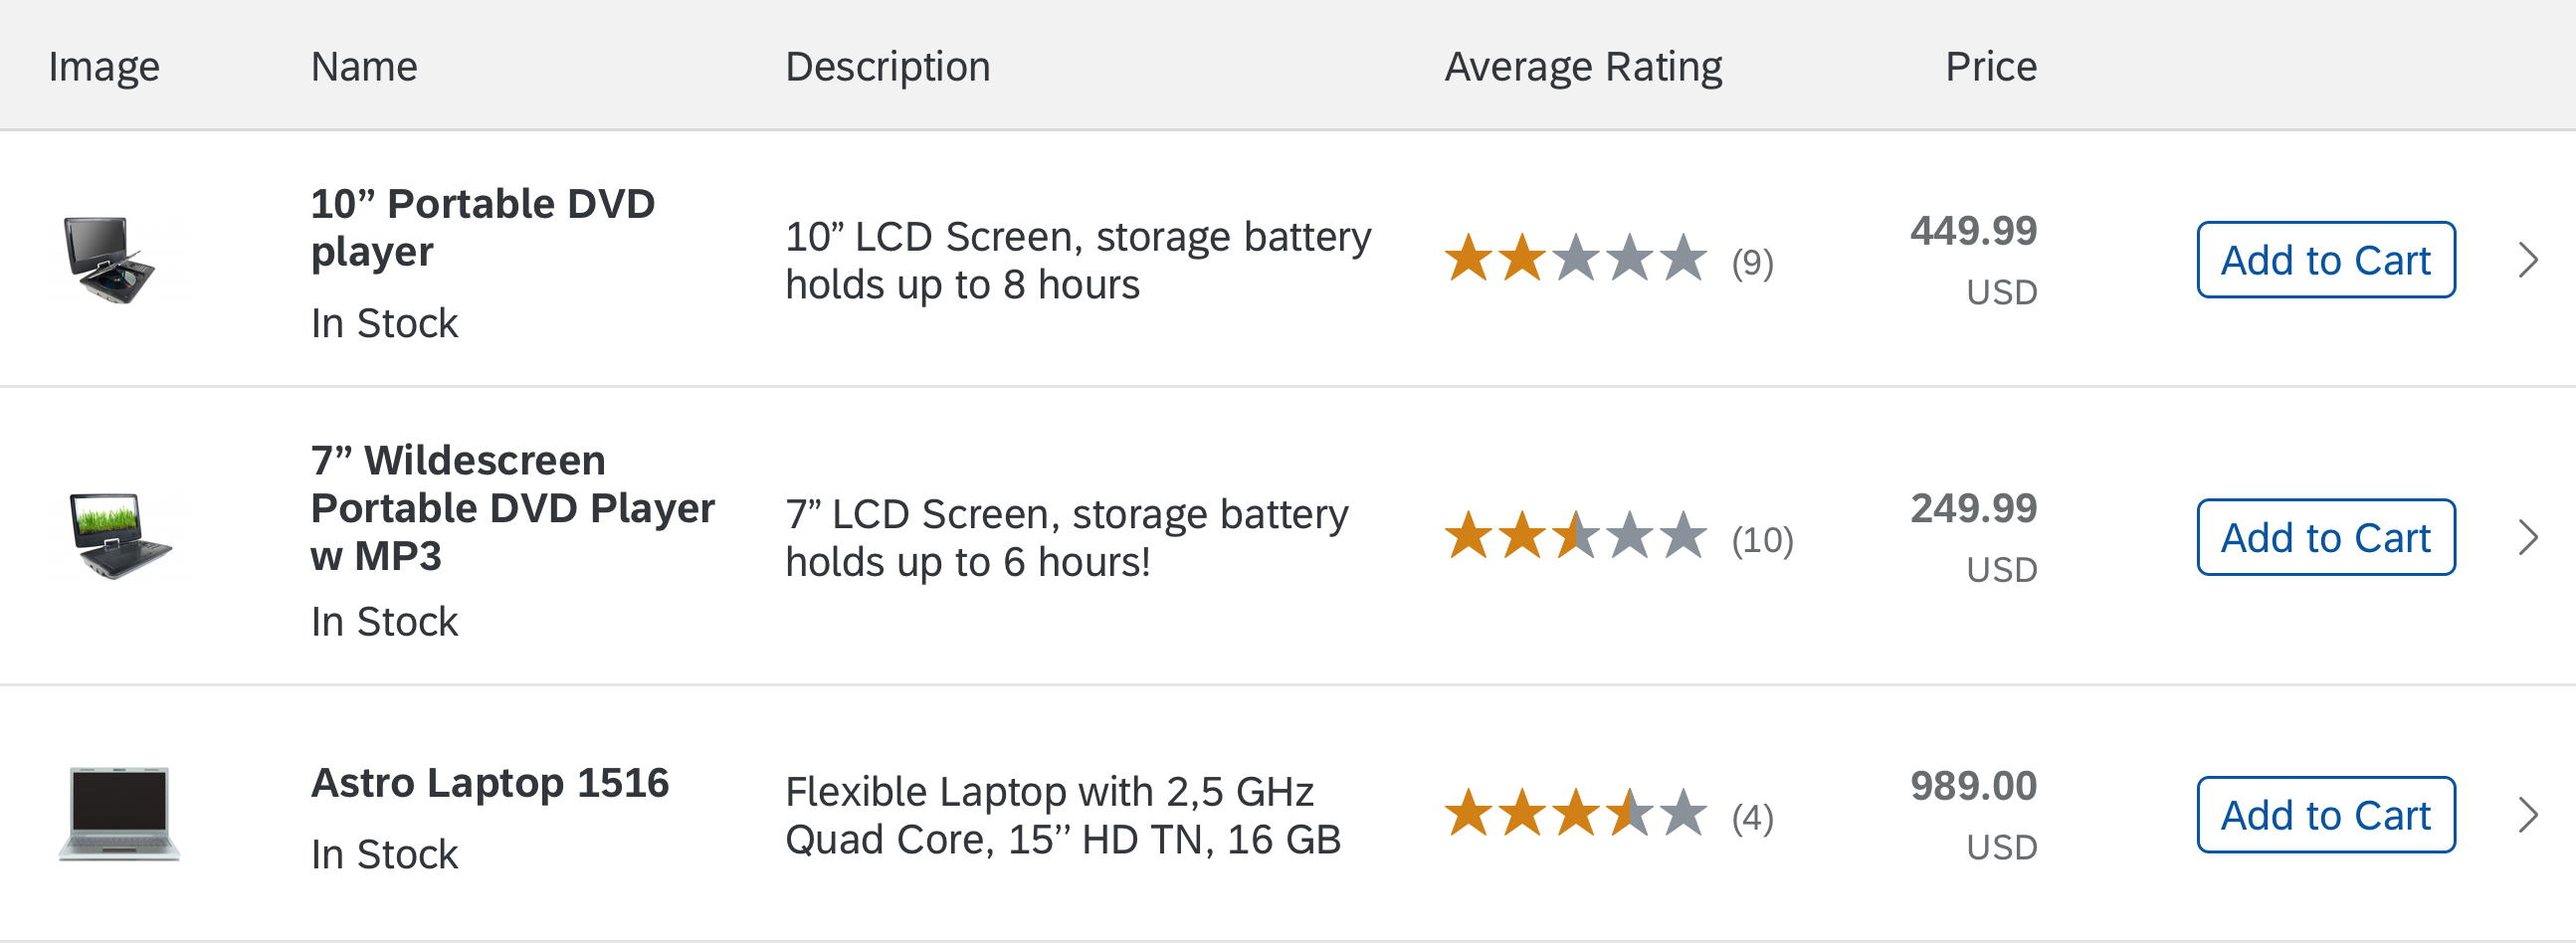
Columns have a minimum width. As soon as the width of all the visible columns exceeds the table width, the right-most column moves to the pop-in. The default minimum width per column is 8 rem. You can change this value for each column (sap.m.Column, property: autoPopinWidth).

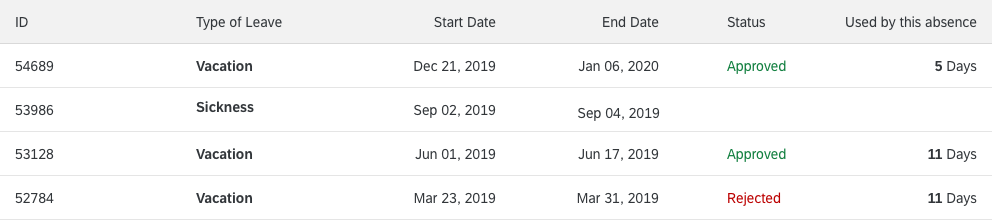
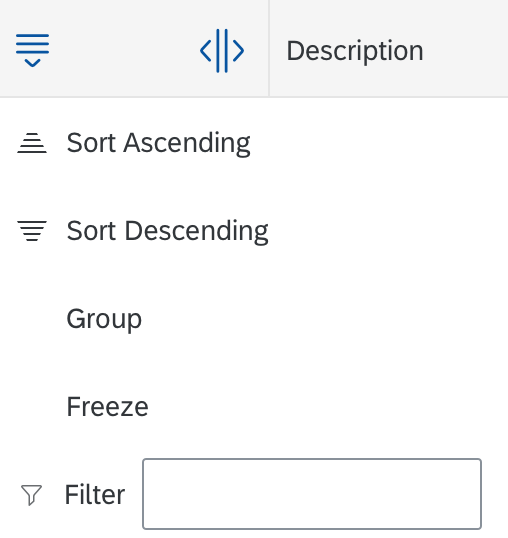
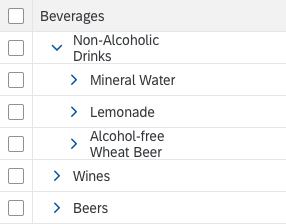
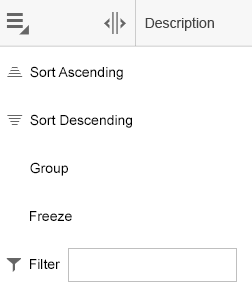
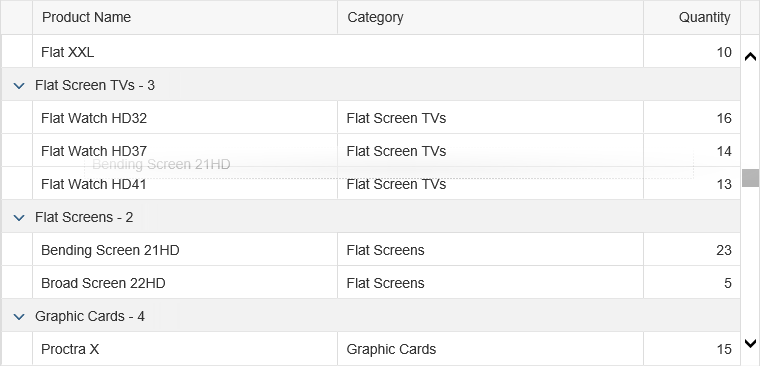
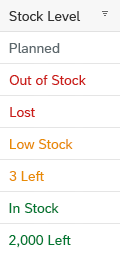
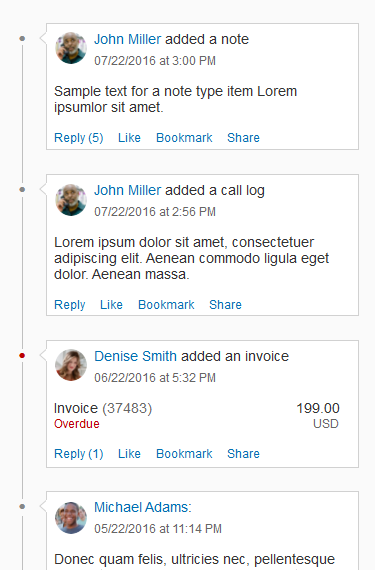
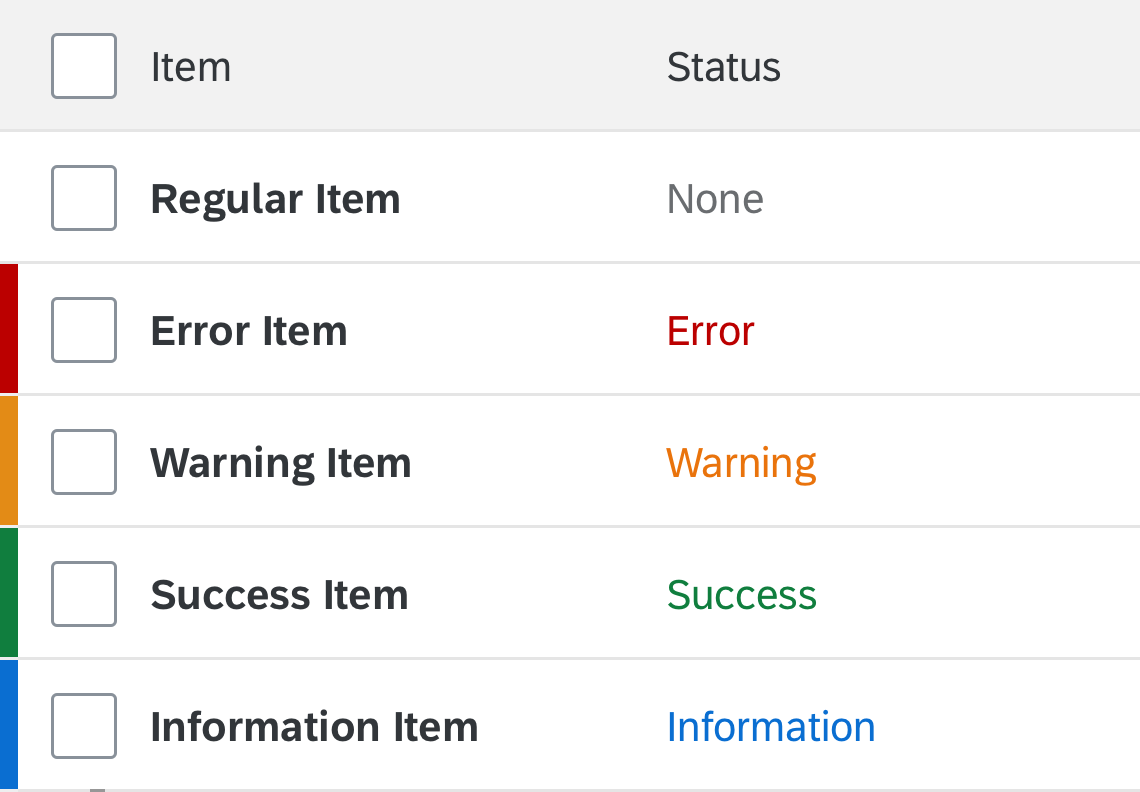
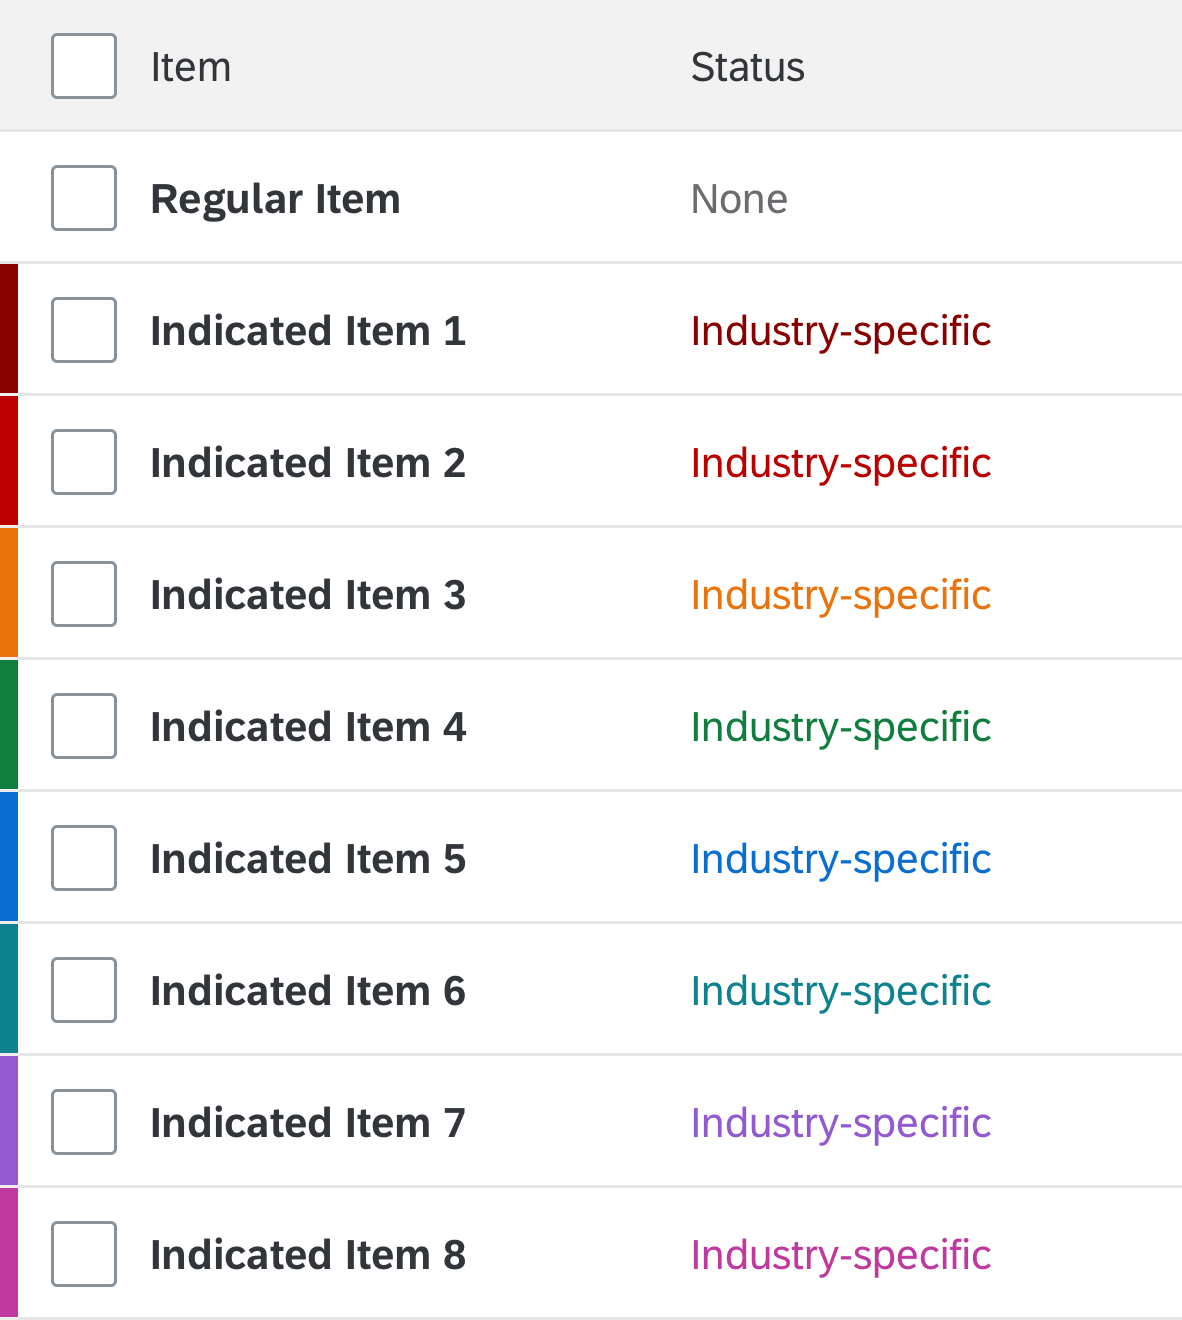
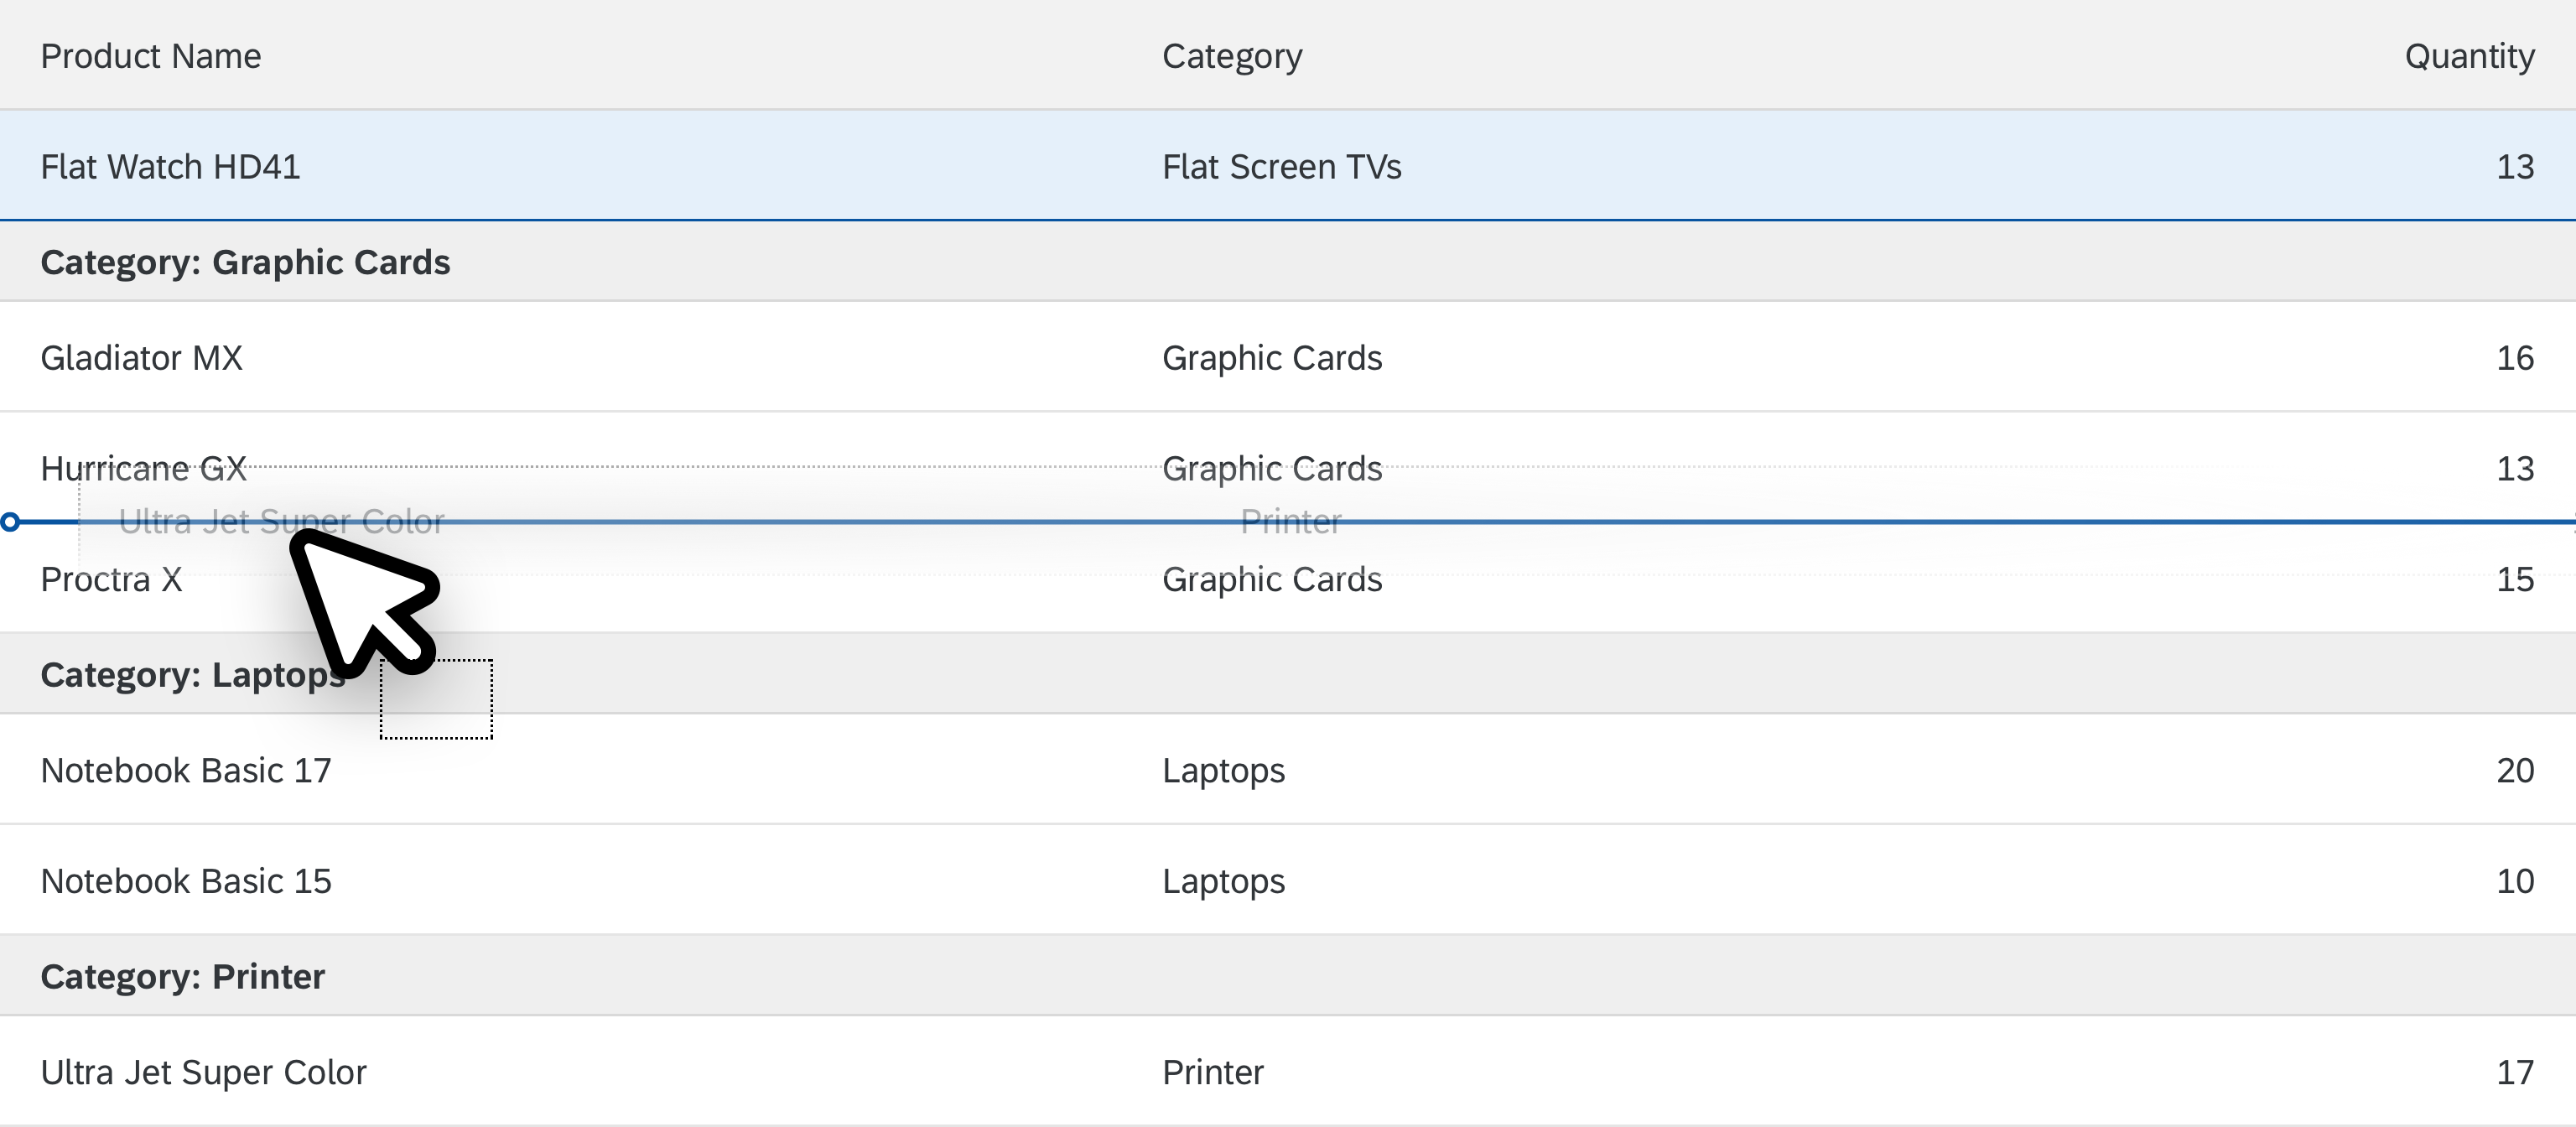
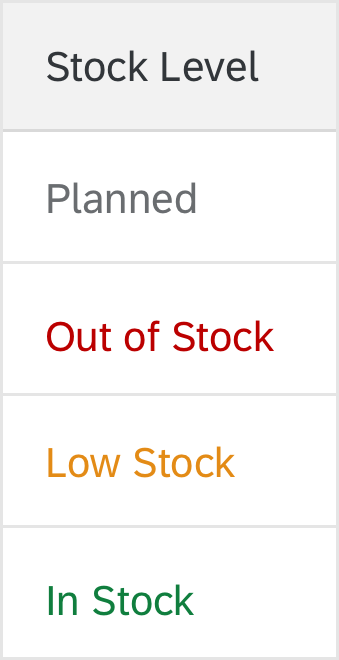
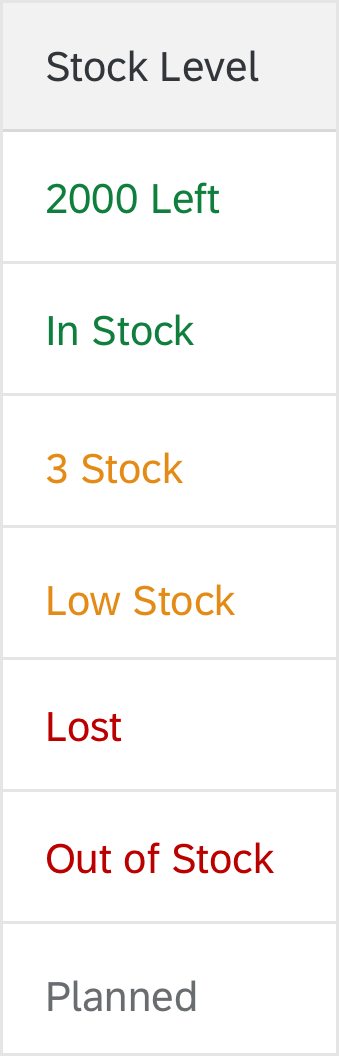
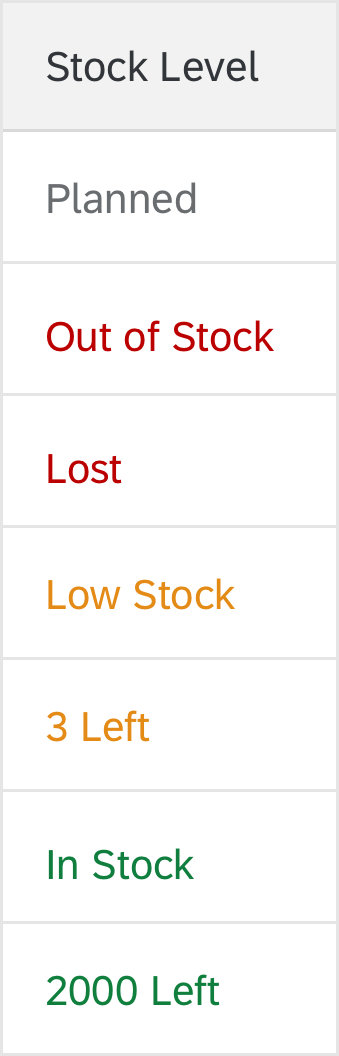
To further influence the behavior, you can assign columns a priority. Low-priority columns move to the pop-in first (right-most low priority column first), medium-priority columns next, and high-priority columns last. The default priority is “none”, which is handled like the “medium” priority (sap.m.Column, property: importance).

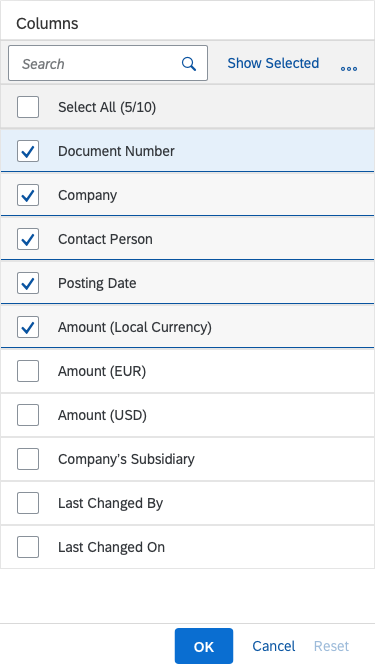
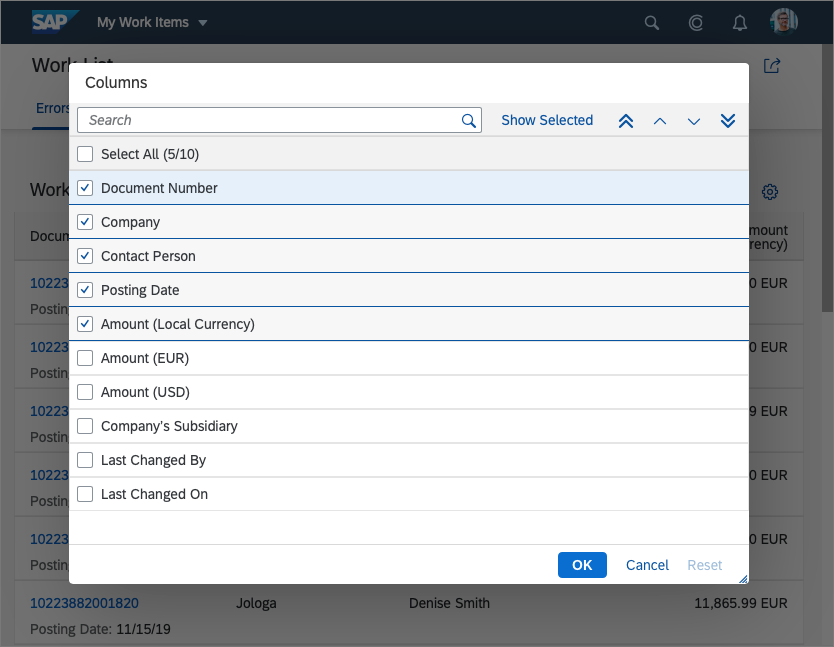
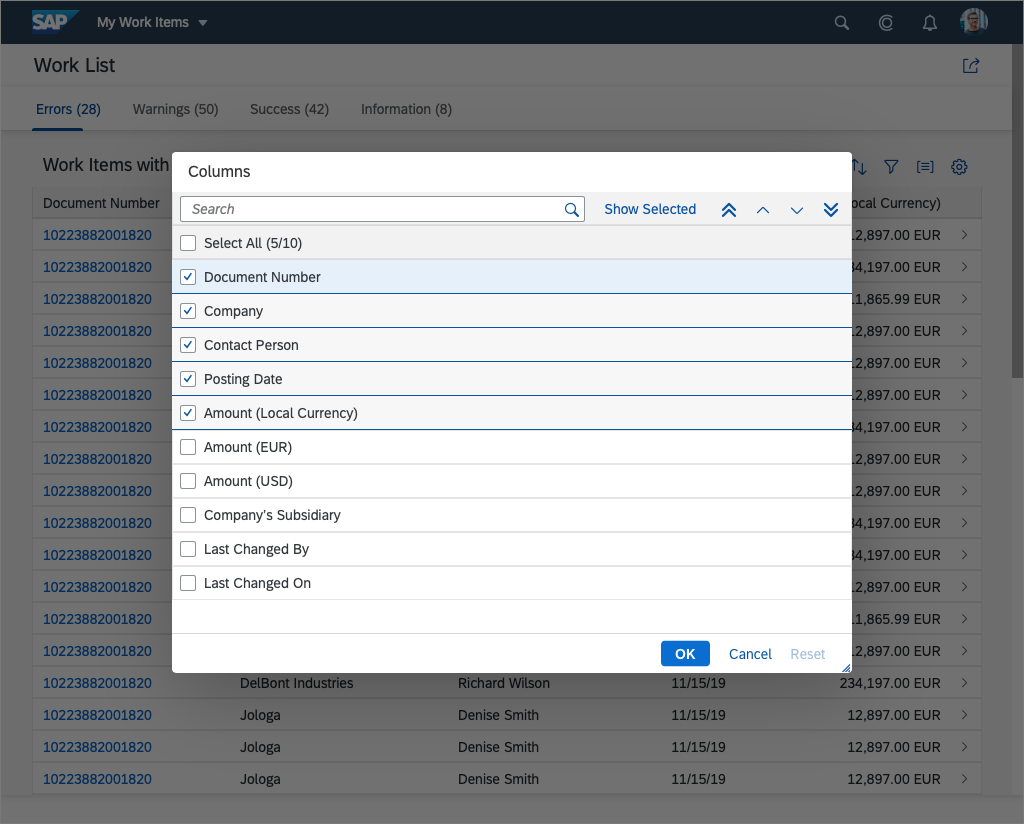
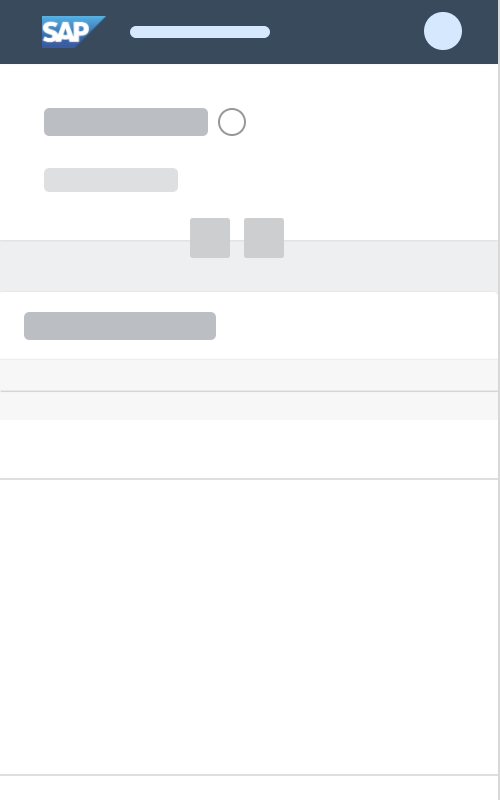
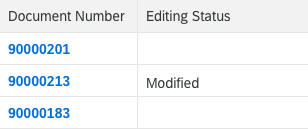
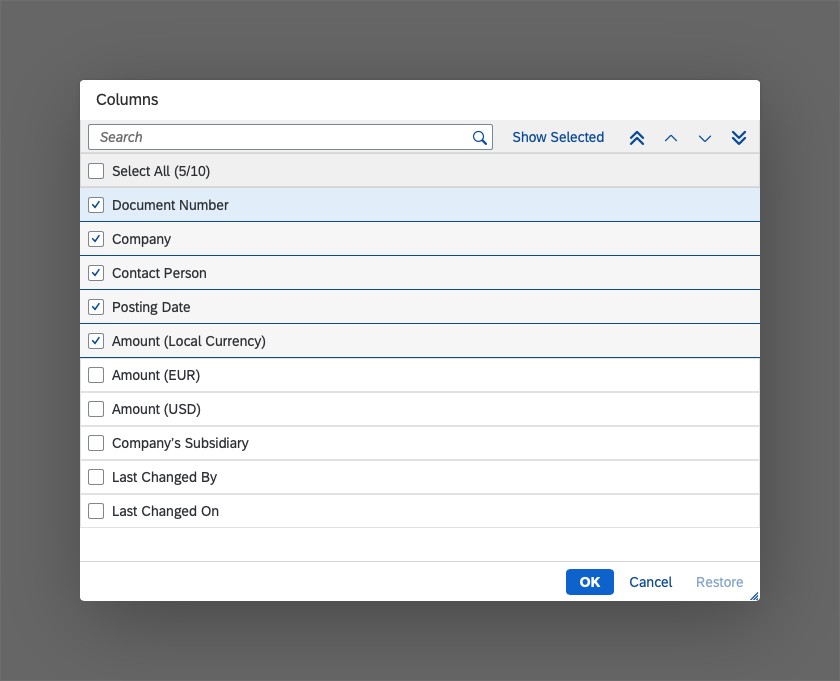
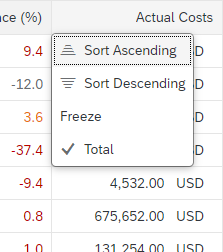
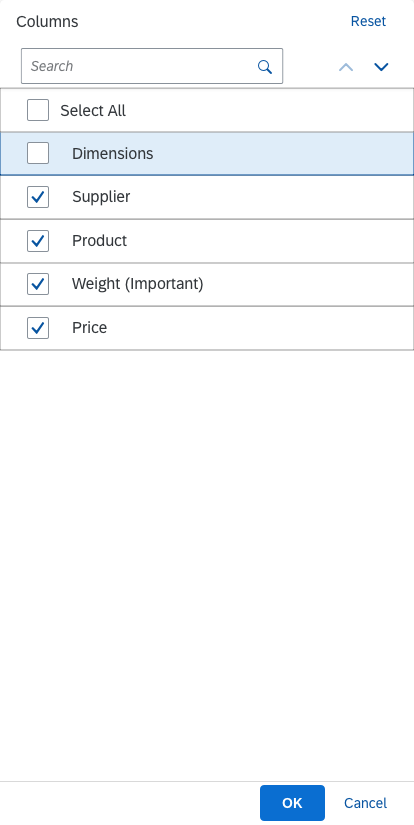
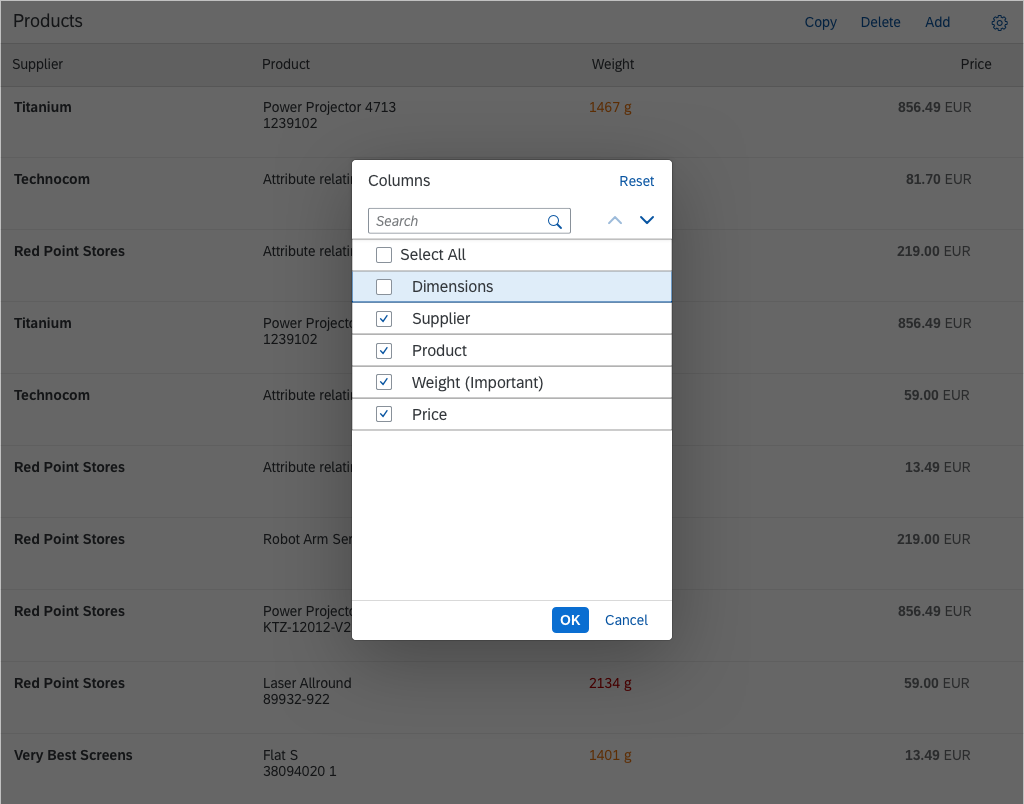
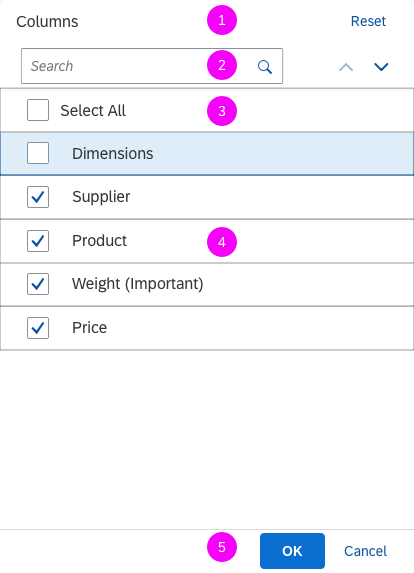
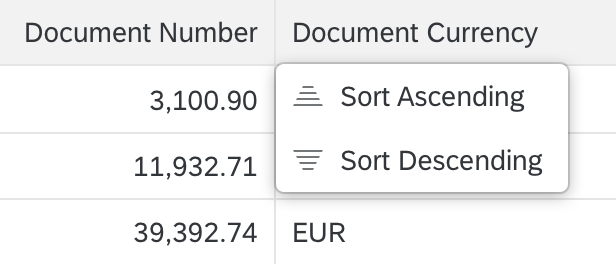
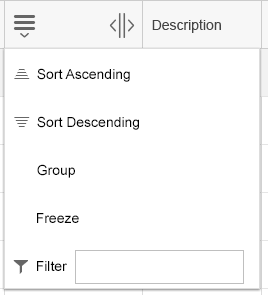
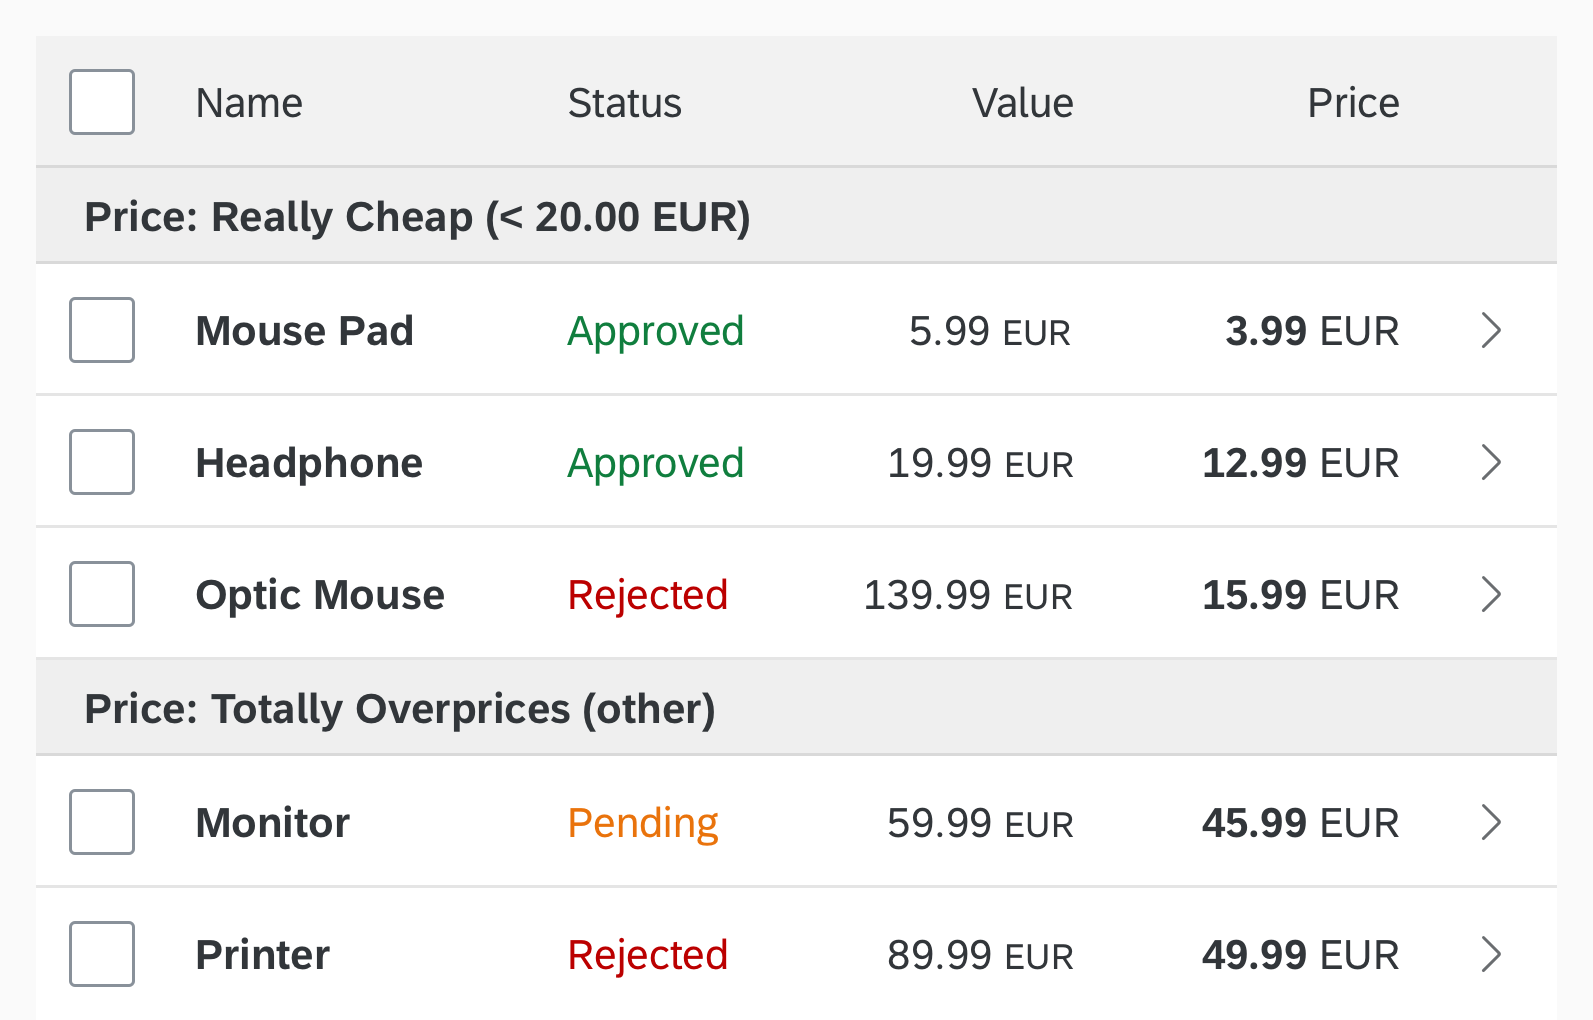
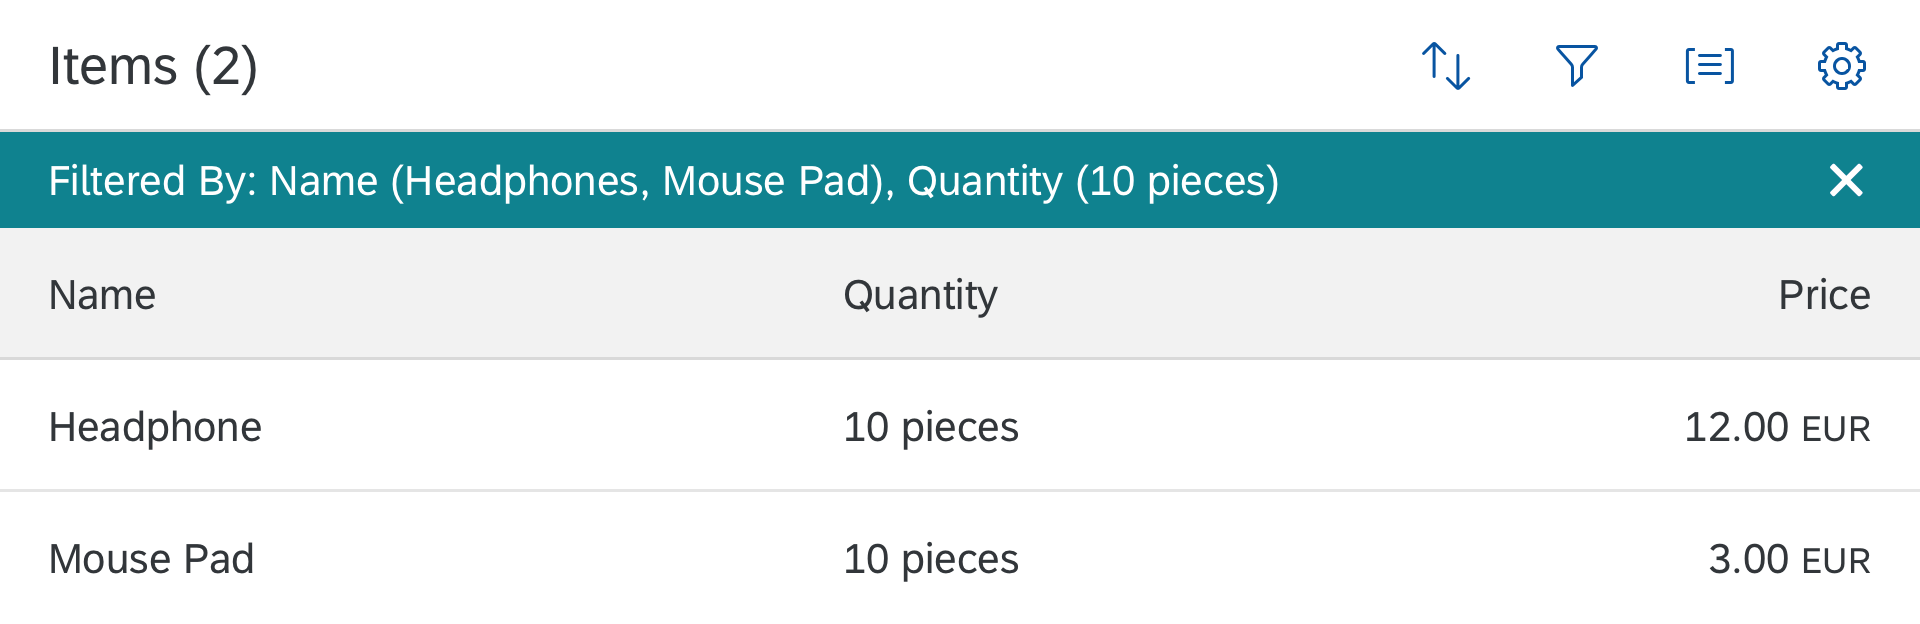
Instead of moving columns to the pop-in area, you can also hide columns of one or more priority levels (property: hiddenInPopin).

In auto pop-in mode, all other pop-in-related column settings are ignored.
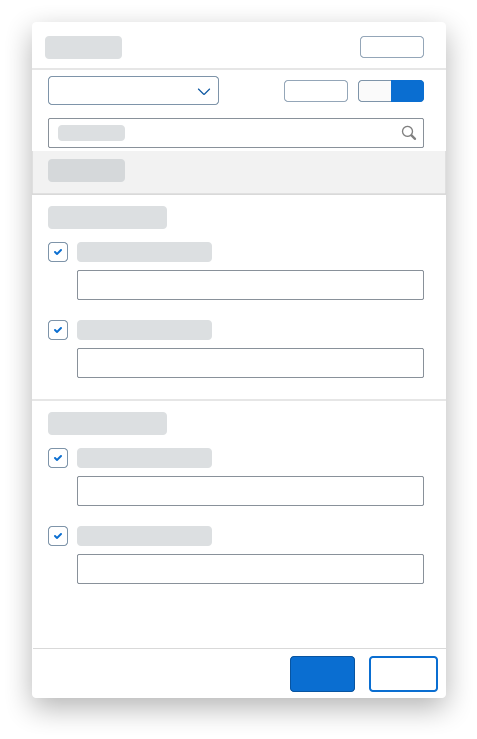
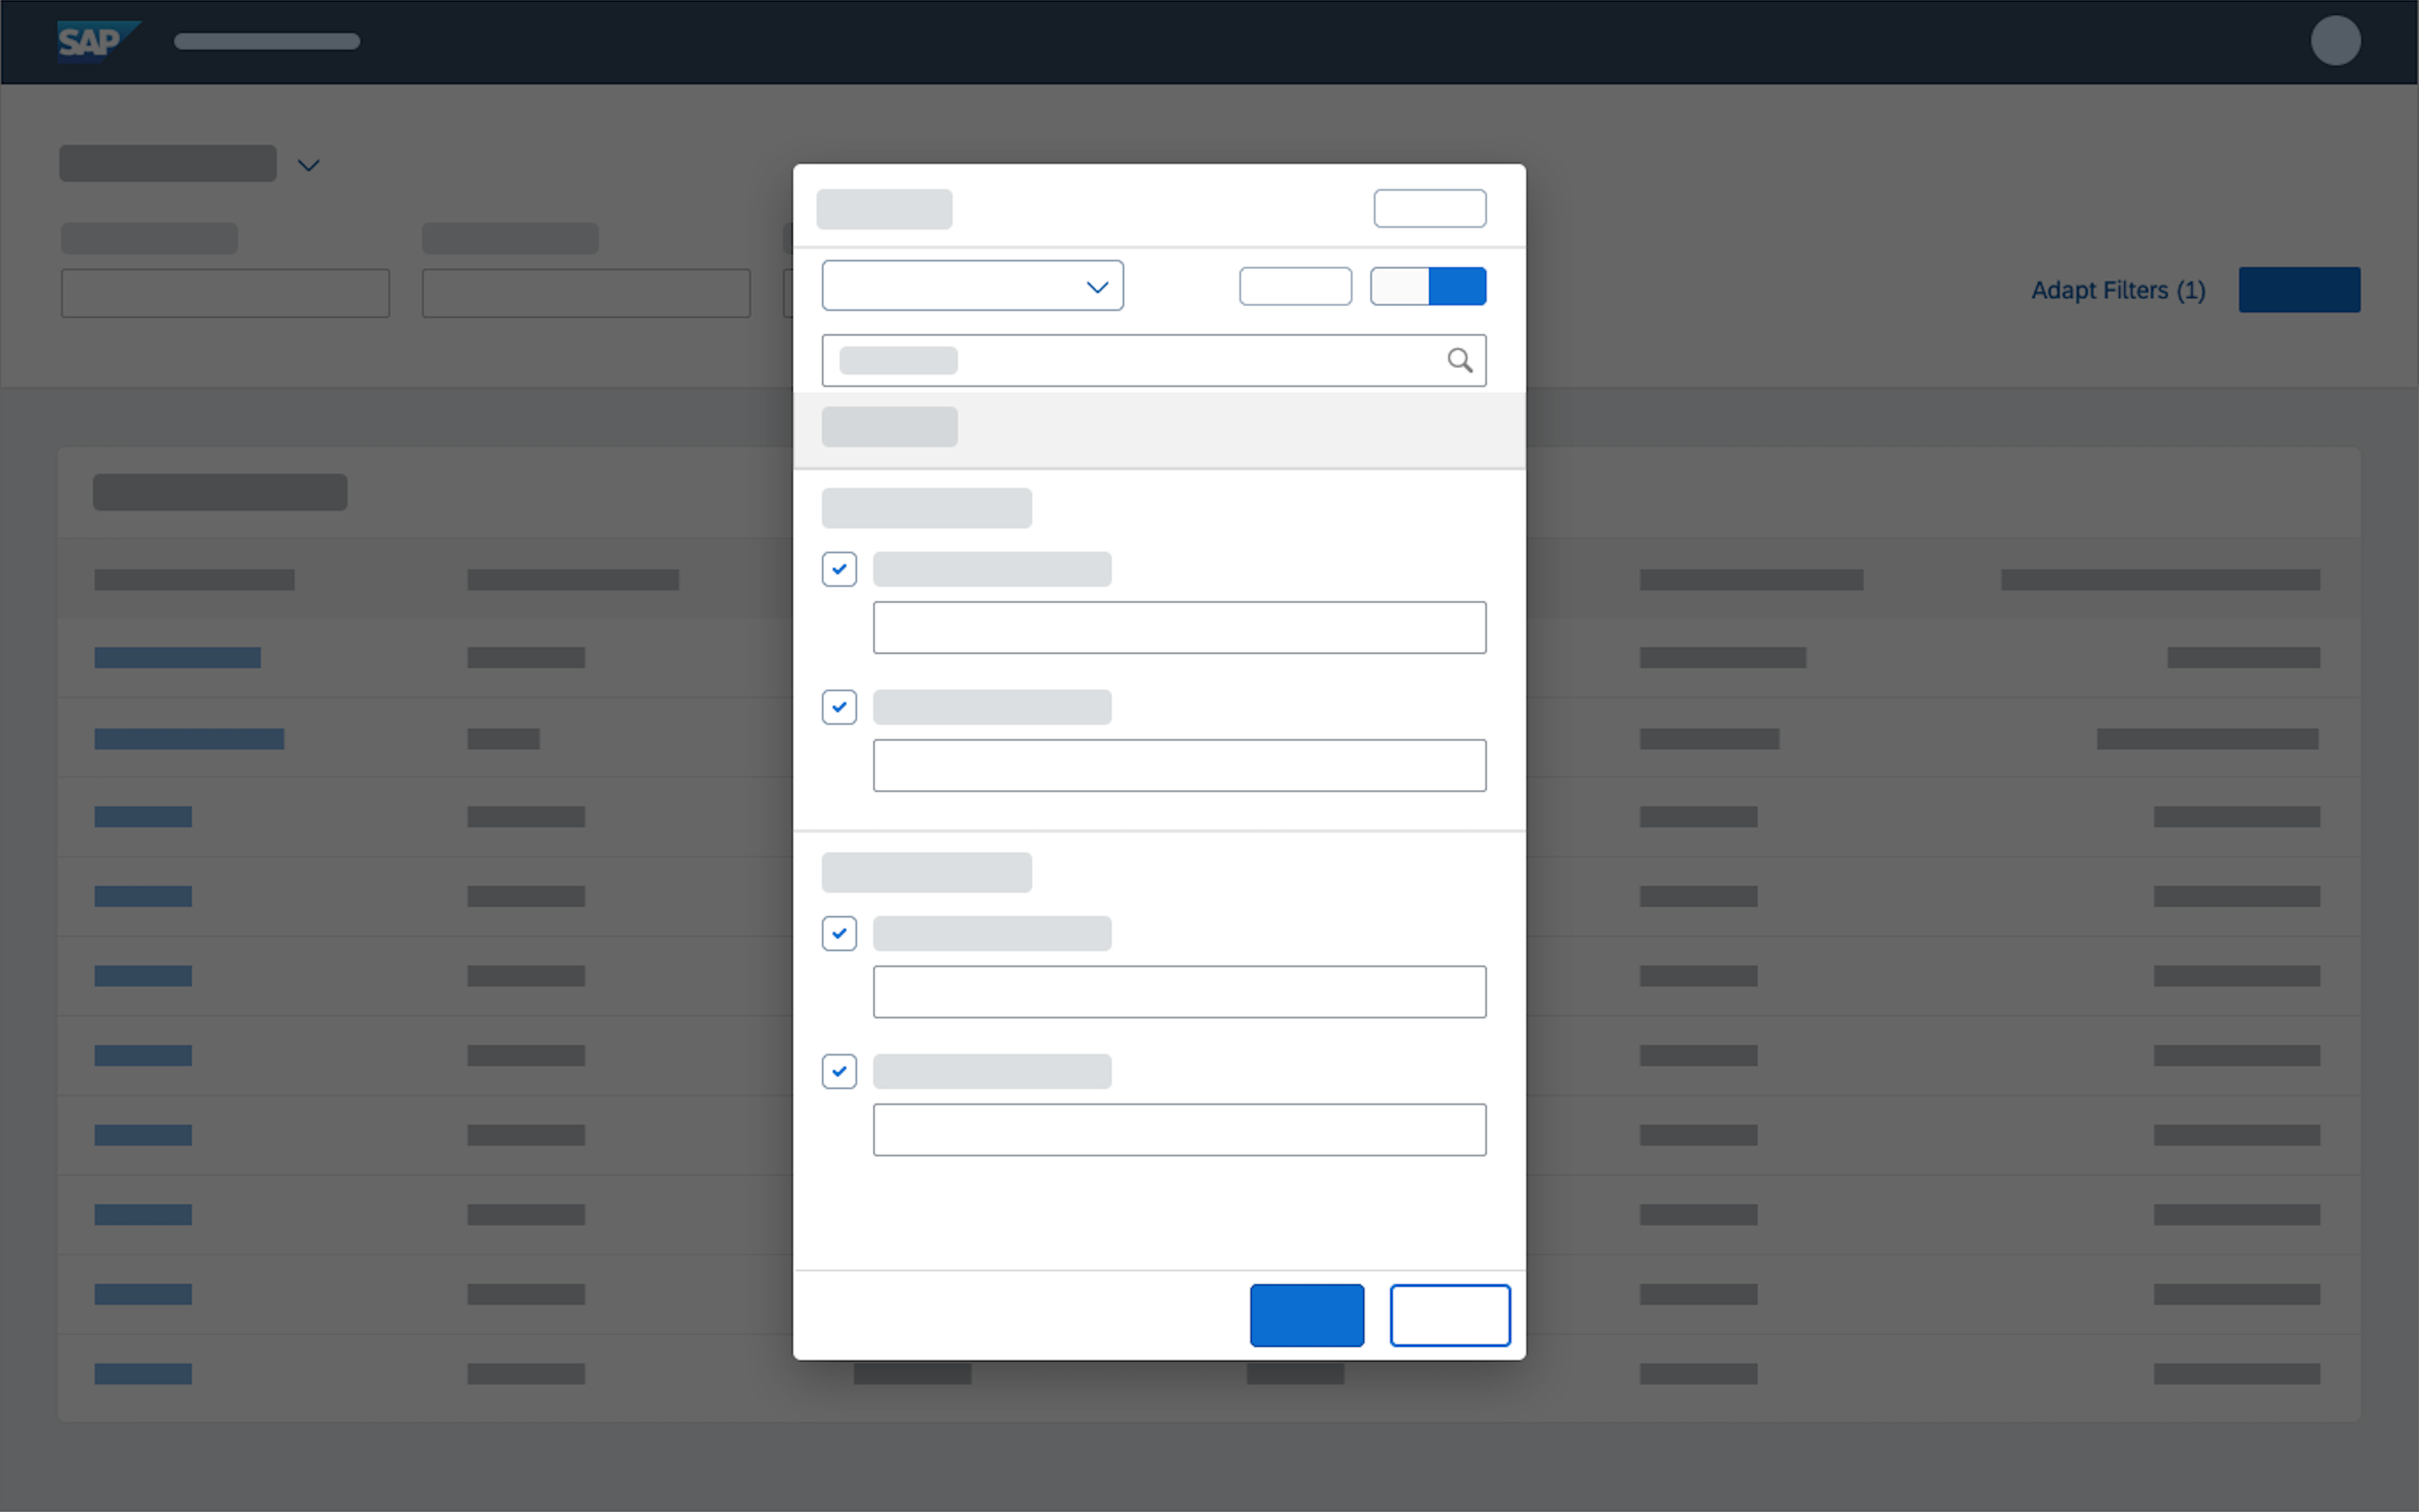
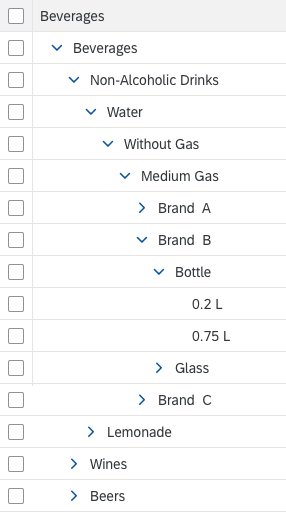
Manual Pop-In Mode

The manual pop-in mode allows more flexibility but also requires more effort if you want it to work in a meaningful way. You also need to invest additional effort if table columns can be shown/hidden or re-ordered.

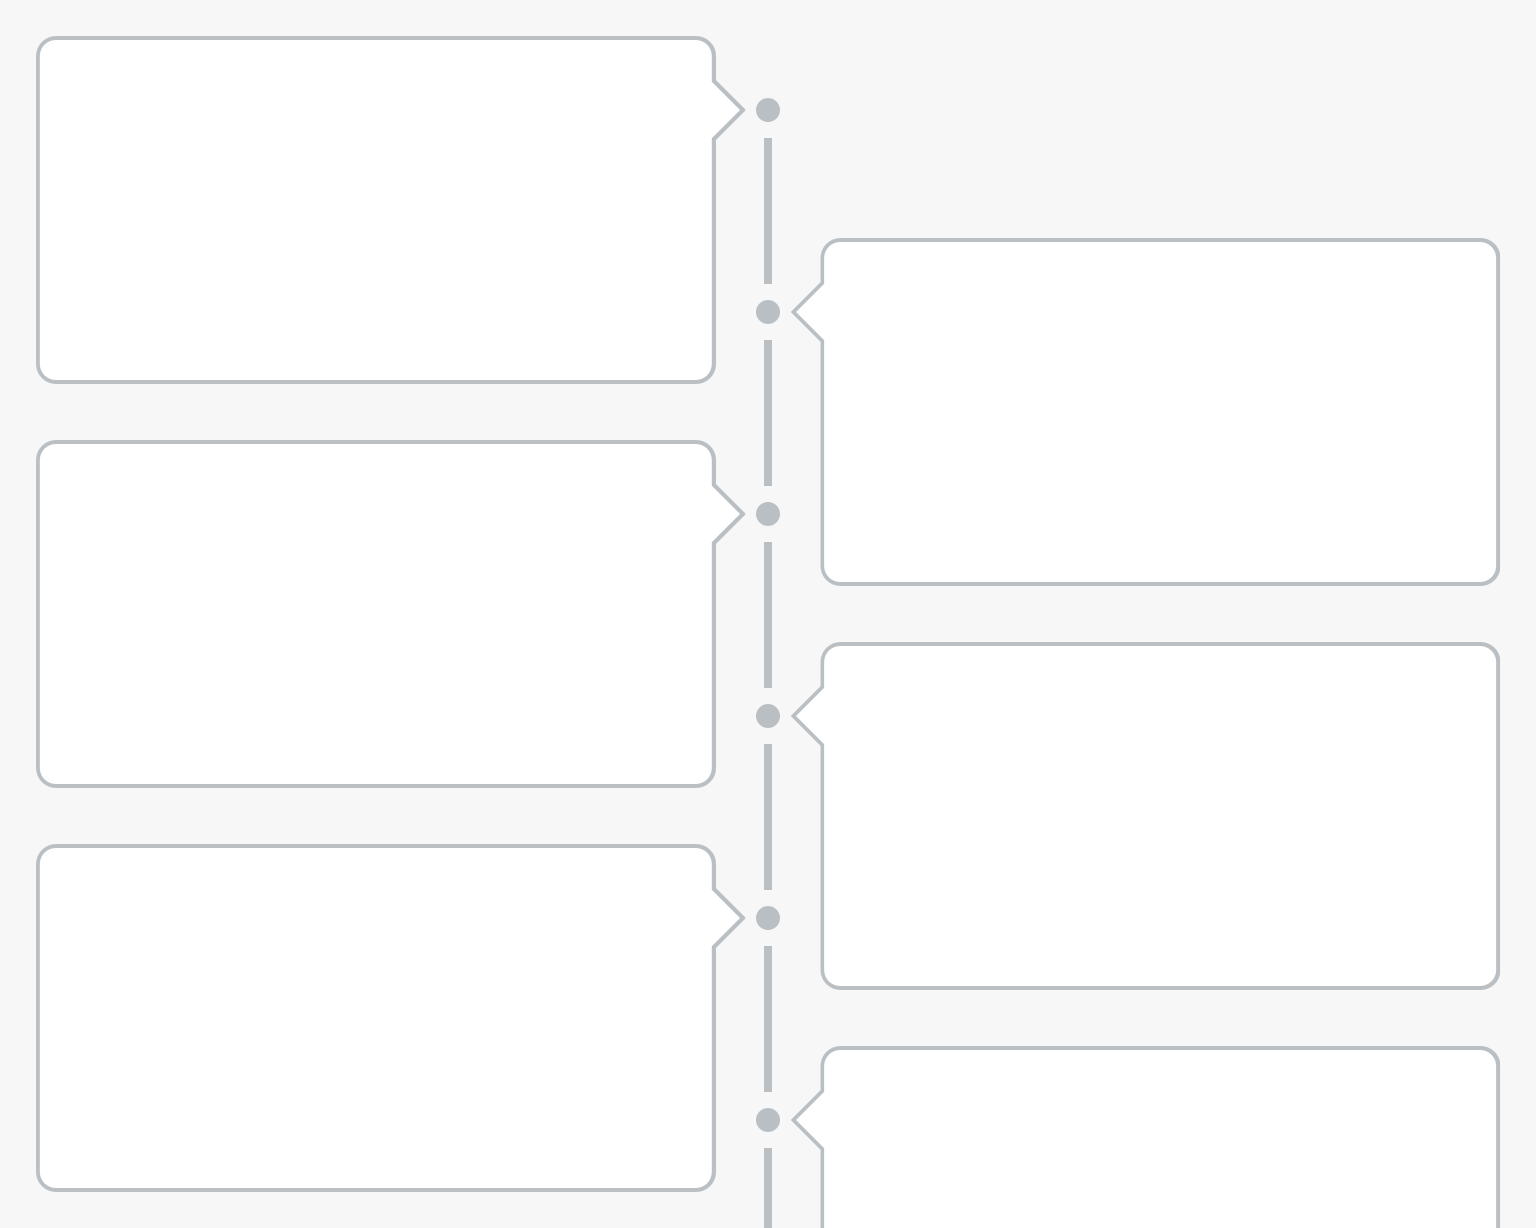
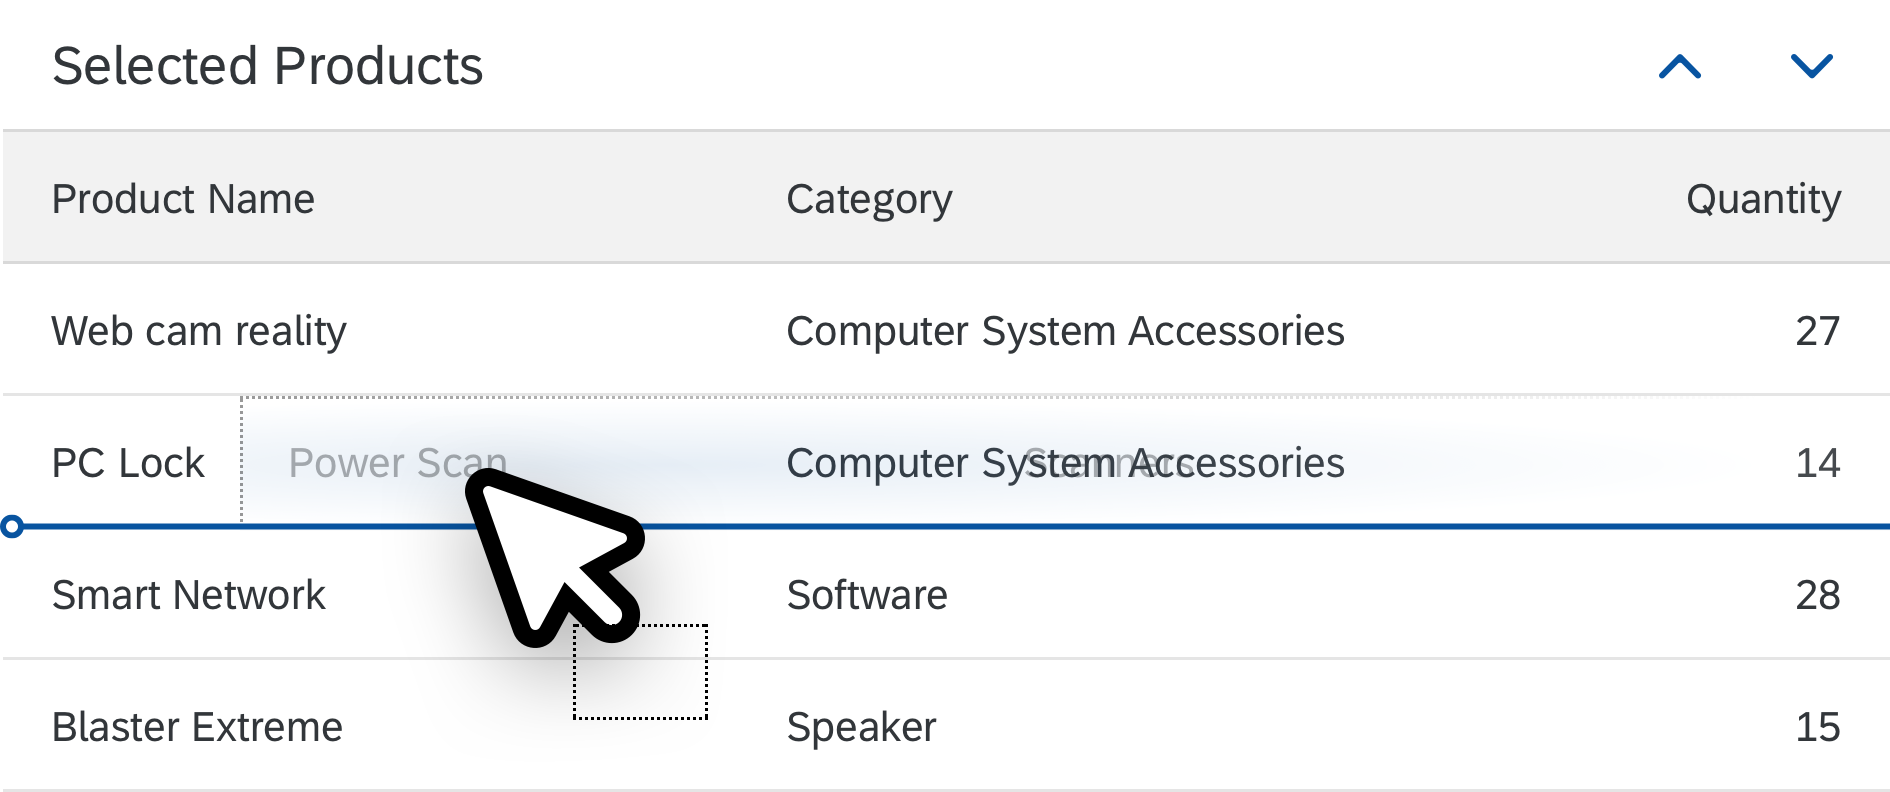
You need to configure each column manually. Depending on the width of the table (in pixels), the column needs to know which of the following responses is required:

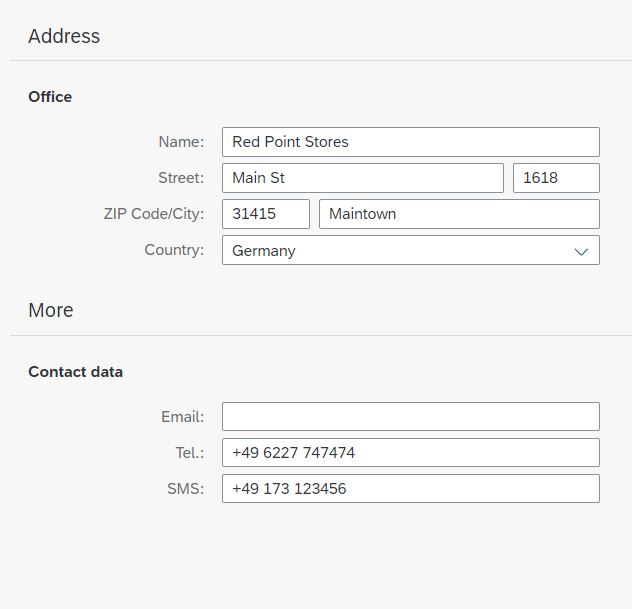
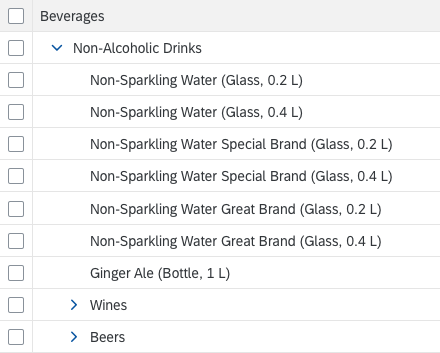
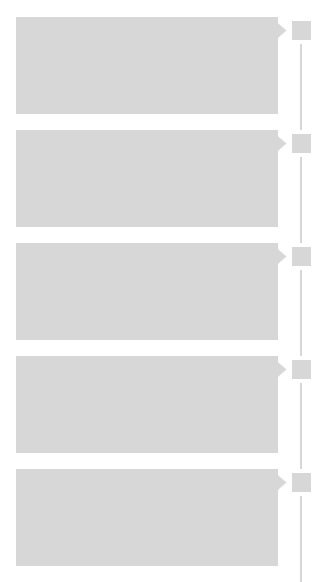
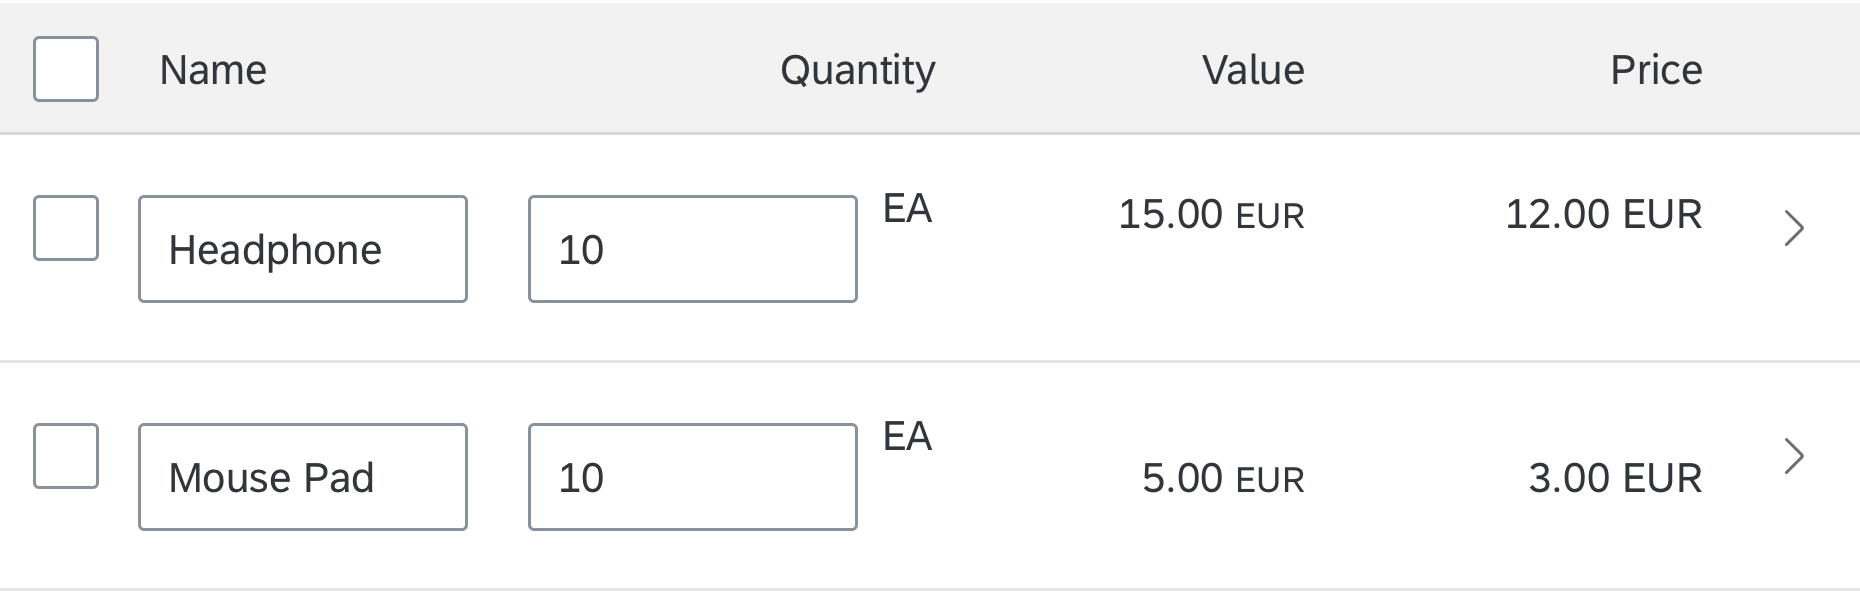
  • Stay in the table layout (in auto pop-in mode, only one column stays in the table layout).
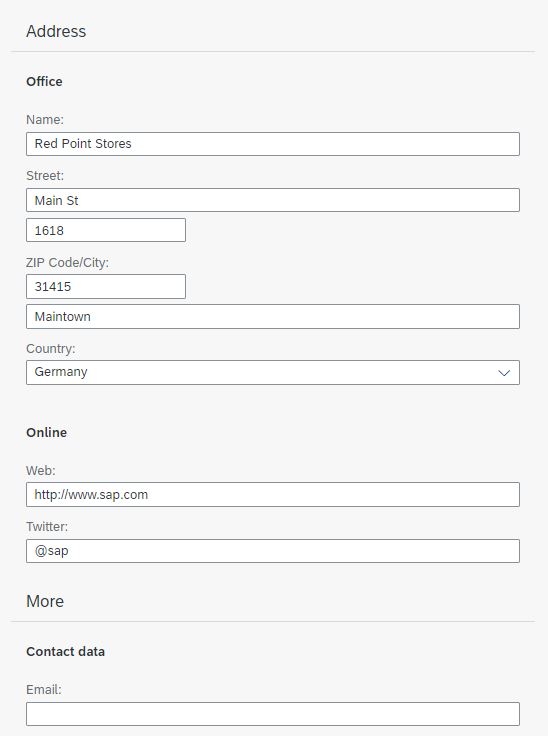
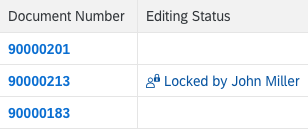
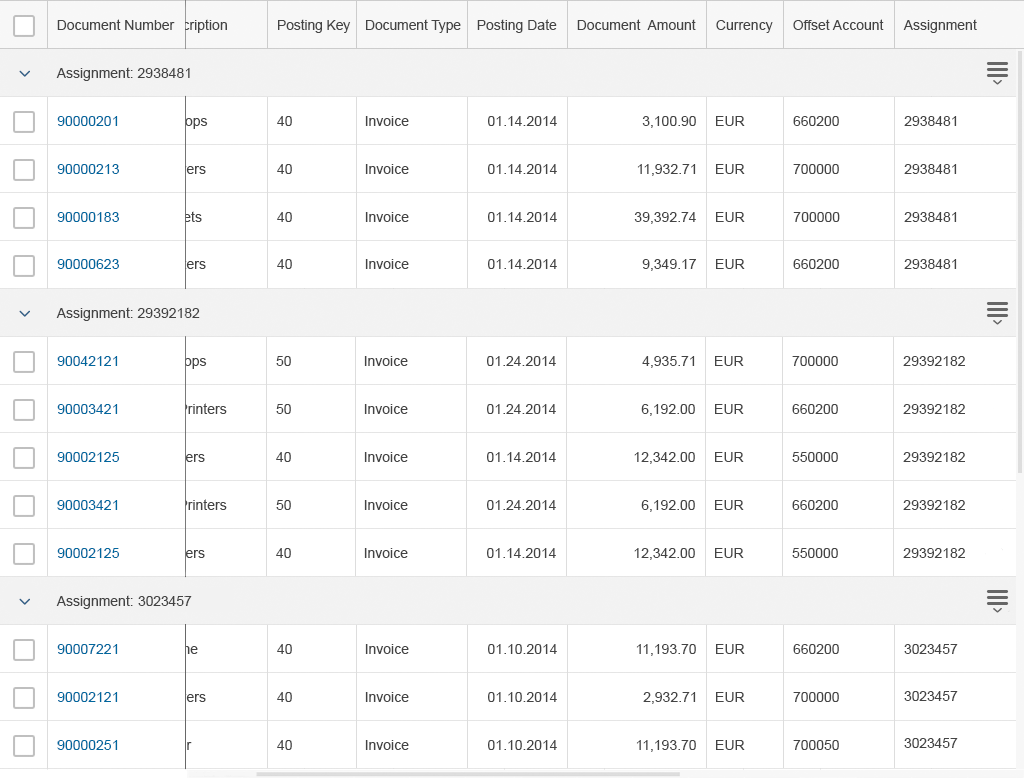
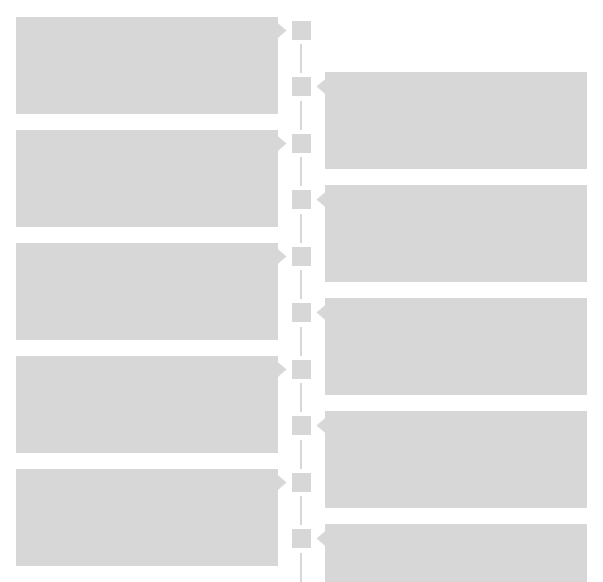
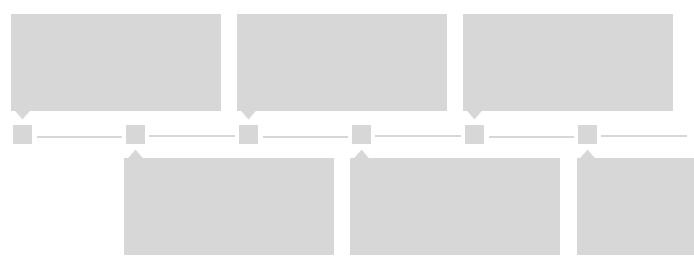
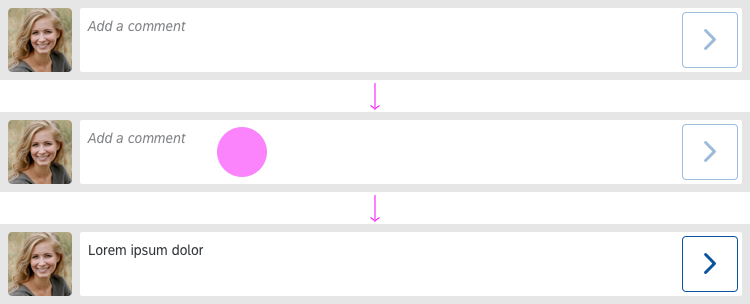
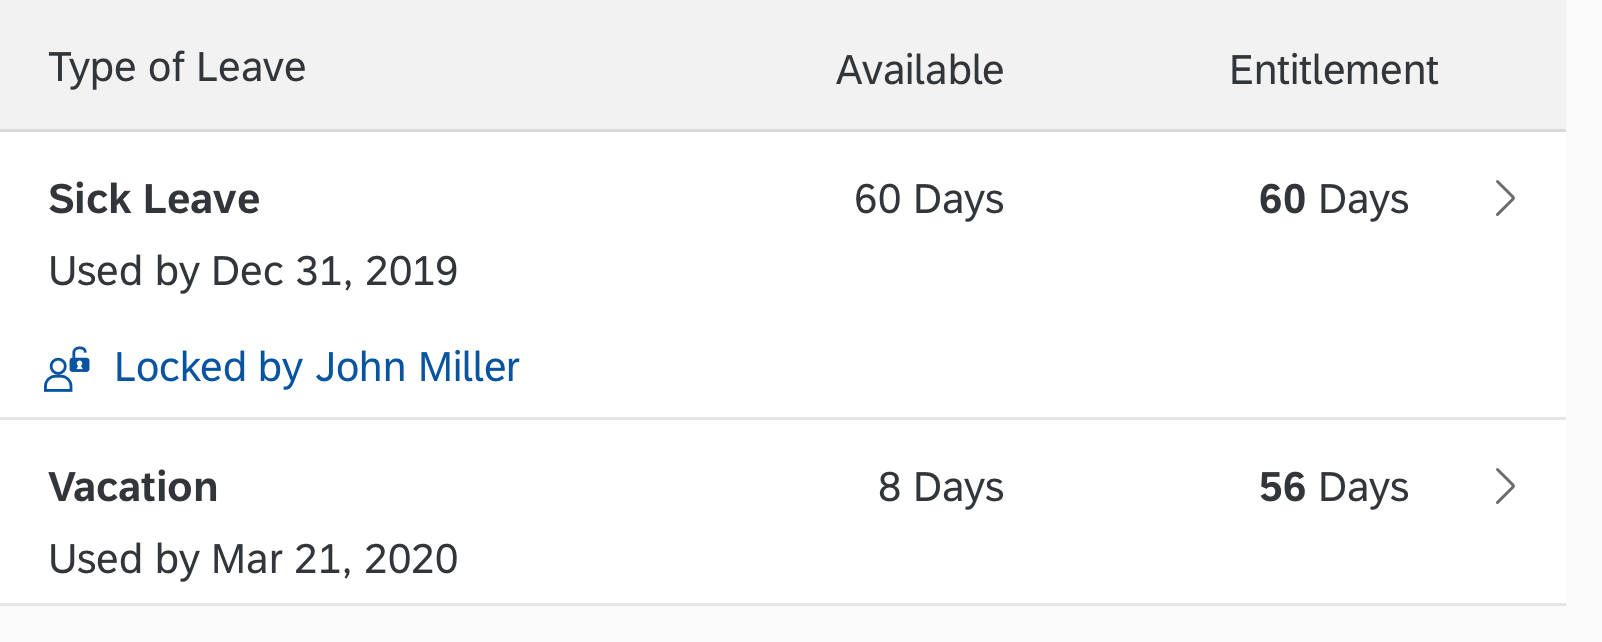
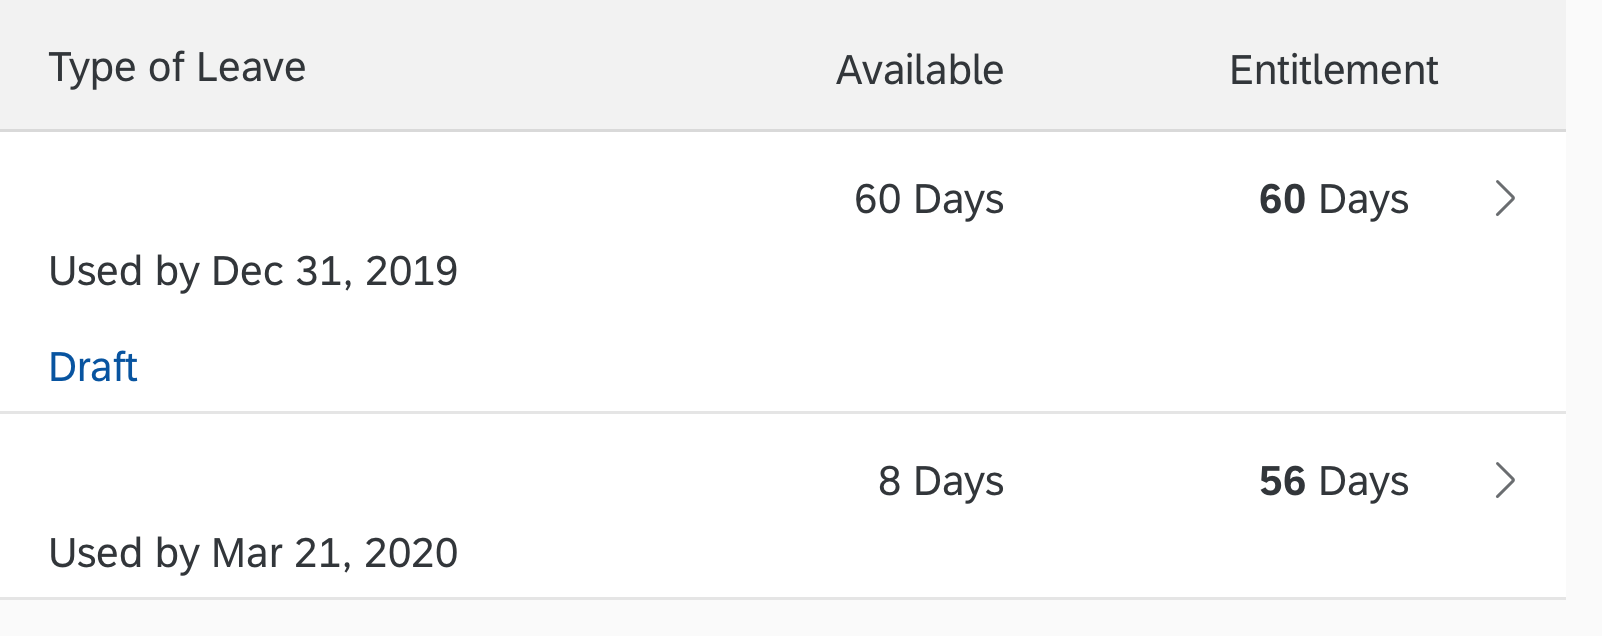
  • Move to the pop-in (sap.m.Column, with the properties: demandPopin, minScreenWidth, popinHAlign, popinDisplay).
  • Hide

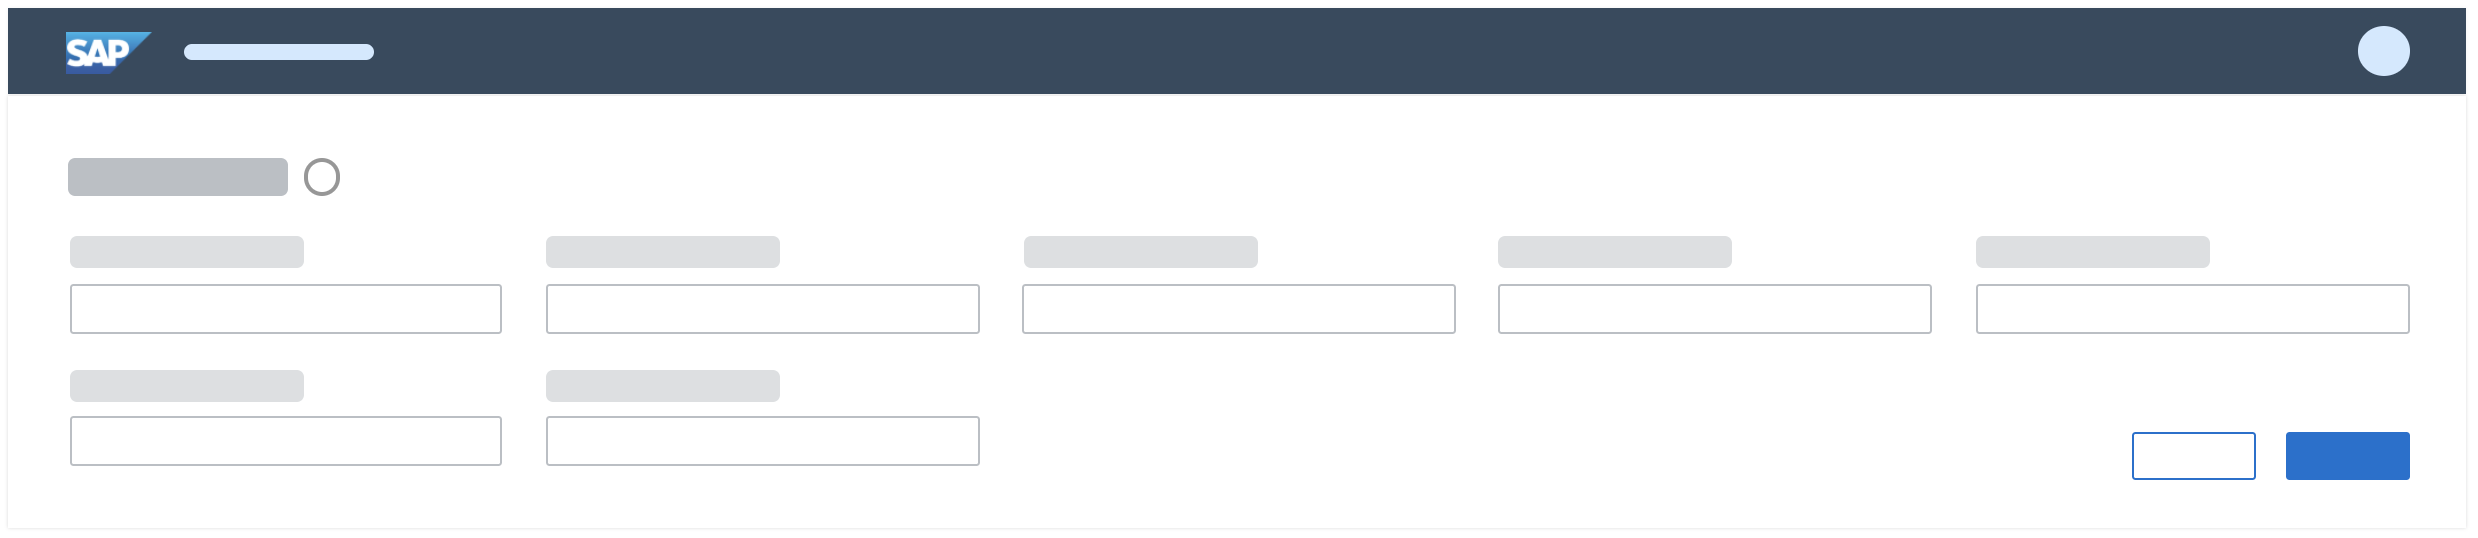
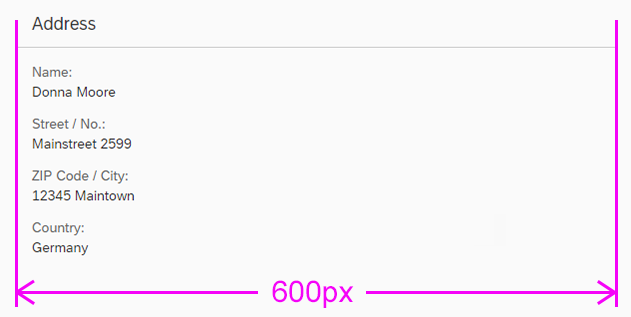
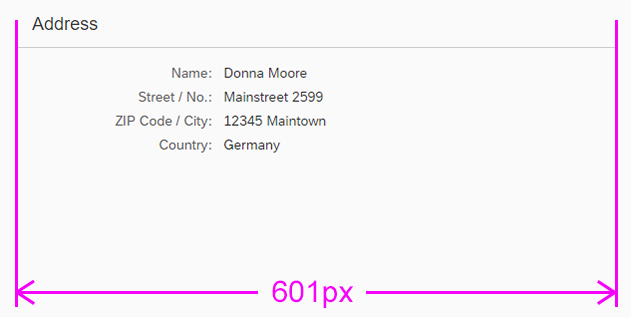
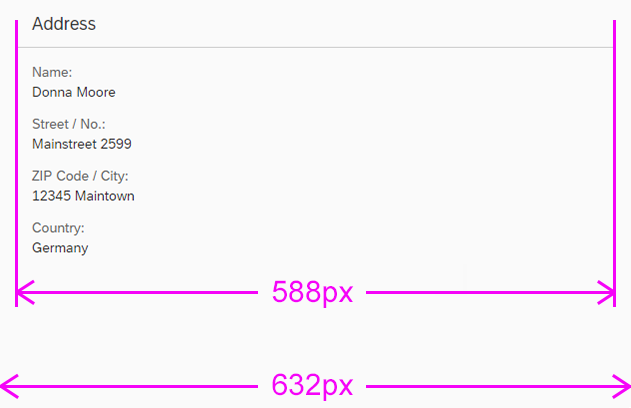
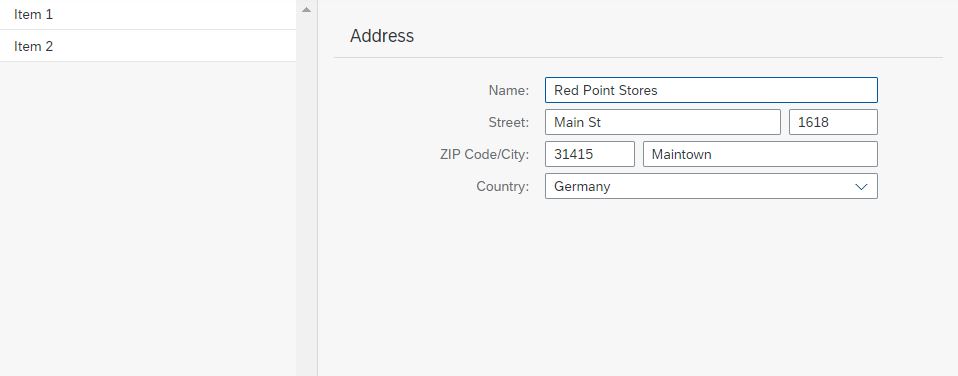
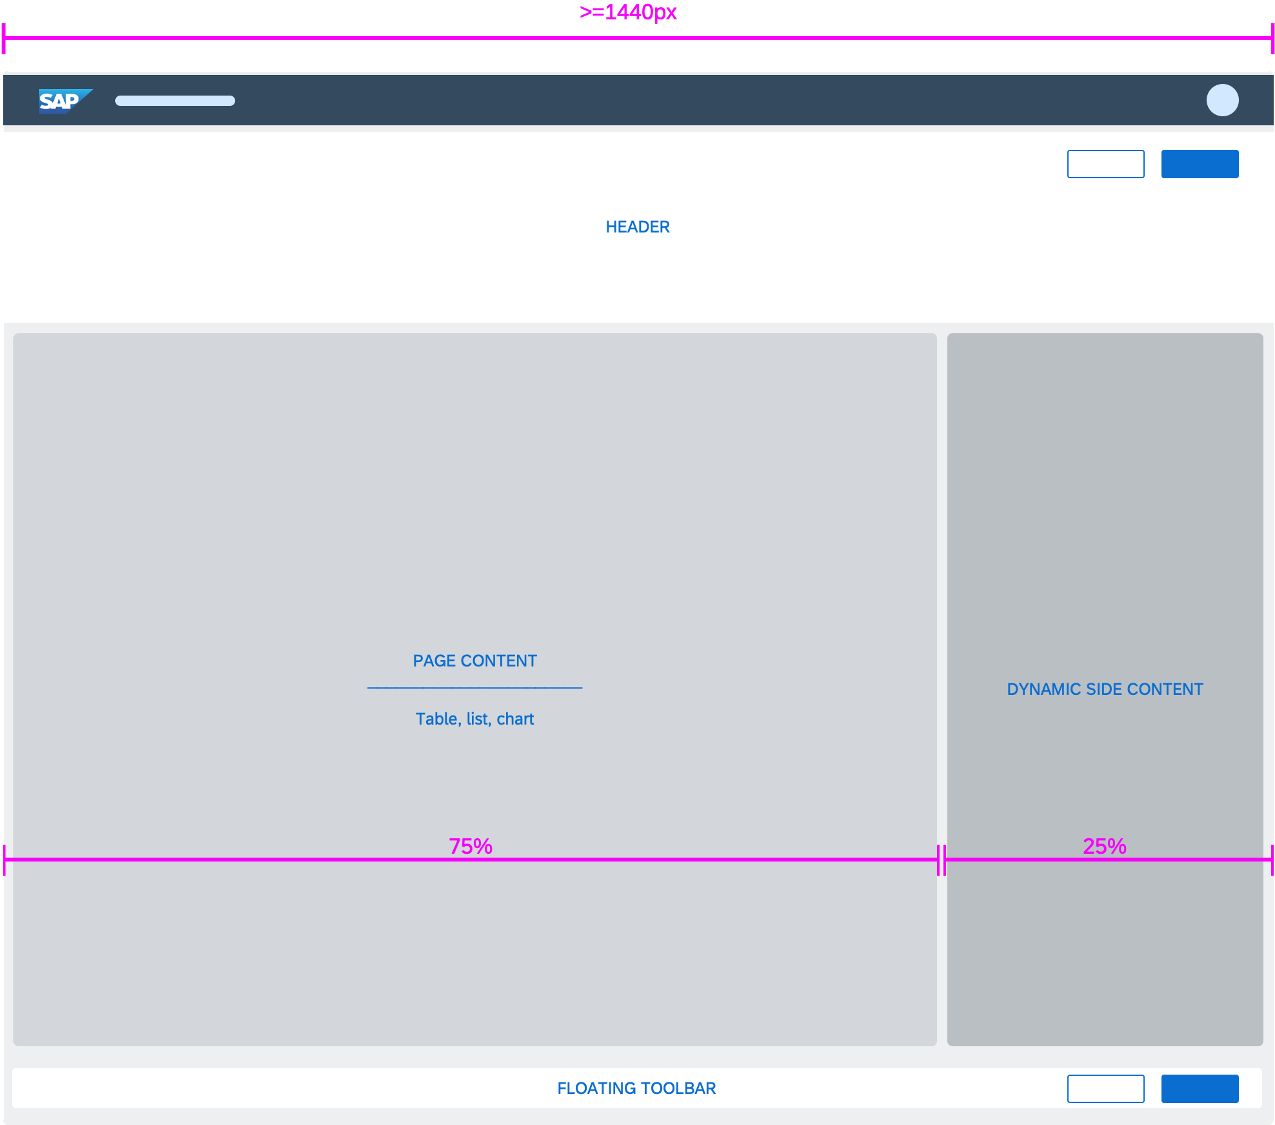
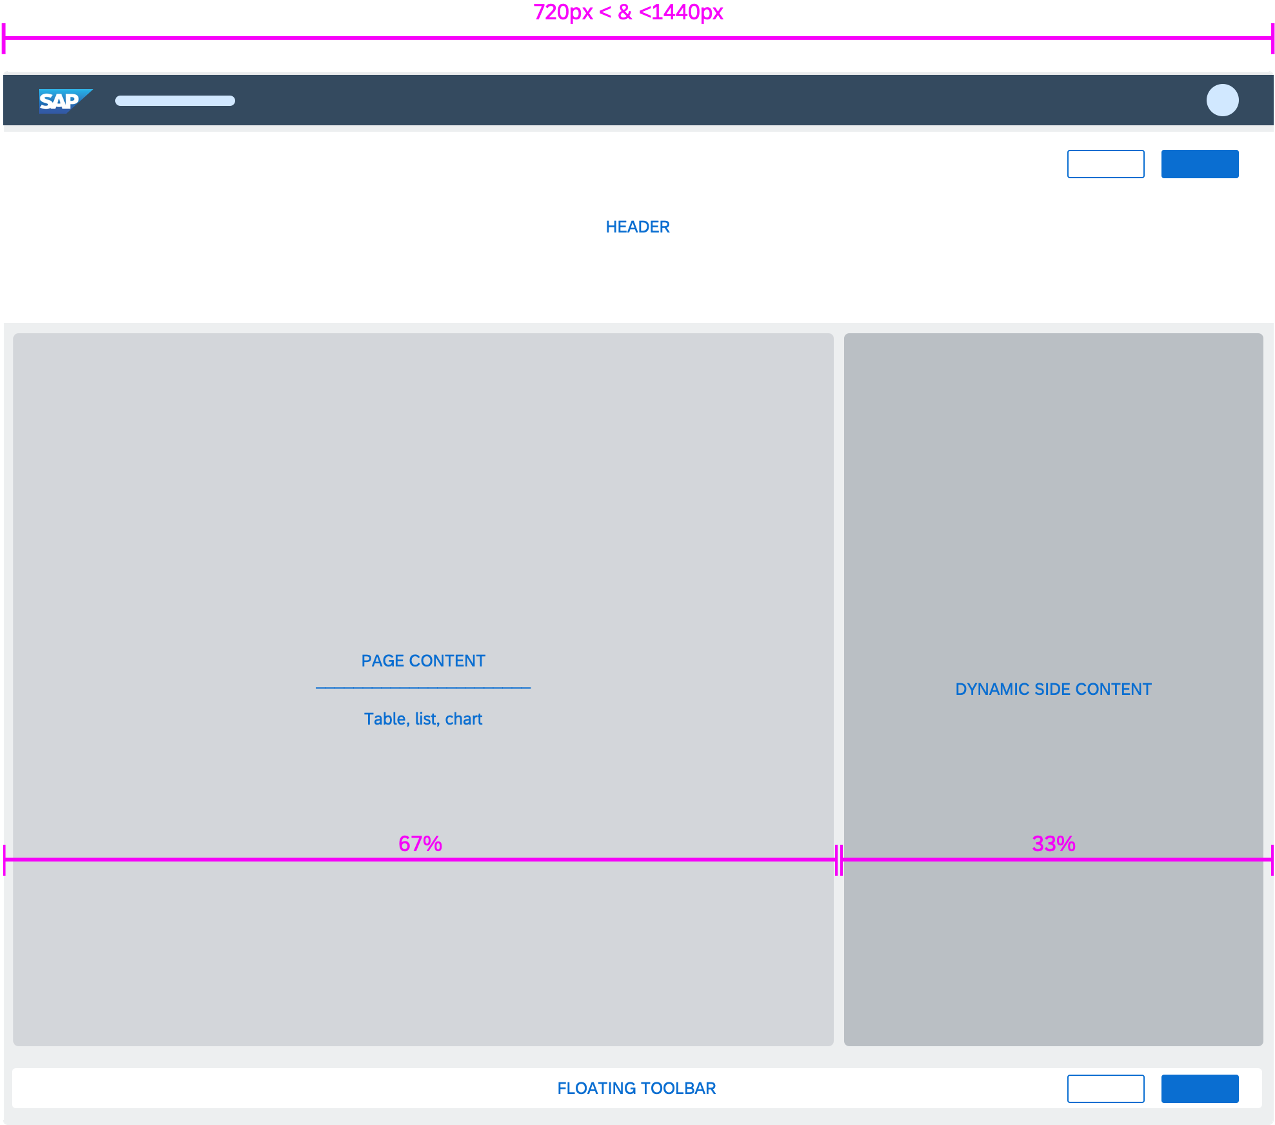
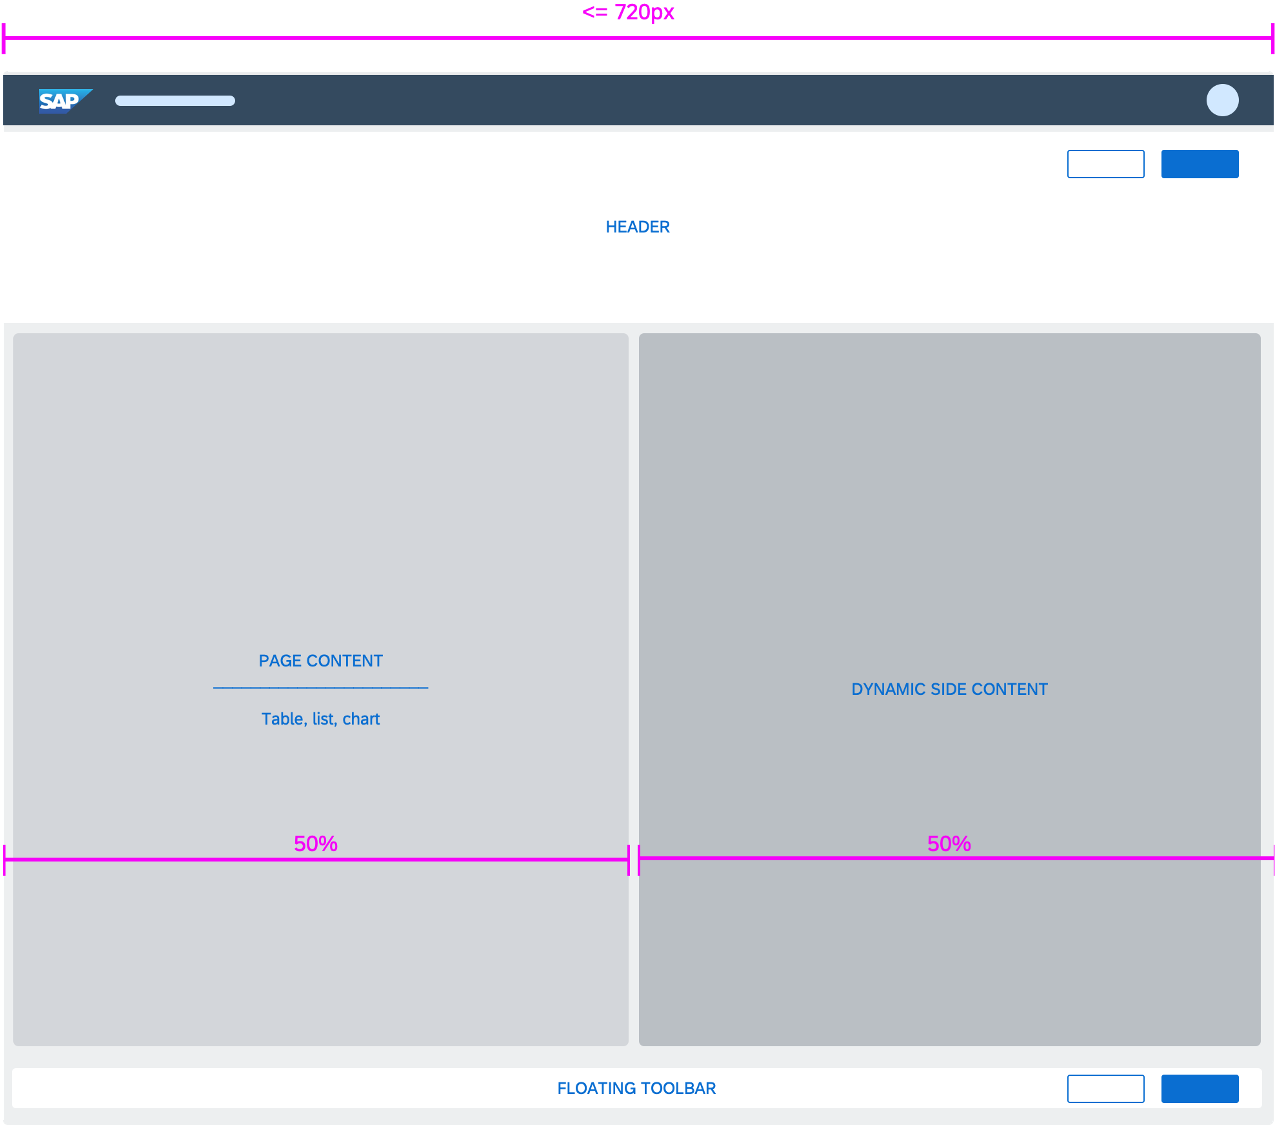
By default, the table width is assumed to be the screen width. If the table does not use the full width of the screen, app developers must configure the table accordingly (sap.m.Table, property: contextualWidth).

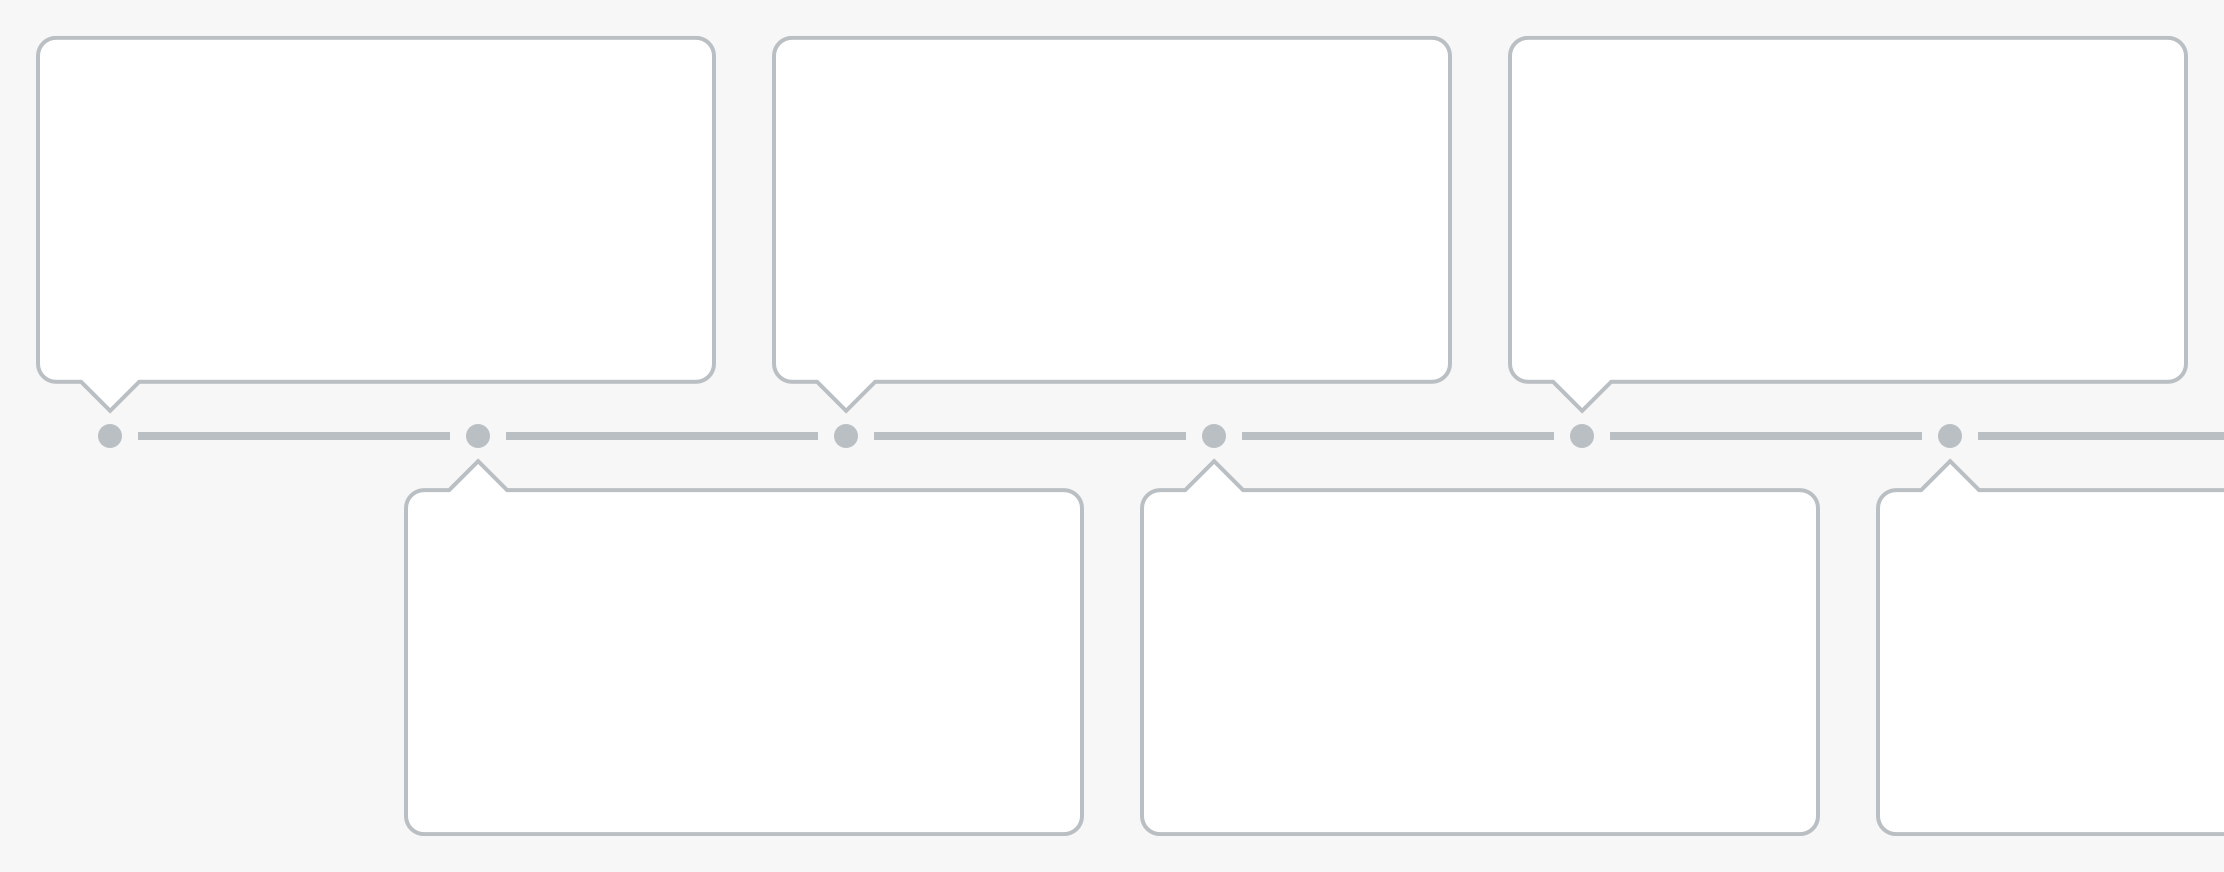
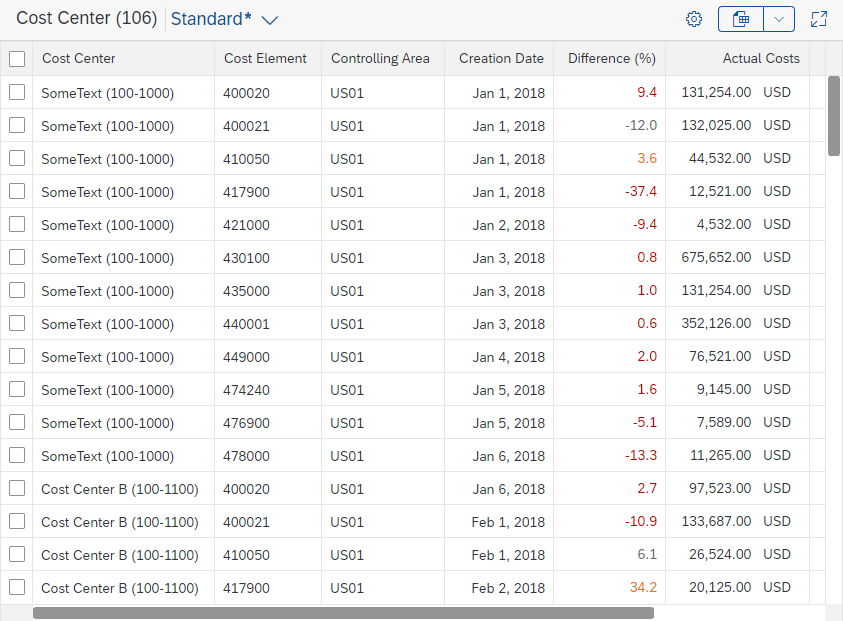
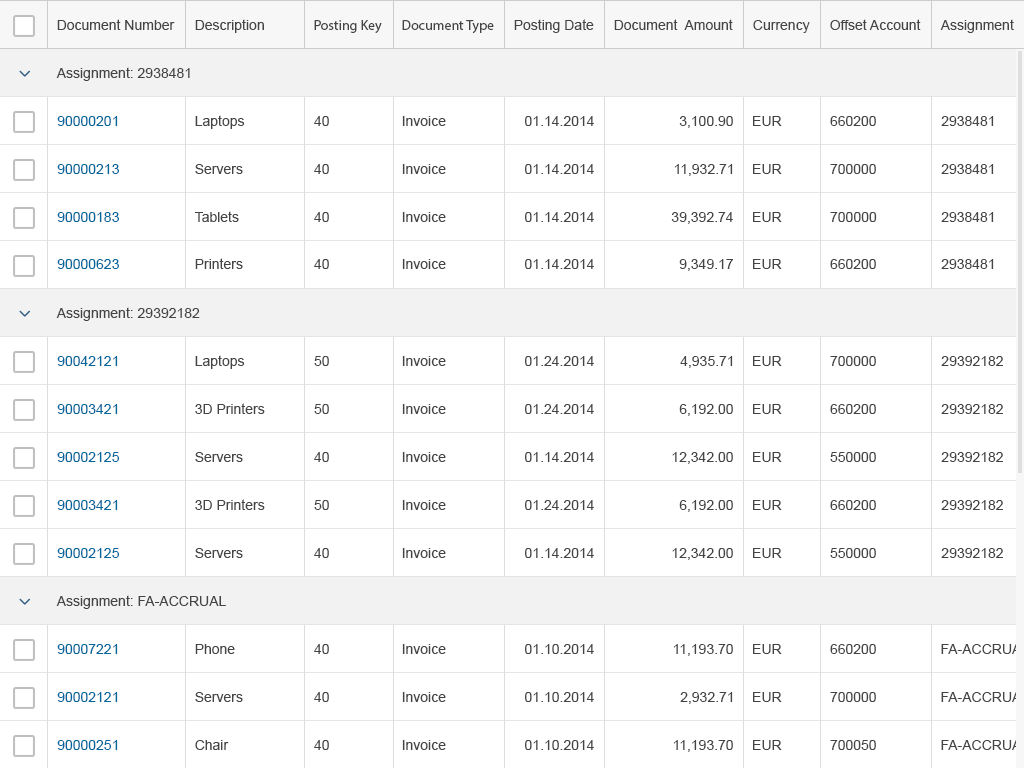
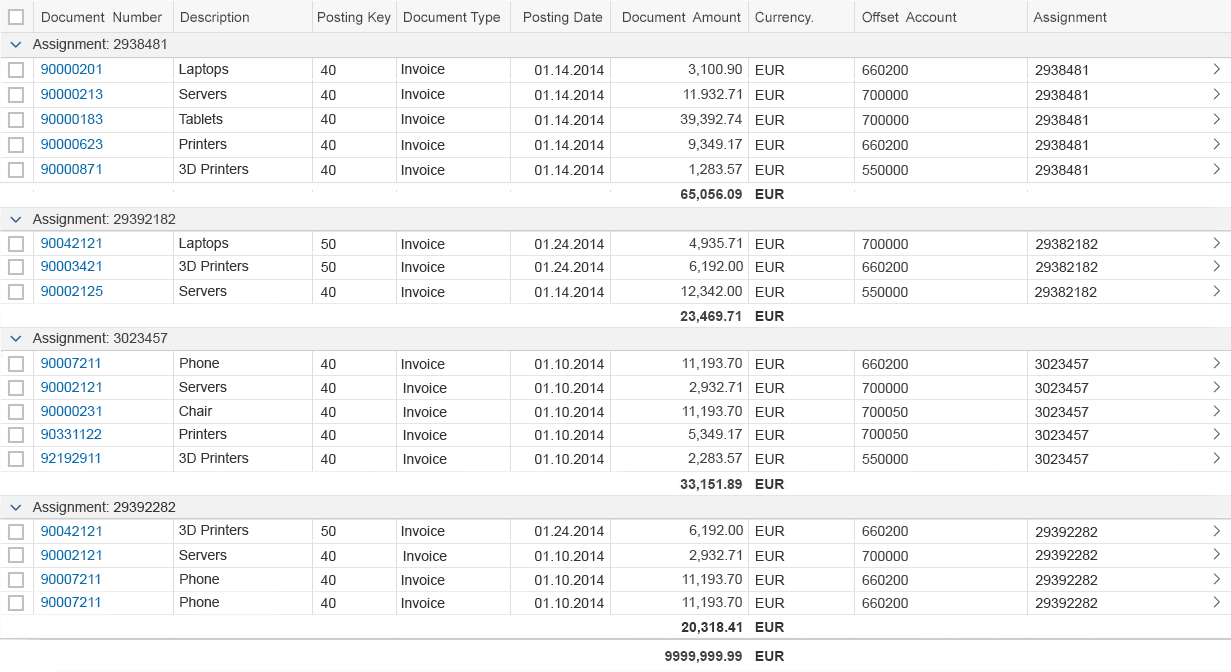
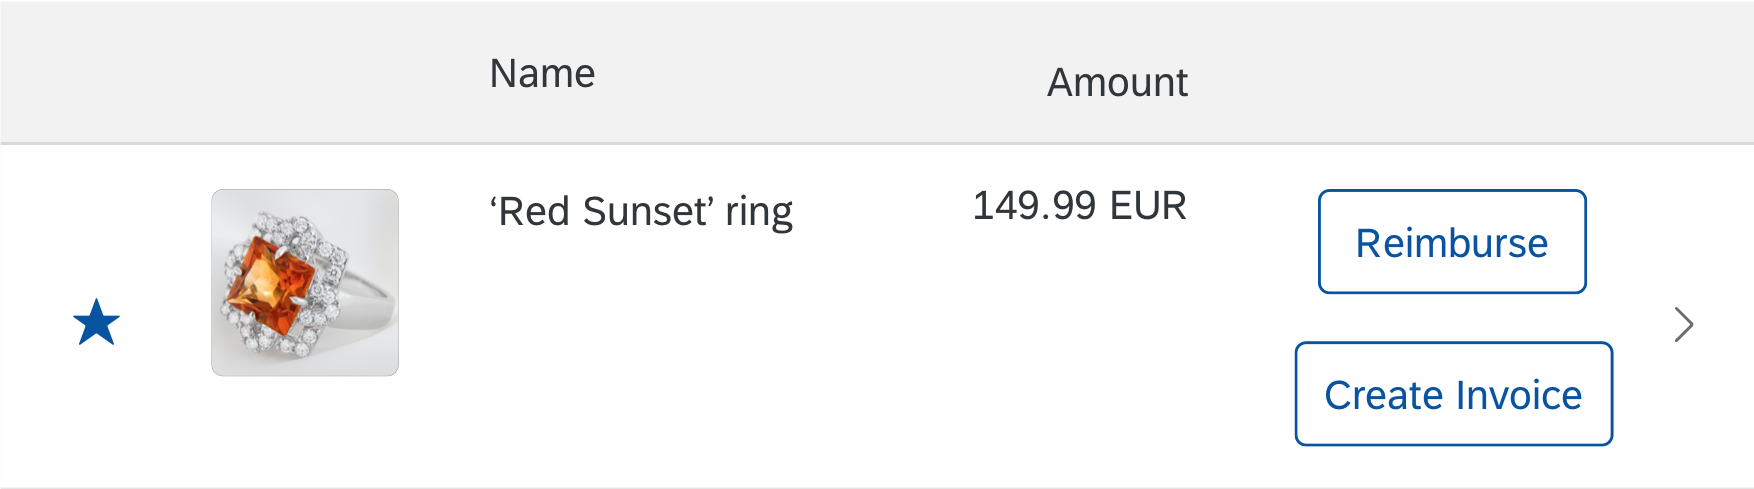
Because you configure the pop-in response for each column individually, you can also handle more than one column at a given breakpoint. This allows you to move several columns to the pop-in area at once, which isn’t possible in auto pop-in mode

Each of the three device types has a predefined value for the screen width. However, you will get better results if you offer more breakpoints by using pixel values instead of the predefined values.

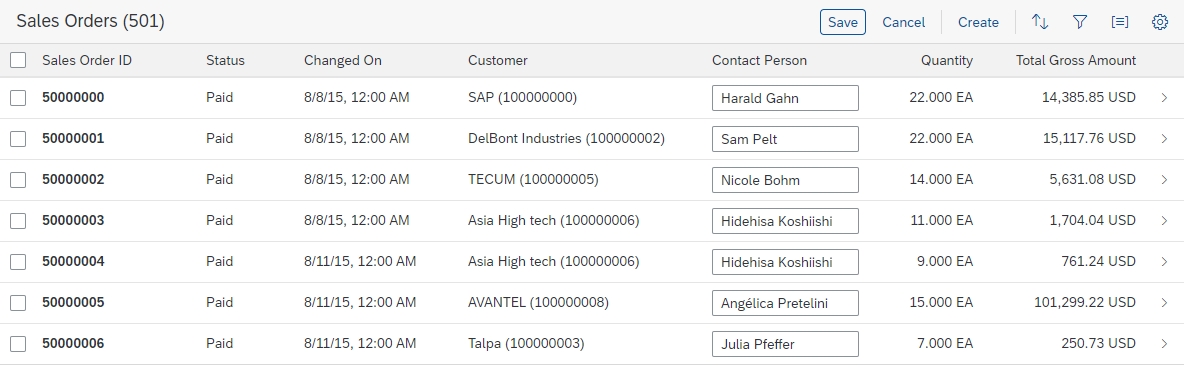
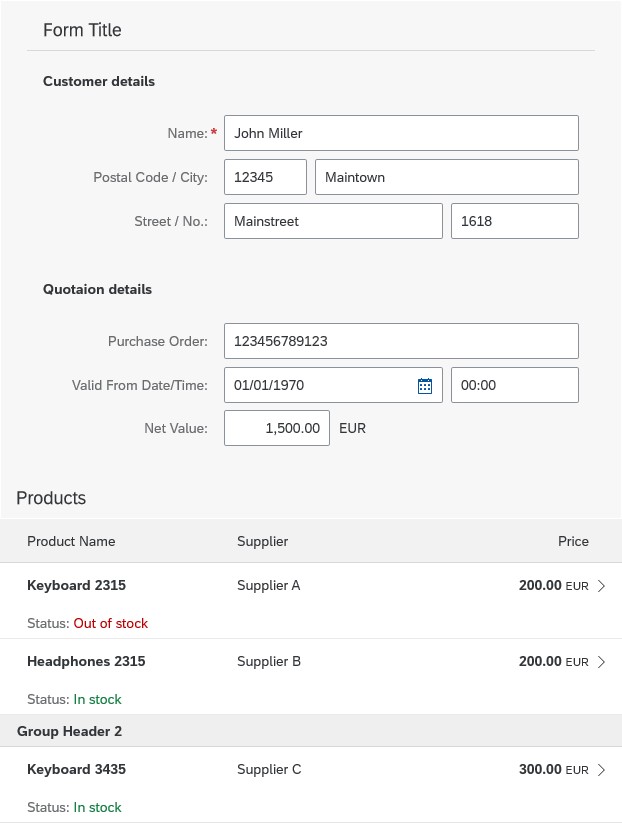
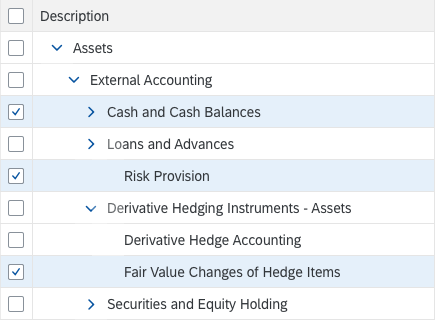
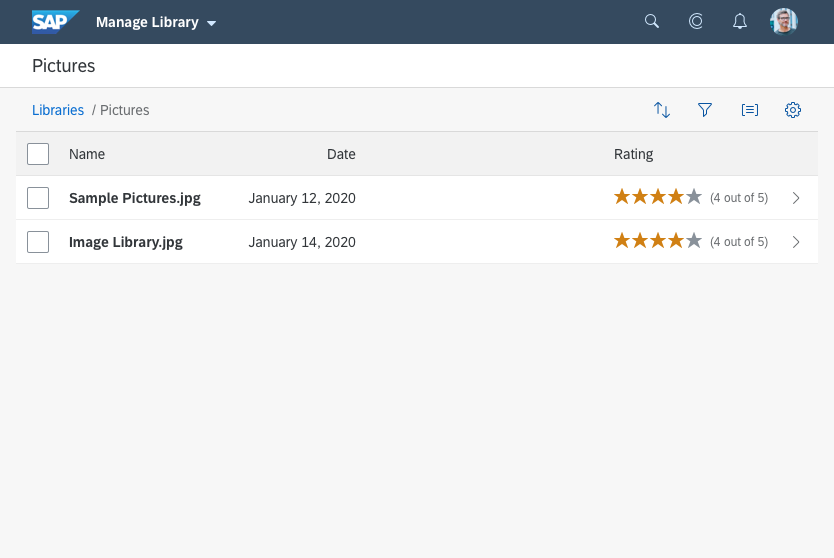
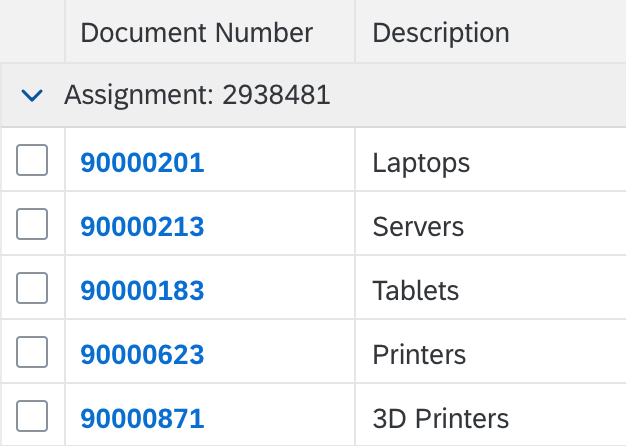
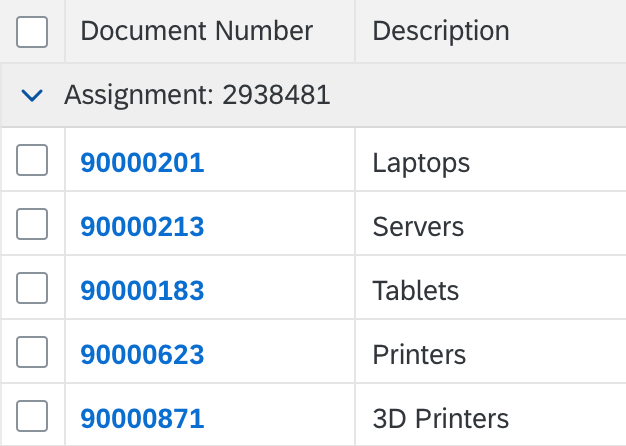
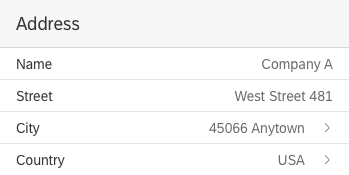
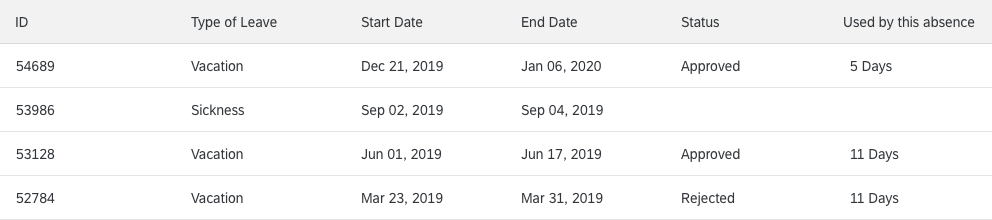
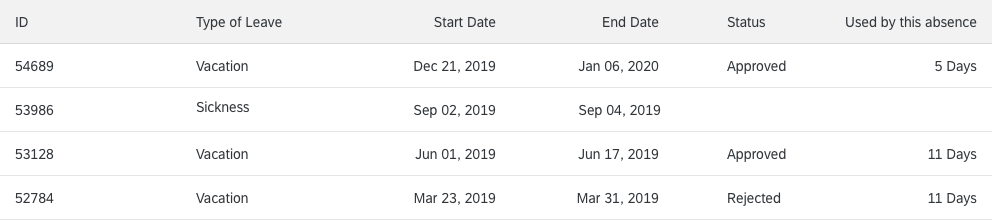
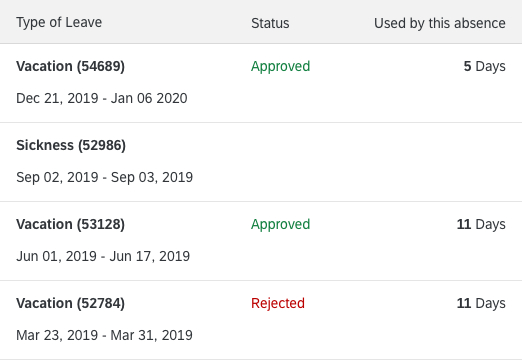
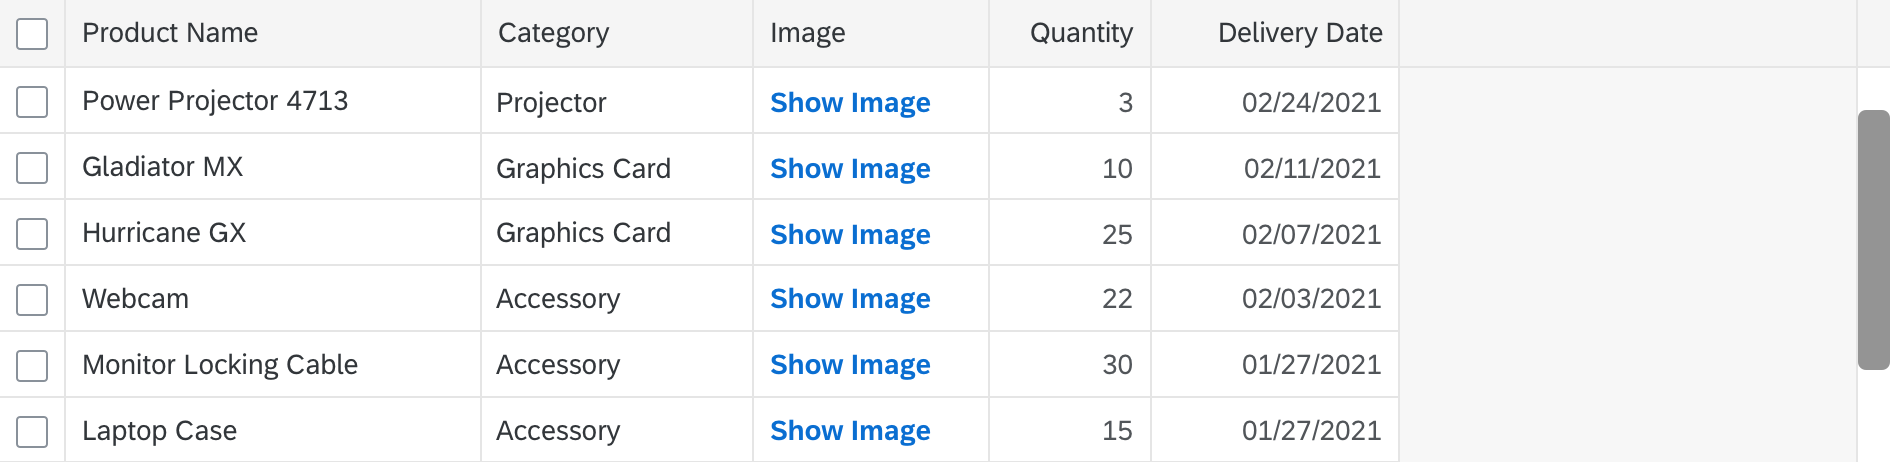
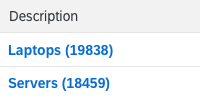
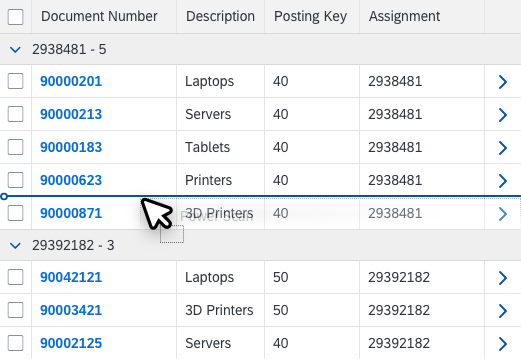
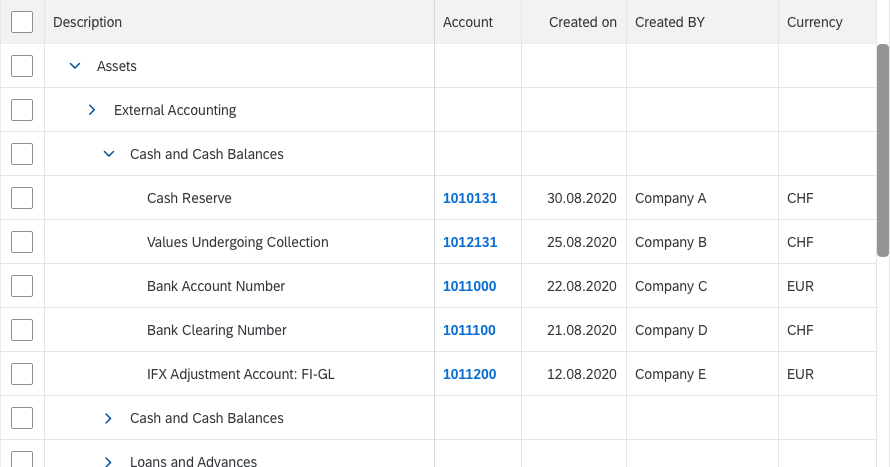
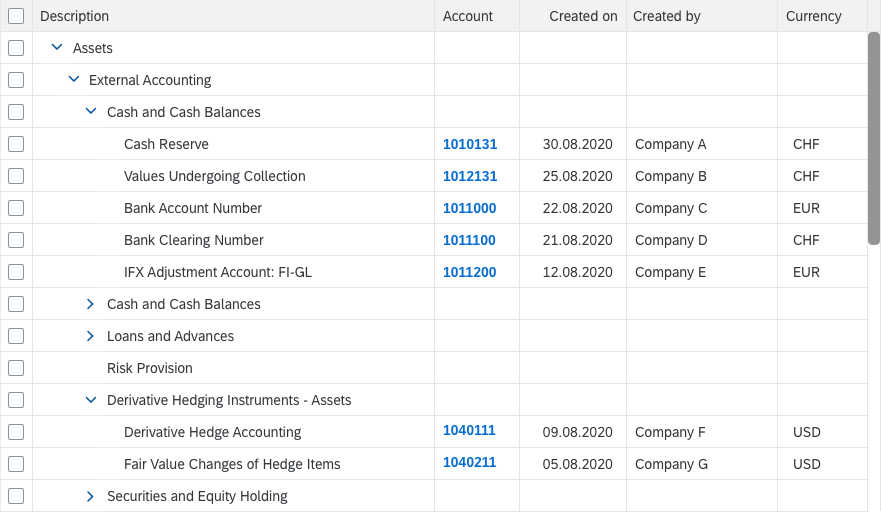
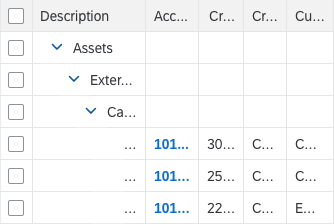
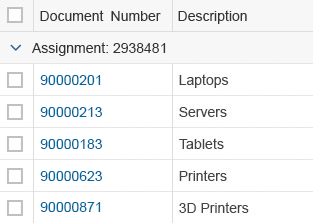
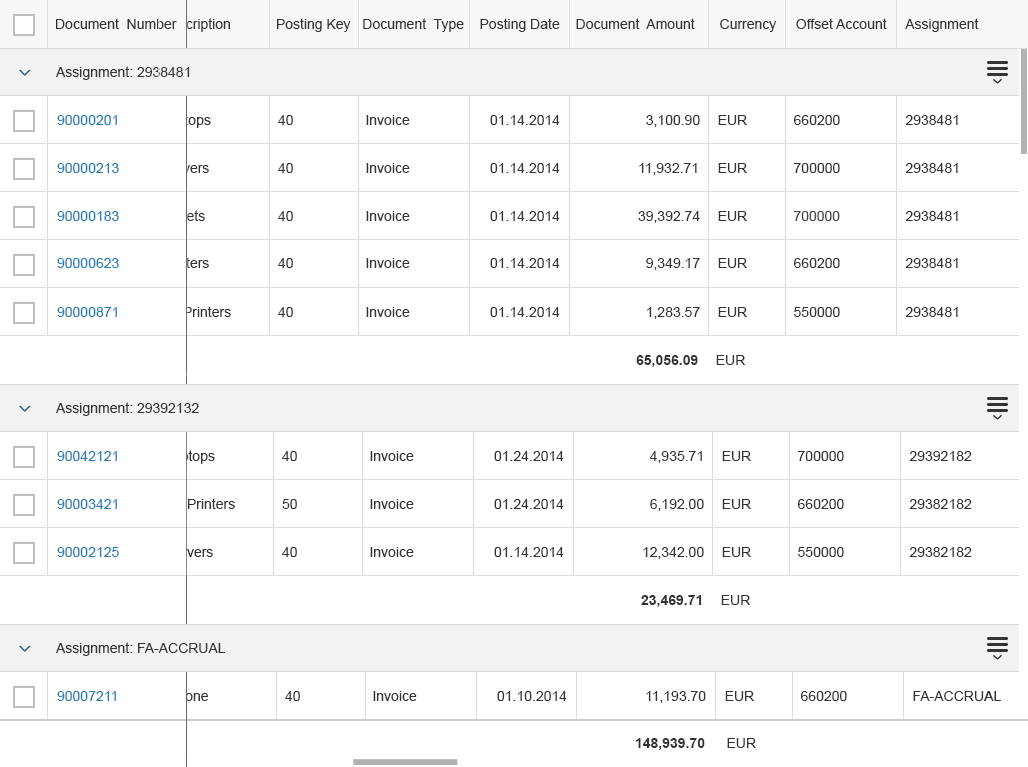
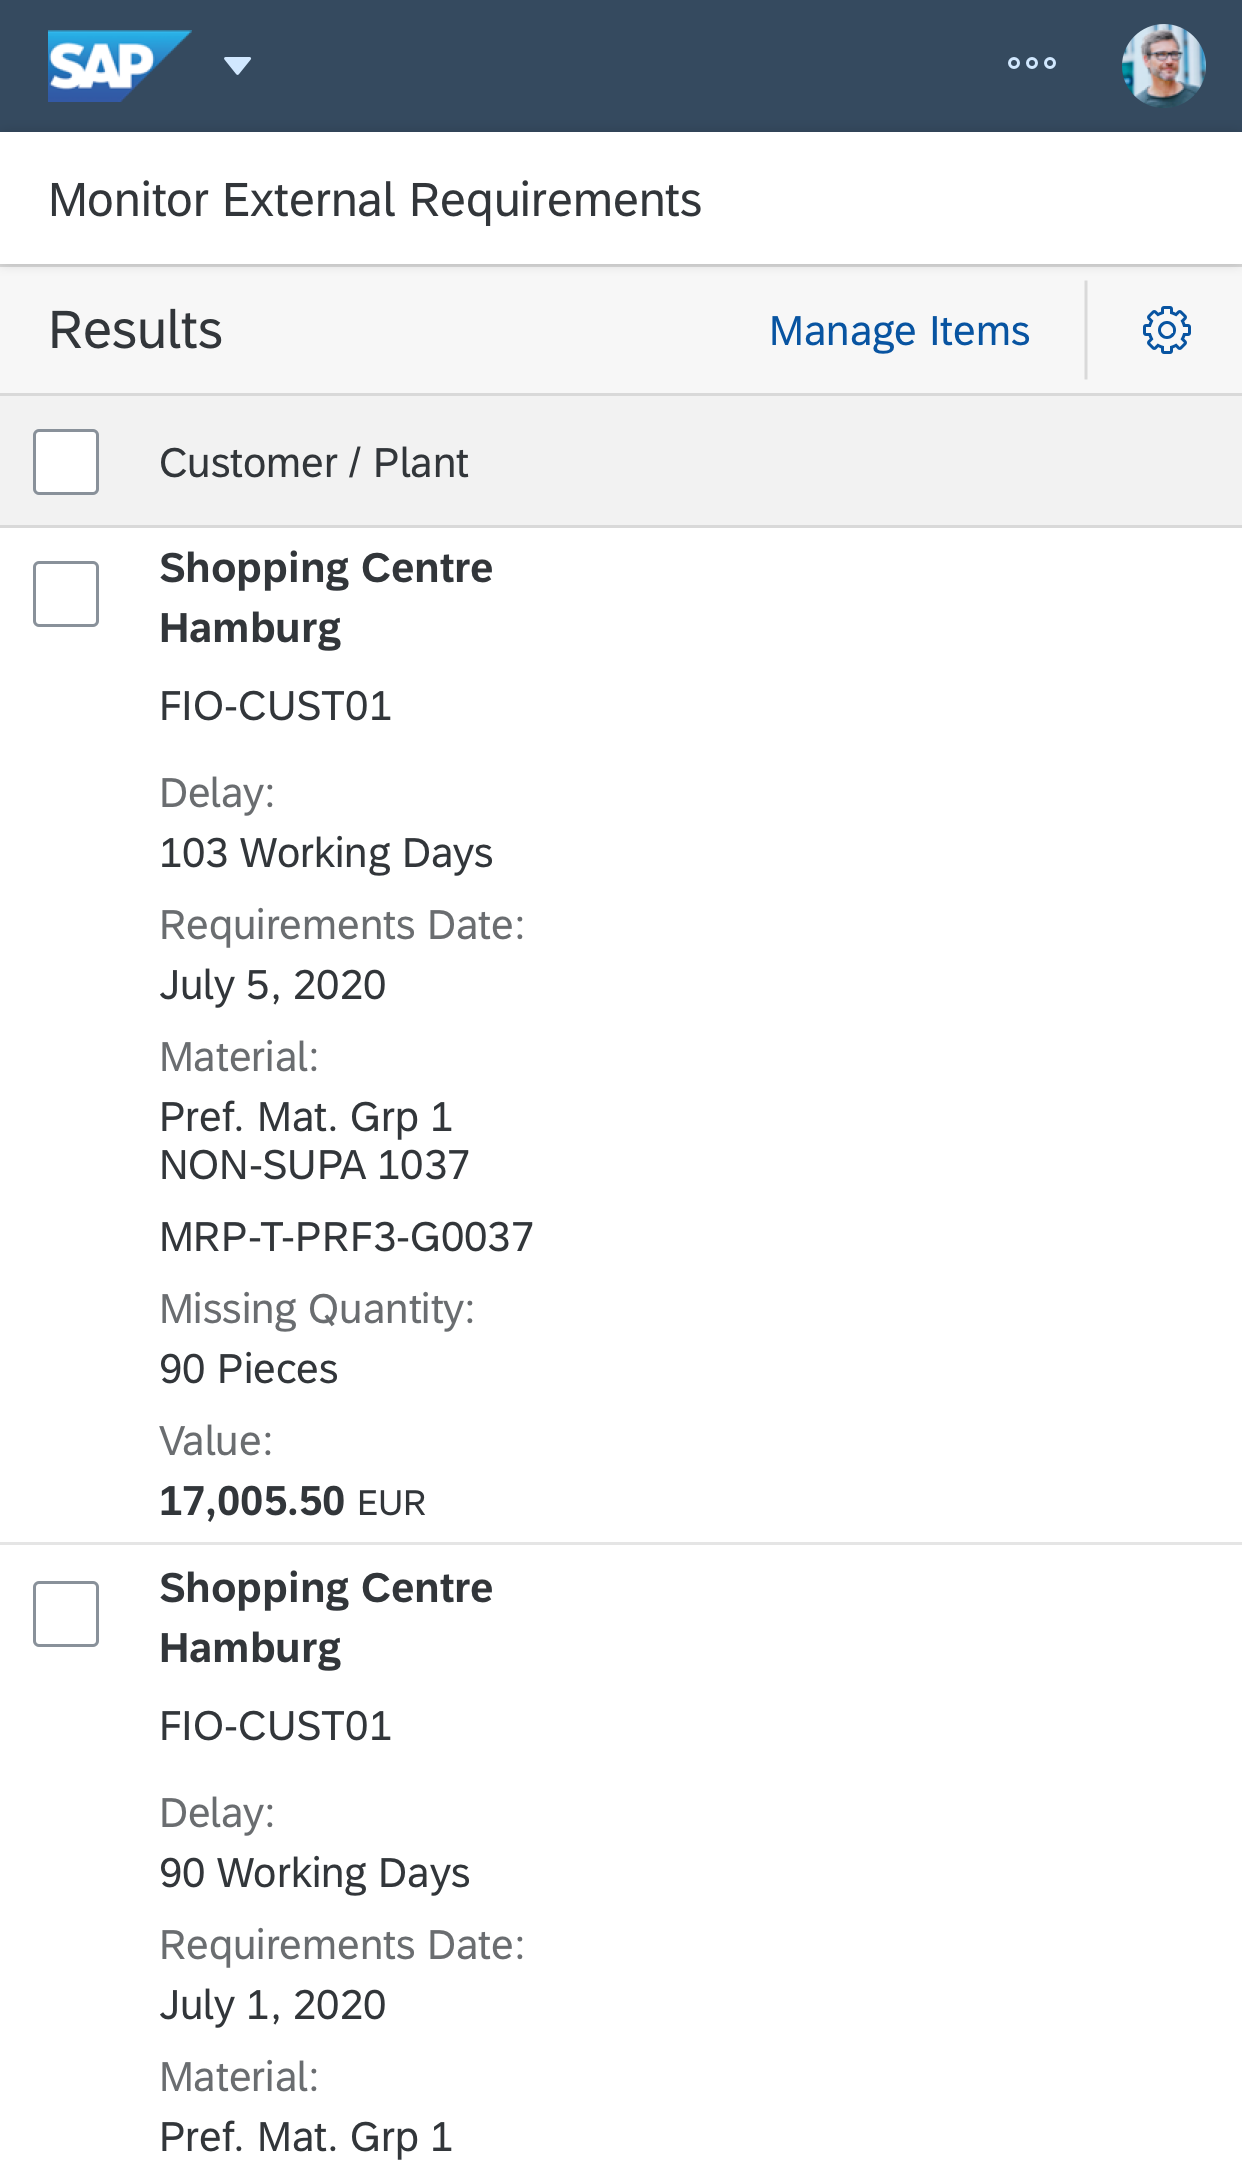
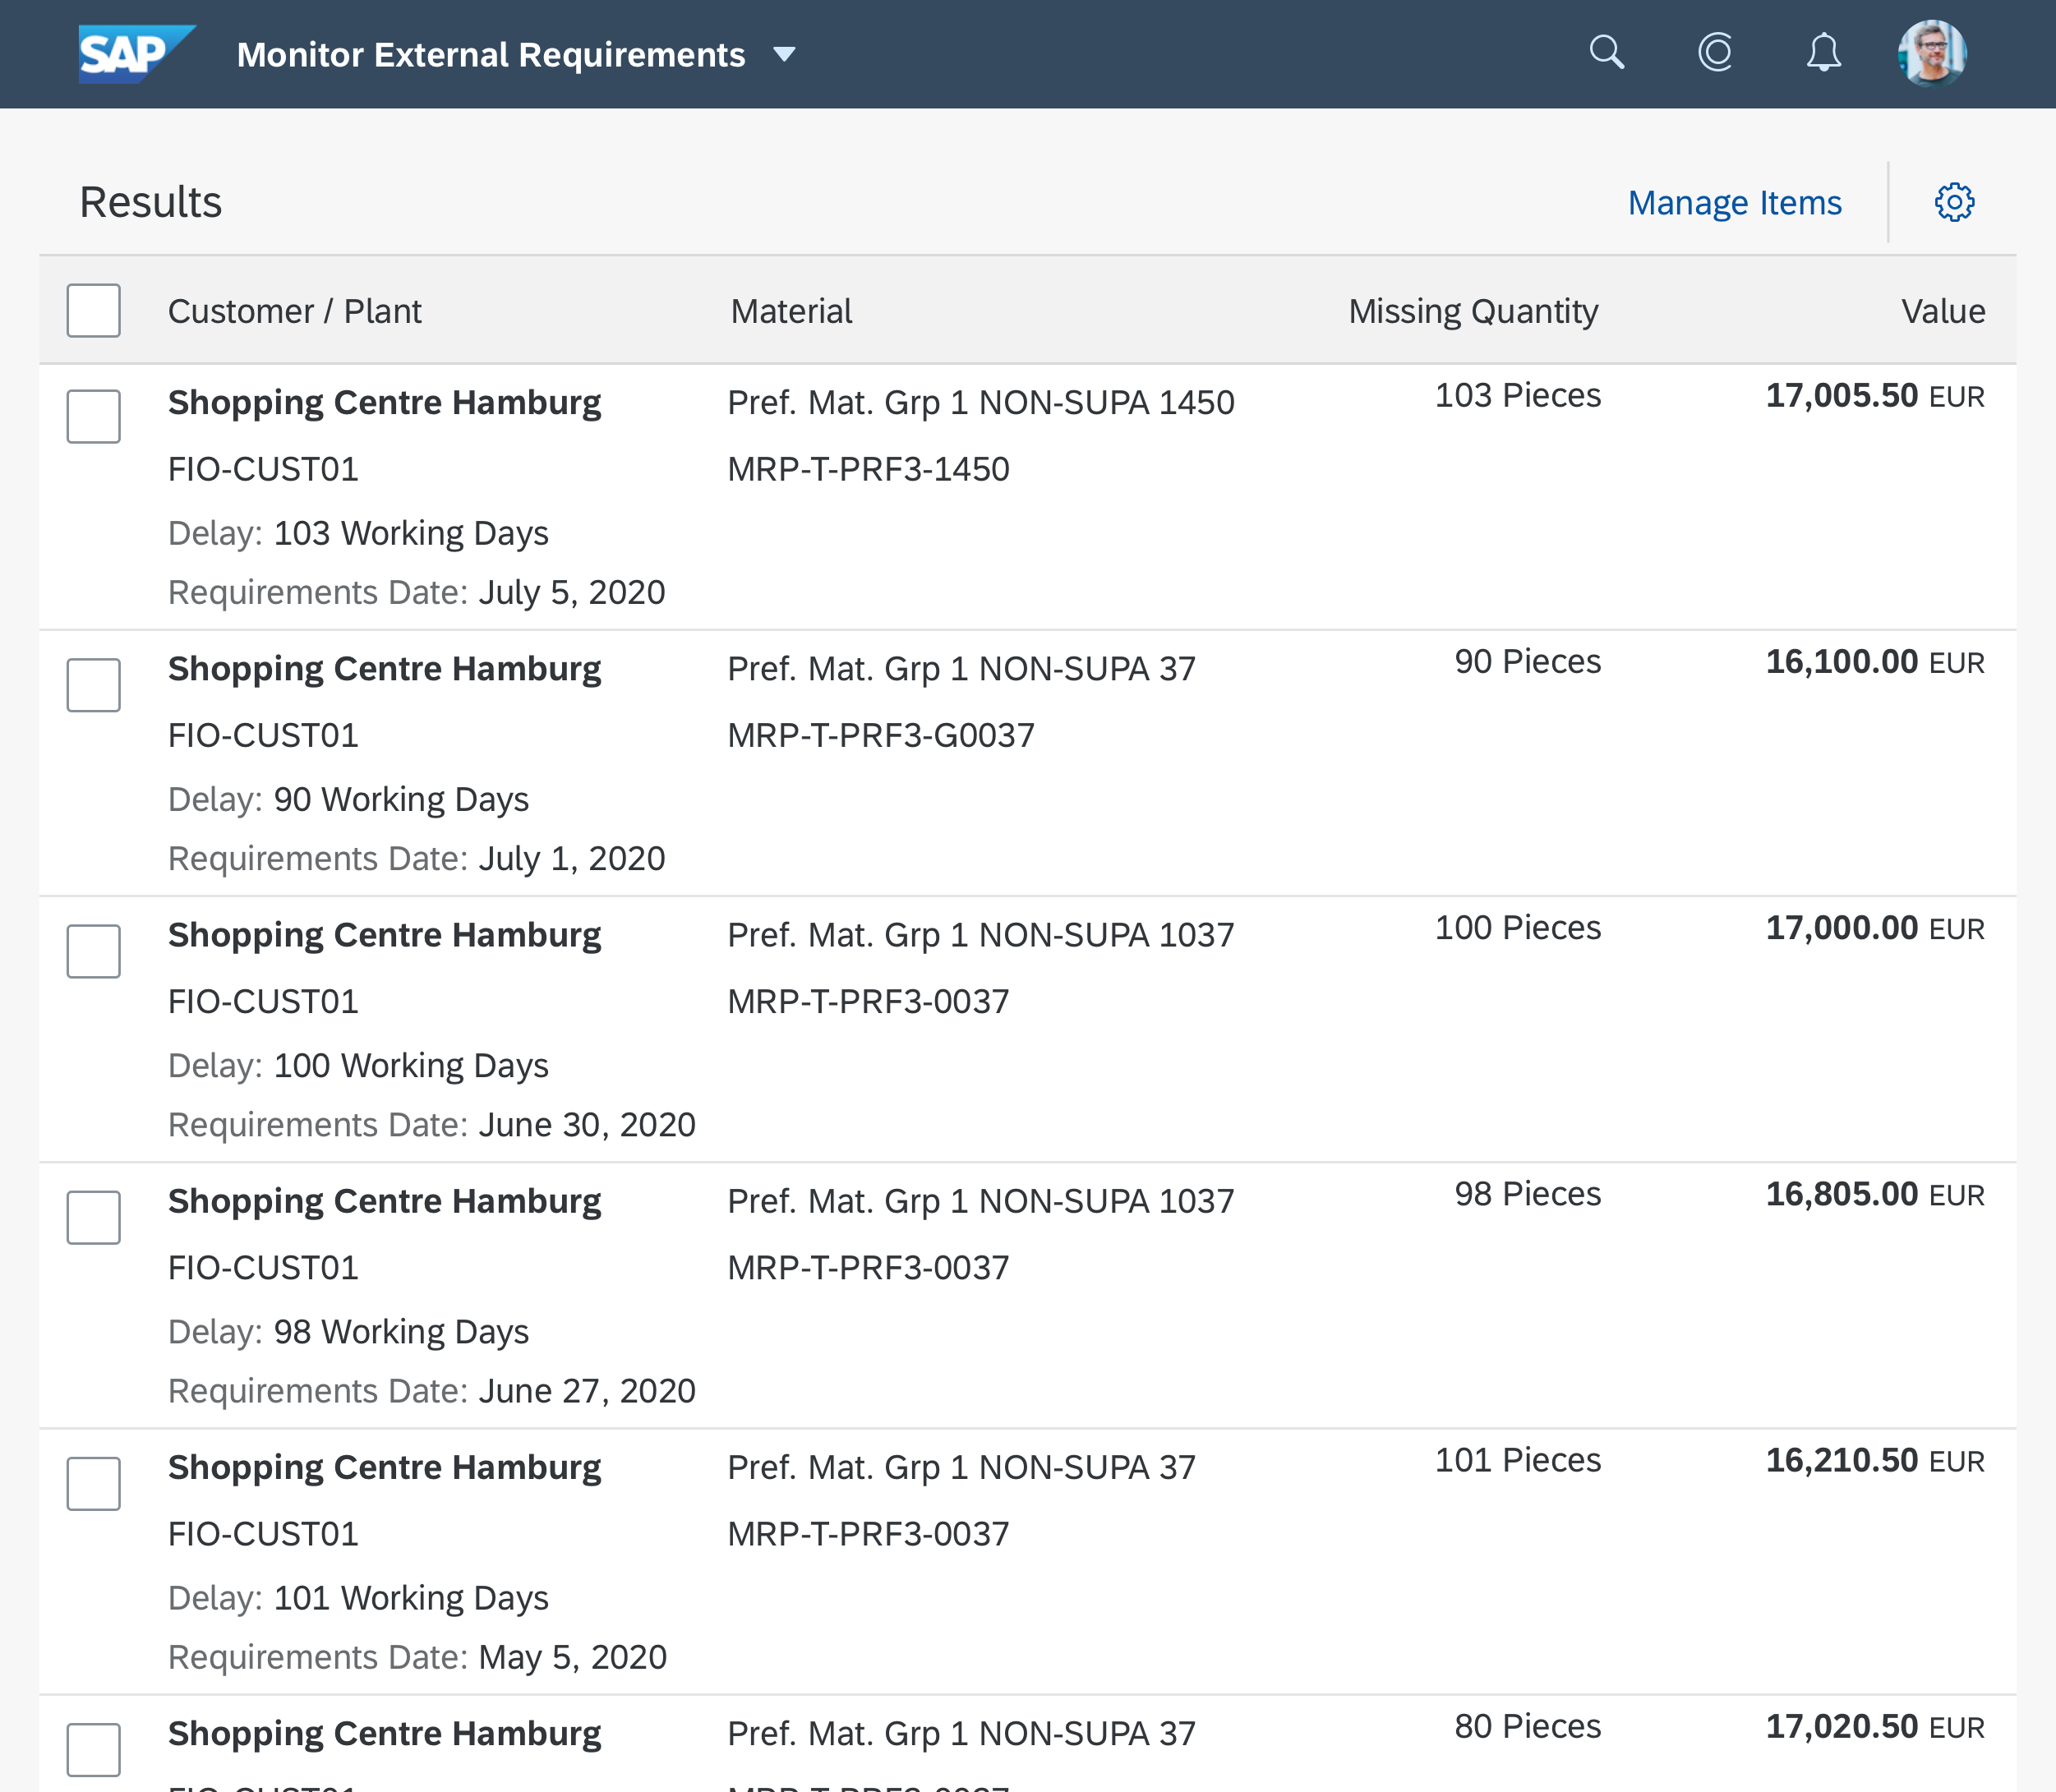
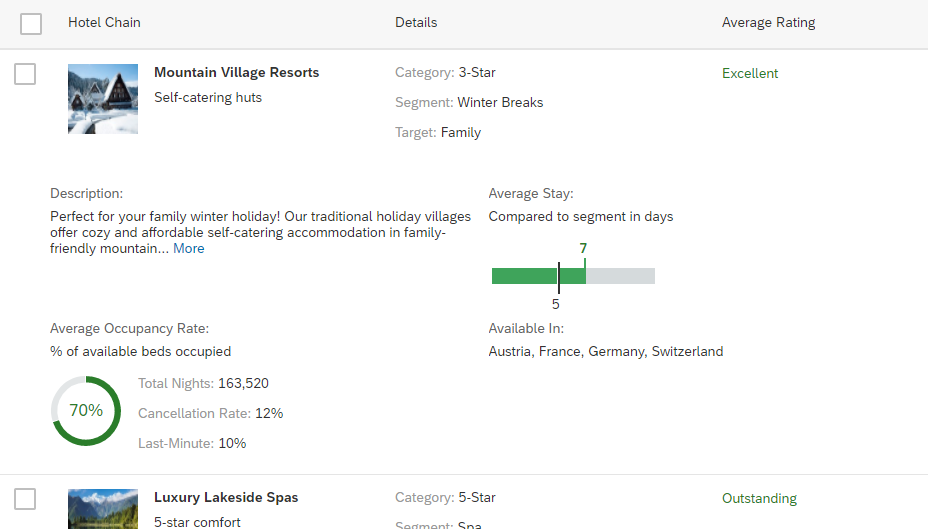
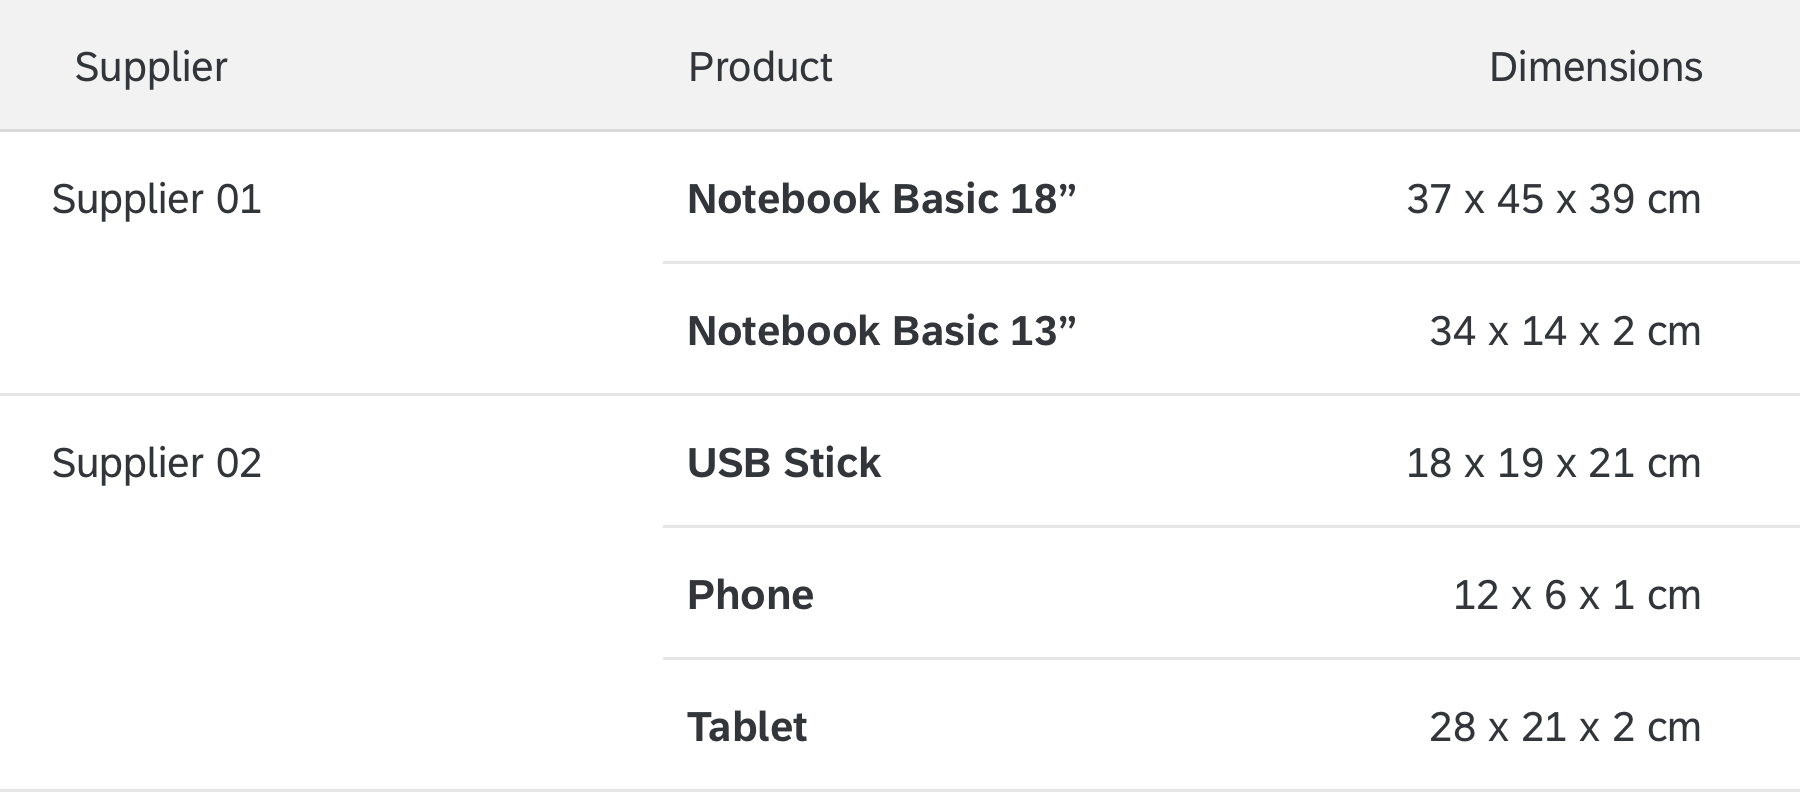
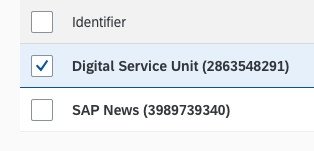
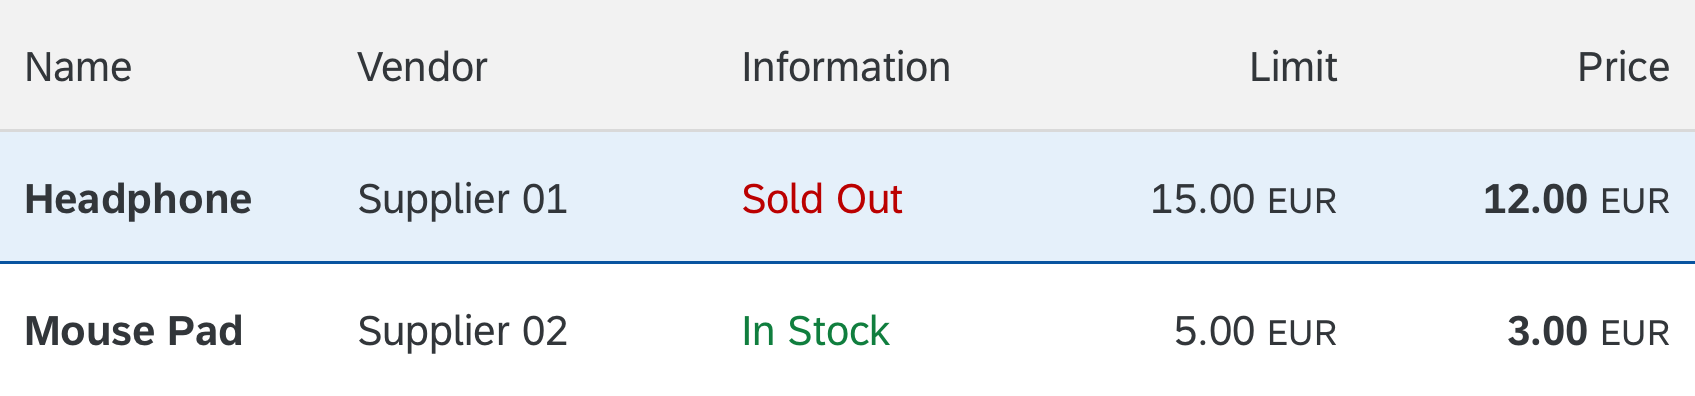
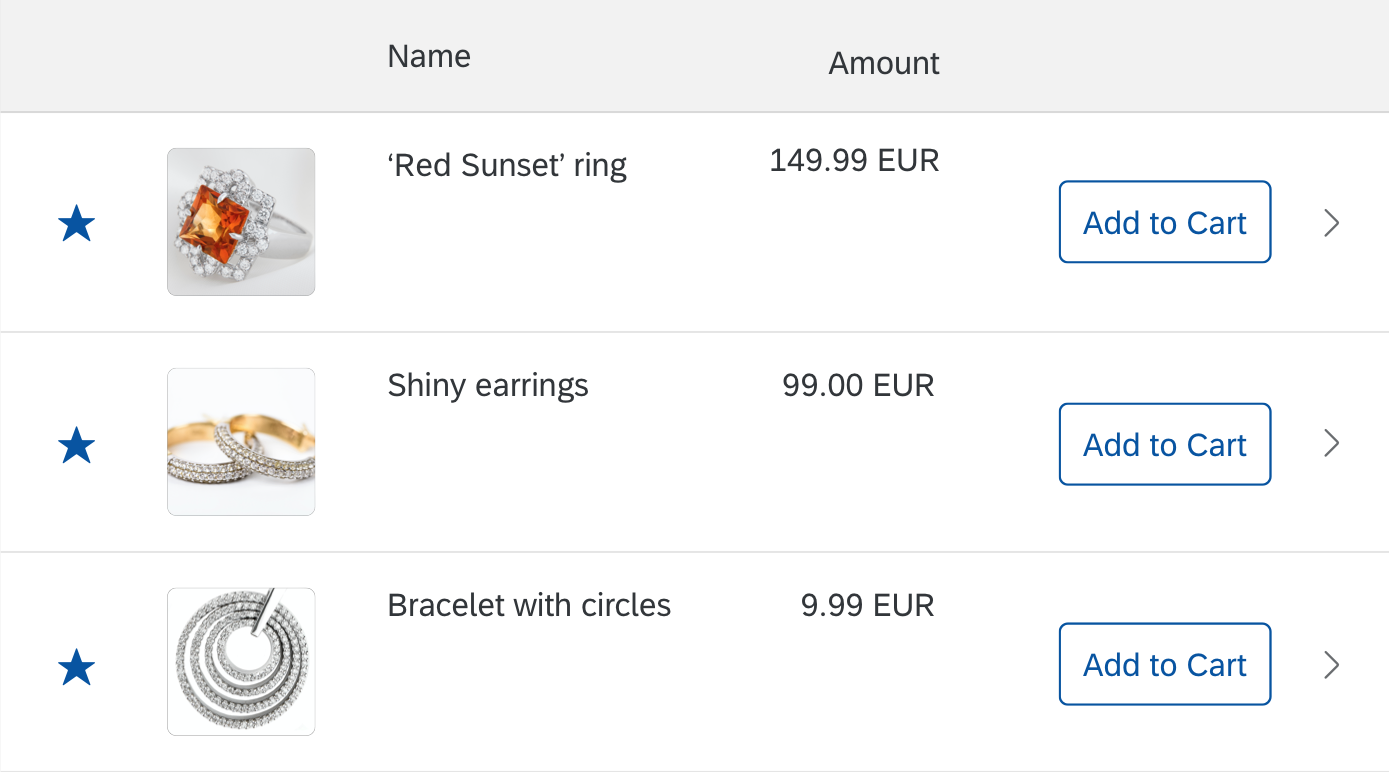
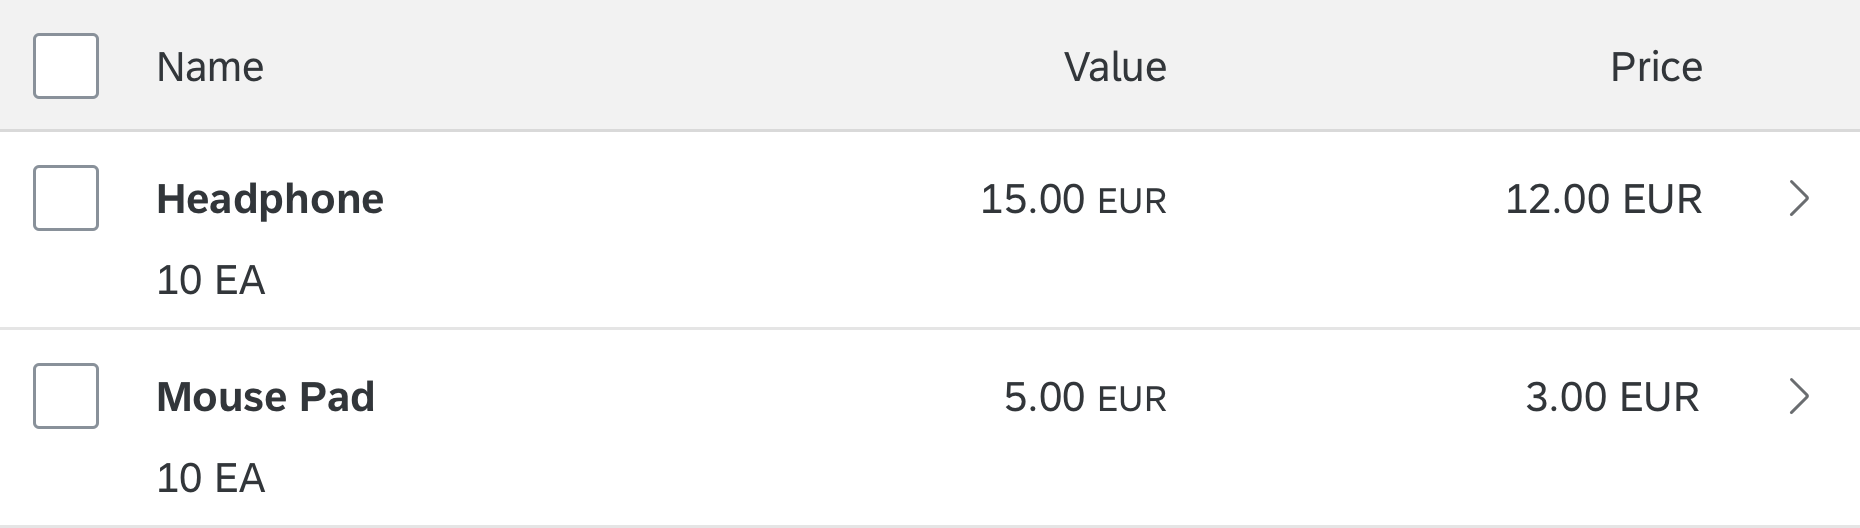
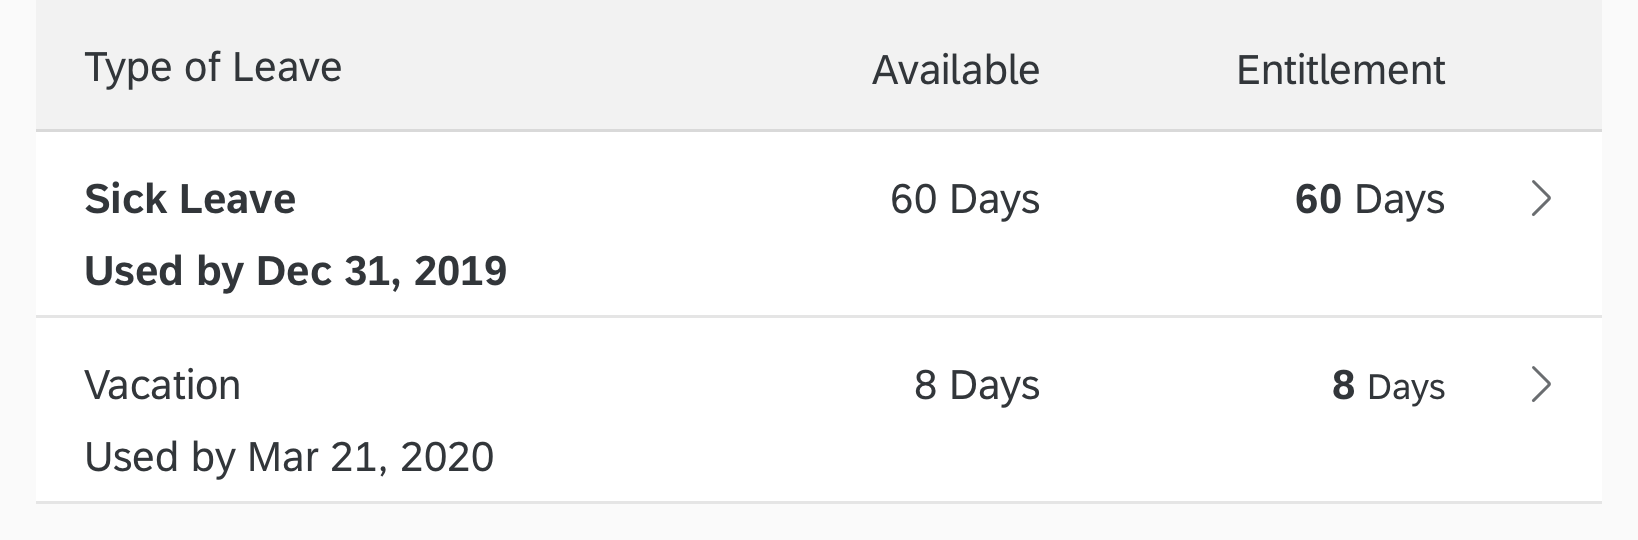
For the smallest screen width, keep the following information in the table layout:

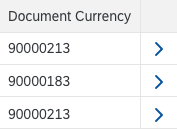
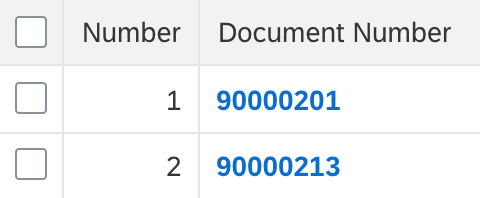
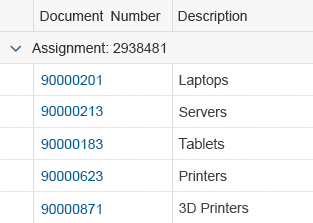
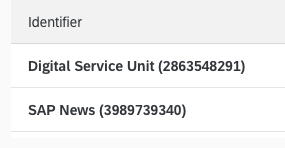
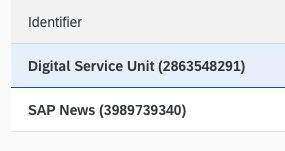
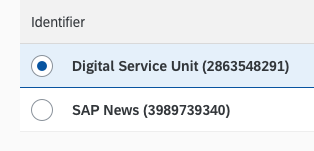
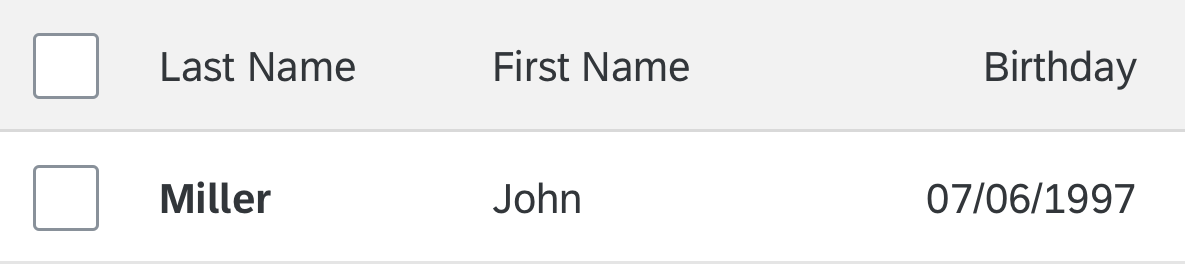
  • The identifier of the line item
  • The key attribute

Example for Block Layout

A typical responsive table.

A typical responsive table

Hide the information column for a width smaller than 570 px.

Hiding the information column

Move the column “vendor” to the pop-in area for a width smaller than 460 px (sap.m.Column, properties: demandPopin, minScreenWidth).

Moving the vendor column to the pop-in area

Move the column “limit” to the pop-in for a width smaller than 350 px (sap.m.Column, properties: demandPopin, minScreenWidth).

Moving the limit column to the pop-in area

Move the column “price” to the pop-in area for a width smaller than 270 px (sap.m.Column, properties: demandPopin, minScreenWidth).

Moving the price column to the pop-in area

If you still need to support smaller screens, values can be moved below the corresponding labels inside the pop-in area. In these examples, this happens for a width smaller than 220 px (sap.m.Column, property: popinDisplay).

Pop-in area: Moving the data below the labels

Example for GridLarge Layout

A more complex responsive table.

A more complex responsive table (full screen without pop-in)

In this example, the Average Occupancy Rate and Available In columns move to the pop-in area if the screen width is less than 1900 pixels.

GridLarge layout - 'Average Occupancy Rate' and 'Available In' columns move to the pop-in area

If the width is less than 1500 pixels, the Average Stay column moves to the pop-in area.

GridLarge layout - 'Average Stay' column moves to the pop-in area

If the width is less than 1100 pixels, the Description column moves to the pop-in area. Since all four columns in the pop-in area do not fit into one row, the pop-in wraps.

GridLarge layout - 'Description' column moves to the pop-in area

If the width is reduced even further, the Details column moves to the pop-in area. On this narrow screen, only one column fits into one pop-in row, so it looks exactly like the block layout.

GridLarge layout - 'Details' column moves to the pop-in area

Layout

The optional title bar consists of the title of the responsive table, an item counter, variant management, and the toolbar.

The filter infobar appears when the responsive table is filtered, and shows information on the filter settings.

The column header shows the label for each column.

The collection of items, or rows, occupies the main part of the responsive table.

You can add aggregation information (such as totals) on the table footer.

A More button can be shown if you do not want all items to be loaded at the start (known as “lazy loading”). Ideally, you should use scrolling to load more items instead of choosing the More button.

Schematic visualization of the responsive table

Components

The title bar contains the title of the responsive table, an item counter, variant management, and the toolbar.

The toolbar can contain entry points for the view settings dialog and the table personalization dialog, as well as view switches in the form of a segmented button, and buttons for AddEdit, and other actions.
Beneath the toolbar, display a filter infobar (which itself is a special toolbar) if the responsive table is filtered.
To format within items, apply the guidelines for formatting data. Controls commonly used inside items are the object identifier and the object number. For more information about these controls, see object display components.
You can use the table footer to display additional static information relating to the table content.
The More button loads more items to the front end if not all items have yet been loaded.
Components of the responsive table

Behavior and Interaction

The responsive table is quite flexible with regard to its content.

Table Level

Scroll

The height of the table is defined by the number of items it contains. It does not have a scroll container on its own, but is scrolled together with the app (in contrast to the grid table and the analytical table).

If the table works in a “growing” mode, it only loads a few items at first. Additional items are only loaded (and rendered) on request. The “request” can either be triggered by scrolling (preferred), or by clicking the More button.

Same table, different number of items

When the user scrolls, the title bar, column headers, and filter infobar can stick to the top of the surrounding layout container (sap.m.Table, property: sticky).

Information
The “sticky” feature comes with some limitations:

  • It is not available on all browsers. In non-supporting browsers, the corresponding areas (title bar, column headers, filter infobar) are not fixed on top of the surrounding layout container while scrolling.
  • Certain layout containers suppress the sticky behavior, such as the grid layout. The same happens if the table is placed within the object page.
  • If focus is set to a fixed column header, the table is automatically scrolled to top.

Sticky table title and sticky column header

Merge Duplicates

To simulate the behavior of row spanning, you can merge cells of consecutive rows inside one or more columns automatically if they contain the same value (sap.m.Column, properties: mergeDuplicates, mergeFunctionName).

Use the merge feature if you expect the column to contain duplicate entries, and it makes sense to group them. In the example screenshot, the Supplier, Product, and Dimensions columns reflect a hierarchical structure: Suppliers have products, which in turn have dimensions. Because suppliers typically have multiple products, merging duplicate entries for the supplier column makes the table easier to read. Note, however, that when the user sorts the table by another field, the hierarchy changes and the merged items are regrouped accordingly.

Do not use the merge feature:

  • If duplicate entries are not part of the design. If consecutive table rows happen to have the same values at runtime, this alone isn’t a valid reason to group them.
  • If the corresponding column can contain blank cells. Otherwise, it is cumbersome to differentiate between blank values and merged values.
Supplier column merges duplicates in consecutive rows
Merged columns with multiselection

Select

A responsive table can have one of the following selection modes (sap.m.Table/ sap.m.ListBase, property: mode):

  • None: Items cannot be selected (sap.m.ListMode.None).
    Beware: Line items can still use the sap.m.ListType “navigation”, which allows click handling on specific line items. Only use this option if the click triggers navigation to a corresponding line item details page.
  • Single selection master: One item in the responsive table can be selected. Items are selected by clicking the whole row. The single select master mode has no obvious visual cues, such as checkboxes or radio buttons. It only provides a light blue background for the selected state. Because of this, it can barely be differentiated from tables without selection (mode: None). Single select master is the preferred mode for single selection (sap.m.ListMode.SingleSelectMaster).
  • Single selection left: One item in the responsive table can be selected. For this, the responsive table provides radio buttons on the left side of each line item. Only use this mode if row clicks are being used for something else, such as navigation. (sap.m.ListMode.SingleSelectLeft).
  • Multiple selection: Users can select one or more items using the checkboxes on the left side of each line item. The Shift key can be used to select a range. Users can (de)select all items using the Select All checkbox to the left of the column header. Select All should (de)select all items that the user can reach by scrolling.  (sap.m.ListMode.MultiSelect).
Single selection master
SIngle selection left, with radio buttons. Use only if row clicks are used for something else.
Multiple selection
Multiple selection

Group

For grouping items, a group header is displayed (sap.m.GroupHeaderListItem). The group header is not interactive.

Group headers
Group headers

Show Aggregations

Show aggregations (such as totals) on the table footer (sap.m.Column, aggregation: footer).

Do not show aggregations in “growing” mode. It is not clear, if an aggregation will only aggregate the items loaded into the front end, or all items.

Table footer displays aggregated total

Load Items

To show more than 200 items, use the “growing” mode (sap.m.Table/ sap.m.ListBase, properties: growing, growingThreshold, growingScrollToLoad, growingTriggerText). The growing mode allows the user to load only the first few items. Additional items are only loaded (and rendered) on request, which improves performance. The “request” can either be done via scrolling (preferred), or by clicking the More button.

If using the More button, show the number of items already loaded and the total number items below the text More, if possible.

Do not show more than 1,000 items overall, even in growing mode. Use the grid table instead.

Do not show aggregations in growing mode. Also, do not display an item count on the table toolbar if growing mode is used. Use the count on the More button instead.

Load on scroll
Load on scroll

Line Item Level

Delete Single Item Rows

To delete single item rows, use the table in the mode “delete” (sap.m.Table/ sap.m.ListBase, property: mode, value: sap.m.ListMode.Delete). This adds Delete buttons to each line item. Clicking this button triggers the deletion of the corresponding line item.

Do not use this mode if deleting multiple lines at once is the preferred use case.

Delete is a mode of the responsive table and therefore cannot be used together with single selection or multiselection.

Responsive table in 'Delete' mode

Highlight an Item

To highlight an item, use the “highlight” indicator (sap.m.ColumnListItem, properties: highlight).

Highlighted item
Highlighted item

Navigate

To allow navigation from a line item, use an item with the type “navigation” (sap.m.ColumnListItem/ sap.m.ListItemBase, property: type, value: sap.m.ListType.Navigation). This creates an indicator at the end of the line (“>”) and the entire line item becomes clickable. If the user clicks on the line, navigate to a new page containing line item details. In rare cases, you can also use the navigation mode for category navigation, without navigating to another page.

By contrast, clicking an interactive control within a line item does not trigger the navigation event. Instead, the corresponding control handles the click event.

If no navigation is possible, set sap.m.ListType to “inactive”.

“Navigation” is a list item type and therefore cannot be used together with “edit”, or in combination with click events for the entire item (“active”).

Navigation indicator

Indicate Navigated Item

When multi-selection is used in a master-detail scenario, it is not clear which item was last opened (for example, which item is currently shown in the second column of a flexible column layout). In this case only (multi-selection table with navigable items), you can display a “navigated” indicator to mark the item that is currently open (sap.m.ColumnListItem, property: navigated).

Navigated item
Navigated item

Edit Line Items

To allow editing for a line item, set sap.m.ListType to “detail” within the corresponding item (sap.m.ColumnListItem/ sap.m.ListItemBase, property: type, value: sap.m.ListType.Detail or sap.m.ListType.DetailAndActive). This will create an Edit button at the end of the line. Clicking the button triggers the edit event. Use this event to switch the corresponding line item to edit mode.

Edit is a list item type and therefore cannot be used together with “navigation” or in combination with click events for the entire item (“active”).

Edit button
Edit button

Click an Item

Items as a whole can be clickable. An event is fired by clicking on the item (anywhere where there is no interactive control inside the item). Apps can react on the event, for example, by opening a dialog (sap.m.ColumnListItem/ sap.m.ListItemBase, property: type, value: sap.m.ListType.Active or sap.m.ListType.DetailAndActive).

Active elements do not have a visual indication and can therefore not be differentiated from non-active elements.

Active is a list item type and can therefore not be used together with “navigation” or “edit”. In addition, “active” uses the whole item as a clickable area and therefore cannot be used together with a single-selection table.

Active element
Active element

Drag and Drop

One or several items can be repositioned within a table or moved to other UI elements using drag and drop operations (sap.m.ListBase, aggregation: dragDropConfig). While being dragged, the items are shown as ghost elements on the mouse cursor.

Drop targets can be on items, between items, or both (sap.ui.core.dnd.DropPosition). On a drop target, the mouse cursor changes to either a “copy”, “link”, “move”, or “none” cursor. “None” indicates that the dragged item cannot be dropped in the current position (sap.ui.core.dnd.DropEffect).

Drag and drop is only available on supporting browsers.

Drag and drop
Drag and drop
Whole item as drop target

Context Menu

You can attach a context menu (sap.m.Menu) to a table. The context menu gives users an alternative way to modify the focused elements by giving them access to context-specific functions.

When opened, the context menu gets the row and column context, except for special columns (such as the selection column). Context menus can be implemented for a specific table or row.

Context menus are opened by right-clicking (desktop), long press (mobile), the context menu key, or SHIFT+F10.

Be aware that using the context menu overrides the browser context menu, which can no longer be opened.

If a control inside a table is the “click target”, and the control also provides a context menu, the control context menu “wins”.

Responsive table with a context menu

Cell Level

Showing Information

In contrast to traditional tables (such as the analytical table or the tree table), a cell can contain more than just one line of text.

Several lines of text within one cell

Add Controls

Alongside textual elements, you can also add any control to a table cell, such as input fields, microcharts, buttons, and so on.

Controls inside cells
Any control can be placed inside cells

A cell can contain more than one control and more than one data point.

With the View Settings dialog, users can sort, filter, and group by each of these data points.

Several controls per cell

You can also have different controls in different rows in the same column. This could be the case if one item is locked, but another item is in edit mode, for example.

Different controls per column

Guidelines

Responsiveness

In most cases, the auto pop-in mode is sufficient. If you need to optimize further, first try to adapt the columns to influence the automatic behavior (sap.m.Column, properties: autoPopinWidth, importance). For example, set the priority for the two or three most important columns to “High” (identifying column, key attribute).

While the pop-in layouts GridLarge and GridSmall make better use of the available width, they also only look good with content that is specifically designed for these pop-in layouts. If you have text-only tables with only one value per column, use the Block layout (sap.m.Table, property: popinLayout).

Place the column header labels in the pop-in area above the corresponding values (sap.m.Column, property: popinDisplay, value: Block). This avoids alignment issues with different content. Be aware that the labels get top-aligned with the adjacent content.
Only place the label next to the corresponding value under the following conditions (sap.m.Column, property: popinDisplay, value: Inline):

  • The values are text-only (no input fields, icons, images, micro charts, and so on)
  • The available space is at least the double the width of size S.

This avoids truncation or “over-wrapping” of the labels and content.

If a column does not have a column header text (for example, if it always contains the same button with its own label), do not show the header text as a label in the pop-in area either (sap.m.Column, property: popinDisplay, value: withoutHeader). If you forget this setting, you will see an empty space followed by a colon (“:”).

Information
The GridSmall and GridLarge layouts are not available in all browsers. If the chosen layout is not available, it is automatically changed to Block layout.

Design for Performance

To optimize performance, we recommend showing no more than 200 items at once in the responsive table. For larger datasets (up to 1,000 items), use the “growing” mechanism to limit the number of displayed items, and make sure that users can filter the data.

Warning
The limits above are only recommendations. For a specific app context, the number of manageable items might be far higher or lower.

The actual limits depend on your concrete scenario, including:

  • The number of rows in the table
  • The number of displayed columns
  • The complexity of the cell content (for example, simple text vs. complex charts)
  • Other elements on the page (for example, multiple pages in a flexible column layout, or several tables/elements with more complex rendering on one page)
  • The browser being used

Table Title

Implement the table title by using a title control in a toolbar.

Use a table title only if the title of the table is not indicated in the surrounding area. Do not use a table title if it simply repeats text that is already above the table. For example:

  • A pricing conditions table is the only control on a tab labeled Pricing Conditions.
  • A section or subsection on an object page contains only one table.

Use a table title if you need the item count, table toolbar, or variant management. To avoid repeating text, feel free to use generic text as a table title, such as Items.
Exception: If the surrounding area contains the table title, and both the item count and toolbar can be added to the surrounding area, no additional table title is needed.
Example: An object page (sub-)section contains only one table. In this case, add the item count and the table toolbar to the (sub-)section header.

Developer Hint
Assistive technologies (such as screen readers) use the title to create a hierarchical site map for faster navigation. In addition, screen readers use the title as the label for the table.

If you don’t use a title (for example, to avoid repetition), make sure that the table is connected to another meaningful on-screen text that can be used as a label for assistive technologies. You can do this using the method addAriaLabelledBy.

If you use a table title, show either a title for the table, with or without variant management, or an item count in the following format:

Items (2,534)

The item count in the table title includes all the visible items that a user can reach by scrolling. Group headers are not included.

Remove the item count in the table title if there are zero items. Do not use an item count together with “growing mode”.

If possible, keep the title bar sticky (sap.m.Table, property: sticky).

Table title with item count

Selection

If the click area for the row is being used for another purpose (such as navigation), it cannot be used for selecting the row. In this case, use the “single select left” selection mode, which offers a radio button as an additional click area for each row. To avoid confusion, make sure that the first data column does not contain radio buttons in default delivery.

In all other single selection cases, use the selection mode “single select master”.

For all single selection modes, make sure that one item is initially selected. Otherwise, the user cannot return to the initial state. A selected item can only be deselected by selecting another item.

In multiple selection mode, do not show checkboxes in the first data column in the default delivery to avoid confusion. Offer the Select All checkbox for (de)selecting all items the user can reach by scrolling.

Don't
Single selection left - Don't show radio buttons in the first column in the default delivery
Don't
Multiple selection - Don't show checkboxes in the first column in the default delivery
Do
Use the selection mode
Use the selection mode "single select left" if clicking the row is used for something else (such as navigation)
Do
Use the selection mode
Use the selection mode "single select master" in all other single-selection cases
Developer Hint
Select All is only applied to items that have already been loaded to the front-end server. All other items are not (de)selected before they are loaded, such as items added via lazy loading with growingScrollToLoad. This conflicts with the guideline that all items the user can reach by scrolling must be (de)selected.

To process all items, listen to the selectionChange event and to its selectAll flag. This indicates whether the Select All checkbox was triggered. As soon as an action is triggered, process the items accordingly. Depending on the number of items, consider processing them in the back end.

Loading Data

To indicate that the table is currently loading items, use the busy state. (sap.m.Table, property: busy). Do not show any items or text. As soon as the data is loaded, remove the busy state and show all items.

Table in busy state while loading data

Columns – Best Practices

Minimize the number of columns:

  • On a smartphone, use only one or two columns, depending on the content.
  • On a tablet or desktop, use three to five columns if the responsive table is shown within the flexible column layout. Use about eight columns if using the full screen width, depending on the content.

If the responsive table does not fit into the width provided:

  • Hide columns to reduce the width of the table.
  • Use pop-in areas to show the whole content by increasing the height of the line items (sap.m.Column, properties: demandPopin, minScreenWidth).

At the smallest size, keep the following information in the table layout:

  • The column that identifies the line item.
  • The column that contains the key attribute.

If both of these do not fit into the width provided, keep just the column with the line item identifier in the tabular layout.

The responsive table assigns the same width to each column by default. It is recommended that you overwrite this default to provide optimal space for your content (sap.m.Column, property: width).

Optimize column width for its initial content (sap.m.Column, property: width). If the content is dynamic, optimize column width for typical content.

If you need more columns than those that fit on a tablet screen (usually five) to fulfill 80% of your main use cases, offer an option to add, remove, and rearrange columns via the table personalization dialog. Before doing so, try to reduce the number of columns, for example, by using several lines per column or by utilizing the pop-in function. See the cheat sheet for an example.

Column Headers – Best Practices

Within the column header, provide a label for each column (sap.m.Column, aggregation: header). The column header label is reused as a label in the pop-in area.

Exception: If the column does not pop in, no column header label is needed as long as at least one column still has a column header label.

Use controls that wrap and support wrapping with hyphenation, such as text (with wrapping and hyphenation enabled). Do not use controls that truncate.

Keep column headers sticky.

Do
Wrap column headers
Wrap column headers
Don't
Don't truncate column headers

Column headers (sap.m.Column, aggregation: header) usually contain links or text-based controls.

Column headers can also contain other kinds of SAP Fiori controls. However, the column header cannot be aligned vertically, making it difficult to use many controls in the column header. Using other kinds of controls also creates problems with pop-in behavior and could thus lead to accessibility issues. Therefore, exercise caution when using them in a column header.

Accepted: Link as column header text (rarely used)
Accepted if responsiveness is taken into account: Text plus search field

If a column cell contains several fields, use an umbrella term in the column header (such as Address for fields like Street, ZIP Code, and City).

For text and ID fields, use a generic label (for example, Employee for Name and ID).

If none of these are possible, separate the labels with “/” (for example, Name / Status).

For boolean values, such as checkboxes, find a descriptive text for the column header.

Horizontal Content Alignment

For alignment of cell content, follow the guidelines below (sap.m.Column, properties: halgin, valign, sap.m.ColumnListItem, property: VAlign). Align the column header horizontally according to the content of the cell.

Exception: Secondary information in a column always follows the alignment of the main information.

Left-Align

Left-align: Text, IDs, phone numbers, URLs, passwords, and email addresses.

Left-align text
Left-align text

Left-align: Status information

Left-align status information

Right-Align

Right-align: Dates and times (to ensure comparability for most formats and locales)

Right-align dates
Right-align dates

Right-align: Numbers and amounts, except IDs, to ensure figures are comparable

Right-align numbers
Right-align numbers

Center-Align

Center-align: Icons, images, and avatars

Keep the column name for center-aligned columns as short as possible to avoid excessive white space between columns. Alternatively, you can leave the column header empty on the visual UI, and use the invisible text control to provide information on the column content for screen reader listeners.

Responsive table with an avatar and an action

Center-align: All actions in a line item that appear as buttons

If you have more than one action, display them next to each other. Order the buttons based on importance. The most important action is on the left, the least important on the right. If there is not enough space to display them all in one line, move the actions from the right onto the next line one by one. We recommend a maximum of two buttons per line item.

Responsive table with icon, avatar, and actions

Vertical Content Alignment

Top-align where possible to facilitate reading the content on one line.

Do not use top-alignment if it results in a peculiar layout. This usually happens when controls that need more vertical space are combined with text-only controls, such as input fields. In this case, try center-alignment instead and fine tune it until the layout fits.

Do
Use top-alignment where possible
Don't
Don't use top alignment if it doesn't make sense

Content Formatting

The responsive table provides flexibility, including multi-line cells, by enabling every control to be put into a cell.

As a key identifier of an item, use an object identifier. Show the key identifier in the first column. For more information, see object display components.

If the table width is small, do not hide this column or move it to the pop-in area.

Object identifier
Object identifier

Strings with IDs: If the responsive table contains more single-line data, show the ID in brackets after the corresponding string.

This minimizes the line height.

For items with a small line height, place the ID in brackets after the corresponding string
If displayed as a link, use the whole text as the link

Strings with IDs: If line height is already large, show the ID below the corresponding string. Use the object identifier to do so.

For items with a large line height, place the ID below the corresponding string
Is displayed as a link, use only the first line as the link

If there is more than one key identifier (for example, First Name and Last Name), display these columns first and show the values in bold text.

Several key identifiers

For status information, use semantic colors on the foreground elements.

For status information on text: If the status is actionable, add a transparent icon button next to the text.

Semantic colors on text

Avoid truncation. Use controls that wrap the text and support hyphenation.

For example, use text.

Do
Wrap text
Wrap text
Don't
Don't truncate text
Don't truncate text

For editable content, use input fields and other interactive controls within the table cells. If you need to offer edit mode, change your text controls (labels, text, and links, to input fields or other appropriate controls) as soon as you switch to edit mode, but not before.

You can do this by changing the control or, in more complex cases, by exchanging the whole responsive table.

Interactive controls – Inline

If there is no value for a cell, leave it blank. Do not display text as N/A.

Leave empty fields blank

Numbering Items

  • If the item number has four digits/letters or less and is equally important as the corresponding description, concatenate the item number with the description and show it in one column.
  • If the item number has five digits/letters or more, or if it is more important than the corresponding description, for example, when no description is available, use a separate column for the item number.
  • If the item number is more like an ID in regards to its description, use ID formatting, like Description (ID).
For short numbers, add the item number to the description

Flag and Favorite

Place the flag or favorite marker in the first column (in the default delivery). To change the settings, users need to drill down into the object itself.

Item marked as a favorite

Empty Tables

Try not to display an empty responsive table. If there is no way around this, provide instructions on how to fill the table with data (sap.m.Table/ sap.m.ListBase, properties: showNoData, noDataText).

Examples:

  • If a table is initially empty, provide at least a basic text:
    No items available.
    Overwrite this whenever a hint can be provided on how to fill the table with data.
  • If a table is used together with a filter bar (as in the list report), and is initially empty, use the following text:
    To start, set the relevant filters.
  • If a table is used together with a filter bar and the filter does not return results, use the following text:
    No data found. Try adjusting the filter settings.

Adapt the texts above if:

  • The standard text is not precise enough for your use case (for example, a search is also offered, or only the search is offered).
  • The standard text is misleading (for example, if the data is filled based on a master-detail pattern instead of filter settings).

Remove the item count in the table title if there are zero items.

Provide meaningful instructions

Item States

To show that an item is unread, use the corresponding flag (sap.m.Table, property: showUnread, sap.m.ColumnListItem/ sap.m.ListItemBase, property: unread). This shows most of the content in bold font.

An unread item
An unread item

To show that an item has been modified, for example, within the global edit flow, add the string (Modified) at the bottom of the column that identifies the line item.

A modified item
A modified item

To show that a modified item contains an error (for example, within the global edit flow), add the string (Contains errors) at the bottom of the column that identifies the line item. To do this, use an object status control with the error state (sap.m.ObjectStatus, property: state, value: sap.ui.core.ValueState.Error).

In addition, highlight the row accordingly (sap.m.ListItemBase, property: highlight).

A modified item with an error

To show that an item is locked, use a transparent button with the corresponding icon and the text Locked by [Name] at the bottom of the identifying column. The user can click the button to open a quick view of the person.

A locked item
A locked item

To show that an item is in a draft state, use a transparent-style button with the text Draft at the bottom of the identifying column. The user can click the button to open a popover showing the timestamp of the last change.

Item in draft state
Item in draft state

Show only one state at any one time.

Highlight Items

To show that an item needs attention, you can show a highlight indicator next to the item. The highlight indicator can indicate:

  • A semantic state, such as red or orange for an error or warning. In this case, use semantic colors.
  • Additional information, such as blue to highlight newly added items. In this case, use semantic colors.
  • Industry-specific or process-specific states, such as “out of stock” or “excess of inventory”. In this case, use indication colors.

Be aware that the highlight is just an indication. It doesn’t tell users exactly what is wrong. Make sure that you provide this information within the table row, ideally in the same color.

For details on the use of highlight colors, see How To Use Semantic Colors / Industry-Specific Colors.

(sap.m.ListItemBase, property: highlight)

Highlighted items using status colors
Highlighted items using industry-specific (indication) colors

Numbers and Units

If the following conditions all apply, show the unit of measurement in the column header:

  • The unit of measurement is the same for all rows
  • A single cell contains only one amount with the unit of measurement
  • The column header does not scroll away

In all other cases, show the unit of measurement together with the corresponding amount within the row.

Show the unit of measurement in the same column as the corresponding amount.

For numbers with units, show the correct formatting by using the object number control.

Object number
Object number

For the most important number with its unit, show the correct formatting by using the object number control and the emphasized flag.
Exception: If all numbers are of equal importance, emphasize none of them.

If the table width is narrow, do not hide this column or move it to the pop-in area.
Exception: If the column containing the object identifier and the column containing the key attribute do not fit together on the screen, move the column containing the key attribute to the pop-in area.

Object number (emphasized)

Drag and Drop

Drag and drop is “invisible” on the UI: users can’t see where dragging is available and where it isn’t. In addition, it is not accessible, since there is no generic keyboard interaction. Drag and drop is also not available on all browsers. For these reasons, provide it only in addition to existing (and visible) UI elements that fulfill the same purpose. For example, offer (toolbar) buttons for moving or for copying and pasting items.

Use drag and drop only in addition to existing visible UI elements

If you offer drag and drop for rearranging items within the table, use drop targets that are between items (sap.ui.core.dnd.DropPosition.Between). This provides better feedback on where the item will be inserted. Show the “move” mouse cursor (sap.ui.core.dnd.DropEffect.Move).

Drop targets in between items

Do not combine rearranging items and sorting. If you really need to do so, make sure that there is a dedicated sort criterion for the user-defined sort order, and only offer options for rearranging items if this sort order is set.

When combining rearranging items with grouping, be aware that moving items to another group also means that a value of the dropped item changes: because grouping is based on values in a column, the dropped item needs to take on the value of the target group for the corresponding column. If this is not wanted, do not allow users to rearrange items in grouped tables.

Example:
A table is grouped by availability. An item is moved from the group “Not Available” to the group “In Stock”. In this case, the moved item needs to change its availability to “In Stock” to match the target group. If changing the value doesn’t make sense, only allow users to rearrange the items within the same group, or don’t allow rearranging at all.

Don't
Don't combine rearranging items with grouping, unless you know exactly what you're doing.

Context Menu

Use the context menu only to give users a quick way of accessing functions that are already available elsewhere (for example, as buttons in the toolbar).

Don’t just offer actions in the context menu itself, as users might not realize that these actions are available at all.

The context menu can be triggered for the whole table or per row.

Actions

To trigger actions on multiple items, use a multiselection table (sap.m.Table, property: mode, value: sap.m.ListMode.MultiSelect), and offer the corresponding actions on the table toolbar. Keep the table toolbar sticky (sap.m.Table, property: sticky).

Do not offer actions for multiple items if the table is expected to have fewer than 10 items in most cases.

To trigger actions on a single item only (sap.m.Table, property: mode, value: sap.m.ListMode.SingleSelectMaster):

  • Show the actions on the table toolbar.
  • In rare cases, show the actions within the line item. One example would be an Add to Cart button in a shopping application. Since these actions are repeated in every line and thus use a lot of screen real estate, do this only for a maximum of one or two actions. In this case, show the action trigger near the content to which it belongs. Do not add a specific column for actions. Use a button, unless the action trigger belongs to a link. Hide the action in rows for which it is not applicable.
  • Don’t bundle inline actions that don’t belong together under an unspecific label, such as Misc, Actions, , or similar.
Do
Inline actions
Inline actions
Don't
Don't combine unrelated inline actions

Enabling/Disabling Actions

To indicate if an action can be applied to the current selection:

  • Enable the action if it always works, regardless of whether or not items are selected.
  • Enable the action if it can be applied to all selected items.
  • Enable the action if it can be applied to some of the selected items. If the action is triggered, show a message that informs the user how many items will be affected. Give users the option to apply the action anyway or to cancel the action.
  • Only disable the action if it can be applied to none of the selected items.

For more details, see UI Element – States.

If the action was applied, and if the items are still available, keep them selected.

Message for an action that applies to a part of a selection
Place actions near to the objects to which they belong

The following actions on single items must always be in-line:

Delete: Use “Delete” table mode (sap.m.Table/ sap.m.ListBase, property: mode, value: sap.m.ListMode.Delete). This places a Delete button at the end of each row.

Delete button
Delete button

Navigation: Use the “Navigation” column list item type (sap.m.ColumnListItem/ sap.m.ListItemBase, property: type, value: sap.m.ListType.Navigation). This places a Navigation indicator at the end of each row.

Use this to navigate to a new page containing line item details. In rare cases, you can also use this for navigation within the table without navigating to another page.

Navigation indicator

Edit: Use the “Detail” column list item type (sap.m.ColumnListItem/ sap.m.ListItemBase, property: type, value: sap.m.ListType.Detail). This places an Edit icon at the end of each row.

Edit button
Edit button

From these three actions (delete, navigation, and edit), you can combine delete and edit, or delete and navigation.

Edit and navigation cannot be combined.

To trigger actions that are independent of the selection, show the actions on the table toolbar. Examples of such actions are add, edit (in the sense of changing the whole table to edit mode), sort, filter, group (or view settings), and table personalization.

To trigger a default action on the whole line item, use the “Active” or “DetailAndActive” column list item type (sap.m.ColumnListItem/ sap.m.ListItemBase, property: type, value: sap.m.ListType.Active).

Active items trigger an event when clicked, which can be handled by apps (for example, to open a dialog). Clicks on interactive controls within the item do not trigger the event, but are handled by the interactive control. Do not use this for navigation, to switch the line item to an edit state, or to delete the item.

Active can be combined with edit and delete, but not with navigation. Do not combine active with single selection.

Add Items

For adding items, place an Add or Create text button on the table toolbar.

  • Use Create if the button adds a brand new item that doesn’t yet exist on the database.
  • Use Add if the item already exists and is merely added or assigned to the current object.

Show new items as the first item of the table, with a visual highlight at the beginning of the row.

Enable the shortcut CTRL+ENTER to trigger the Add and Create buttons.

There are three options for adding an item. In order of priority (most recommended first), these are:

  1. Add the item inline. Create an empty, editable row as the first item of the table. Show the Save button on the table toolbar. This option is recommended for simple scenarios with just a few columns and no option to hide columns.
  2. Open a dialog for larger tables with up to 8 editable columns. Save the new item at the dialog level.
  3. Navigate to a new page. This behavior should only be used for very complex scenarios that cannot be handled by a dialog (for example, tables with more than 8 columns). When the user presses Save in the footer toolbar of the create page, navigate back to the table.

A new item can have three different states:

  1. New: The item was just created and is in edit mode. It is highlighted with a visual indicator.
  2. Recent: The item was saved, but is still highlighted and displayed as the first item of the table. Current filter, sort and group criteria are ignored to keep the item visible.
  3. As soon as the responsive table is sorted, filtered, or grouped again, the action is also applied to the new item. It then also loses the visual highlight.

In the context of the draft handling new items are not saved on table level, but rather with the entire draft.

For more details, see the guidelines for managing objects (including subarticles).

Add button in table toolbar
New item as first row in edit mode
Saved new item, still highlighted, still the first item

Editable Content

For editable content, use input fields and any other interactive controls within the table cells that meet your input needs.

All SAPUI5 controls can be used.

If you need edit mode, change your text controls, such as label, text, and link, to input fields, or other appropriate controls as soon as you switch to edit mode, but not before.

You can do this by exchanging the control or, in more complex cases, by exchanging the entire responsive table.

For mass editing items:

  • Provide multiselection (sap.m.Table/ sap.m.ListBase, property: mode, value: sap.m.ListMode.MultiSelect).
  • Provide an Edit button.
  • If several items are selected, choosing the Edit button opens a dialog in which the user edits the corresponding fields for all selected items.

For details, see mass editing.

View Settings: Sort, Filter, and Group

Sort, filter, and/or group settings are handled in the view settings dialog. This dialog can provide any combination of these three settings, including just one setting, such as sort only.

  • If sorting, filtering, and/or grouping are a common use case in your app, offer one, two, or all three of the corresponding features in one or more view settings dialogs. Note: Do not offer these features if the table is expected to have only a small number of entries (up to 20 in most cases).
  • If filtering is a main use case, do not offer filtering in the view settings dialog. Use the filter bar instead.

To trigger the view settings dialog, provide several buttons, one for each of these view settings. Each button opens a view settings dialog that contains only the relevant page.

You should always use only the view settings you really need. For example, do not offer grouping if it does not support your use case well.

Using the view settings dialog allows you to define several sort, filter, and/or group settings per column. Therefore, you can sort, filter, and/or group a column with several data points independently by each data point.

Several triggers for the different view settings (sort, filter, group)

Sort

For the default sort settings, sort by the column that identifies the row, which is usually the first column in default delivery. From this column, use the primary data point.

If you offer sorting, offer it for each data point. In other words, allow sorting by both the primary and secondary information in a column. Allow sorting in both directions, ascending and descending. The descending sort order must always be the exact reverse of the ascending sort order.

For each data point, provide a meaningful sort order. For example:

  • Sort text alphabetically
  • Sort numbers by their value
  • Sort status information by the severity of the status:
    • Ascending: Sort status information from positive to negative, with neutral last.
    • Descending: Sort status information from negative to positive, with neutral first.
Object status sorted ascending, with neutral status last
Object status sorted descending, with neutral status first
    • Ascending with different values per severity level: Sort status information from positive to negative, with neutral last. Sort different values within a severity level (semantic color) alphabetically.
    • Descending with different values per severity level: Sort status information from negative to positive, with neutral first. Sort different values within a severity level (semantic color) alphabetically.
Object status sorted ascending and alphabetically, from positive to negative with neutral last
Object status sorted descending and alphabetically, from negative to positive with neutral first

Filter

To display the current filter state, use the infobar below the table title. Clicking the infobar opens the view settings dialog on the filter page.

Show the infobar only if the filter settings are not shown somewhere else. For example, do not show the infobar for settings taken in the filter bar or in a select placed in the table toolbar.

If the infobar is shown, provide an option to reset all corresponding filters on the infobar.

Keep the infobar sticky (sap.m.Table, property: sticky).

Developer Hint
To display the current filter settings on the infobar, consider using the list formatter (sap.ui.core.format.ListFormat).
Filtered table
Filtered table

Group

To display the current group state, group headers are shown.

On the group header, show the following text (sap.m.GroupHeaderListItem, property: title):

[Label of the grouped column]: [Grouping Value]

Do not use several values on the group header.

Grouped table
Grouped table

If there is no grouping value, show the following text:
[Label of the grouped column]: (Not Available)

This is the case if you have a group of items that don’t have a value for the grouped column.

Grouped table, with missing grouping value

Persist the view settings. When a user reopens the app, show the responsive table with the same sort, filter, and group settings as last defined by this user.

Personalization

To add, remove, or rearrange columns, use the table personalization dialog. Trigger the dialog via a button in the table toolbar.

Offer personalization if you need more columns than those that fit on a tablet screen, which is usually five, to fulfill 80% of your main use cases. Before doing so, try to reduce the number of columns, for example, by using several lines per column or by utilizing the pop-in function. See the cheat sheet for an example.

If all columns are hidden, the table shows a corresponding “no data” text.

View settings and table personalization icons

Persist the column layout settings. When a user reopens the app, show the responsive table with the same column layout as last defined by this user.

Tables in Object Pages

To show a table in the object page content area, use the responsive table.

A responsive table with up to 20 expected items can be displayed right away, without lazy loading.
If you expect the table to have more than 20 items, use one of the following 3 options:

  1. Lazy loading (More button): Use this option if you expect to have up to 100 items.
  2. Tab navigation: If you expect to have more than 50 to 100 items, but less than 400, use the object page with tab navigation instead of anchor navigation. Put the table on a dedicated tab.
  3. Navigation to a list report: If you expect the table to have more than 400 items, or if the tab approach is unsuitable, restrict the number of items in the table itself to a reasonable amount. To provide the user with a way to work with the entire table, offer navigation to a separate list report containing the full table.

For all of the three options mentioned above, we recommend providing a search, and if feasible, sort and filter capabilities for the table in the object page. Grouping should be avoided.

For more information on the use of tables within the object page, see the Tables section of the Object Page article.

Export to Spreadsheet

On the table toolbar, apps can provide a menu button for exporting table data to a spreadsheet. For the export, use the export to spreadsheet function.

'Export to Spreadsheet' menu button

Paste

To paste data from the clipboard to the table, the browser functionality for paste can be used (CTRL + V or browser context menu).

  • If the focus is on row level, the app has to take the data from the clipboard and add it to the corresponding controls within the table.
  • If the focus is on an editable control within the table, the control gets the data automatically.

Pasting via context menu does not work if a custom context menu is used.

Properties

sap.m.Table

The following additional properties are available for the responsive table:

  • The property: fixedLayout defines the algorithm the control uses to define column width. Setting it to “false” would perform automatic calculations for the column width, based on the longest non-breakable content. You should always set it to “true” for performance reasons. Exceptions are permissible if the table has only a few columns for a large width and fewer than 10 rows are displayed.
  • The property: backgroundDesign defines the background on which items are rendered. Use the default value.
  • The property: showOverlay provides an overlay on the whole table, which prevents use of the responsive table. This is used within the list report floorplan to mark the table as outdated after filter settings have been changed but the new filter settings have not yet been applied. Do not use it in other cases.
  • The property: inset adds a margin on all sides of the responsive table.
  • The property: headerText is a simple way to set the table title if you just need a title. However, do not use any of the following:
    • A separate toolbar
    • variantManagement
    • headerToolbar aggregation
  • The property: headerDesign affects the appearance of the header if the theme supports it. Leave the default value as it is.
  • The property: footerText adds a small additional row below the table footer or last item. This row can contain text only. Do not use this property.
  • The property: width defines the width of the whole table.
  • The property: includeItemInSelection uses a click on the whole line item to select the corresponding item if the responsive table is in a selection mode. This competes with other settings like “Navigation” or “Active” and should therefore not be used.
  • The property: enableBusyIndicator automatically shows a busy indicator while data is loaded. (In contrast to the property: busy, where the application can control when the table is set to busy state)
  • The property: modeAnimationOn does not have any effect. Do not use it.
  • The property: showSeparators allows you to show all, none, or some separators. The default setting, which is to show all separators, is to be used.
  • The property: swipeDirection allows you to define the direction in which to swipe if additional actions are hidden behind a table row. This works only on touch devices. Do not use this property.
  • The property: rememberSelections leaves items selected even if they are not currently visible, for example, through filtering. If this behavior is not wanted, set the flag to “false”, but you should do so only in exceptional cases.
  • The property: busy sets the table to a busy state. While in busy state, the whole table cannot be used and items cannot be read due to an overlay.
  • The property: busyIndicatorDelay defines the time after which a busy state is shown after the responsive table has been set to this state. Use the default value.
  • The property: visible shows the table (“true”) or hides it (“false”).
  • The property: tooltip does not have an effect. Do not use it.
  • The property: alternateRowColors displays the rows with alternating background colors (“banded rows”). Do not use it.

sap.m.Column

The following additional properties are available for sap.m.Column:

  • The property: width defines the width of the column in all units allowed by HTML, such as em, rem, %, and px.
  • The property: styleClass is used if you need to change the visual design of a column. Do not use this, but use the default style instead.
  • The property: visible shows or hides the column.
  • The property: tooltip does not have an effect. Do not use it.

sap.m.ColumnListItem

The following additional properties are available for sap.m.ColumnListItem:

  • The property: selected allows an item to be selected programmatically.
  • The property: counter does not have any effect. Do not use it.
  • Do not use the property: busy.
  • Do not use the property: busyIndicatorDelay.
  • The property: visible shows or hides the item.
  • The property: tooltip adds a tooltip to a whole row. The tooltip is only shown on mouse interaction. It will not work on tablets or smartphones. Do not use it.

Resources

Want to dive deeper? Follow the links below to find out more about related controls, the SAPUI5 implementation, and the visual design.

Elements and Controls

Implementation

Panel

The panel is a container for grouping and displaying information. It can be collapsed to save space on the screen.

Usage

Use the panel if:

  • You need to group or display information.
  • You want to give users the option of hiding this information.
  • You want to show additional information on demand (for example, a panel could show optional input fields for an advanced search).

Do not use the panel if:

  • You are designing an object page. Never use panels in the object page content area.

Responsiveness

If the width of the panel is set to 100% (default), the panel and its children are resized responsively, depending on its parent container.

Layout

  • The panel control is a container for controls.
  • The panel can have a solid or semi-transparent background.
  • The panel always includes a header.
  • An infobar can be added to the panel to show extra information.

Examples

Panel with a header text
Panel with a header toolbar and a infobar

Types

There are two types of panels: fixed and expandable.

Fixed Panel

Fixed panels are useful for grouping custom content. They include headers and infobars.

Fixed panel with a picture

Expandable Panel

Expandable panels are much like fixed panels, except their content can be expanded and collapsed by clicking on the title bar.

Expandable panel – Collapsed
Expandable panel – Expanded

Components

A panel consists of a title bar with a header text or header toolbar, an infobar (optional), and a content area.

The title inside the title bar can be added by using the “headerText” property. If you use the “headerToolbar” aggregation, the “headerText” property is ignored. With the “headerToolbar” aggregation, you can add a toolbar with any toolbar content inside the title bar. For example, if you need a title text on the left and some action buttons on the right, add a title to the toolbar’s content aggregation, toolbar spacer, and then your buttons.

Header toolbar of a panel

Behavior and Interaction

Expand/Collapse

  • When the panel is expandable, an arrow icon (pointing to the right) appears in front of the header.
  • Click anywhere on the title bar to expand and collapse the content area.
  • When the animation is activated, expand/collapse uses a smooth animation to open or close the content area.
  • When the panel expands, the arrow icon rotates 90 degrees clockwise.
  • When the panel collapses, the arrow icon rotates 90 degrees counterclockwise.
  • The buttons in the header can be clicked separately.

Overflow Scrolling (Content Area)

  • By setting the height to use the default property “auto”, the height of the content area will automatically be adjusted to match the height of its content.
  • When the height of the panel is set to a fixed size, the content area can be scrolled through.

Panel With Scrolling

Panel with a fixed height (scrolling activated)

Panel Without Scrolling

Panel with auto height (no scrolling)

Guidelines

  • Nesting two or more panels is not recommended.
  • Do not stack too many panels on one page.

Exceptions

If you add a header toolbar (sap.m.Toolbar) via aggregations, it will overwrite the “headerText” property.

Resources

Want to dive deeper? Follow the links below to find out more about related controls, the SAPUI5 implementation, and the visual design.

Elements and Controls

Implementation

  • Panel (SAPUI5 samples)
  • Panel (SAPUI5 API reference)

Object List Item

The object list item offers a quick overview of an object within a list. Typically, it is used in a master list in the flexible column layout. The object list items usually allow the user to navigate to the details of an object. Therefore, the object list item should only contain essential information that is necessary for the user to identify which object to work on first.

Object list item
Object list item

Responsiveness

The object list item’s text sizes are limited due to truncation. The title wraps once and truncates after two lines. The key attribute also truncates if it does not have enough space. Apps therefore need to use formatters, for example, to transform 1,659,963,900.42 into 1.7 B. (Note that this transformation is language-specific.)

Status texts (on the right) and object attributes (on the left) do not wrap, but only truncate. Status texts can have a semantic color (to reflect the state) and an optional icon. The object attributes are placed next to the status texts. If they do not have a neighboring status text, they use the full width available for the list item.

Components

The object list item provides the following optional data:

  • Title of the object instance, which acts as the main identifier (title)
  • Key attribute (number) + unit (numberUnit)
  • Object status (sap.m.ObjectStatus)
  • List of object attributes (sap.m.ObjectAttribute)
  • Introductory text indicating the origin of the object, such as Forwarded by… or On Behalf of… (intro)
  • Icon that identifies the object (icon)

The first status line can contain indicator icons for locked items, favorites, or items that have been flagged for follow-up.

Object list item examples (with attributes, status, locking, flag, and favorites)

Behavior and Interaction

List item behavior and interaction is similar for all list item variants and is therefore described in the list overview article.

Guidelines

  • An icon in front of the title requires a lot of space. Ensure there is sufficient space available if you are planning to use one.
  • This control can only throw one event. Therefore, object list items cannot contain an additional link.
  • Display the date  within the title in the long format and within the attributes in the medium format.
  • Avoid long descriptive texts. They may not be displayed due to truncation.

Resources

Want to dive deeper? Follow the links below to find out more about related controls, the SAPUI5 implementation, and the visual design.

Elements and Controls

Implementation

Date/Time Picker

The date/time picker allows users to select date and time values in a combined input.

Usage

Use the date/time picker if:

  • You need a combined date and time input control.

Do not use the date time picker if:

  • You want to use either a date or a time value. In this case, use the date picker or the time picker instead.

Responsiveness

The date/time picker runs on all form factors and fully adapts to all devices.

Date/time picker - Compact mode
Date/time picker - Cozy mode

Behavior and Interaction

Selecting Date and Time Values

Sizes M and L/XL

The date/time picker appears as a popover when the user clicks a date (input field) on the calendar. The user can then select the desired date from the calendar, and the time from the rotating wheel. For the time, it’s possible to select hours, minutes, and even seconds.

When the user clicks the OK button, the popover closes and the selected date and time appear in the input field. When the user selects Cancel, the action is aborted and the input field remains unchanged.

Date/time picker – Entering data with input and picker

Size S and Mobile Size

On smaller devices, the user can choose the date and time value in arbitrary order by tapping the segmented button on top of the screen. Be aware that the popover is superimposed on the input field during the selection process for mobile/S sizes.

The user can select the desired date from the calendar, and the time from the rotating time wheel. For the time, it’s possible to select hours, minutes, and even seconds. Clicking a date in the calendar automatically takes the user to the time selection screen.

When the user selects OK, the popover closes and the selected date and time appear in the input field. When the user selects Cancel, the action is aborted and the input field remains unchanged.

Date/time picker - Smartphone view

Styles

Value States

The Date/Time picker supports the following value states:

  1. Regular
  2. Success
  3. Warning
  4. Error
  5. Information

For the Warning, Error and Information states, there are additional messages available to provide hints for the user.

For more information, see How to Use Semantic Colors.

Date/time picker - Value states

Guidelines

Date Picker and Time Picker

In general, we recommend separating the date/time picker controls as the time picker supports the mask input function and the date picker allows the user to enter date in different formats. This makes it easier and more convenient for the user to enter the desired values. For additional guidelines and information on the individual controls, see the resources section below.

Default Values

Independently of the chosen control, set the default values of the date/time picker carefully to avoid unnecessary scrolling. It often makes sense to set the default for the time to the full or half hour, setting the minutes to 00 or 30. Sometimes, it may also make sense to use the current time and date.

Formatting Dates and Times

For guidelines and information on the SAPUI5 date formatters, see formatting dates.

For guidelines and information on the SAPUI5 time formatters, see formatting times.

Setting Steps

You can set intervals for the minutes and seconds on the slider (properties: minutesStep and/or secondsStep). For example, if you set the seconds step to “5”, the slider offers “00”, “05”, “10”, “15”, and so on.

Time Zone

If the user has to set a time that is time zone-sensitive, offer a select control next to the date/time picker control to choose the appropriate time zone.

Properties

AM and PM are locale-dependent. The locale can be set using the property localeId.

You can set the display format (property: displayFormat) to define the format in which the time input field and the time picker dropdown display the time.

Resources

Want to dive deeper? Follow the links below to find out more about related controls, the SAPUI5 implementation, and the visual design.

Elements and Controls

Implementation

Lightbox

The lightbox control allows the user to view an image in its original size. This control displays the image in a popup while dimming the rest of the screen.

Usage

Use the lightbox if:

  • The thumbnail view is not detailed enough, and it would help the user to see the image in its original size.
  • The original size of the image is bigger than the thumbnail.

Do not use the lightbox if:

  • The image you are using is smaller than or as big as the thumbnail.
  • There is another click event attached to the image control.
  • You are using an image placeholder to display the object.

Responsiveness

The lightbox container is displayed in the middle of the screen.

The image is displayed in its original size unless the original image size is bigger than the size of the screen. In this case, the image is resized proportionally in order to be fully visible and fit on the screen.

On a mobile device, flipping the device to landscape mode will flip the lightbox. The image will then be adjusted to fit the new dimensions.

Lightbox - Size S
Lightbox - Size S
Lightbox - Size M
Lightbox - Size M
Lightbox - Size L
Lightbox - Size L

Components

The lightbox contains the following components:

  • Lightbox container: This is the main container that holds all other components.
  • Image: This component is an embedded image control that displays the image file with the maximum available size. The size of the image should not exceed the original size and it should fit within the screen.
  • Image title: This component is mandatory and is used to describe the object to which the image is attached.
  • Image subtitle: This component is optional and is used to give additional information about the object.
  • Close button: This is a mandatory component and is used to close the lightbox container.
The components of the lightbox

Behavior and Interaction

Basic Interactions

The lightbox control is attached to the press event of the image control. To trigger the lightbox, the user should click an image. Every image with an attached lightbox control is indicated with a zoom icon on the bottom right.

Lightbox - Zoom icon

When the lightbox control is triggered, the lightbox overlays the page content and the rest of the screen is dimmed out.

If it takes more than one second to load the original image, a busy indicator is shown inside the lightbox container.

The user can close the lightbox by clicking the Close button or by clicking outside of the lightbox container.

Lightbox - Basic interactions
Lightbox - Image loading

Error Handling

An error message is displayed inside the lightbox when:

  • The original file is missing or the connection to the server is lost.
  • The image takes more than 10 seconds to load due to a server error or the size of the image.
Developer Hint
The URL of the image is mandatory. If it is not specified, the lightbox will not be triggered.
Lightbox - Error message

Resources

Want to dive deeper? Follow the links below to find out more about related controls, the SAPUI5 implementation, and the visual design.

Elements and Controls

Implementation